With as many systems of record available in the cloud– from SaaS applications like Salesforce to Netsuite – the need for a cloud-based enterprise messaging solution has now become necessary to support high availability, scalability, and reliability patterns in an Integration Platform as a Service (iPaaS) solution, such as MuleSoft’s CloudHub.
Thus, a key component of any integration platform is a message broker to support all the above “ilities” using asynchronous messaging via store and forward mechanisms. This effectively decouples source and destination systems via a cloud-based messaging broker. With MuleSoft, this can be achieved with Anypoint MQ.
What is Anypoint MQ?
Anypoint MQ is a multi-tenant, cloud messaging service that enables customers to perform advanced asynchronous messaging scenarios between their applications. The service is fully integrated with Anypoint Platform, offering role-based access control, client application management, and connectors.
Anypoint MQ supports the asynchronous connectivity model using queues. It also supports the publish-subscribe model using exchanges, enabling users to send the same message to multiple queues. Anypoint MQ provides a management console for monitoring and managing queues and exchanges. It also has the Anypoint MQ Connector for Anypoint Studio, which can be used with Mule applications deployed on both CloudHub and/or on-premises in hybrid mode.
Additionally, Anypoint MQ also supports non-Mule applications written in Java, node.js etc. to communicate with the broker using REST APIs. These REST APIs enable sending and receiving messages, administering queues and exchanges, as well as analyzing reports. The available APIs can be classified as follows:
- Anypoint MQ Administration API to create and manage applications using Anypoint MQ, as well as to create, browse, and configure queues and exchanges
- Anypoint MQ Broker API to publish, subscribe, acknowledge, or discard messages between queues and exchanges
- Statistics API to browse queue and exchange usage statistics
Now that I have provided an overview of Anypoint MQ, I want to introduce API usage with a simple Broker API example to publish and consume messages from Anypoint MQ queue.
Let’s start with key steps as required to communicate with Anypoint MQ queue:
- Register client applications with Anypoint MQ. This provides a client-id and client-secret key to authorize an application to communicate with Anypoint MQ
- Use the client-id and client-secret keys to obtain the access token as required, in order to identify the client application
- Then, the publishing client application will send the message to the queue using the access token
- The subscribing client application will receive the message from the queue, along with a lock-id that prevents other subscribers from consuming the same message
- The subscribing application acknowledges the message in the queue and removes the message from the queue. If the application negatively acknowledges the message or the lock-id time-to-live (TTL) expires, then the message is then returned to the queue for other subscribers
Now, let’s walk through same steps via an example using Java as the client application.
Note: The Java example below uses the same application to publish-to and subscribe-from the queue. The complete Java code is available here, and you can also download the entire project with dependent JAR files.
Part 1: Register client applications with Anypoint MQ
1. Log in to Anypoint Platform.

2. Select Anypoint MQ

3. Select “Region” to use for Anypoint MQ messaging, this will set up the base URL for Anypoint MQ REST APIs.
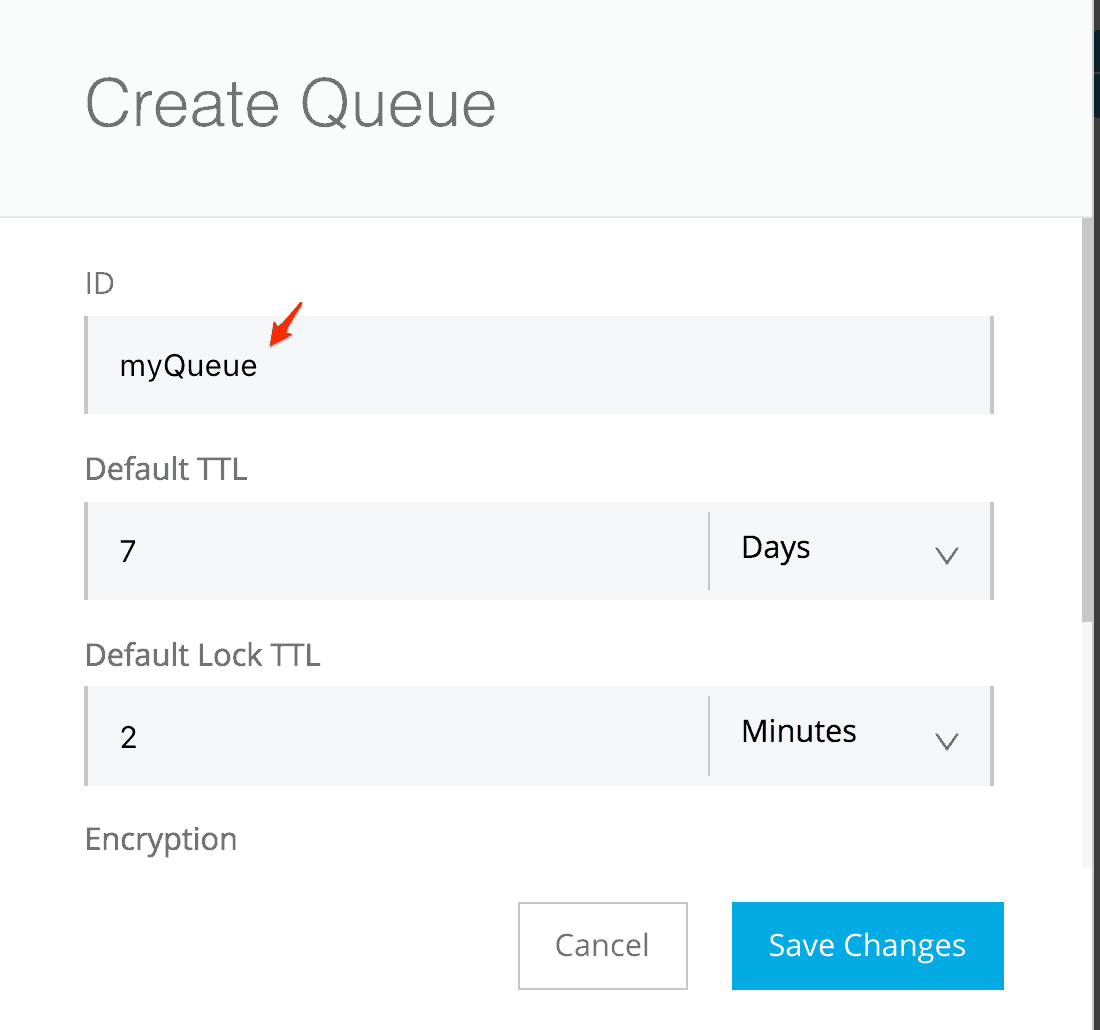
4. Click on “Destinations,” then click on the blue “plus” icon. Select “Create Queue” from the drop-down to create a new queue
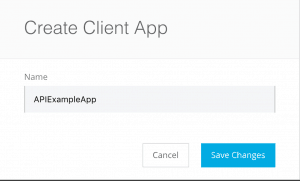
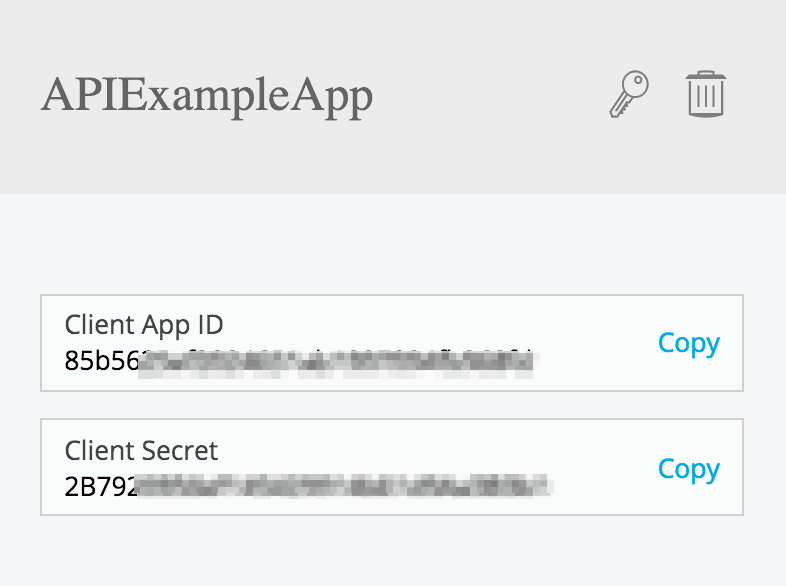
5. Click on “Client Apps” and then click on the blue “plus” icon to specify an MQ client application and save changes. Then, copy the Client App ID and Client Secret keys.

Part 2: Get the access token to identify the authorized client application
1. For this tutorial, I used the Jersey framework to configure the Java REST client. In order to complete this step, you will need following 3 JARS, please download the following:
- jersey-client-<version>.jar
- jersey-core-<version>.jar
- jsr311-api-1.1.1.jar
2. You will also need a JSON parser, the example uses a json-simple-1.1.1.jar, which is available for download as well.
3. You will need the following information to authorize the client to send messages to Anypoint MQ
- App Client ID and Client Secret keys, which uniquely identify the message sender. This information is available via Part 1, Step 5 above
- Queue name
- Authorization URL – REST API URL to invoke for authorization. The base URL is dependent on the selected region, as shown in section the above, here’s the complete URL – “https://<region dependent base url>/api/v1/authorize”, for example,
4. Then, you need the sample Java code snippet to retrieve access token required and send a message to Anypoint MQ. The complete Java code is available for download, you can also download the entire project with dependent JAR files
String client_id="85b56xxxxxxxxxxxxxxxxxxxxxxxxxb968fd";
String client_secret="2B792xxxxxxxxxxxxxxxxxxxxxx3B3b1";
String authURI="";
// Get access token required for publish/subscribe API's
Client client = Client.create();
WebResource webResource = client.resource(authURI);
String input = "client_id="+client_id+"&client_secret="+client_secret+"&grant_type=client_credentials";
ClientResponse response = webResource.header("Content-Type", "application/x-www-form-urlencoded")
     .accept("application/json")
     .post(ClientResponse.class, input);

String authResponse = response.getEntity(String.class);
// Retireve and store access-token,org-id and env-id values from JSON response
JSONParser jsonParser=new JSONParser();
JSONObject jsonObject= (JSONObject) jsonParser.parse(authResponse);
String access_token=(String)jsonObject.get("access_token");

JSONObject structure = (JSONObject) jsonObject.get("simple_client");
String orgId=(String)structure.get("orgId");
String envId=(String)structure.get("envId");
5. Completing step 4 will return a JSON response with following values, as required to invoke APIs and publish and consume messages,
- Access Token
- Organization ID – organization or business group identifier created on Anypoint Platform for access management purposes. This can also be downloaded on the support site
- Environment ID – Anypoint Platform allows users to create and manage separate environments for deploying Mule applications, this is an identifier for the same information. Alternatively, users can also obtain this from the Platform URL, similar to the organization id noted above
Sample response below:
{
"access_token":"308xxxxx-XXXX-xxxx-xxxx-xxxxxxxxxc1",

"simple_client":{
"envId":"d33xxxxx-XXXX-xxxx-xxxx-xxxxxxxxxxc3",

"orgId":"3bfxxxxx-XXXX-xxxx-xxxx-xxxxxxxxxx48"

},
"token_type":"bearer"
}
Part 3: Send message using the Java Client Application
1. You will need following values to authorize the client to send messages to Anypoint MQ,
- Queue Name – Message will be sent to this existing queue
- Message ID – A unique identifier for each message sent to queue
- Message – Message as needed to be published to the queue
- Organization ID – As retrieved in Part 2 above
- Environment ID – As retrieved in Part 2 above
- MQ Broker URL – REST API URL to invoke sending messages. The base URL is dependent on the selected region as shown in section above, here’s the complete URL – “https://<region dependent base url>/api/v1/authorize/<organization id>/environments/<environment id>/destinations/<queue name>/messages/<message id>”, for example, https://<region dependent base url>/api/v1/authorize/3bfxxxxx-XXXX-xxxx-xxxx-xxxxxxxxxx48/environments/d33xxxxx-XXXX-xxxx-xxxx-xxxxxxxxxxc3/destinations/myQueue/messages/7f3de427-fe98-481e-ad86-f1d624f7640c/
2. The following is the sample Java code snippet required to publish a message using APIs. You can download the complete Java code, or you can also download the entire project with dependent JAR files:
String queueName="myQueue";
String queueMessage="This is my test message";
String brokerURI="";

brokerURI = brokerURI + orgId +"/environments/"+ envId +"/destinations/"+ queueName+"/messages";

// Post message to existing queue using API
String messageId=UUID.randomUUID().toString();
String postURI=brokerURI+"/"+messageId;
System.out.println(postURI);

WebResource webResourcePost = client.resource(postURI);
String inputPost="{ "body": ""+queueMessage+"" }";
ClientResponse responsePost=webResourcePost.header("Authorization"," bearer" + access_token)
   .type("application/json")
   .accept("application/json")
   .put(ClientResponse.class, inputPost);
String outputPost = responsePost.getEntity(String.class);
System.out.println("Post Successful: n"+outputPost);
3. Sample response as below:
{
"messageId" : "7f3de427-fe98-481e-ad86-f1d624f7640c",
"status" : "successful",
"statusMessage" : "Send operation successful"
}
Part 4: Retrieve message using Java Client Application
1. You will need some information to retrieve messages from Anypoint MQ. This process is similar to that required for publishing messages, as shown in the previous section. Here’s the complete broker URL , “https://<region dependent base url>/api/v1/authorize/<organization id>/environments/<environment id>/destinations/<queue name>/messages, for example, https://<region dependent base url>/api/v1/authorize/3bfxxxxx-XXXX-xxxx-xxxx-xxxxxxxxxx48/environments/d33xxxxx-XXXX-xxxx-xxxx-xxxxxxxxxxc3/destinations/myQueue/messages/7f3de427-fe98-481e-ad86-f1d624f7640c
2. Additionally, you also need to specify using query parameters
- Pooling Time – Duration to poll the queue for messages
- Batch Size – Maximum number of messages that will be retrieved, a maximum of 10 messages can be retrieved in a single call
- Lock TTL – A message lock makes a message unavailable to other applications while locked, this is the lock time-to-live
3. The following is the sample Java code snippet required to retrieve messages. You can download the complete Java code, or you can also download the entire project with dependent JAR files
String queueName="myQueue";
String queueMessage="This is my test message";
String brokerURI="";

brokerURI = brokerURI + orgId +"/environments/"+ envId +"/destinations/"+ queueName+"/messages";

// Get message from existing queue using API
WebResource webResourceGet = client.resource(brokerURI);
MultivaluedMap<String, String> queryParams = new MultivaluedMapImpl();
queryParams.add("poolingTime","10000");
queryParams.add("batchSize","1");
queryParams.add("lockTtl","10000");

ClientResponse responseGet=webResourceGet.queryParams(queryParams)
        .header("Authorization"," bearer" + access_token)
 .type("application/json").accept("application/json").get(ClientResponse.class);

String outputGet = responseGet.getEntity(String.class);
System.out.println("Message Retrieved: n" + outputGet);
4. Below is a sample response
[ {
"properties" : { },
"headers" : {
"messageId" : "7f3de427-fe98-481e-ad86-f1d624f7640c",
"lockId" : "AQEBnN0DTpdYr8cqQ20qc3nOt3rX2hQEn0sgxHrGZ2N/028ZJaAhn3e8rFQrtomeLCzKfvs2CsDbxM2C5g+uPb/voe025pNNpQIUaROkjt0u3qyKaKVVbWTLWrqLGQckqcwyVtIKOusPYmarPLGTfICzDLzPD9o9dK4s+dOX9zHu5Bxt3lHXZoIkP/xMSeL5K0jtYWGawjv8Xd35T6Zco9SYkq1KmmobqAb22npTybt5L2JCUn5isJO/w/bWZn/IrXEScv/0iehdVAYt+p6RiN7fn09VakTbpTJDf3/LmWe1BhOZPEbh5gw4VxubBuYYXVcu72n6HWap1QjBrMocM7HXI+sV123pZi34xmJZrb4oto1zzlqm50GeWGIsJ3LC837CIurcTE/taOUku/KsLsDztU+mNoQ7VHS76lTYQItNQNQ=",
"created" : "Thu, 6 Jul 2017 03:17:43 GMT",
"deliveryCount" : "1"
},
"body" : "This is my sample message"
} ]
5. In order to ensure that the message is only processed once, it must be removed from the queue so that its not available to any other client anymore. This step requires the lockid value as returned in JSON response earlier. The following is the sample Java code snippet to acknowledge message:
String queueName="myQueue";
String queueMessage="This is my test message";
String brokerURI="";

brokerURI = brokerURI + orgId +"/environments/"+ envId +"/destinations/"+ queueName+"/messages";

// Post message to existing queue using API
String messageId=UUID.randomUUID().toString();
String postURI=brokerURI+"/"+messageId;
System.out.println(postURI);

// Message acknowledgement, effectively deleting message from the queue

JSONArray jsonArrayAck= (JSONArray) jsonParser.parse(outputGet);  // Parse json output from retrieve message earlier to get lock id
JSONObject structureAck =(JSONObject) ((JSONObject)jsonArrayAck.get(0)).get("headers");
String lockId= (String)structureAck.get("lockId");

WebResource webResourceAck = client.resource(postURI);
String inputAck="{ "lockId": ""+lockId+"" }";
ClientResponse responseAck=webResourceAck.header("Authorization"," bearer" + access_token)
  .type("application/json")
 .accept("application/json")
 .delete(ClientResponse.class, inputAck);

String outputAck = responseAck.getEntity(String.class);
System.out.println("Ack Message: n" + outputAck);
6. Finally, here is a sample response below:
{
"messageId" : "5876373e-2bf7-4ee6-aa98-bdbd517f1cbc",
"status" : "successful", "statusMessage" :
"Acknowledgement operation successful"
}
That wraps up our introduction to Anypoint MQ APIs!
Why Anypoint MQ?
Anypoint MQ is one of the key platform services of a unified Anypoint Platform, which aims to further support connectivity requirements. Anypoint MQ supports environments and business groups. It also supports role-based access control (RBAC) to help organizations deliver seamless customer experiences across channels, as well as integrate applications and devices reliably with enterprise-class functionality. Overall, Anypoint MQ provides a number of features, including:
- Support for messaging scenarios such as queueing and pub/sub with cloud message queues and exchanges
- Scalable, asynchronous messaging delivered as a fully hosted cloud service
- Turnkey secure, reliable message delivery
- Easy connectivity to Mule application or non-Mule applications (using APIs as shown above)
- Single pane of glass for runtime, API and queue management
To download the complete Java code and the entire dependent JAR files, please refer to the links above. You can also check out all API reference documentation for Anypoint MQ on the developer portal. All Anypoint MQ documentation is also available online.