
This post was written by one of the stars in our developer community, Kian Ting. Read this post to learn how to use a Mule app to retrieve legacy data and sync it to a new destination endpoint with the poll scope method.
As integration developers, we are always faced with the need to poll a legacy resource to retrieve new data and to sync it over to another destination endpoint. MuleSoft allows developers to do this via “Poll Scope.” The poll scope feature allows the developer to poll a particular source endpoint based on a timed interval. The poll scope also has this neat caching function known as “watermark.”
Watermark allows the poll scope to poll for new resources instead of getting the same resource over and over again. The following illustration shows how this works:

The figure above is an abstraction of the Mule Poll Scope, it is always implemented in the “receive scope.” The illustration shows that the example is polling a database table. In this case, the database table must be ordered so that the “watermark functionality” can move effectively in the ordered list. Watermark stores the current/last picked up “record id.”
If the Mule application is shut down, it will store the last picked up “record id” in the Java Object Store and the data will continue to exist in the file. This watermark functionality is valuable and enables developers to have increased transparency. Developers do not need to create code to handle caching; it is all configurable!
2 Creating a Hypothetical Scenario
It is always easier to learn something by applying it in practice, so let us make up a hypothetical scenario.
In this scenario, the integration developer has to build a Mule app that is capable of syncing newly created employees from a legacy database to a new source system.
Let’s say our source system is a SQL Server database. You can do this via any database. MuleSoft already provides an example using an MySQL database, I will be doing the same example differently, so that developers have more sample codes to play around with.
2.1 Preparing the Legacy Database
You will need to install the SQL Server on your local machine. Then, you need to create a database with the name “MuleDemoDb,” as per the following depiction.

After you create the database, you need to open a query editor and point to the newly created database. Then, execute the following DB Scripts.
CREATE TABLE employees (
no INT NOT NULL,
dob DATE NOT NULL,
first_name VARCHAR(14) NOT NULL,
last_name VARCHAR(16) NOT NULL,
gender VARCHAR(1) NOT NULL,
hire_date DATE NOT NULL,
PRIMARY KEY (no)
);
CREATE TABLE roles (
id INT  NOT NULL IDENTITY(1,1),
emp_no INT,
role varchar(255) default NULL,
PRIMARY KEY (id)
) ;
INSERT INTO employees (no,dob,first_name,last_name,gender,hire_date) VALUES (1011,'1985-09-02','Chava','Puckett','F','2008-10-12');
INSERT INTO employees (no,dob,first_name,last_name,gender,hire_date) VALUES (1012,'1971-12-03','Christopher','Tillman','M','2006-11-01');
INSERT INTO employees (no,dob,first_name,last_name,gender,hire_date) VALUES (1013,'1975-07-31','Judith','David','F','10-11-20');
INSERT INTO employees (no,dob,first_name,last_name,gender,hire_date) VALUES (1014,'1957-08-03','Neil','Ford','F','08-09-04');
INSERT INTO employees (no,dob,first_name,last_name,gender,hire_date) VALUES (1015,'1977-01-09','Daryl','Wolfe','M','07-09-14');
...
INSERT INTO roles (emp_no,role) VALUES (1011,'Sr. Developer');
INSERT INTO roles (emp_no,role) VALUES (1012,'Office Manager');
INSERT INTO roles (emp_no,role) VALUES (1013,'Secretary');
INSERT INTO roles (emp_no,role) VALUES (1014,'Engineer');
INSERT INTO roles (emp_no,role) VALUES (1015,'CEO');
...
2.2 The Hypothetical Requirement
You will build a Mule application that will pool this employee database for newly created employees and send it to be handled across different message processors. In the event of an execution failure or message processor exception, the app must be capable of resuming the database polling from an “employee ID” that is larger than the previous successful watermark value. The following flow chart illustrates this requirement:

3 Developing the Mule Application
The figure below depicts how the end solution looks. The main flow that depicts the solution is “muledbpollingflow.” The second flow, “resetObjectStore,” is for us – the developers – to reset the watermark value. This step enables us to not have to keep creating new records.

Now, I will discuss the internal configuration of the main flow “muledbpollingflow.” I will start from left to right, so that readers can understand what is going on under the hood.
3.1 Poll Scope Settings
First, in the “receive scope,” we have the poll scope. The image below shows the settings we have employed into the poll scope.

I set the frequency for polling to happen every five seconds, by entering 5000 milliseconds to the text box. There will be a zero start delay, and I put in the time measurement as milliseconds. If you look at the figure above, you will see an alternate option to set up a Cron Scheduler.
Next up you have the watermark pane. This is where you key in all the configurations for the watermark functionality. The first field would be the flow variable name that you want watermark operation to serialize. The second field is the default value that you want your flow variable to store on its first run. Here I have used the Update Expression instead of the Selector Expression, because that is the only thing that will work for the mentioned requirement in section 2.2 (and besides, the Selector Expression is already demonstrated in the MuleSoft documentation; I chose the Update Expression because its usage is not demonstrated).
Next, we have the selector expression. This is important as it tells the watermark function on which field on the database to focus on. Here you can see that it is implied where one record from the database is equivalent to one payload. In other words, when a record’s data is retrieved from the database onto a Mule flow, it is then represented as a payload; the field name of the records are the same whether it be from the table (in the database) or from the message payload in Mule (during runtime).
The next field is the “Object Store.” Developers have an option to write their own Java Object Store (for more convoluted use cases) or to use the default object store implemented in Mule. I have made a reference to the default/implied object store in mule “defaultUserObjectStore.”
3.2 The Database Connector
Inside the poll scope, we have the database connector. You can obtain the details of the database connector configuration from the source code that I have checked into GIT Hub.

Now, we will execute a select operation. In the select operation, you have to key in the SQL statement that will be executed by the poll. Here you can see that I am using the watermark flow variable called “lastRecordID.” Notice that you need to order the records by the section of the query. This is really important because we want an ordered result to be able to apply the watermark function. Now, if you look at the advanced tab (depicted in the iage below) you will see that I configured the database connector to retrieve five records at a time.

3.3 The “For Each” Scope
Before we delve into the “for each” scope, notice that we have set a message processor to initialize a flow variable: “previousRecordID.”
<set-variable variableName="previousRecordID" value="#[flowVars['lastRecordID']]" doc:name="Initialize previousRecordID" />
This enables us to use this flow variable later in the for each scope.
Next, we move on to the for each scope, depicted in the image below. We do not need to configure anything in this step. The scope already knows how to split the five records payload.

This mean that all we have to do is process one record at a time within the for each scope. This step is necessary because the for each scope splits the records for us. The first operation of the for each scope is to set a flow variable called “currentRecord” with the value of “#[payload[‘no’]]”.
<set-variable variableName="currentRecord" value="#[payload['no']]" doc:name="currentRecord" />
This enables us to keep track of the current record being processed. At the end of the for each scope we will set the value of “currentRecord” into a new flow variable called “previousRecordID.”
<set-variable variableName="previousRecordID" value="#[flowVars['currentRecord']]" doc:name="previousRecordID" />
“previousRecordID” is the same flow variable that is used in section 3.1 (above) for the watermark’s update expression.
Now, let us look at the Groovy expression between the flow variable setting message processors.
flowVars.dividend = Math.abs(new Random().nextInt() % 3 - 1);
flowVars.divisor = Math.abs(new Random().nextInt() % 3 - 1);
System.out.println("Curent Record ID:" + flowVars['currentRecord']);
System.out.println("Payload: " + payload );
System.out.println("Executing " + flowVars.dividend + " / " + flowVars.divisor );
def ans = flowVars.dividend / flowVars.divisor ;
What I want to do here is create a division by zero exception/error. The reason I am doing this is to simulate a real-world example where an exception/error can happen anytime, especially when the records are being processed.
When an exception happens, we want the watermark function to be able to revert back to the previous successful record and start from there. In other words, the sole purpose of the Groovy message processor is to simulate unexpected and intermittent errors, while we are processing the records in runtime.
4 Testing the Mule App
It’s time to put the rubber on the road and see what really happens during runtime.
4.1 Resetting the Watermark during runtime
You could reset the watermark value by using Postman or any web browser. Simply pass in the “Employee ID” as the URL parameter, and the Mule app will pick up the next biggest employee ID from the table (refer to the following image).
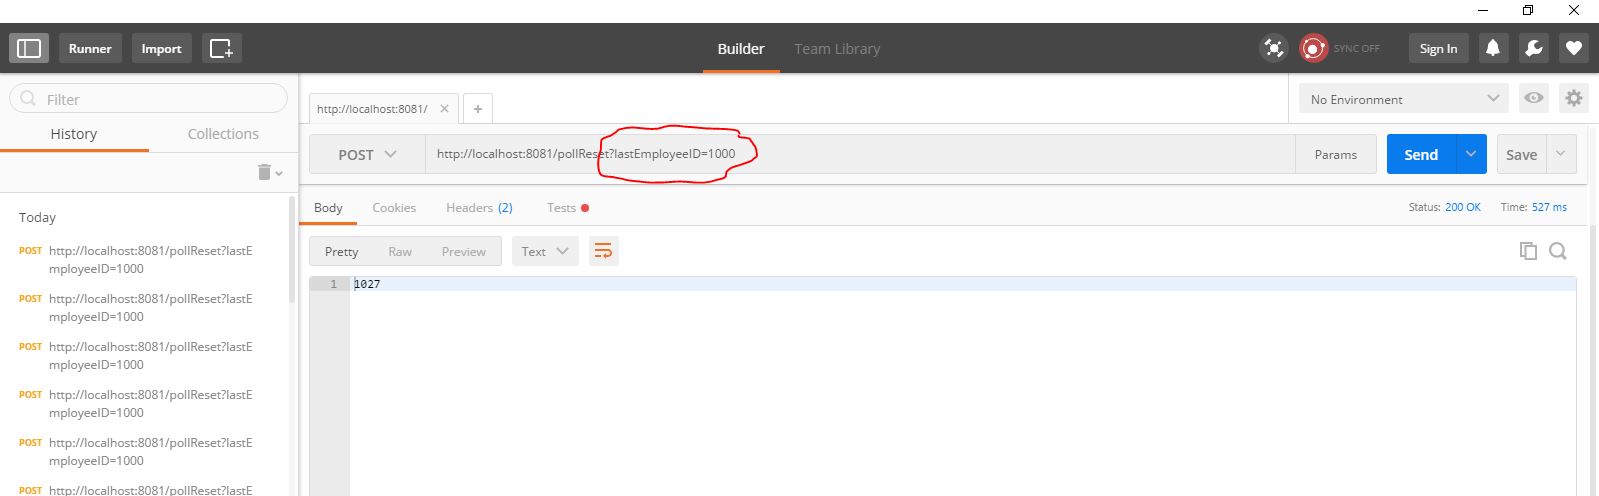
If you click send on Postman, you will see the following log in your console window:
org.mule.api.processor.LoggerMessageProcessor: Reset WaterMark to : 1000
When you set the watermark value to 1000, the first record in the employee table actually begins with the ID 1011; the poll scope can then start from the first record and work its way through to the last record.
When the poll scope finishes picking up all records, you will see the following in your console window:
Foreach$CollectionMapSplitter: Splitter returned no results. If this is not expected, please check your split expression
Foreach$CollectionMapSplitter: Splitter returned no results. If this is not expected, please check your split expression
Foreach$CollectionMapSplitter: Splitter returned no results. If this is not expected, please check your split expression
Foreach$CollectionMapSplitter: Splitter returned no results. If this is not expected, please check your split expression
Foreach$CollectionMapSplitter: Splitter returned no results. If this is not expected, please check your split expression
Foreach$CollectionMapSplitter: Splitter returned no results. If this is not expected, please check your split expression
Foreach$CollectionMapSplitter: Splitter returned no results. If this is not expected, please check your split expression
Foreach$CollectionMapSplitter: Splitter returned no results. If this is not expected, please check your split expression
4.2 Polling Starts
When polling starts, you will see the following in your console window:
Curent Record ID:1011
Payload: [gender:F, no:1011, dob:1985-09-02, last_name:Puckett, hire_date:2008-10-12, first_name:Chava]
Executing 2 / 1
Curent Record ID:1012
Payload: [gender:M, no:1012, dob:1971-12-03, last_name:Tillman, hire_date:2006-11-01, first_name:Christopher]
Executing 1 / 3
Curent Record ID:1013
Payload: [gender:F, no:1013, dob:1975-07-31, last_name:David, hire_date:2020-10-11, first_name:Judith]
Executing 1 / 1
Curent Record ID:1014
Payload: [gender:F, no:1014, dob:1957-08-03, last_name:Ford, hire_date:2004-08-09, first_name:Neil]
Executing 3 / 2
Curent Record ID:1015
Payload: [gender:M, no:1015, dob:1977-01-09, last_name:Wolfe, hire_date:2014-07-09, first_name:Daryl]
Executing 0 / 3
...
When you look at the logs, notice that there are intermittent errors that are caused by “division by zero.” When this happens, the poll scope will resume polling back to the failed record ID. have achieved our objective of creating a Mule app that will fulfill the requirements specified in section 2.2.
Finally, with this last step, we have achieved our objective of creating a Mule app that fulfills the requirements specified in section 2.2.
5. Full Source code
The full working source code can be found at this link.
Conclusion
There are many ways you can apply to test the watermark functionality. For example, one of the ways my 3-year-old son has helped me test this functionality is, while I was away on a coffee break, he took my laptop and pressed the shutdown button while the polling was in the middle of running.
When this happened, I thought I would need to reset the watermark to have it run from scratch all over again. However, I turned on my laptop, started Anypoint Studio, I found that this Mule app opened exactly where it left off. Amazing, isn’t it?
This watermark functionality will really come in handy with its implied serialization to disk when we shut down the app or the server. My son has discovered this feature for me! To test this out yourself, download the app or do more testing yourself. The only way to learn something is to experience it and play around with it, so happy exploring!
This post first appeared on Dzone.