Have you ever tried to move already created elements through the canvas in Mule Studio? Well, if you did, you may have figured out that the elements weren’t moved at all. You would probably have seen a black box while you were dragging elements into the canvas and nothing else; the elements were not transported.
Drag and drop support is important because when users use a tool like Mule Studio, they intuitively try to move elements. Furthermore, it saves a lot of work, since you don’t have to delete components from the canvas and then add them again from the palette; you can just move the components without the need of removing them. It makes your job easier, from the creation of the element, to the configuration. (When you decide to remove an element, you probably have already configured it).
Apart from others great improvements, the new release of Mule 3.3.1 comes to solve that painful issue, comes to give you drag and drop support!
How comprehensive is the refactoring support?
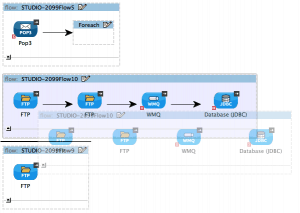
Mule 3.3.1 gets into the user’s mind and try to support all the different cases of drag and drop that the user could need. Besides, the feedback images provided when the user is dragging and dropping elements through the canvas have been changed. Now, a “ghost” image is displayed when the user is moving an element inside the canvas (as shown below):
It’s important to note that the feedback image provided when an element is being moved is exactly the same as the element, but more transparent. It happens to every component. The feedback image which was shown when the user dragged an element from the palette and dropped it in the canvas was also changed.
Regarding drop locations, it’s worth to say that the drop location feedback image and the cursors were improved. Now, when the user is moving an element in the canvas, the UI shows a rectangle with an arrow to suggest that it is a valid location to move the element or a red cross to indicate that it isn’t a valid location to place the element.
Now, let’s watch the different cases of drag and drop supported in Mule Studio.
That’s all!
I hope you’ve enjoyed this tutorial! This new feature is available with Mule Studio 3.3.1. If you haven’t already, you can download Mule here. Enjoy!


