
Salesforce Data Cloud has a lot of integrations that you can use directly. Like Google Cloud Storage or Amazon SageMaker. However, when there are no specific integrations with other data sources, you have to be creative.
We’ll show you how to create a basic Mule application to use as an integration with Data Cloud. To make things simple, we’ll create a basic HTTP Listener that will query, insert, or delete items to and from Data Cloud.
Prerequisites
Before starting, there are a few things you need to have in order:
- Salesforce account with Data Cloud access
- Your Salesforce username and password (the ones you use to log in to Salesforce)
- Data Cloud Consumer Key and Secret, which you can retrieve from the Connected App you have set up in Data Cloud
- An empty Mule project to get started. You can use Anypoint Code Builder (ACB) or Anypoint Studio to develop this integration. We will be using ACB for this tutorial.
Let’s start by setting up your global configuration elements and make sure your pom.xml file contains the necessary dependencies.
Set up the global configuration
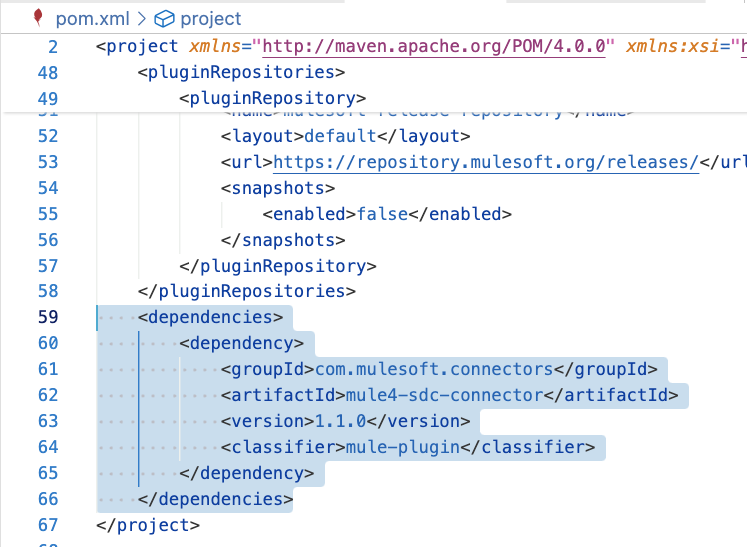
First, make sure to install the connector dependency from Exchange called Salesforce Data Cloud Connector – Mule 4. You can add the dependency directly on the pom.xml, or install it through the Mule Palette in Studio or the Import Asset from Exchange command in ACB.
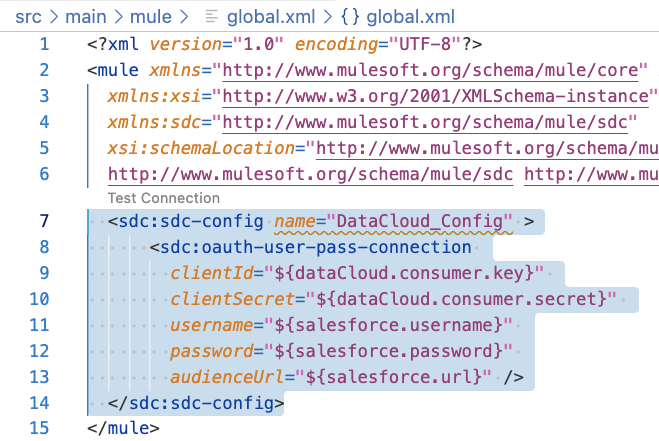
After that, to follow best practices, make sure you create a global.xml file inside your src/main/mule folder. Once you have it, create a new Global Element for Data Cloud. We’ll create properties for each of the required fields and add them in a properties file. For now, your Global Element should look like this:
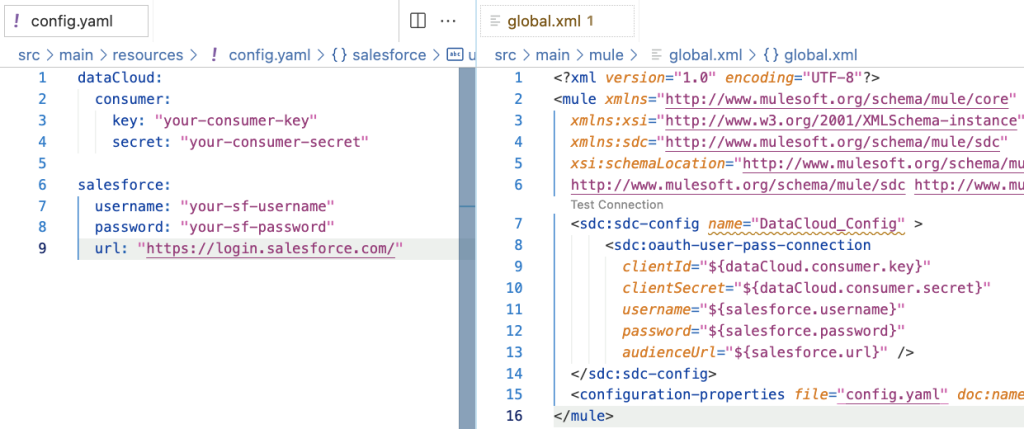
After this, add the necessary global configuration to read a property file and add these properties into it. Your properties file should end up looking like the following:
Important note: DO NOT commit your credentials to any properties file. This is a huge security issue. We are only using this to demonstrate the connection locally. To secure/encrypt your credentials properly, watch this video.
Finally, add an HTTP Listener configuration to your global.xml file so we can create Listeners to call the flows we’ll be creating today. Let’s start with the Query flow.
Query data
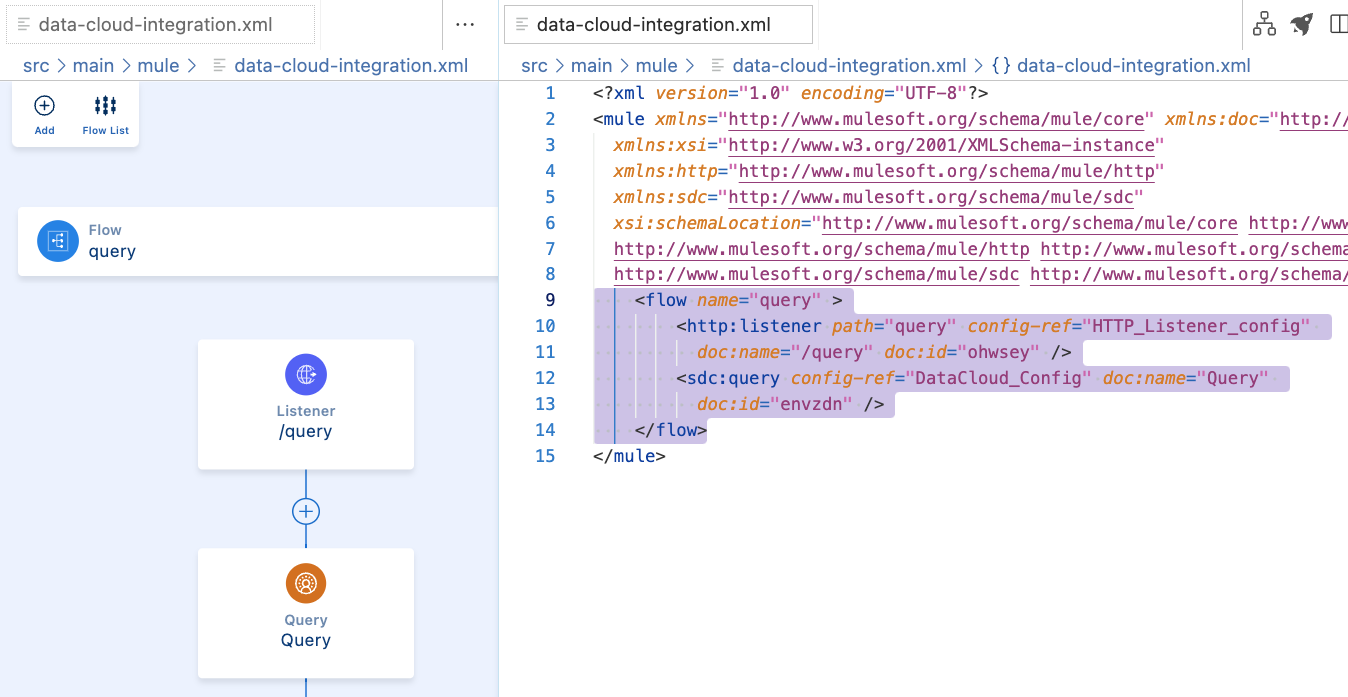
This is the easiest of all. Create a flow with an HTTP Listener and use the Query component from the Data Cloud module. That’s all you need!
You can try running the Mule application at this point to make sure everything is set up correctly. Take a look at the following screenshot to see the format you need to use for the query.
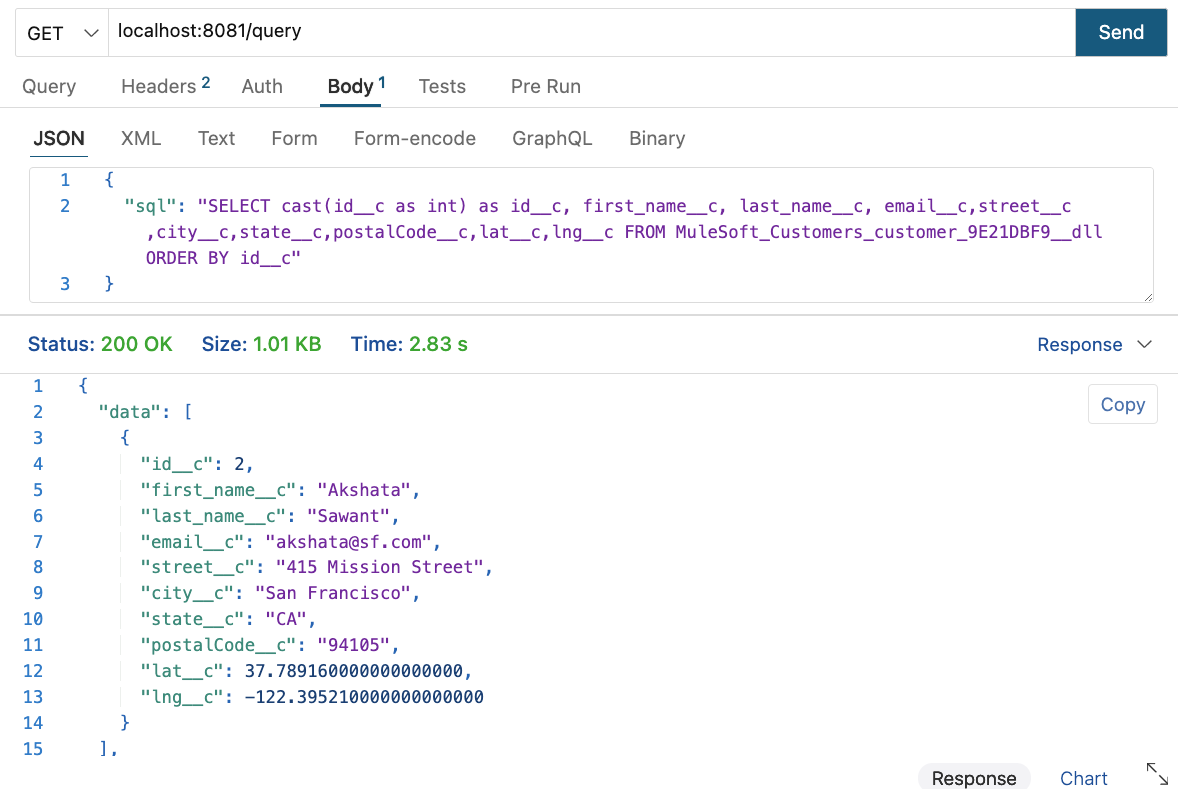
You will receive a 200 OK response with the result of the query if your Mule application was set up correctly.
Well, that was easy! Let’s now see how we can insert some objects.
Insert objects
To insert objects into Data Cloud, you can use either the Bulk or the Streaming API. The difference is that the Streaming API has a maximum of 200 objects to be inserted at a time. For this example, since we won’t be using a lot of power, we’ll use the Streaming API.
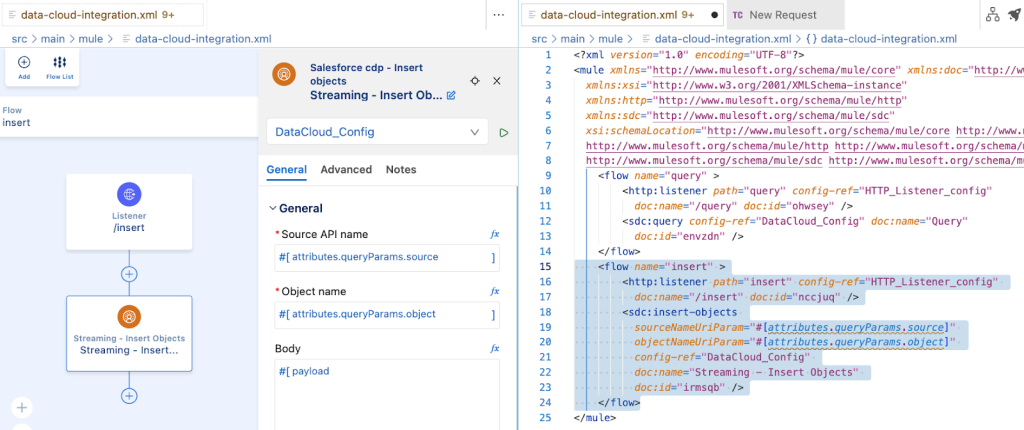
So, once you have your new flow and listener ready, add a Streaming – Insert Objects component. This component will ask for the source name and the object name. You can retrieve these from Data Cloud. The source name would be the name of the Ingestion API you created in Data Cloud (for example, My_Ingestion_API), and the object name would be the actual name of the object you want to insert the records into (for example, runner_profiles).
You can either hardcode these for a Proof of Concept, add them as properties, or make them dynamic by getting them from headers or query parameters. In our case, we will be extracting them from the query parameters. Once you’re done with this configuration, it should look like the following.
Once again, try running the Mule application at this point to make sure everything is set up correctly. Take a look at the following screenshot to see the format you need to use for the insertion data (note that the fields will differ depending on the YAML schema you set up for the Data Stream in Data Cloud).
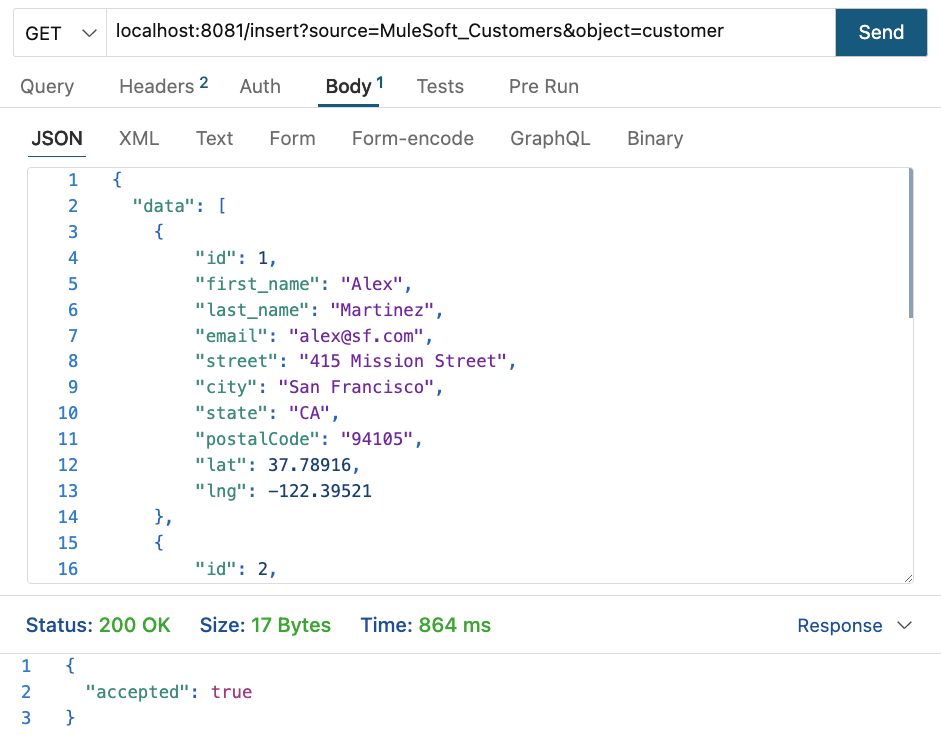
You will receive a 200 OK status response and the accepted: true response body if everything is set up correctly. Note that it will take a few minutes for the changes to be reflected in Data Cloud.
Delete objects
Same as the insertion, you can delete objects with the Bulk or the Streaming API. The Streaming API will have the same limit of 200 records at a time, so make sure you choose the right component for you. In this case, we’ll use the Streaming API once again.
Prepare your new flow with the HTTP listener and add a Streaming – Delete Objects component. Same as the insertion, you can hardcode the source and object, add them as properties, or make them dynamic. And the same as we did before, we will be extracting them from the query parameters. Once you’re done with this configuration, it should look like the following.
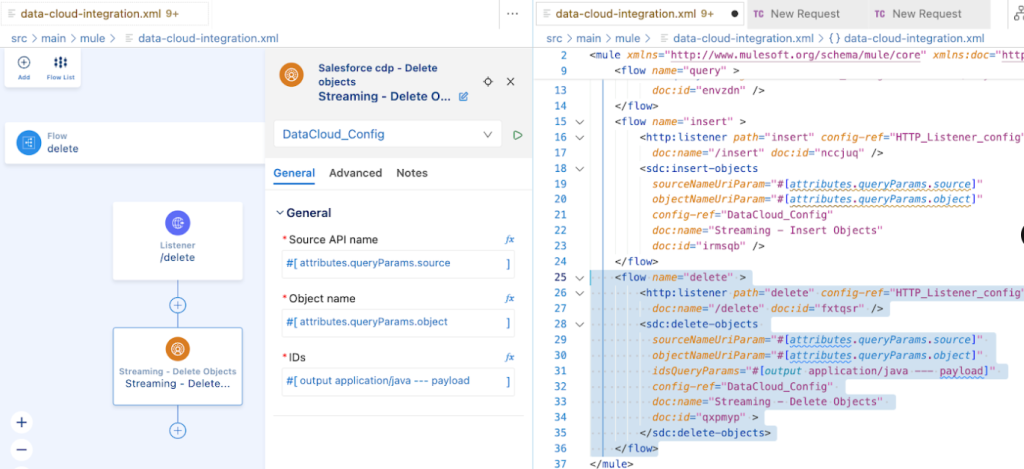
Once again, run the Mule application. This request is easier because you only need to send an array of IDs. Each ID represents the primary key of the object you want to delete. Each primary key will differ depending on the YAML schema you previously uploaded to the Data Stream on Data Cloud.
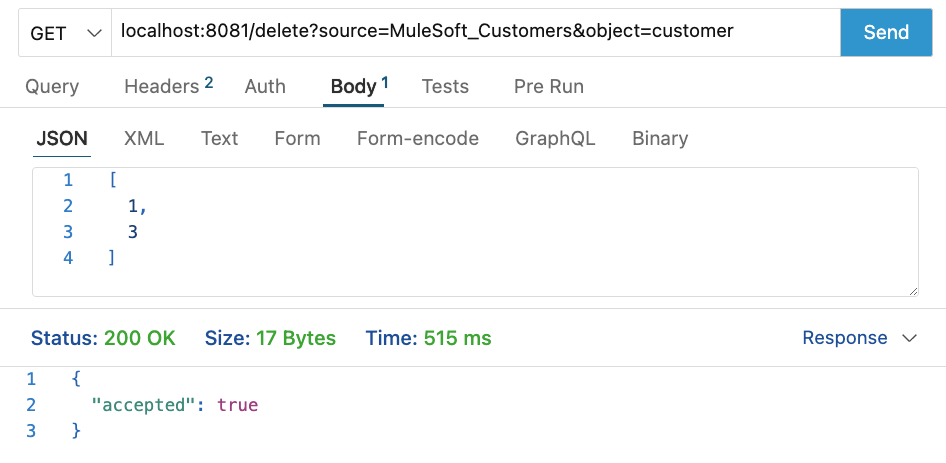
You will receive a 200 OK status response and the accepted: true response body if everything is set up correctly. Note that it will take a few minutes for the changes to be reflected in Data Cloud.
All things go
You can create custom Data Cloud integrations with MuleSoft. You can easily use the Data Cloud module and its variety of components to use the different Data Cloud APIs. This is just the beginning for you to know the basics of this module. We only used HTTP Listeners for the examples here, but you could create custom functionality using databases, cloud products, or even create complex transformations using DataWeave.
Check out the following resources for more detailed information:
- Read:
- Watch: