
In Salesforce Data Cloud, there are two different ways to import data using the Ingestion API: streaming ingestion and bulk ingestion.
The streaming process is not as complex as the bulk process. It’s as easy as using a single connector to insert/delete your data in a JSON format. However, the bulk process is not as straightforward. Before starting, make sure you set up your Data Cloud configuration. It’s important to have the Connected App credentials and that your Ingestion API and Data Stream are set.
Now, let’s look at the bulk process and how to upsert data using the Salesforce Data Cloud Connector for Mule 4. Let’s start by understanding this process before implementing it.
Bulk ingestion process steps
Here are the three steps you need to follow for bulk ingestion:
- Create a job
- Upload job data
- Close the job
Step 1: Create a job
It all starts with creating a job. A “job” represents the bulk operation for loading data into the Data Cloud org of your choice. Once you create a job, the following information will be made available for you:
- Job ID
- Operation (upsert, in this case)
- The object where you’ll insert the data into
- The source name of the Ingestion API
- User ID that created the job
- Date and time of job creation
- State (open, in this case)
- Content type (CSV, in this case)
- API version
- Content URL
From this, what’s more important is the job ID and the state. The job always starts with an open state. This is very important because this is the only state in which you can start uploading data into the job before it moves to Data Cloud’s queue for processing.
Step 2: Upload job data
After you create the job, the next step is to upload the data in a CSV format. A job can consist of up to 100 data files. As long as the job is in an open state and you don’t exceed this limit, you are free to keep uploading files/data. Once you are done uploading the data, you can continue to the next step to start the processing in Data Cloud.
Step 3: Close the job
It’s a best practice to not leave open jobs. If you made a mistake with the data or want to start over, you’ll have to first abort the job. This removes all the uploaded data and frees up the object for a new job to be created upon it. If you do want to continue the process with the data you uploaded, you have to close the job at this point. The state will change to “UploadComplete” and this will indicate Data Cloud to start processing the data.
Once you close the job, you’ll have to wait until Data Cloud finishes processing it before you create a new job for the same object. If the job is in an “UploadComplete” state, it means Data Cloud hasn’t picked up the data yet. It will change to “InProgress” once it has been queued. After that, it will change to either “JobComplete” or “Failed,” depending on the result of the processing.
These are the three steps we will need to do in MuleSoft to create our integration. Fortunately for us, the Data Cloud connector includes these 3 operations already. We just have to import it from Exchange.
Creating the job
As we just learned, the first step is to create a job where we will be uploading the data. In our Mule application, we can receive the data in a JSON or CSV format, for better convenience. We can then use DataWeave to transform the data. Take a look at the following script to learn how to do this:
output text/csv
var contentType = payload.^mediaType
---
if (contentType contains "text") read(payload,"text/csv")
else payload
We will take this data and save it in a variable to be used later in the flow. After that, we can use the Bulk – Create Job connector with the upsert operation. Like so:
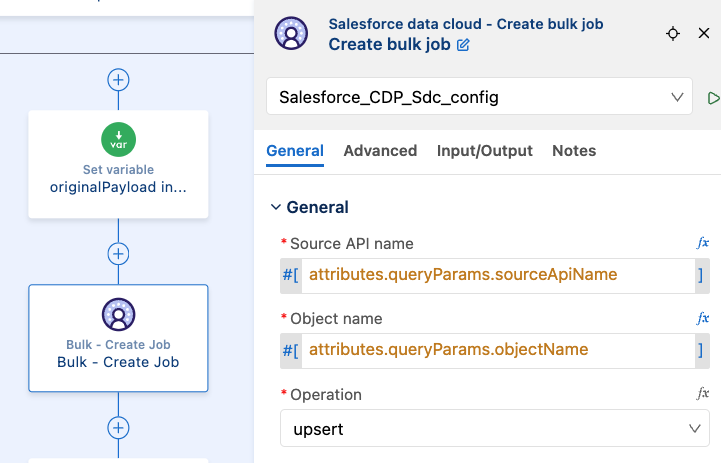
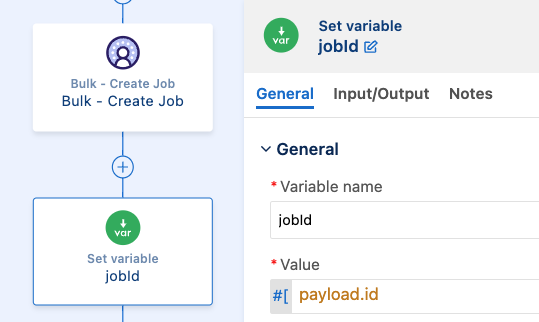
This will create the job and return the job’s information. We’ll create a new variable containing the job ID so we can reuse it in the rest of the flow.
After creating the job, we are now ready to upload the data and close the job to start the processing by Data Cloud.
Processing the job
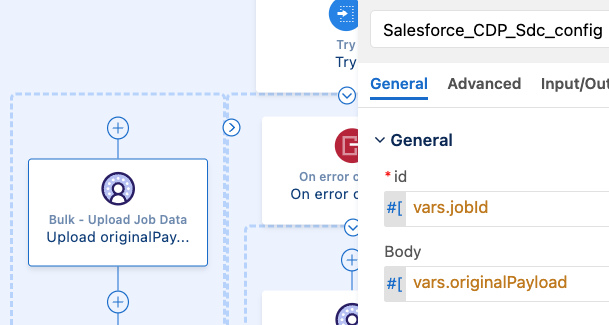
Because we don’t want to leave an open job in this specific Mule application, we can make use of the Try component in MuleSoft – kind of like a Try/Catch block in Java. we’ll first try to upload the data and close the job, but if anything goes wrong there, we want to abort the job instead. This part of the flow would look something like the following.

On the left side, we can see the flow we are expecting to run if everything is successful. It starts by uploading the now transformed CSV payload to the open job.
And then closing the job with the UploadComplete state.
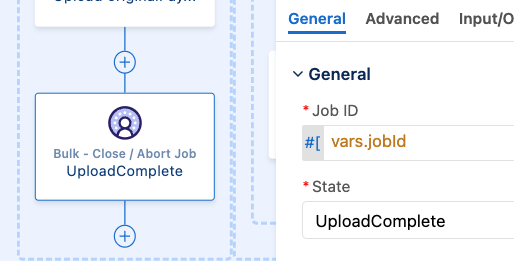
If any of these two connectors fails for whatever reason, then the flow will shift to the Error Handler section where we have set up an On error continue scope that will abort the job.

This will ensure that no job is left open by the end of the flow.
After the application is finished, all that’s left is to let Data Cloud process the data we sent. You can use the Get Job Info call to retrieve the information of a given job ID, if you want to keep track of which state the job is in at any given time.
No limit to integrations
Yes, the bulk ingestion process is not as easy as the streaming ingestion process. But once you really understand how it works, there’s no limit to the integrations you can create with the Data Cloud connector for Mule 4!
For more detailed information, check out the following resources:
- Read: