
MuleSoft empowers developers to achieve business agility by providing a unified, visual toolset for building automations. This allows them to concentrate on business logic and data transformation, rather than complex programming.
With the advent of agentic integrated development environments such as Visual Studio Code and Cursor, developers can speed up their workflow through intelligent agentic assistants, with agents taking actions and providing recommendations that can be enhanced using Model Context Protocol (MCP). With MuleSoft, developers can quickly and easily build MCP servers that AI agents can then use to improve your development workflow. Let’s take a look at an example of how we can build one.
API specification enhancements overview
We’ll demonstrate developing an MCP server using Anypoint Code Builder, allowing API developers to enhance OpenAPI specifications by asking their IDE agent. MuleSoft provides flexibility for automating logic, whether through integration patterns or by orchestrating calls to an LLM. In this example, we’ll use an LLM to generate and fill in missing API specification details.
Before we get started, let’s make sure that the environment is all set up correctly for Anypoint Code Builder:
- Install Git
- Install Visual Studio Code
- Install Anypoint Extension Pack in Visual Studio Code
- Install Cline in Visual Studio Code or something similar
- Deploy and obtain an Azure OpenAI key or similar
We’ll use Cline as the agent to interface with (in Visual Studio Code); however, you can use any other MCP enabled agent as well. Cline is great as it allows us to provide our own LLM keys and gives you a selection of LLMs that you can choose from.
For this demo, we will be using a key from Azure OpenAI, but you are welcome to use a key from another LLM as well. Just know that each LLM responds differently, so responses and results may vary.
Create automation in Anypoint Code Builder
Open Visual Studio Code and select the MuleSoft icon from the left bar. Select Develop an Integration and fill in the details for the project name. Click Create Project and sign in to your Anypoint Platform account if prompted to do so.
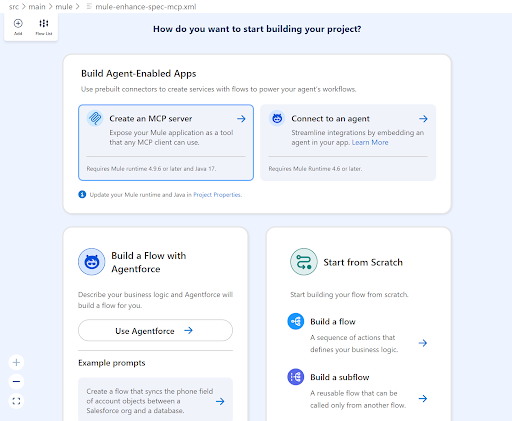
You should now be presented with the project wizard screen. Select Create an MCP server. A new flow will automatically get created and the MCP – Tool Listener component should now be highlighted.
In the Connection Config section, select the + icon to open the MCP tool connection configuration tab. Set Server name to enhance-spec-server and Server version to 1.0.0. In the General Connection Config click the + icon to open the HTTP listener configuration tab.
In this new tab, set Host to 0.0.0.0 and Port to 8081 and click Add to configure and close the HTTP listener configuration tab. Click Add one more time to configure and close the MCP tool connection configuration tab.
Back in the MCP – Tool Listener component you should now see the Connection Config populated with the name of the configurations we just specified. Continue to fill in the remaining parameters as follows:
| Parameter | Value |
|---|---|
| Name | enhance-api-spec |
| Description | Enhances the given API specification with missing information and to conform to company standards. |
| Parameters schema | { “$schema”: “http://json-schema.org/draft-07/schema#”, “type”: “object”, “properties”: { “spec”: { “type”: “string”, “description”: “The entire API specification that needs to be enhanced” }, “required”: [ “spec” ]} |
| Responses | Click Add and click the Expression mode icon beside Text and input payload.^raw |
We’ve now configured the input and output schemas for the MCP tool.
Back in the Mule canvas, select the + icon under the MCP Server – Tool Listener component, click the Search in Exchange button, search for the Inference Connector and add the [Agent] Define Prompt Template component. In the Connection Config sections, click the + icon and configure all the necessary fields within the General and Advanced section depending on your chosen LLM.
If you need to manually add the information instead of using some of the drop down fields, you can click the Expression mode button beside the parameters to do so. In our example we are using Azure OpenAI so we filled in the following details:
| Parameter | Value |
|---|---|
| Connection | Azure OpenAI |
| Azure model name | azure-openai |
| API key | The key that we obtained from Azure OpenAI |
| [Azure OpenAI] Deployment ID | The Azure AI Foundry deployment name |
| [Azure OpenAI] Resource name | The Azure OpenAI resource name |
Click Add to return back to the Agent Prompt template configuration.
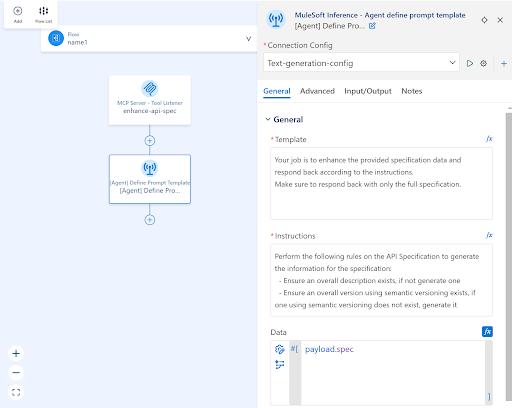
Back in the Agent define prompt template component, you should now see the Connection Config populated with the name of the configuration we just specified. Continue to fill in the agent parameters as follows:
| Parameter | Value |
|---|---|
| Template | Your job is to enhance the provided specification data and respond back according to the instructions. Make sure to respond back with only the full specification. |
| Instruction | Perform the following rules on the API Specification to generate the information for the specification: – Ensure an overall description exists, if not generate one – Ensure an overall version using semantic versioning exists, if one using semantic versioning does not exist, generate it |
| Data | payload.spec |
We’ve now defined an LLM call with specific instructions to enhance the given API specification. In this case we’re instructing the LLM to generate a description and/or version of the spec if one does not exist. This use case can easily be expanded upon by adding more instructions to the LLM.
Finally, back in the Mule canvas, select the + icon under the [Agent] Define Prompt Template and search and add the Transform component. Set the final payload to:
%dw 2.0
output application/json
---
payload.response
Click the Run and Debug icon from the left pane and hit the Start Debugging button to run the application.
Test workflow enhancement
With the MuleSoft automation running, let’s set up Cline as our Agent interface in Visual Studio Code. Click the Cline robot icon from the left pane and select Use your own API key. Select the API provider and fill in the rest of the details of your deployment based on your chosen LLM and hit Let’s Go.
Inside Cline, click the MCP Servers icon on the top, select the Remote Servers tab and add our newly developed MCP server by entering enhance-api-spec for the Server Name and http://localhost:8081/sse for the Server URL and clicking Add Server. Click Done to return back to the Cline main page.
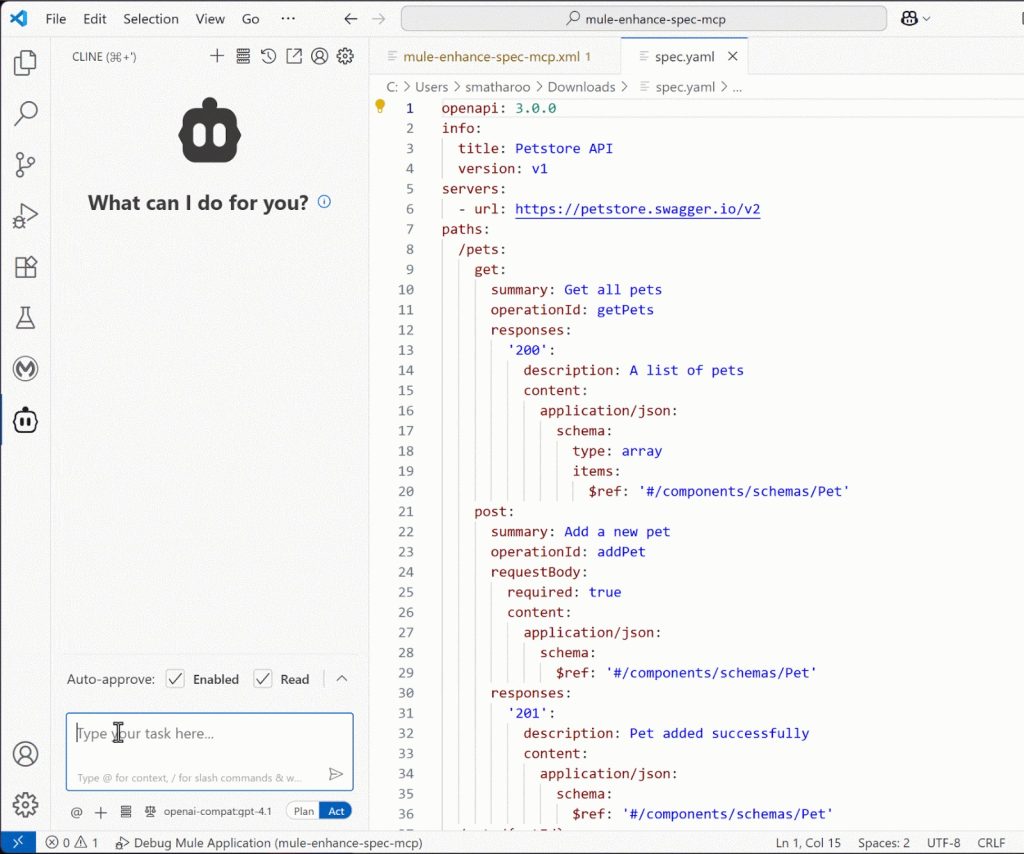
Finally, create a new text file inside of Visual Studio Code to serve as our API specification in development. You can paste the following specification as an example and make sure to save the file somewhere once pasted:
openapi: 3.0.0
info:
 title: Petstore API
 version: v1
servers:
 - url: https://petstore.swagger.io/v2
paths:
 /pets:
  get:
   summary: Get all pets
   operationId: getPets
   responses:
    '200':
     description: A list of pets
     content:
      application/json:
       schema:
        type: array
        items:
         $ref: '#/components/schemas/Pet'
  post:
   summary: Add a new pet
   operationId: addPet
   requestBody:
    required: true
    content:
     application/json:
      schema:
       $ref: '#/components/schemas/Pet'
   responses:
    '201':
     description: Pet added successfully
     content:
      application/json:
       schema:
        $ref: '#/components/schemas/Pet'
 /pets/{petId}:
  get:
   summary: Get a pet by ID
   operationId: getPetById
   parameters:
    - name: petId
     in: path
     required: true
     schema:
      type: integer
   responses:
    '200':
     description: Pet details
     content:
      application/json:
       schema:
        $ref: '#/components/schemas/Pet'
    '404':
     description: Pet not found
components:
 schemas:
  Pet:
   type: object
   properties:
    id:
     type: integer
     example: 1
    name:
     type: string
     example: Fluffy
    species:
     type: string
     example: Dog
    age:
     type: integer
     example: 3
Notice how this example spec is missing a description field in the info section and the version field is also not in proper semantic versioning. These are the fields in the specification that we’re going to enhance using our new MCP server.
Now simply tell Cline to Enhance this specification in the agent prompt and watch how it determines that an MCP tool is available with exactly those capabilities, followed by it outputting a comparison of the newly enhanced spec.
With MuleSoft, we just made API specification development even easier.


