Anypoint Flex Gateway by MuleSoft is a key component of Anypoint Platform supporting Universal API Management, and it can be easily installed as a Linux Service, Docker container, or Kubernetes Ingress Controller.
One of the lesser known installation patterns is deploying Flex Gateway as a sidecar within a Kubernetes Pod. We’ll dive into how to achieve this process by leveraging Flex Gateway in Connected Mode. The following diagram depicts an example simple pod architecture:
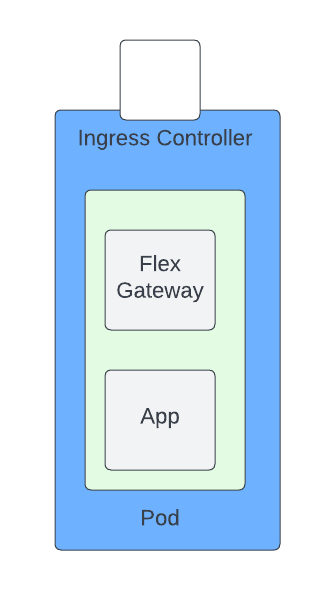
In this case there will be a single application replica, and a single Flex Gateway replica in a pod. There are a number of prerequisites that must be installed before starting, so explore what those are.
Prerequisites for deploying Anypoint Flex Gateway as a sidecar
This document assumes the following prerequisites:
- Have or create an Anypoint Platform Account with Flex Gateway Permissions
- Install Kubernetes (K3S or K3D can be used)
- Install Docker
- Install kubectl
Once all the prerequisites are installed, you can begin the installation.
How to install Anypoint Flex Gateway
In short, these are the steps you need to take to prepare to deploy Flex Gateway as a sidecar:
- Download Flex Gateway
- Register Flex Gateway
- Create pod deployment
- Add API(s) to Flex Gateway
- Bring it all together
Let’s discuss each in more detail.
1. Download Flex Gateway
To download Flex Gateway, issue the following command: docker pull mulesoft/flex-gateway
- Please note that this blog leverages version 1.3.0.
2. Register Flex Gateway
Now that you’ve downloaded Flex Gateway, it needs to be registered. To complete the registration process, register it as a Docker container, not a Kubernetes container.
- Navigate to Management Center → Runtime Manager → Flex Gateways → Add Gateway
- Select Docker as the environment:
- Copy and paste the registration command as shown below: Be sure to change <Org ID>, <Token>, and <gateway-name> to valid values
docker run --entrypoint flexctl \ -v "$(pwd)":/registration mulesoft/flex-gateway:1.2.0 \ register --organization=<Org ID> \ --token=<Token> \ --output-directory=/registration \ --connected=true \ <gateway-name>
3. Create pod deployment
The pod will contain two containers:
- Flex Gateway
- Mulethunder Payments: A sample payments API container.
The following will create the deployment:
- Create the test namespace: kubectl create namespace test
- Create a Kubernetes Secret. This will link the registration data to the Flex Gateway. Be sure to change <gateway-name> to the value used in step three of the registration process:
kubectl -n test create secret generic <gateway-name> --from-file=registration.yaml=registration.yaml
- Create a pod.yaml file, and be sure to change <gateway-name> to the value used in step two above:
apiVersion: apps/v1

kind: Deployment

metadata:

 name: test-sidecar

 namespace: test

 labels:

   app: test-sidecar

spec:

 replicas: 1

 selector:

   matchLabels:

     app: test-sidecar

 strategy:

   rollingUpdate:

     maxSurge: 25%

     maxUnavailable: 25%

   type: RollingUpdate

 template:

   metadata:

     labels:

       app: test-sidecar

       version: "2"

   spec:

     containers:

     - name: app

       image: mulethunder/payments:1.0

       imagePullPolicy: IfNotPresent

       ports:

       - containerPort: 3000

         name: http

         protocol: TCP

       resources:

         limits:

           cpu: 100m

           memory: 160Mi

         requests:

           cpu: 100m

           memory: 160Mi

     - name: gw

       env:

       - name: FLEX_NAME

         valueFrom:

           fieldRef:

             apiVersion: v1

             fieldPath: metadata.name

       - name: FLEX_NAMESPACE

         valueFrom:

           fieldRef:

             apiVersion: v1

             fieldPath: metadata.namespace

       image: mulesoft/flex-gateway:latest

       imagePullPolicy: Always

       ports:

       - containerPort: 8080

         name: http

         protocol: TCP

       resources:

         limits:

           cpu: 250m

           memory: 512Mi

       volumeMounts:

       - name: anypoint-certs

         mountPath: /etc/mulesoft/flex-gateway/conf.d/register

         readOnly: true

     volumes:

     - name: anypoint-certs

       secret:

         secretName: <Gateway-Name>

     restartPolicy: Always

---

apiVersion: v1

kind: Service

metadata:

 name: test-sidecar

 namespace: test

spec:

 ports:

 - name: http

   port: 8080

 selector:

   app: test-sidecar

 type: ClusterIP
- Create the deployment: kubectl create -f pod.yaml
- Verify the pods are created and running: kubectl get pods -n test
If the pods have been created, the following output should be generated:
NAME READY STATUS RESTARTS AGE
test-sidecar-5ddf6c97c6-dc8s5 2/2 Running 0 2m
- Then, verify the Flex Gateway is connected in Anypoint Platform.
4. Add API to Flex Gateway
Now, the API is added to Anypoint Flex Gateway. This is a simple HTTP request which doesn’t require any RAML or OAS specification. Any REST or HTTP asset in exchange can be leveraged with Flex Gateway
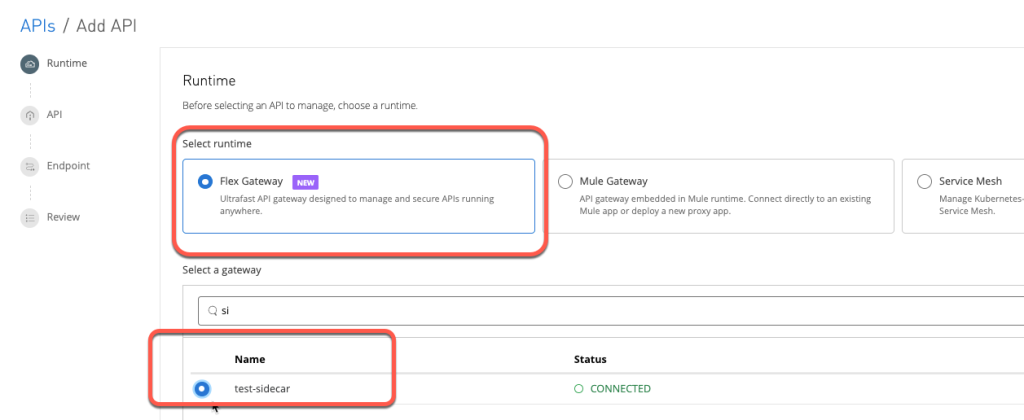
- Navigate to Management Center → API Manager → Add API → Add new API

- Ensure Flex Gateway and the appropriate Flex Gateway is selected; then, click Next:
- Make sure that “Create a New API” is selected and that the Asset type is HTTP API. Then give it a name, as shown below:

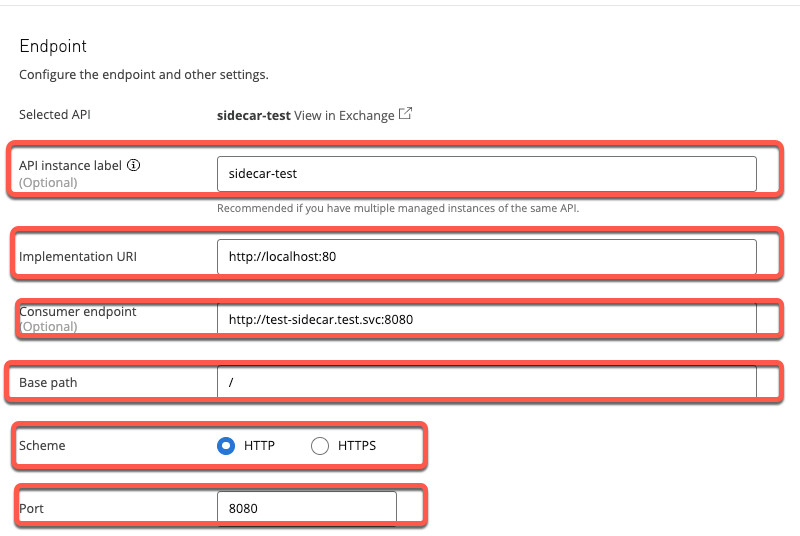
- Ensure the endpoint configuration is configured as follows:
- API Instance Label: any value in this example sidecar-test is used
- Implementation URI: http://localhost:80. This is due to the app listening on port 80.
- Consumer endpoint: http://test-sidecar.test.svc:8080 . This is what the Flex Gateway is listening to in order to proxy to the app listening on port 80.
- Base Path: /
- Scheme: HTTP
- Port: 8080
- Click Save and Deploy. The deployment should show as successful.
Once the API has been deployed, the next step will be to test the deployment by bringing it all together.
5. Bring it all together
Once the deployment has been completed, it is time to test the deployment. Since an ingress controller was not installed or configured, a container with CURL installed within the Kubernetes cluster will be used to test the service.
- Issue the following command to download and run the container: kubectl run curl –image=curlimages/curl –rm -i –tty — sh
- Test the service by issuing the following command: curl -v http://test-sidecar.test.svc:8080
The following or similar should be returned:
$ curl -v http://test-sidecar.test.svc:8080

*   Trying 10.43.105.133:8080...

* Connected to test-sidecar.test.svc (10.43.105.133) port 8080 (#0)

> GET / HTTP/1.1

> Host: test-sidecar.test.svc:8080

> User-Agent: curl/7.85.0-DEV

> Accept: */*

>

* Mark bundle as not supporting multiuse

< HTTP/1.1 200 OK

< date: Fri, 07 Oct 2022 23:24:06 GMT

< content-length: 354

< content-type: text/plain; charset=utf-8

< x-envoy-upstream-service-time: 0

< server: Anypoint Flex Gateway

<

Hostname: test-sidecar-5ddf6c97c6-dc8s5

IP: 127.0.0.1

IP: ::1

IP: 10.42.0.14

IP: fe80::1037:6cff:feb0:a652

RemoteAddr: 127.0.0.1:45728

GET / HTTP/1.1

Host: localhost

User-Agent: curl/7.85.0-DEV

Accept: */*

X-Envoy-Expected-Rq-Timeout-Ms: 15000

X-Envoy-Original-Path: /

X-Forwarded-Proto: http

X-Request-Id: 33956192-385e-4092-bf20-4bd669e63574
The container with the Flex Gateway accepts the request and forwards it to the app running in another container on the same pod. Notice the server header returns Anypoint Flex Gateway, ensuring the request is hitting the Flex Gateway. Due to the nature of a sidecar deployment, there should only be one API per Flex Gateway in this configuration.