Creating a DataWeave Date or Period value requires knowing a specific syntax, and that syntax can be difficult to remember and understand.
The new DataWeave modules dw::core::Dates and dw::core::Periods provide functions that will help you create those values using objects as arguments so you could find it more declarative and easy to remember.
We’ll cover what Dates Dates and Periods are in DataWeave; how the new Dates and Periods modules can help you; general examples of using both modules; and how to apply those functions quickly using Anypoint Studio.
Note: These modules are supported in DataWeave 2.4.0. Supported by Mule 4.4 and later.
What are Dates and Periods in DataWeave?
Inside the DataWeave type system, there are temporal types:
- Date
- DateTime
- LocalDateTime
- Time
- LocalTime
- Period
- TimeZone
These are simple types, they are not composed of other values and DataWeave has a specific syntax to create them.
- A DateTime represents a date and time within a time zone. It is the conjunction of Date + Time + TimeZone. Dates in DataWeave follow the ISO-8601 standard and literals are defined between | characters.
- The syntax to create them is:
- |uuuu-MM-ddTHH:mm:ss±HH:mm|
- E.g. |2003-10-01T23:57:59-03:00| This value represents the date October 1st of 2003 in the Time 23:57:59 with TimeZone -03:00.
- |uuuu-MM-ddTHH:mm:ss±HH:mm|
- The syntax to create them is:
- A Period represents an amount of time. The syntax to create a Period takes the following form:
- |P[n]Y[n]M[n]D| for a date-based amount of time
- |P12Y1M1D| Meaning a Period of 12 years, 1 month, and 1 day.
- |P[n]DT[n]H[n]M[n]S| for a time-based amount of time (a Duration that has a fixed amount of time instead of a month that could have different amounts of days, for example).
- |P1DT1H12M30S| Meaning a Duration of 1 day, 1 hour, 12 minutes, and 30 seconds.
- |P[n]Y[n]M[n]D| for a date-based amount of time
As you can see, the syntax to create Dates and Periods in DataWeave is pretty specific and maybe for periods, it could be difficult to understand them if you don’t have previous knowledge.
Creating Dates
The dw::core::Dates module contains functions to create and manipulate dates. To use this module, you must import it to your DataWeave code by adding the line import * from dw::core::Dates to the header of your DataWeave script.
The functions provided are:
- Functions to create a `date`, `dateTime`, `localDateTime`, `localTime` and `time`.
- Functions to create the Dates for `today`, `tomorrow` and `yesterday`
- Functions to reset a DateTime to the beginning of day, hour, month, week, year (`atBeginningOfDay`, `atBeginningOfHour`, `atBeginningOfMonth`, `atBeginningOfWeek`, `atBeginningOfYear`)
This example shows how it looks creating a Date, Time, and DateTime using the DataWeave syntax:

Using the functions in the module would look like this:

The autocompletion can help you define the DateTime if you use functions of the Date module, in contrast to just using the DataWeave DateTime syntax. Find the complete list with the descriptions of each function.
Creating Periods
The dw::core::Periods module contains functions to create and manipulate Period values.
To use this module, you must import it to your DataWeave code by adding the line import * from dw::core::Periods to the header of your DataWeave script.
The functions provided are:
- Functions to create a Period (period, duration, years, months, days, hours, minutes, seconds).
- Functions to return a Period value consisting of the number of years, months, and days between two Date values (between).
This example shows how it looks creating Periods using the DataWeave syntax:

Using the functions in the module would look like this:

Using the functions of the Period module and the autocompletion tool helps you while writing your Periods. Also, the example shows that if you want to write a minutes duration with the DataWeave syntax, that looks pretty similar to a month duration, so to avoid any confusion, you can use the months and minutes functions.
Manipulation of Dates and Periods
For example, we have an integration that delivers packages and we want to send an apology email to the customer if the maximum wait period for a package to arrive has been exceeded. In that case, we also want to offer a discount for purchases starting the next week after the package was delivered.
To know if the apology email is needed, we need to calculate if the days that passed between the actualDeliveryDay and the expectedDeliveryDay are greater than the maxWaitingDays. To do this, we can use the function `between` from dw::core::Periods and the Period decomposition to get the specific amount of days.
To calculate the apologyDiscountStartDay we can use the function `atBeginningOfWeek`from dw::core::Dates over the actualDeliveryDay and add to it 8 days using the function `days` of dw::core::Periods.
Note that the function `atBeginningOfWeek` counts Sunday as the first day of the week, that is why we add eight days instead of seven, so the promotion starts on a Monday.
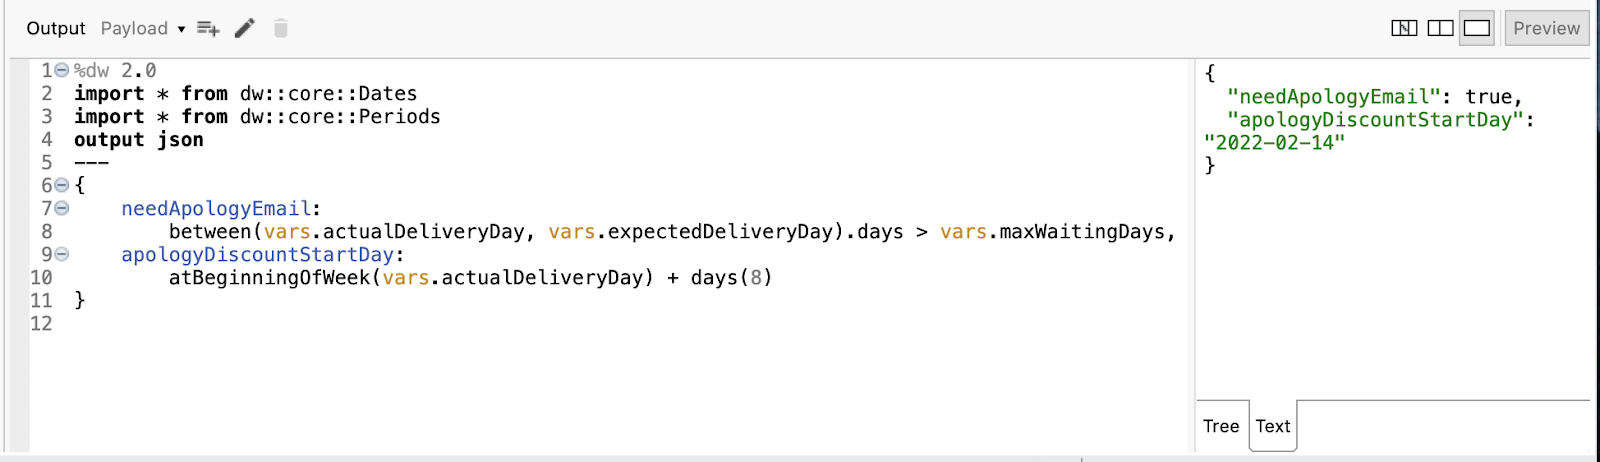
In this example, `vars.actualDeliveryDay` is `2022-02-11`, `vars.expectedDeliveryDay` is `2022-02-06`, so it passed dic days and the `vars.maxWaitingDays` is three, this meaning that the apology email is needed, and the start date of the discount would be `2022-02-14`.
After generating this data, we can use it in the integration to actually generate the email and apply the discount on the day generated by the DataWeave script.
Apply those functions easily in Studio
You can apply functions easily from Studio by using the “Apply Transformation”.
This is intended for simple mappings where your input and output have a similar structure. The metadata that works as constraints and guidelines for both input and output should be set (this is done automatically in most cases), and you can add sample data if you want to use the preview.
On a field of the output you can use the “Apply Transformation” and search your desired function using the `Browse functions`. The list of functions will contain only the functions that output the same type defined in the output metadata for that field. The function browser also shows the documentation for each function so you can choose the appropriate function.
Check this example where we want to transform the input field soldDate into the output field soldWeekDate, meaning the Date when the week of the sold Date started, for example to check if that week contained a promotion that needs to be applied.

Conclusion
Now you can start creating Dates and Periods with this alternative that you could find easier and search functions in Studio using the `Apply Transformation` for simple mappings.
If interested in learning more, check out the latest documentation about the dw::core::Dates module, dw::core::Periods module and the Dates and Period values documentation to see what else you can do with them.