You can connect to MuleSoft’s Virtual Private Cloud in multiple ways. IPsec tunnel is one of the ways you can connect an Anypoint Virtual Private Cloud (Anypoint VPC) to your private network. However, VPN setup can be challenging to many customers, this blog will walk you through the process of creating an IPsec tunnel between your on-premise data center and MuleSoft CloudHub in 10 simple steps.
Why you need a VPN?
- MuleSoft’s CloudHub is a multi-tenant integration platform in the Cloud. The Anypoint Virtual Private Cloud (VPC) allows you to create a virtual, private, and isolated network segment in the cloud to host your CloudHub workers. A VPC is a virtual software defined network in the cloud. To connect to your tenancy / access the data securely from your onprem you need a VPN connection between your on-prem and cloud.
- If you have secure data that you don’t want to transmit over the internet without encryption then you need an IPsec VPN.
- Connecting to your Anypoint VPC extends your corporate network and allows CloudHub workers to access resources behind your corporate firewall. An IPsecVPN tunnel allows you to access your resources over this secure tunnel using private IP’s
Network Setup
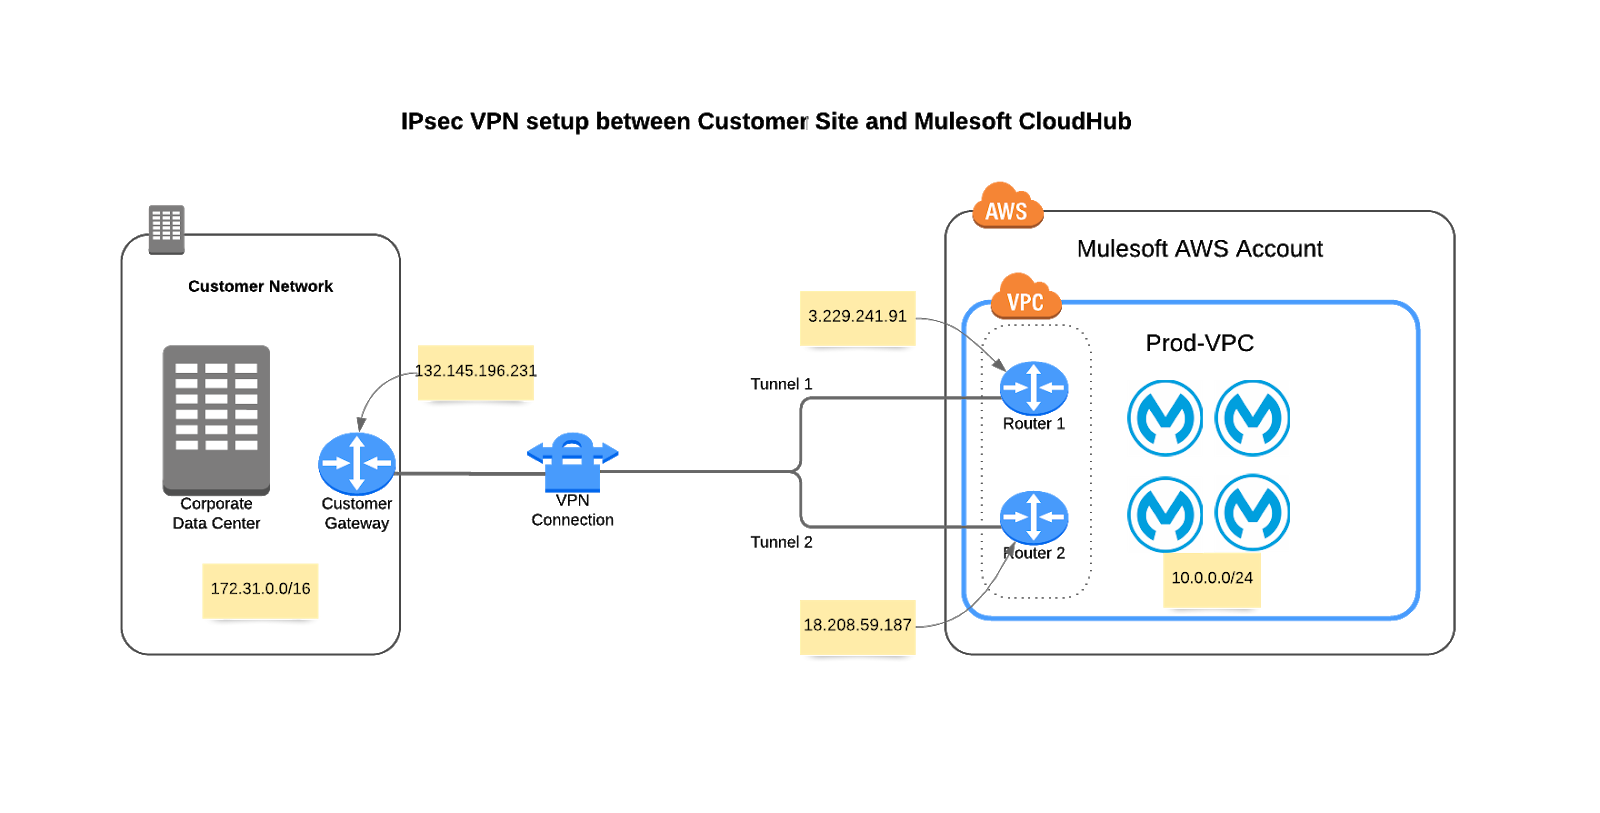
This diagram depicts the network setup we are going to implement. We are going to set up a VPN connection from Customer Data Center to the Anypoint VPC in the CloudHub.
Note: On the MuleSoft side, high availability is built into the Anypoint VPN as shown in this diagram with Router 1 and Router 2 each with its own public facing IPs and with respective tunnel 1 and tunnel 2. If the Customer also intends to build high availability into their VPN setup they would need to implement the VPN across at least two different customer gateways. This blog walks you through the process of setting up VPN with only one customer gateway.

Prerequisites
Please ensure you have the right access to the Anypoint Platform before you can create a VPN. More details on the prerequisites can be found in our documentation.
IPsec VPN setup process
Lets now walk through the steps to create a VPN:
Step 1: Sign into Anypoint Platform and select Runtime Manager.

Step 2: Select the environment where you want to create an Anypoint VPN.

Step 3: From the menu on the left, click VPNs, and then click Create VPN.

Step 4: Enter or select the following information for your Anypoint VPN.
- Name:
Enter a name for your Anypoint VPN. - VPC:
From the drop-down list, select the Virtual Private Cloud for the Anypoint VPN connection. - Remote IP Address:
Enter the public IP address of your VPN endpoint (Your customer gateway public IP). - Routing Type:
We chose static routing type, but if your device supports BGP, please select BGP routing as thats the preferred routing type. If you are planning to set up high availability for VPN’s with two customer gateways, BGP routing type will automatically fails over to the second VPN if the primary VPN link goes down. - Tunnel Configuration:
We selected automatic, but if you want to set your own shared secret key and define your own point to point CIDRs, you can select custom and input those values.
Step 5: Click “Create VPN.”
You cannot modify tunnel settings after you create the Anypoint VPN connection. To change the settings for an existing connection, you must delete the Anypoint VPN connection and create a new one.
The status of the VPN will change to “Pending” with Tunnel 1 and Tunnel 2 both in “Pending” state. This indicates that the VPN is being configured on the CloudHub side.

After about 10-15 minutes, the status will be still “Pending” but the Tunnel 1 and Tunnel 2 status will change to “DOWN.”

Step 6: Now select your VPN you just created to view the details and download the configuration file.

In the next screen download the configuration file.

Step 7: Download the configuration file.
This configuration files will be referenced to setup the VPN on the customer end.

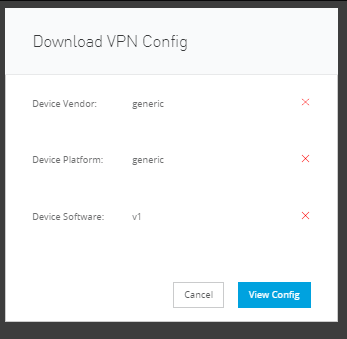
You have an option to select the configuration file based on your device type, either Cisco or a generic. Your Customer Gateway device vendor determines the option you select here. If it’s a Cisco device, select Cisco, or select generic for all other types of customer gateways
For this specific setup, we are going to select a “generic” device vendor because the customer gateway we are going to setup a VPN is not a Cisco device.

This downloaded VPN config file will have the IPsec Tunnel #1 and IPsec Tunnel #2 configuration information along with the pre-shared Key.
Step 8: Configure your VPN endpoint.
This step involves configuring the customer end-point, i.e., the customer gateway (VPN device). For this specific setup we are going to capture the required information from the downloaded configuration file.
The following information was used to configure the customer gateway:
 ike=aes128-sha1;modp1024
     phase2alg=aes128-sha1;modp1024
     encapsulation=no
     ikelifetime=28800s
     salifetime=3600s
Step 9: Initiate the VPN tunnel from the customer gateway.
This step involves initiating the tunnel from the customer end. This depends on the customer gateway.
A sample output from the device we tested will show the following output once the tunnels are established.
[KP@VPNDevice ~]$ sudo service ipsec status
Oct 07 00:37:58 : "mule-tunnel-2/1x0" #3: STATE_QUICK_I2: sent QI2, IPsec SA established tunnel mode {ESP=>0x2cda5143 <0x5eb6ba1f xfrm=AES_CBC_128-HMAC_SHA1_96 NATOA=none NATD=none DPD=passive}
Oct 07 00:37:58 : "mule-tunnel-1/1x0" #4: STATE_QUICK_I2: sent QI2, IPsec SA established tunnel mode {ESP=>0x2d4bc4aa <0xb9488361 xfrm=AES_CBC_128-HMAC_SHA1_96 NATOA=none NATD=none DPD=passive}
Hint: Some lines use ellipses, use -l to show in full.
Step 10: Verify the VPN connection status in the Anypoint platform console.
After the tunnel is successfully established you can verify the status in the Anypoint Runtime Manager console. The status should be “AVAILABLE” and Tunnel 1 and Tunnel 2 status should be “UP.” This completes the VPN setup process. You may have to add routes within your corporate network depending on the type of network you have

For more on how to use Anypoint Platform, check out some of our developer tutorials.


