
In secured properties files, you will want to insert information such as usernames, passwords, or other bits of information that you will want to reuse in multiple places in your project.
Security should be the top priority when preparing to deploy a Mule application. One of the best things you can do for security within your code is to encrypt your secured properties from unwanted attention.
Before we go further, if you’re new to Anypoint Code Builder, take a look at the Getting Started and Get Familiar with the Basics guides for more information.
Configure the secure properties file
First, let’s create the properties file with the plain values. Create a new dev.secure.properties file under src/main/resources and add the following properties:
example.username=myUsernameDev
example.password=myPasswordDev
Then, open your Mule configuration file (in my case it’s called global.xml) and add the Secure Properties Config snippet. This snippet already contains the basic configuration like the algorithm, the file, and the key properties.
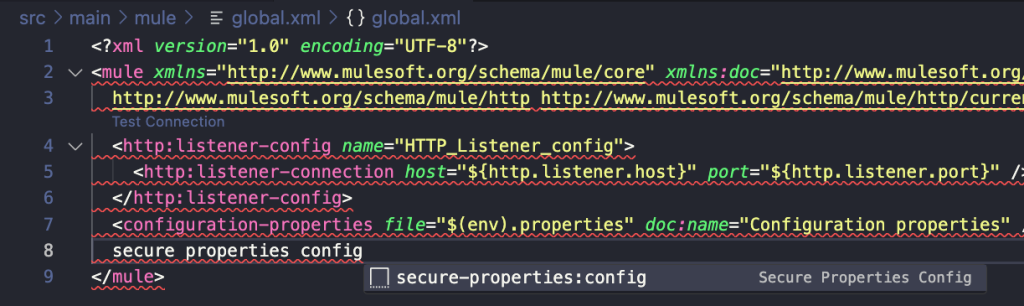
At the time this post was created, the latest ACB version was the one from the February 2024 release (Anypoint Extension Pack version 1.0.7). This means you still had to add the Global Element Configurations by hand, using the XML editor.
After you add it, make sure the file field matches the new file you created. In this case, it should be ${env}.secure.properties. You should end up with something like the following.

Now let’s see how to encrypt the values of the properties.
Encrypt your properties
There is an unofficial UI that you can use to encrypt your properties without having to download the JAR file. However, since this is not an official MuleSoft product, you won’t be able to create tickets or get support for it. You can use this method if it’s easier for you.
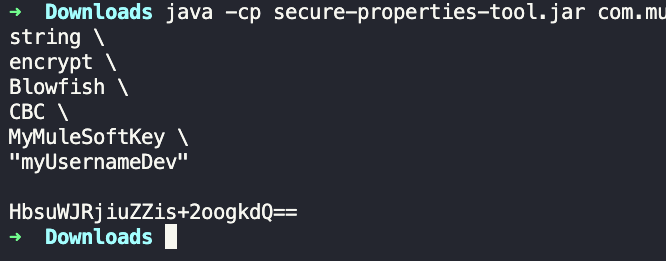
The usual method is to first download the Secure Properties Tool Jar file. Then, you can open a terminal or command line prompt in the directory where this JAR file is located and run the following command (just replace MyMuleSoftKey with your encryption key).
java -cp secure-properties-tool.jar com.mulesoft.tools.SecurePropertiesTool \
string \
encrypt \
Blowfish \
CBC \
MyMuleSoftKey \
“myUsernameDev”
As you can see, we are using the Blowfish algorithm like we had set up in our Global Element Configuration. After you run the command, you should see the encrypted value being returned.
After you get the encrypted value, you need to add the following syntax in the properties files:
![encryptedValue]
If your encrypted value was abc, then your property should now be ![abc]. Repeat for each property. You should end up with something like the following.
example.username=![HbsuWJRjiuZZis+2oogkdQ==]
example.password=![zhoritn2db6oII22158LPQ==]
After you encrypt your properties, now we can learn how to read them.
Read the encrypted properties
The syntax to read encrypted/secure properties is the same as you’d do for a regular property, but adding a secure:: prefix. For example, if your regular property was ${username}, then an encrypted property should be ${secure::username}.
You can add a logger to read the Username secured property we had set up like this:
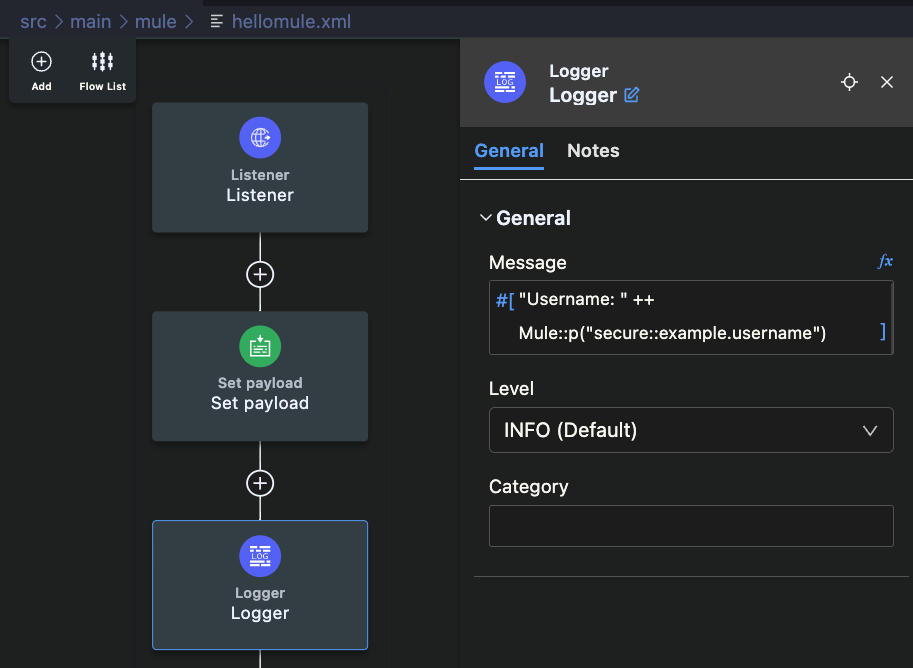
You can repeat the same to log the second property, the example.password.
Once you’re ready to run this locally, make sure you add the encryption key property at runtime. To do this from ACB, you have to first go to the ACB sidebar (by clicking on the MuleSoft button in the activity bar on the left of the screen) and select the settings button located right over Max’s picture.

Once you open the settings, head to the Runtime: Default Arguments setting and add the following at the end of the line:
-M-Dencryption.key=MyMuleSoftKey -M-Denv=dev
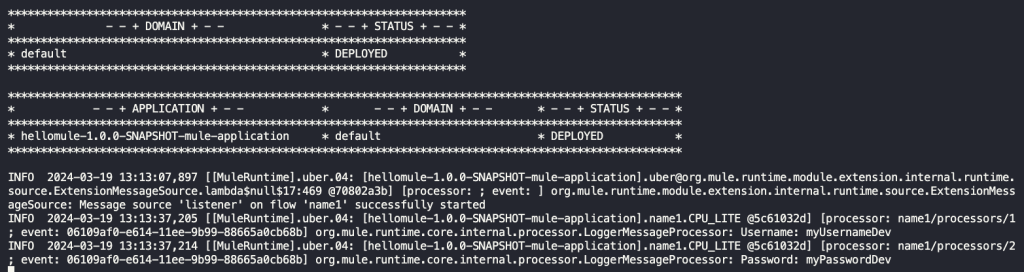
This will pass the encryption.key property to decrypt the secured values and the env property to take the appropriate properties file. Make sure the encryption key matches the one you used to encrypt the values. Remember to never hardcode this value into your code. After you do this, you can run your Mule application and verify it’s working as expected.

Once you’ve verified the values are being read correctly, now we can see how to secure our properties for deployment.
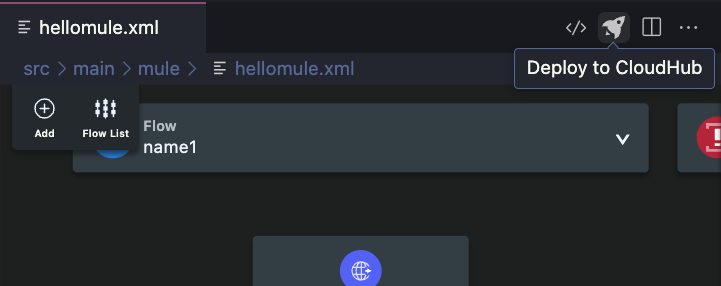
Deploy to CloudHub from ACB
Stop your application and start the deployment using the Deploy to CloudHub button.
If you haven’t signed into your Anypoint Platform account, you will need to sign in. Once you have, a new deploy.json file will be created under your src/main/resources folder. Before deploying, add the env property with its value in this file, as demonstrated below.

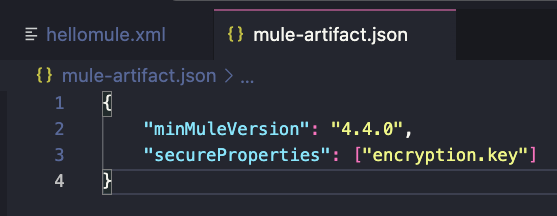
Note that we are not adding the encryption key in this file. We do not want to hardcode our key in our Mule application. Instead, you can open the mule-artifact.json file located in the root folder of your project and add the encryption.key property here.
After that, you can click on the Deploy to CloudHub button once more. Now you will see a new prompt asking you to write the encryption key manually so it’s deployed to your CloudHub application, without having to hardcode it in your actual code.

Meanwhile, the env property was able to be sent to CloudHub with the hardcoded value we had set up in the deploy.json file. You can hardcode regular properties in that file, but leave the secured ones for the mule-artifact.json file instead.
Encrypted, secured, delivered
Congratulations! You learned how to encrypt and secure your properties in Anypoint Code Builder.
At the time of writing, Anypoint Code Builder’s February 2024 release was the latest available version. A few things might have changed if there are new releases available now. But remember, we can’t compare Anypoint Studio to ACB just yet. Studio has had years of development and releases to make it what it is today.
The ACB team keeps gathering feedback to improve this tool in future releases. In mid-2024, there will be some new updates, so keep your eyes peeled for even more improvements!
Check out the following resources to learn more about Anypoint Code Builder: