Every so often, while using Studio, I come across clever little gems that our team thoughtfully inserted into the product to improve usability. These gems don’t get a lot of fanfare, nor do they often warrant much attention on their own, but put together, they make for a smoother, intuitive user experience. Nearly invisible, they have become nearly indispensable to me.
#1 Wrap in and Extract to
Building along, building along, then all of a sudden I decide to cache part of a flow. I could drag a cache scope onto the canvas, then drag message processors inside its boundaries. Or, I could Command+click to select a few message processors on my canvas, then right-click to select Wrap in > Cache. Done. Similarly, if I wanted to just extract those message processors to a new, separate flow or sub flow, it’s right-click to select Extract to > Flow. Oh, right-click! Is there anything you can’t do?
#2 Distraction-free modeling
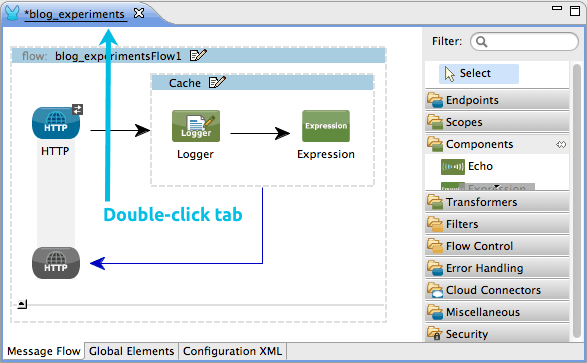
Want to get rid of the background noise and build your flows on a big, blank canvas? As an Eclipse-based IDE, take advantage of this OOTB feature: double-click the tab of your Studio project to minimize the other windows in Studio and maximize the canvas space. Double-click the tab again to resurface all the other windows.
#3 Insta-docs!
Let’s say you built an app in Studio and it is good. It’s elegant, it’s efficient, and it works like a charm. Everyone wants to see what you’ve done, and you want to show off your mad skillz. Rather than projecting Studio onto the meeting room wall, then trying to slide horizontally and vertically around the canvas, describing the different pieces verbally, you can instantly create much more presentable, and digestible, documentation that describes your project. From the File menu, select Export Studio Documentation to auto-generate an index.html file (and its attendant files) that contains all your flows, your XML and any content you added to the Documentation tab in each message processor. The layout of this documentation is designed to be presented to an audience, even if you’re not there to walk them through it.
#4 Print canvas
…and for your presentation, you can also print out your canvas to that your audience can reference the complete flow(s) as they are graphically rendered in Studio. From the File menu, select Export diagram to…, save the PNG and create hard or soft copies that display your app’s flow(s) as pretty graphics.
#5 Tweak it
There will always be little things that could use adjusting. Maybe you prefer an XML line width of 65 instead of the default 72; maybe you want to change the default target namespace; maybe you find red text *really* distracting and want to change the error message text color from red to a less-alarming shade of mauve. Whatever the tweak, use MuleStudio Preferences. (MuleStudio > Preferences, or Command+,)
#6 Add libraries
Ever find that you need to add user libraries? There’s a wizard for that. Right-click your project’s name, then select Build Path > Add Libraries… then answer all the wizard’s questions to add your library. Want to get rid of an old one? Right-click your project’s name, then select Build Path > Configure Build Path… Click the Libraries tab, then just select the one you want to pitch and click the Remove button. Gone! (Full details.)
#7 Meddle with reality
Using Studio’s Visual Debugger yet? Stay tuned for a blog post that highlights the best parts of Debugger for a trove of useful tips on how to use it. Meanwhile, I’ll just call out one little gem: changing the payload of a message at a breakpoint. Let’s say you’ve applied a bunch of breakpoints to your application so that when running in debug mode you can check on the payload of a message as it reaches and passes through each breakpoint. That might help you understand any potential weak points in the app, but what if you want to see what happens if you change just one little part of the payload? With debugger, you can do it! With your application running in debug mode, access one of the breakpoints, then click the little “X=Y=?” icon, which is the Expression Evaluator. In the yellow box that pops up, enter an expression to change the payload, then press enter. Click the Next Processor icon (or F6) to move forward to the next breakpoint, and note that your payload value in the message pane has changed.
#8 Set an Exception Strategy as Default
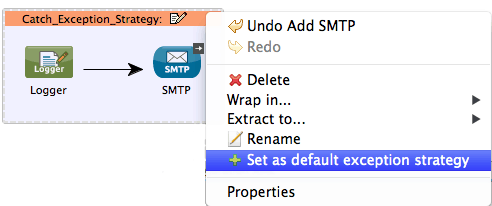
Though Studio automatically handles all exceptions with its default exception strategy, you can create your own custom global exception strategy, then make it the default for your application. Create a global exception strategy by first dragging an Exception Strategy onto your canvas outside and below all flows, then filling it with message processors to handle your exceptions. Then right-click the title bar of the exception strategy and select Set as default exception strategy. (Check the XML; there’s a new configuration global element sitting above all your flows referencing your global exception strategy as the application’s default.)
#9 Create a POM for your new project
If you know, or suspect, that at some point you’ll need to export your Studio project and continue building or modifying it with Maven, then you better start with a pom. If you normally click through wizards without reading anything (uh… isn’t that everyone?) then you might have missed it: on the third screen of the New Project wizard in Studio, there’s a checkbox labeled “Create POM file for project and maintain with Maven”. Check that. Now you get a POM to go with your project.
#10 What have I done?
If you’ve been playing around with your instance of Studio and have added a bunch of Mule extensions, runtimes, or plugins, you might find yourself wondering, “what the heck have I got installed here?” Or maybe that’s just me. Anyway, if you want to take a look, navigate to MuleStudio > Preferences, then click to select Install/Update. From there, click the link that reads Uninstall or update software that is already installed. Studio displays it all: Installed Software, Features, Plugins, Installation History. Full details.)
Those are my favs. Got some of your own to share? Add a comment below. Happy right-clicking!


