As you probably know, Mule provides pretty good support for PGP encryption (check the related links for further info on Mule’s PGP support). What we’re going to do in this blog post is provide a step-by-step, real life use case for PGP encryption. We’ll take a ride all the way from key generation to Mule configuration.
Before we begin
If you’re not familiar with PGP and its public/private key approach, you may want to visit this site first.
The Mission
Generate a confidential payload (details on what this is and how to do it is beyond the scope of this article), encrypt it using PGP and deliver it to an FTP site. In this case, the FTP owner (from now on “the receiver”) shared his public PGP key in ascii format.
Step 1: Become Lord of the KeyRing
Mule’s PGP manager requires two separate binary key rings, one for public keys and another one for private keys. As you probably noticed, the receiver provided his public key in ascii mode. So, the first task here is to create a binary key ring that holds the receiver’s public key. The easiest way to do so is to use a key management application such as GPG Key Chain, a free utility from GPG tools. First, we’re going to import the ascii key into our keyring as shown here: After importing the key, you need to click the export button and select binary as the output format:
The result will be a key ring file with gpg extension.
The next step is to generate your own pair of keys.
Although a tool like GPG Key Chain is perfectly capable of generating a key pair, I prefer doing so through the command line executing this command on your shell:
This command will ask you a series of standard questions such as your real name, your address and even a passphrase that will make your key stronger. The most important question of all is how many bits you want your key to have. The more bits, the stronger the key. However, be mindful of this value. At the end of the day, this key is going to be used by a Java application with a security policy that limits how big can a key get. This is better explained in this blog post, but the important thing is that you have to be mindful of how different key sizes will impact in your development, QA and production environments.
When this operation is finished, the key generation tool will have added your brand new public key to a system wide PUBLIC key ring and your private key to a parallel system wide PRIVATE key ring. Remember that what we’re trying to achieve here is to encrypt a Mule message and to do that, we need to have the receiver’s public key (we received that and used a graphic tool to make it a binary key ring) and our very own private key ring (which we just generated). So, to finish the key handling part and move straight into the Mule code, you need to grab the two key rings and place them on your project’s classpath.
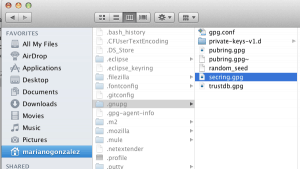
You know where the public key ring is because you just generated it. Locating the private one can be a little tricky. In *NIX systems or in OS-X it will most likely be stored in a hidden folder in your home folder. In Windows, it depends on configuration. Check your system to find out where to look for it; the following image shows you where to find it on the Mac:

Step 2: Give The Mule a Ride
Now it’s time to configure Mule! First, let’s add dependencies into our pom.xml
Then, declare a Spring Bean that acts as a key manager:
All the properties here are pretty obvious except for the alias id. This alias refers to the private key ring and will allow us to select from the many keys that can be stored there. You can obtain that id by:
- Using a tool such as GPG KeyChain (it will show you each key’s id in HEX format; you then have to convert that number to Decimal format)
- Putting a ridiculous number such as 1 and trying it out. It will throw an exception saying that there’s no such key id and will list the available ids in decimal format. Then it’s just a matter of picking the right one. Brute force I know, but hey, it’s quick and easy if you only have a few keys!
Next, we need to configure a credential accessor, which is a simple class that will provide the credentials the receiver used to generate his key. Just as the alias id helped us browse our private key ring, these credentials are necessary to surf the receivers public key ring. The credentials accessor is nothing but a simple class that extends org.mule.api.security.CredentialsAccessor. In my case, I coded a simple implementation that receives the credential on the constructor via Spring.
The accessor implementation:
And its configuration:
We then wire everything together in a security manager:
We’re almost there…now all we need to do is set up the flow that will perform the encryption and generate the file on the FTP:
Let’s go through this flow step by step:
- First, we call the pgp transformer to encrypt.
- Then we call the object to string transformer. This is because the pgp transformer replaces the payload for a lazy proxy that uses bouncy castle’s library to encrypt using streaming, allowing for better scalability when handling large files. This transformer will make sure that all the encryption is finalized and ready to upload.
- Finally, we use the ftp transport to upload the file.
And that’s it. Mission accomplished! We even learned a few things about PGP along the way! I hope you find this useful, and feel free to reach out if you have any questions.


