On my previous 3-part blog, I showed how Mule ESB can be used to service-enable and orchestrate traditional on-premise technologies like an Oracle database and IBM Websphere MQ. Using Mule ESB, we created a service that accessed employee information from an Oracle database table and transmitted this to IBM WebSphere MQ. An observant customer I was showing this to noticed a security flaw with how sensitive employee information was being transmitted in plain text and also asked how the employee record can be sent to SalesForce.com. This blog will show how these can be easily addressed using MuleSoft’s AnyPoint Platform. We’ll make use of the PGP encryption features from AnyPoint Enterprise Security to encrypt the data before sending it to WebSphere MQ. Then, we’ll create another message flow to retrieve this message, decrypt it and send it to SalesForce.com using the AnyPoint Connector for SalesForce.com.
Part 1: PGP Encryption with AnyPoint Enterprise Security
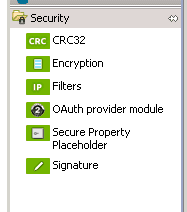
First thing we’ll need to do is install the AnyPoint Enterprise Security module in Mule Studio by following the instructions here. After applying this update, you should see the security modules in your palette.
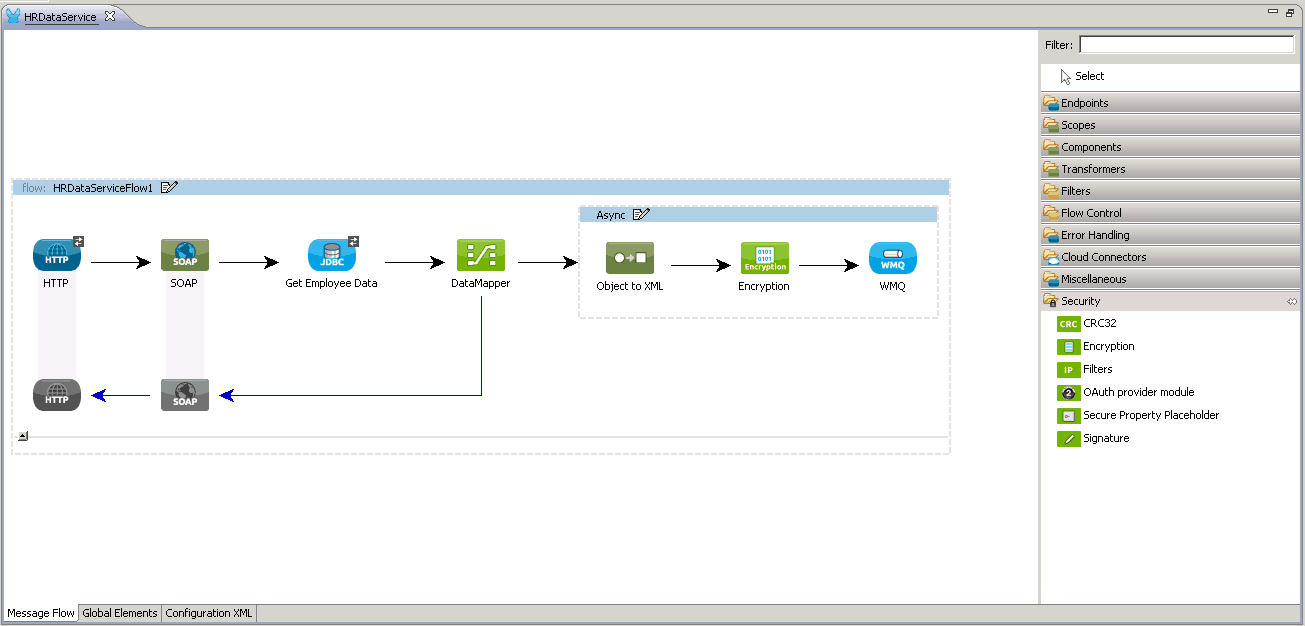
If you recall from my previous blog, the employee information was transmitted to WebSphere MQ in XML with plain text which we will now encrypt using PGP encryption.
In your flow, add the Encryption module from the Security group just before the WMQ endpoint.
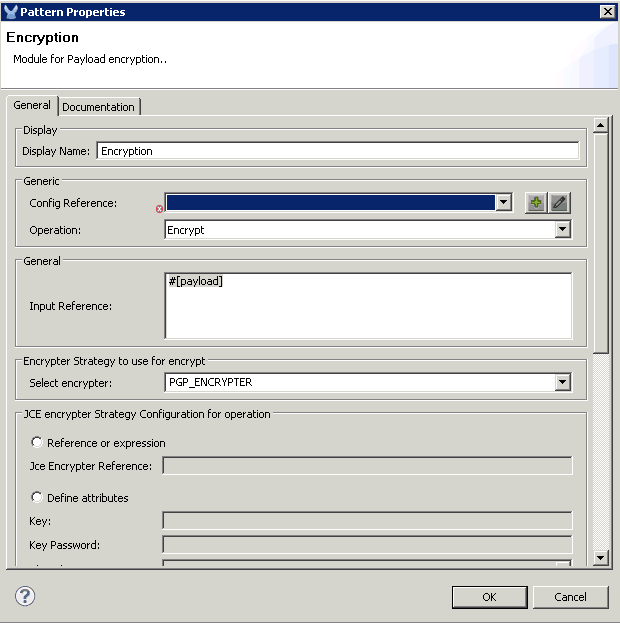
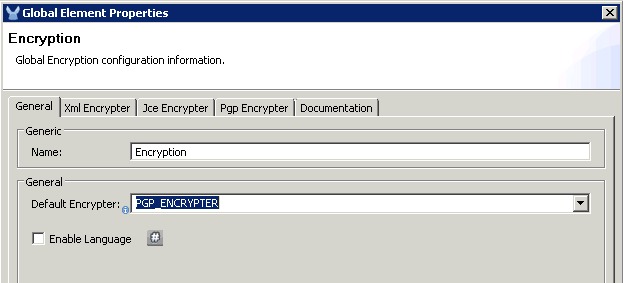
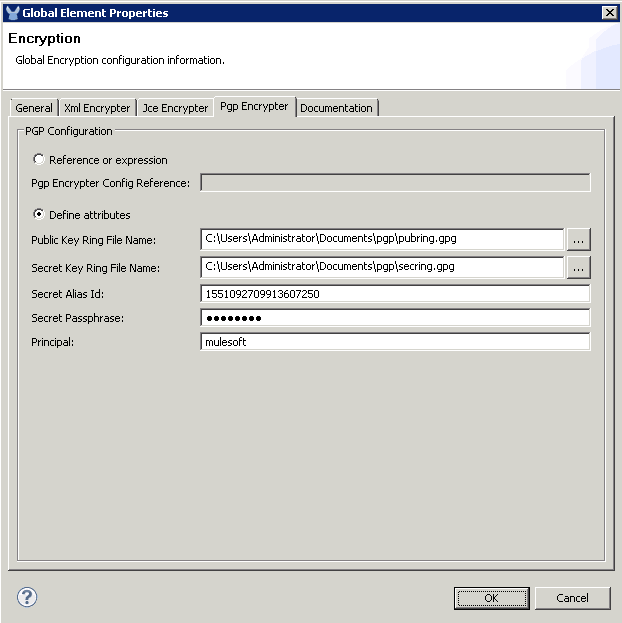
Click the Config Reference + icon to add a Global Encryption configuration and set it to use the PGP_ENCRYPTER.
Click the Pgp Encrypter tag and define the attributes. You can download my pubring.gpg and secring.gpg files and use these for the Public Key Ring File Name and Secret Key Ring File Name. If you choose to do this, set the following:
Set the Secret Alias Id to: 1551092709913607250
Set the Secret Passphrase to: mulesoft
Set the Principal to: mulesoft.
If you prefer to generate your own keys, you can use the gpg command-line utility which is available in Linux operating systems, as part of the GPG Keychain Access tool for Mac OS, or for Gpg4win for Windows. This screenshot shows how my keys were generated using the gpg command from a Mac OS. Note that the pubring.gpg and secring.gpg key files will be created in a hidden directory called .gnupg under the user home directory. For Windows, this will be in C:/Users/myuser/AppData/Roaming/gnupg directory.
The Principal will be the USER-ID which is a combination of the Real Name,Email Address and Comment in the format: Real Name (Comment) <Email Address>. To keep it simple, you can just use choose a simple Real Name and leave Email and Comment blank. In my example, I simply set the Real Name to mulesoft. I also set the Secret Passphrase to mulesoft.
Determining the numeric value for the Secret Alias Id is not obvious. The GPG utility does not show this numeric value. The best way to derive this is by letting Mule give you some clues. Put any random number initially for the Secret Alias Id and run it to let Mule throw an error on purpose. In the exception thrown from the Console output, you will see a message showing the keys you can use. (Thanks to this blog from Mariano Gonzales for these tips).
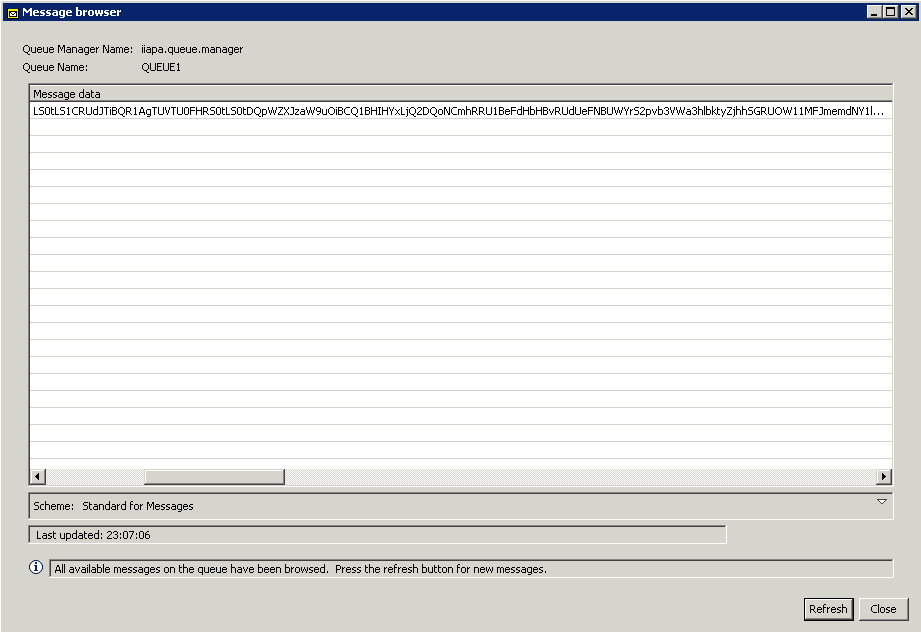
Save the flow. Clear the queue and run the flow again using SOAP UI the same way we tested from my previous 3-part blog. Now the data in the queue is encrypted as shown:
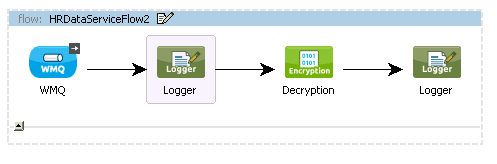
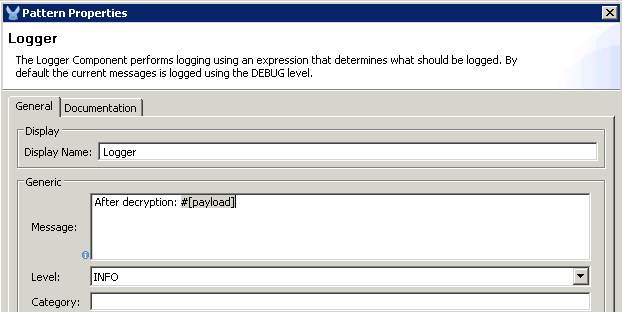
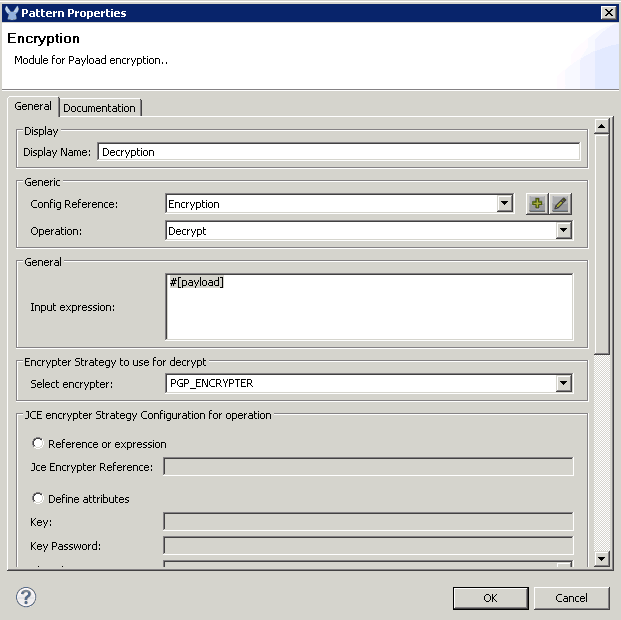
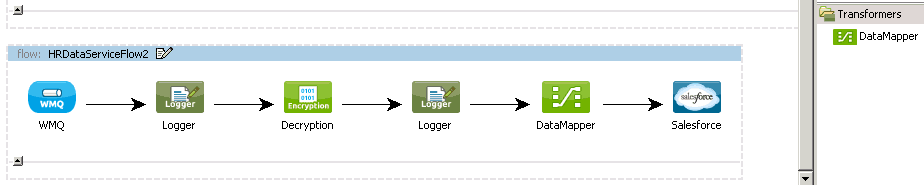
Let’s add a new flow that consumes the message from the queue and decrypts it. Drag the WMQ Endpoint under the previous flow to create a new one. Add an Encryption module (rename it to Decryption) to decrypt the message. Let’s also add a couple of Logger components to log the payload before and after the decryption.
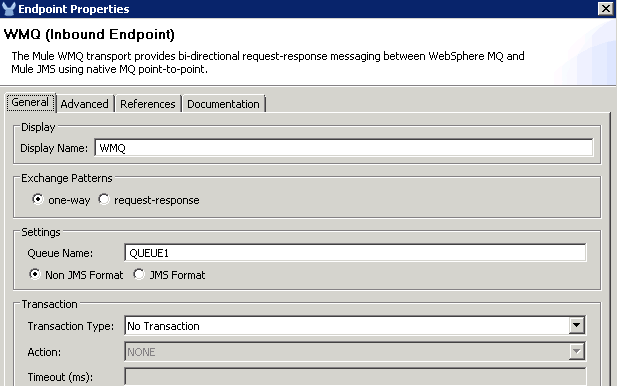
For the WMQ endpoint, use the same queue name (QUEUE1) and WMQ connector used in the previous flow’s WMQ endpoint.
Log the message Before decryption: #[payload] on the first Logger and “After decryption: #[payload]” on the second Logger.
Use the same Encryption Global Element and PGP_ENCRYPTER for the Encryption component, but this time, choose the Decrypt operation:
Save it and Run the Flow as a Mule Application (if it is not yet running). The flow should immediately pick up the encrypted message from the queue and then decrypt it. The console should show the log messages:
Part 2: SalesForce.com integration with the AnyPoint Connector for SalesForce
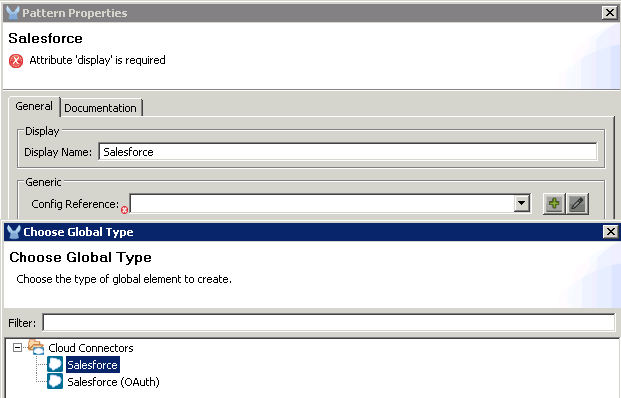
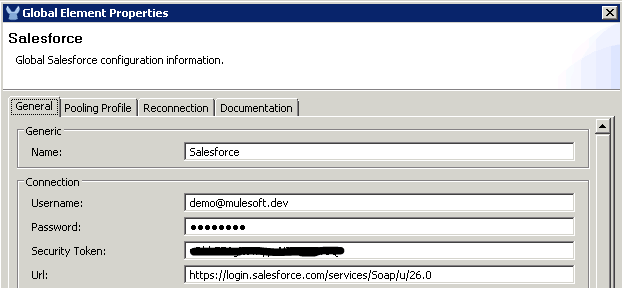
Add a Salesforce Global Element in the Config Reference.
You should have a SalesForce.com developer account with a Security Token. You can follow the instructions for registration and getting your security token here. Add your SalesForce.com username, password and security token in the Sales Force connection configuration.
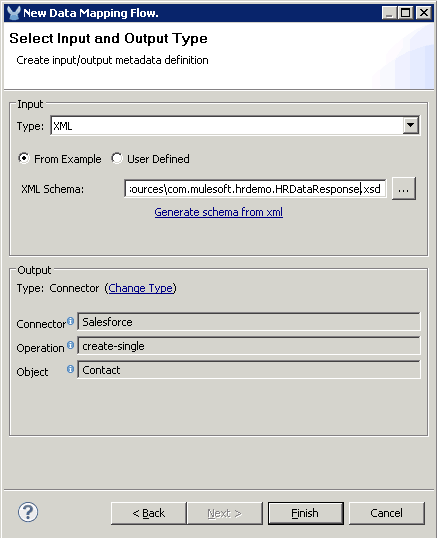
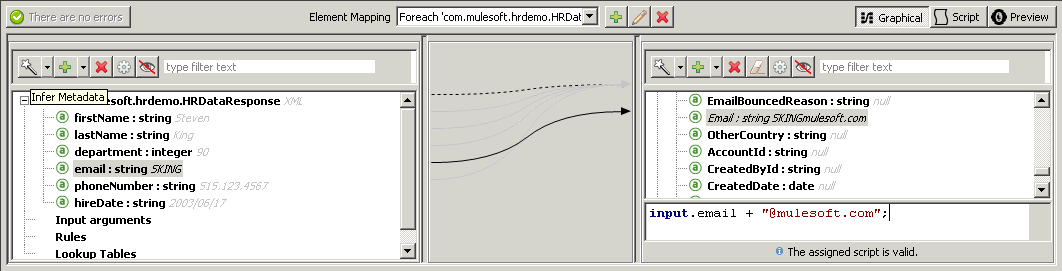
Choose the Create single operation and the Contact sObject Type. Set the sObject Field Mappings to From Message: #[payload] as shown:
Notice that the Output has been automatically identified for the Salesforce Contact object thanks to Data Sense.
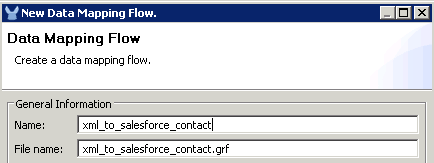
For the Input, choose XML. You can either use the XML you got from the Logger output to generate your XML schema by saving it in a file then clicking the Generate schema from xml link. Or, you can download the generated XSD from here.
Most of the fields should be automatically mapped. Just add a mapping from phoneNumber to Phone.
Also append + “@mulesoft.com”; to the email mapping as shown below since the data only has the email alias.
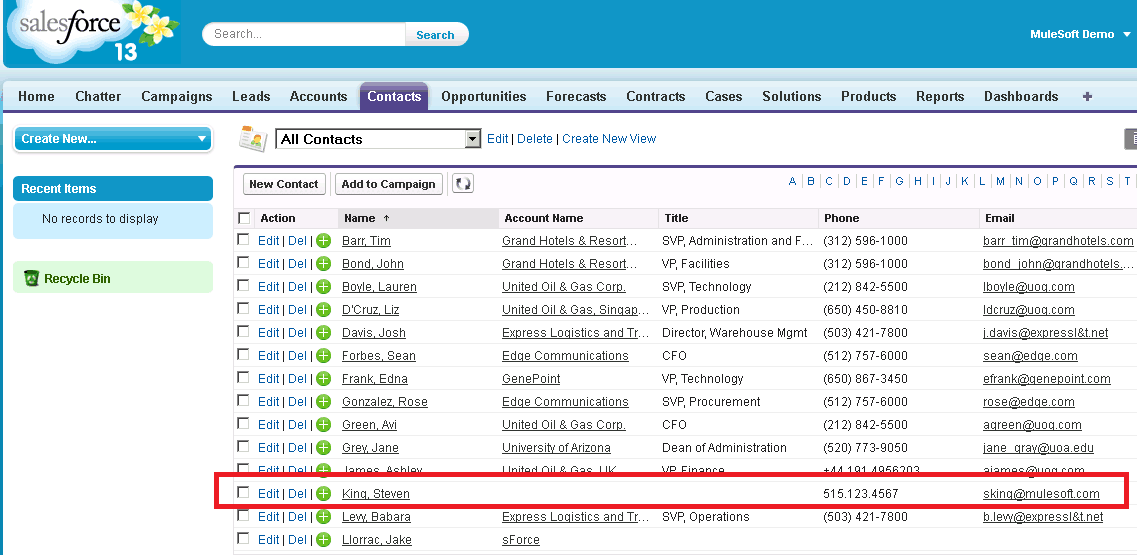
Save it and run the test again using SOAP UI (same test from the previous 3-part blog). You should now see Steven King as a contact in SalesForce.com.
Summary
Using MuleSoft’s AnyPoint Enterprise Security, we are able to easily utilize encryption and decryption modules using industry standard approaches such as PGP to ensure that messages are protected as it gets transmitted across systems. Using MuleSoft’s AnyPoint Connectors and Data Mapper, we are able to easily transform and send the employee information to SaaS applications such as SalesForce.com. For more on MuleSoft’s AnyPoint Platform, check out: http://www.mulesoft.com/enterprise-integration-platform.
Have you already tried the Visual Flow Debugger? It’s one of the new shiny features that comes with Mule Studio Enterprise 3.4. Well, if you haven’t used it yet, this post is for you:
1. Message Browsing – All the information you ever wanted, now at a click’s distance.
Before Visual Debugger, if you wanted to see the contents of the payload at each point you had to clutter your mule configuration with loggers all over the place, well, those days are over. Just put in a breakpoint et voilà!
You can also edit most values dynamically at runtime by clicking them.
Note: Be careful, what you put in there is not a string, but a Mule expression. Therefore string literals go with quotes (e.g. “a string”)
Tip: If you are looking for the complete message, it’s located in the Variables tab (on the right side). The things we show on the left are the most commonly used elements, the payload and some IDs.
2. Exception breakpoints – Stop browsing huge logs to find the error source.
This functionality is enabled by default, so that when you run in debug mode and there’s an exception somewhere in your flow, it will stop processing at the exception. Studio highlights the stopping point with a red, dotted line.
Before:
After:
3. Conditional breakpoints – Are you picky? Then today’s your lucky day.
Suppose, for example, that you want to isolate one specific case in a really big set. What do you do? Put another Choice component in your flow just to separate it? No way, just apply a conditional breakpoint! Set it with whatever Mule expression you want evaluated and if it evaluates to true, flow execution stops there.
4. Expression evaluation These come in two flavors:
Non eco-friendly (popup): Just use and dispose. Open it, evaluate, click somewhere else and they’re gone. Really simple, right? (My personal favorite) Tip: Use the popup shortcut and navigate with the arrow keys
Collector’s edition: add your expressions to the Mule Expressions pane so that Studio re-evaluates them at each step.
Save time and reduce frustration: give Debugger a try, by downloading Mule Studio.
Every so often, while using Studio, I come across clever little gems that our team thoughtfully inserted into the product to improve usability. These gems don’t get a lot of fanfare, nor do they often warrant much attention on their own, but put together, they make for a smoother, intuitive user experience. Nearly invisible, they have become nearly indispensable to me.
#1 Wrap in and Extract to
Building along, building along, then all of a sudden I decide to cache part of a flow. I could drag a cache scope onto the canvas, then drag message processors inside its boundaries. Or, I could Command+click to select a few message processors on my canvas, then right-click to select Wrap in > Cache. Done. Similarly, if I wanted to just extract those message processors to a new, separate flow or sub flow, it’s right-click to select Extract to > Flow. Oh, right-click! Is there anything you can’t do?
#2 Distraction-free modeling
Want to get rid of the background noise and build your flows on a big, blank canvas? As an Eclipse-based IDE, take advantage of this OOTB feature: double-click the tab of your Studio project to minimize the other windows in Studio and maximize the canvas space. Double-click the tab again to resurface all the other windows.
#3 Insta-docs!
Let’s say you built an app in Studio and it is good. It’s elegant, it’s efficient, and it works like a charm. Everyone wants to see what you’ve done, and you want to show off your mad skillz. Rather than projecting Studio onto the meeting room wall, then trying to slide horizontally and vertically around the canvas, describing the different pieces verbally, you can instantly create much more presentable, and digestible, documentation that describes your project. From the File menu, select Export Studio Documentation to auto-generate an index.html file (and its attendant files) that contains all your flows, your XML and any content you added to the Documentation tab in each message processor. The layout of this documentation is designed to be presented to an audience, even if you’re not there to walk them through it.
#4 Print canvas
…and for your presentation, you can also print out your canvas to that your audience can reference the complete flow(s) as they are graphically rendered in Studio. From the File menu, select Export diagram to…, save the PNG and create hard or soft copies that display your app’s flow(s) as pretty graphics.
#5 Tweak it
There will always be little things that could use adjusting. Maybe you prefer an XML line width of 65 instead of the default 72; maybe you want to change the default target namespace; maybe you find red text *really* distracting and want to change the error message text color from red to a less-alarming shade of mauve. Whatever the tweak, use MuleStudio Preferences. (MuleStudio > Preferences, or Command+,)
#6 Add libraries
Ever find that you need to add user libraries? There’s a wizard for that. Right-click your project’s name, then select Build Path > Add Libraries… then answer all the wizard’s questions to add your library. Want to get rid of an old one? Right-click your project’s name, then select Build Path > Configure Build Path… Click the Libraries tab, then just select the one you want to pitch and click the Remove button. Gone! (Full details.)
#7 Meddle with reality
Using Studio’s Visual Debugger yet? Stay tuned for a blog post that highlights the best parts of Debugger for a trove of useful tips on how to use it. Meanwhile, I’ll just call out one little gem: changing the payload of a message at a breakpoint. Let’s say you’ve applied a bunch of breakpoints to your application so that when running in debug mode you can check on the payload of a message as it reaches and passes through each breakpoint. That might help you understand any potential weak points in the app, but what if you want to see what happens if you change just one little part of the payload? With debugger, you can do it! With your application running in debug mode, access one of the breakpoints, then click the little “X=Y=?” icon, which is the Expression Evaluator. In the yellow box that pops up, enter an expression to change the payload, then press enter. Click the Next Processor icon (or F6) to move forward to the next breakpoint, and note that your payload value in the message pane has changed.
#8 Set an Exception Strategy as Default
Though Studio automatically handles all exceptions with its default exception strategy, you can create your own custom global exception strategy, then make it the default for your application. Create a global exception strategy by first dragging an Exception Strategy onto your canvas outside and below all flows, then filling it with message processors to handle your exceptions. Then right-click the title bar of the exception strategy and select Set as default exception strategy. (Check the XML; there’s a new configuration global element sitting above all your flows referencing your global exception strategy as the application’s default.)
#9 Create a POM for your new project
If you know, or suspect, that at some point you’ll need to export your Studio project and continue building or modifying it with Maven, then you better start with a pom. If you normally click through wizards without reading anything (uh… isn’t that everyone?) then you might have missed it: on the third screen of the New Project wizard in Studio, there’s a checkbox labeled “Create POM file for project and maintain with Maven”. Check that. Now you get a POM to go with your project.
#10 What have I done?
If you’ve been playing around with your instance of Studio and have added a bunch of Mule extensions, runtimes, or plugins, you might find yourself wondering, “what the heck have I got installed here?” Or maybe that’s just me. Anyway, if you want to take a look, navigate to MuleStudio > Preferences, then click to select Install/Update. From there, click the link that reads Uninstall or update software that is already installed. Studio displays it all: Installed Software, Features, Plugins, Installation History. Full details.)
Those are my favs. Got some of your own to share? Add a comment below. Happy right-clicking!
Security is an ever-present concern for IT. It can be a rather daunting area when one considers all of the different possible dangers and the large variety of solutions to address them. But, the aim of Enterprise Security really just boils down to establishing and maintaining various levels of access control. Mule itself has always facilitated secure message processing both at the level of the transport, the service layer and of the message . Mule configurations can include all that Spring Security has to offer giving, for example, easy access to an LDAP server for authentication and authorisation. On top of that Mule Applications can apply WS-Security thus facilitating, for example, the validation of incoming SAML messages. But in this post, rather than delve into all the details of the very extensive security feature set , I would rather approach the subject by considering the primary concerns that drive the need for security in a Service Oriented Architecture, how the industry as a whole has addressed those concerns, the consequent emergence of popular technologies based on this Industrial best practice and finally, the implementation of these technologies in Mule.
Primary Concerns
Integrity
This is all about knowing who sent the Message. Securing our IT resources is a matter of deciding who gets access to them and of course, entering into the realms of Authorisation, to what extent each person or system should have access to them. A Message (which is also akin to a service invocation) must be determined to be authentic in order for the Server to accept it and process it. It’s authentic if the Server recognises the Client as a valid user of the service. Now such recognition is usually achieved by some sort of Credentials accompanying the Message. However, verifying which Client sent the Message does not guarantee the Integrity of the Message: it may have been modified by some unfriendly third party during transit! Message Integrity, which includes Authentication, guarantees that the Message the Server received is exactly the one that was sent by the known Client.
Confidentiality
It is all very well for the Server to rest assured with the Integrity of a Message sent by a known Client, but the journey from Client to Server may have been witnessed by some unwelcome spies who got to see all of those potentially very private details inside the Message! Thus, it is necessary to hide those details from the point of delivery by the Client to the reception by the Server. An agreement is needed between the Client and Server in order to be able to hide the details of the Message in a way that allows only the Server to uncover them and vice versa.
Response of the Industry
Token based Credentials
The common practice of sending Username / Password pairs with Messages is not recomendable from two perspectives:
Passwords have a level of predictability whereas the ideal is to maximise on randomness or entropy. Username / Password pairs are a low entropy form of authentication.
Also, the maintenance of Passwords is a pain! If you need to change a password then you immediately affect all Clients that make use of that password. Until each of these has been reconfigured you have broken communication with them. As a consequence there is no way you can block access to one Client in particular without blocking all the Clients that use the same password.
A much better alternative exists in the form of high entropy Tokens which represent a more secure form of Authentication and, as we’ll see, Authorisation. The idea is for the Server to issue tokens based on an initial authentication request with Username / Password credentials. From then on the Client only has to send the token, so the net result is a great reduction in Username / Password credentials going to and fro on the network. Also, Tokens usually are issued with an expiration period and can even be revoked. Furthermore, because they are issued uniquely to each Client, when you choose to revoke a particular Token or if it expires, none of the other Clients will suffer any consequences.
Digital Signing
We humans sign all kinds of documents when it matters in the civil, legal and even personal transactions in which we partake. It is a mechanism we use to establish the authenticity of the transaction. The digitial world mimics this with its use of Digital Signatures. The idea is for the Client to produce a signature by using some algorithm and a secret code. The Server should apply the same algorithm with a secret code to produce its own signature and compare the incoming signature against this. If the two match, the Server has effectively completed Authentication by guaranteeing not only that this Message was sent by a known Client (only a known Client could have produced a recognisable signature), but that it has maintained its integrity because it was not modified by a third party while in transit. As an added benefit for when it matters with third party Clients, the mechanism also brings Non-repudiation into the equation because the Client cannot claim not to have sent the signed Message.
Public Key Cryptography
The age old practice of Cryptography has made a science of the art of hiding things! IT has adopted this science and can produce an Encryption of the message which is practically impossible to decrypt without a corresponding key to do so. It is as if the Client had the ability to lock a Message inside some imaginary box with a special key, hiding it from prying eyes, until the Server unlocks the box with its own special key. The Digital Signing discussed above produces signatures in this very way. Cryptography comes in two forms: Symmetric, when both Client and Server share the same key to encrypt and decrypt the Message; and Asymmetric, when the Server issues a public key to the Client allowing the Client to encrypt the Message, but keeps a private key which is the only one that can decrypt the Message: one key to lock the Message and another key to unlock it!
Defacto Standard Implementations
HTTPS
This is a rock solid standard protocol that implements at the level of the transport both Integrity and Confidentiality at the same time. Public Keys are emitted on Certificates which have been digitally signed by independant and trusted Certificate Authorities, thus guaranteeing that the public key was issued by the Server. Once the initial handshake has been completed by the exchange of Messages using public and private keys, the communication switches to the more efficient symmetric form using a shared key generated just for the duration of the communication, all of which occurs transparently.
OAuth2
This emerging standard governs the world of Authorisation using Tokens. I won´t go into all of the complexities of the complete OAuth2 dance here, but I can recommend OAuth2 as a valid way to secure our Enterprise and which scales well to meet the needs of the SAAS oriented New Enterprise. To that end there are two types of Clients we should cater for in our Secured SOA Architecture:
The in-house Applications which are typically exposed to end-users. These should provide the username and password of the end-user and request a token on the strength of those. The process also affords us with the luxury of Single-Sign-On, because the token can be stored by the browser as a cookie based on the domain name of the organisation. All other web applcations can access the cookie. This is what Google are doing with their SSO for each of their cloud apps like Gmail, Calendar, Documents, etc.
Third-party Applications providing services to our users but to which we’d like to grant limited access to our systems. We don’t want those Applications getting their hands on our end-users’ credentials, so we can force them through the typical OAuth2 dance which is what we all see so often nowadays when websites invite us to sign in using our Google, Facebook or Twitter accounts.
Solution in Mule
Let’s implement a RESTful webservice in Mule which will expose a list of Products in our online shop to various Client Applications. We will configure the access control so that certain operations are available only to certain Clients. We could even apply more specific access control by considering the roles of the users of these Applications: Admin for complete access and Standard for read-only access.
HTTPS Inbound Endpoint
The https inbound endpoint on our API needs to use a connector with a reference to a keystore. A keystore is a repository of public key certificates together with their private keys. These certificates are sent to the Client upon the first HTTPS request. The certificate contains the public key and identity of the server and is digitally signed either by the same server (self-signed certificate) or by an independent Certificate Authority. You can create your own self-signed certificate for development purposes using the JDK keytool utility. The keystore needs a password both for the keystore and for the private key.
Anypoint Secure Token Service
Mule can now act as an OAuth2 Provider, issuing tokens to registered Clients, applying expiration periods to these tokens, associating them to User roles and fine-grained access control known in the OAuth world as scopes. Refresh tokens can also be issued and tokens can be invalidated. Mule can of course subsequently validate incoming tokens against expiration periods, roles and scopes and thus grant or deny access to the Flows in the Application.
The above configuration registers 2 different clients for our API:
Web UI: a public web application providing read-only access to the protected Product listing.
Private Web UI: an internal admin app which allows Administrators to add new Products.
Note how the two web applications are considered in-house applications as described above and as such may exchange User Credentials directly for a Token. For example,
This would give a Response something like:
The request includes both scopes READ and WRITE. These appear in the requestable scopes for that particular client. Scopes represent broad levels of access to the Mule flows. The provided access token must be sent in with each request and can be validated by Mule to ensure it hasn’t expired or been revoked and that it has the scopes that correspond to a particular flow. In the following example we only allow requests that have WRITE scope.
More fine grained control can also be applied by comparing the role of the user for whom the token was issued with the allowed roles for the flow. The validate filter has a resourceOwnerRoles attribute to specify these. (The granularity of access control can be in either the grant or the role).
As we venture into the world of the New Enterprise, no doubt we may have to cater for applications belonging to partners. Imagine we were to expose access to our service to a Mobile Application. We need only register this new client in our OAuth2 Provider configuration. Note how the grant type for this configuration is TOKEN which corresponds to the IMPLICIT type according to the OAuth2 specification. This will result in the full dance that we all have experienced when Websites allow us to sign in using our Google, Facebook or Twitter accounts.
Finally
Anypoint Enterprise Security also allows us to explicitly sign Messages and verify incoming signatures and encrypt Messages with 3 different strategies and 20 different algorithms as well as to decrypt incoming Messages. There may be cases when you have to explicitly sign or encypt Messages you send out to third parties or likewise decrypt and verify signatures from third parties. For the purpose of the Clients over which we have complete control in our architecture, it is sufficient to use HTTPS, but for those sideline cases you have all the power of the best that the Industry has to offer in the extremely easy configurations that Mule demands of you! You can download the above example Application here.
If you think that telemetry should only be dealt with by Mr. Chekov, think again… When the “Internet of things” met publish/subscribe, the need for a lightweight messaging protocol became more acute. And this is when the MQ Telemetry Transport (MQTT in acronym parlance) came into play. From its own words, this connectivity protocol “was designed as an extremely lightweight publish/subscribe messaging transport. It is useful for connections with remote locations where a small code footprint is required and/or network bandwidth is at a premium“.
In a world where everything will eventually have an IP address, messages will be constantly flowing between devices, message brokers and service providers. And when there are messages to massage, who you gonna call? Mule ESB of course! With this new MQTT Connector, built on Dan Miller‘s solid ground work, the Internet of things, which had its rabbit, will now have its Mule!
In this blog we will look at an example where Mule is used to integrate conference booth QR Code scanners with an MQTT broker. Why using MQTT? If you’ve ever been to a technical conference and expo, you’ve surely tasted how abysmal the quality of a WIFI network can be. Beside confirming that the shoemaker’s children always go barefoot, it is also an encouragement for using a messaging protocol that’s both resilient and modest in its network needs. With this said, let’s first start by looking at the overall architecture diagram.