Traditional integration platforms could get away with providing some command line tools to automate the build and deployment of applications built on their platform. But in the modern world, integration platforms need to encompass the critical API management & cloud components as well, so the scope of continuous integration and continuous delivery tools are no longer just limited to integration applications only.
This also requires support for provisioning integration software and applications in private or public cloud platforms and capability to automate governance of deployed applications. MuleSoft’s lightweight runtime environment and consistent tools to automate provisioning, building, testing, deploying and applying governance policies across cloud (public or private or MuleSoft’s iPaaS – CloudHub) and/or on-premise infrastructure without complexity of traditional integration solutions, makes MuleSoft’s Anypoint platform a desired choice for DevOps teams around the world. This is the first of many blogs to follow introducing MuleSoft’s DevOps capabilities on the Anypoint Platform.
A key CI/CD capability of any enterprise solution is a testing framework to write and run repeatable tests, so in this article, we will focus on the test automation capabilities of the platform provided by MUnit.
MUnit is a Mule application testing framework that allows you to easily build automated tests for your integrations and APIs. It provides a full suite of integration and unit test capabilities and is fully integrated with Maven and Surefire for integration with your continuous deployment environment.
With MUnit you can:
- Create your Mule test by writing Mule code
- Create your Mule test by writing Java code
- Disable flow inbound endpoints
- Disable endpoint connectors
- Mock outbound endpoints
- Mock message processors
- Spy any message processor
- Verify message processor calls
- Create not only unit tests but also integration tests in a local environment — MUnit allows you to start a local FTP/SFTP, DB server or mail server
- Call the Mule client from Mule code
- Assert flow exceptions
- Enable or disable particular tests
- See assertion/error reports with Mule stack trace
- Extend the MUnit framework with plugins
- Check visual coverage in Studio
- Debug your tests with Studio
Here is a quick example of how to test an existing application developed in another HowTo series blog, HowTo – Wrap SOAP web service around a database, using MUnit.
Step by step guide:
- Download existing HowTo project and setup the prerequisites, as instructed in the readme and exchange documentation, for executing the project.
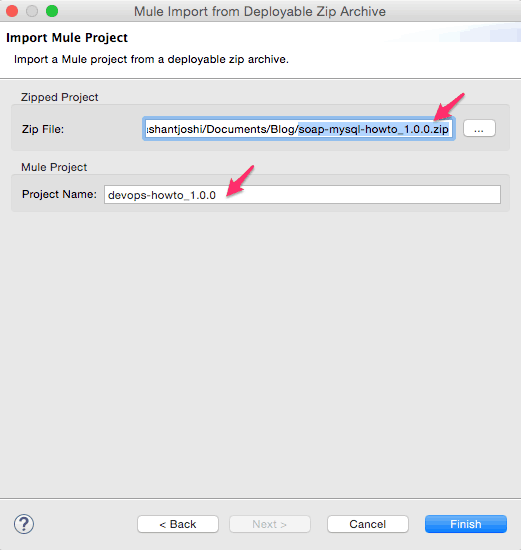
- Import existing project into a new workspace in Anypoint Studio, save as devops-howto_1.0.0

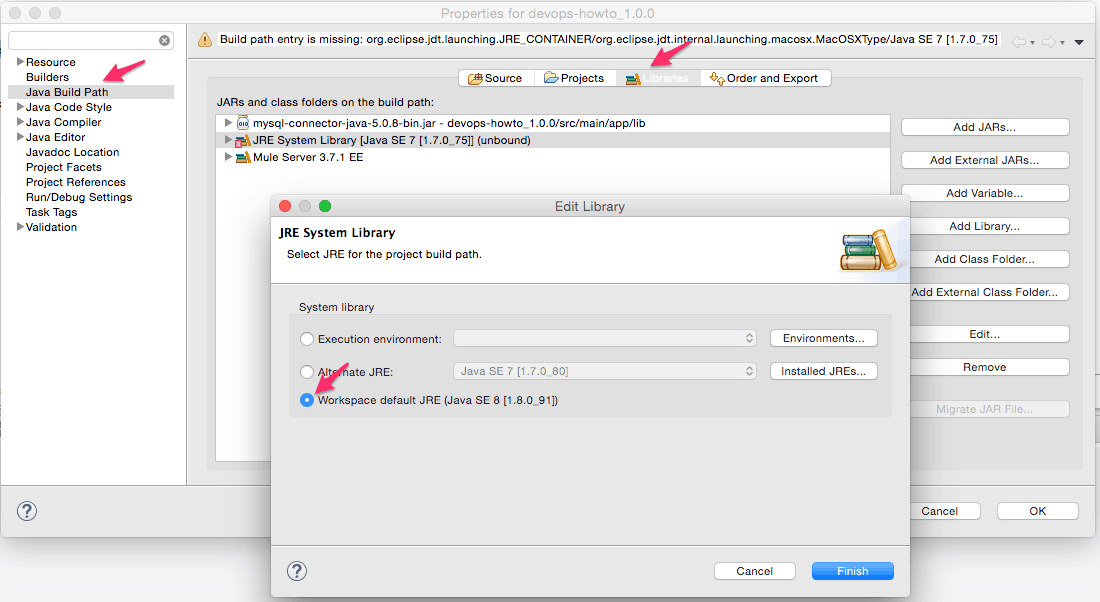
- Make sure that project points to JRE on the local machine as shown below(File -> Properties -> Java Build Path).
- If not already installed, install Munit (Help –> Install New Software).

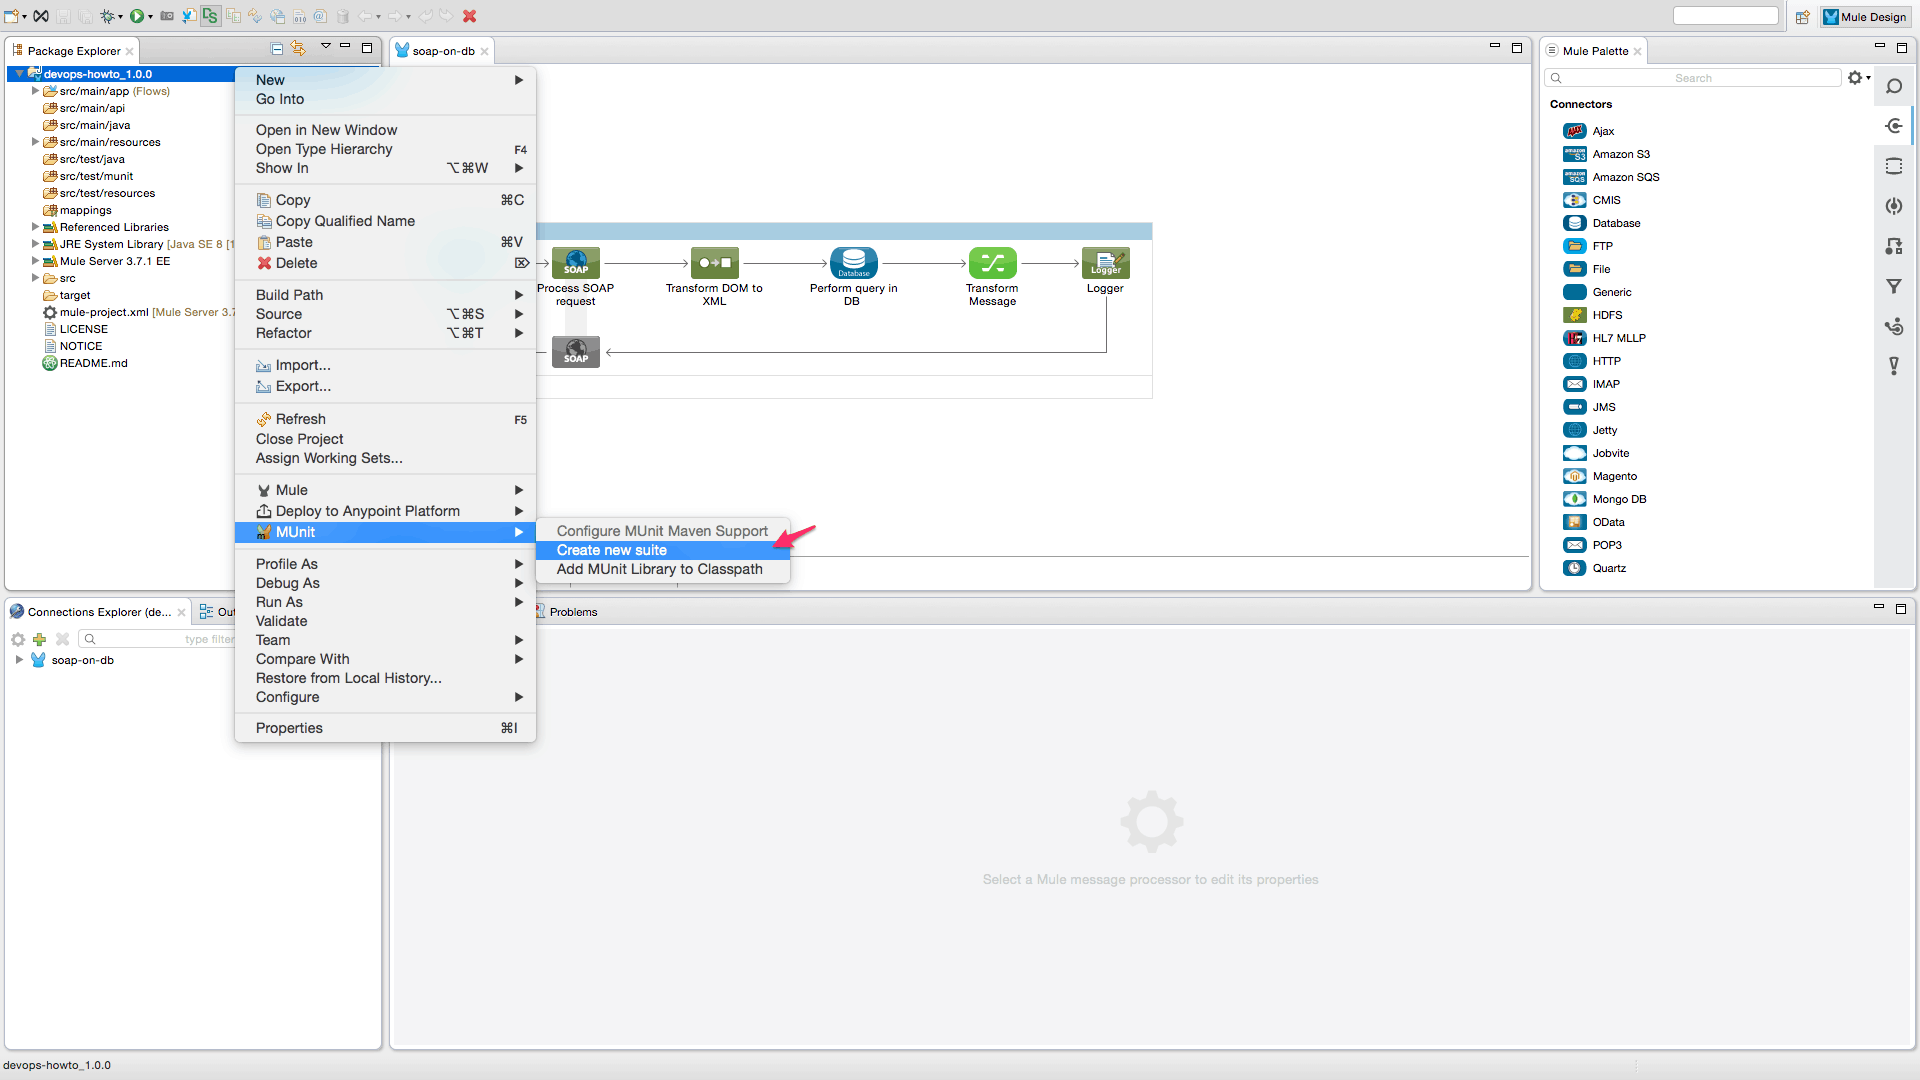
- Once MUnit is installed, right-click on the project and create a new test suite, the test suite is created in the ‘src/test/munit’ folder.

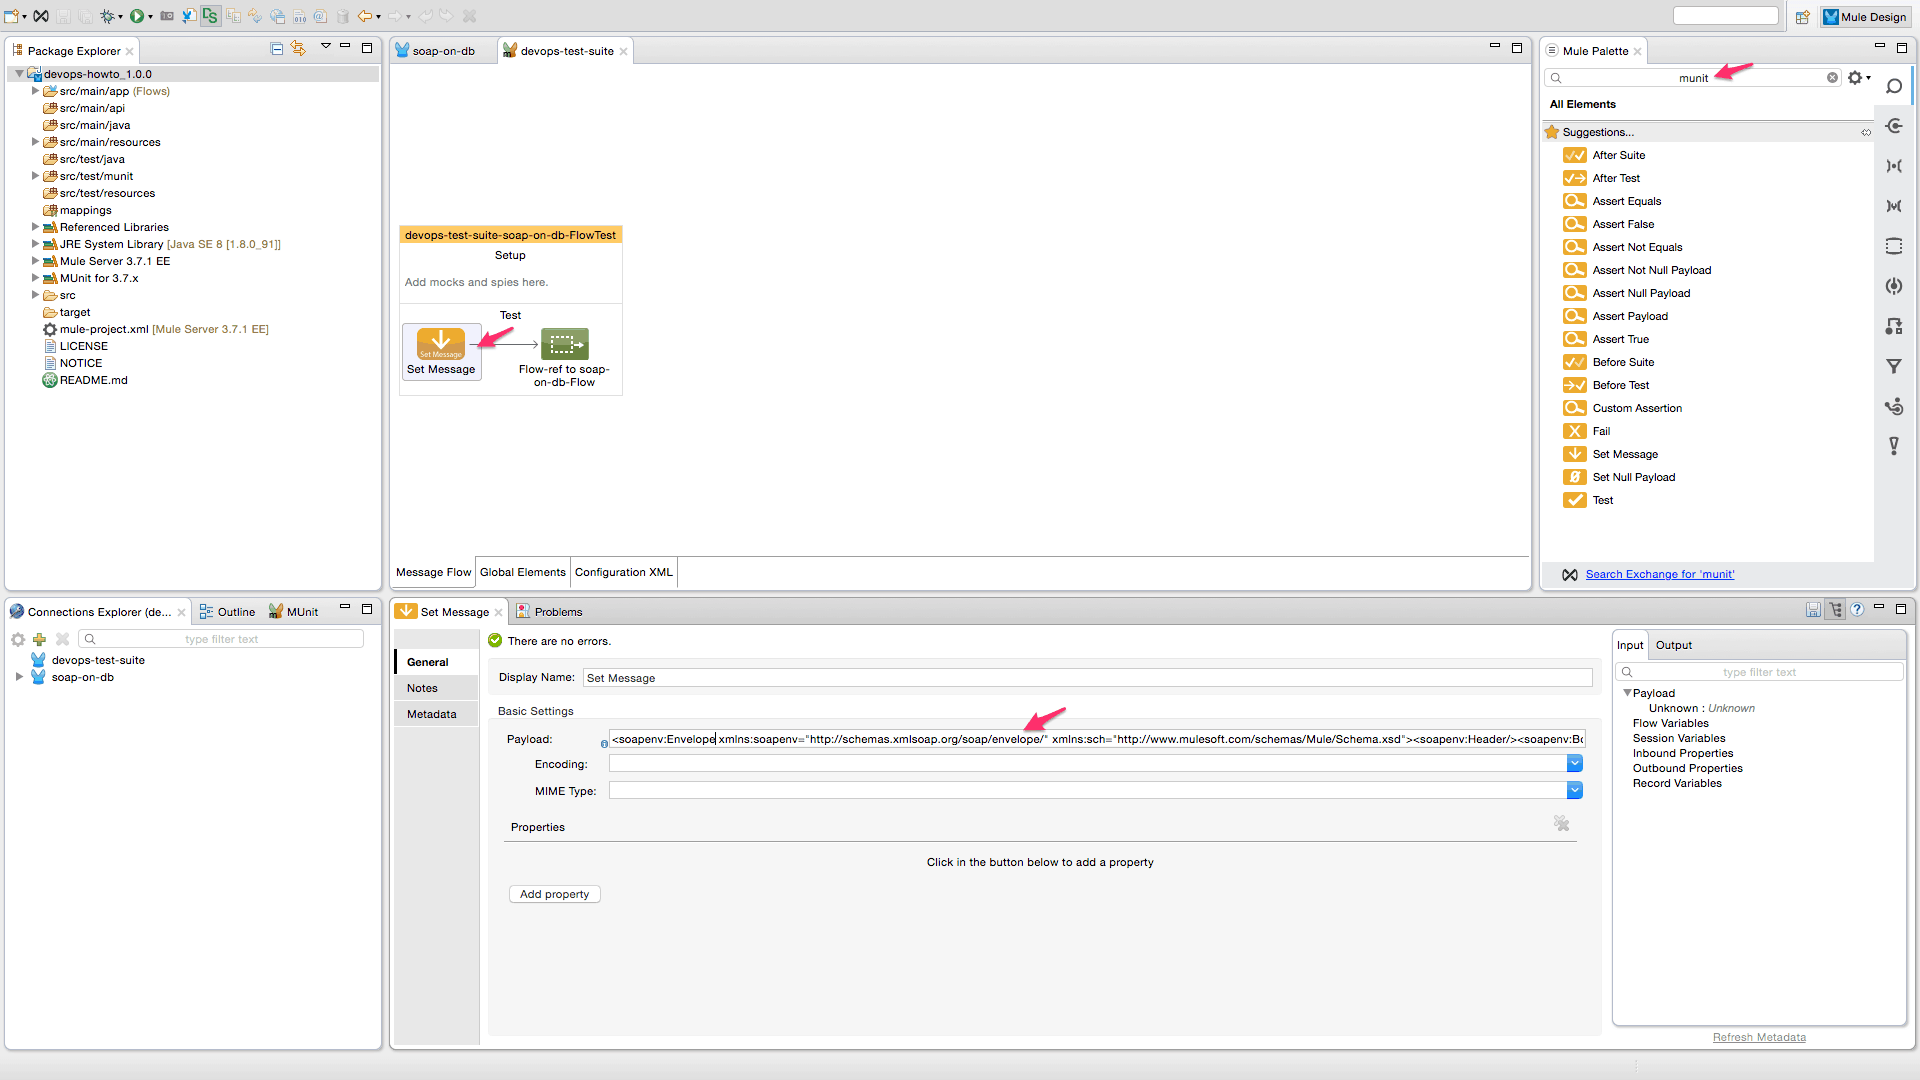
- The test flow in the new test-suite already has reference to the soap-on-db service to be invoked, add ‘Set Message’ processor before the invocation to set the input payload as required to invoke the service. Copy the payload string from ‘SetMessage.xml’ file into the payload field as shown below.
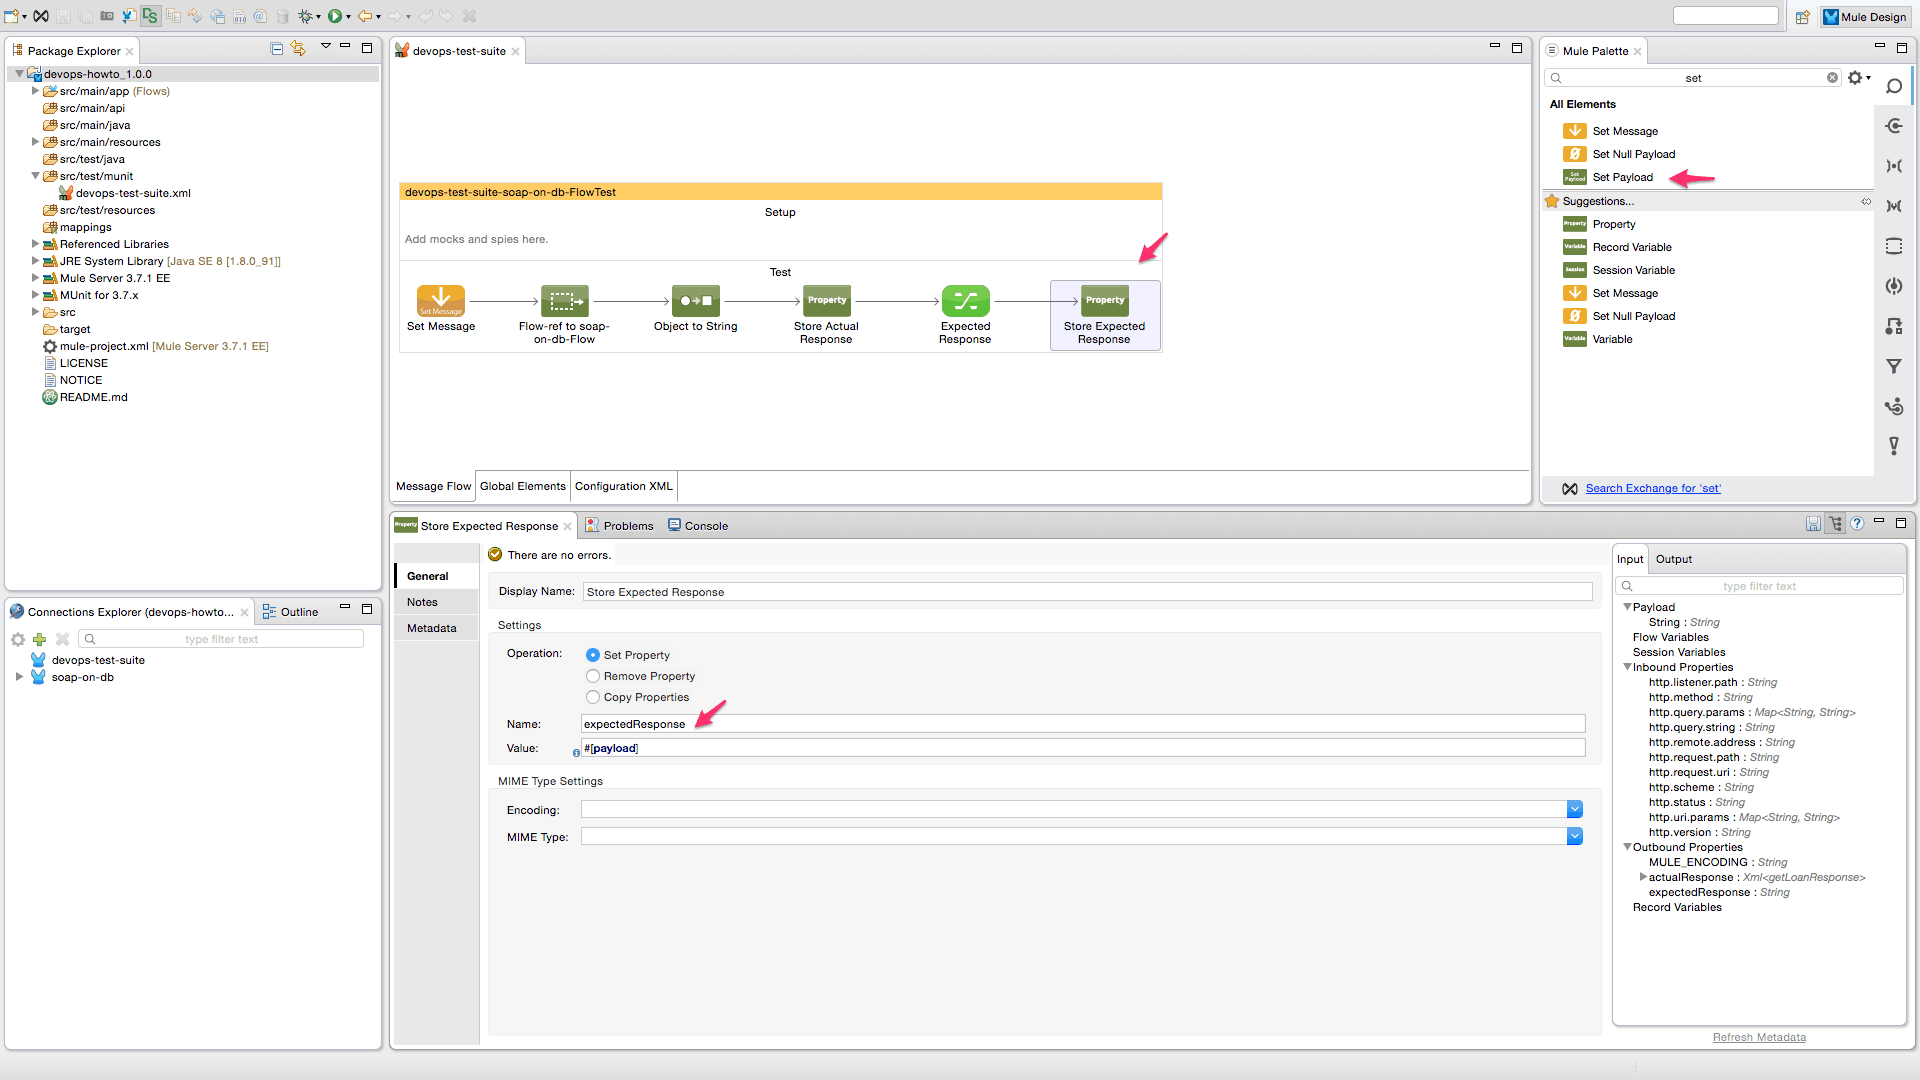
- Next use ‘Object to String’ and ‘Set Property’ processors to store the response from web service.

- Set the expected response using ‘Transform Message’ processor, copy the response from ‘ExpectedSOAPResponse.xml’, ensure that the response is enclosed within single quotes.

- Store the expected response in a property as shown below.
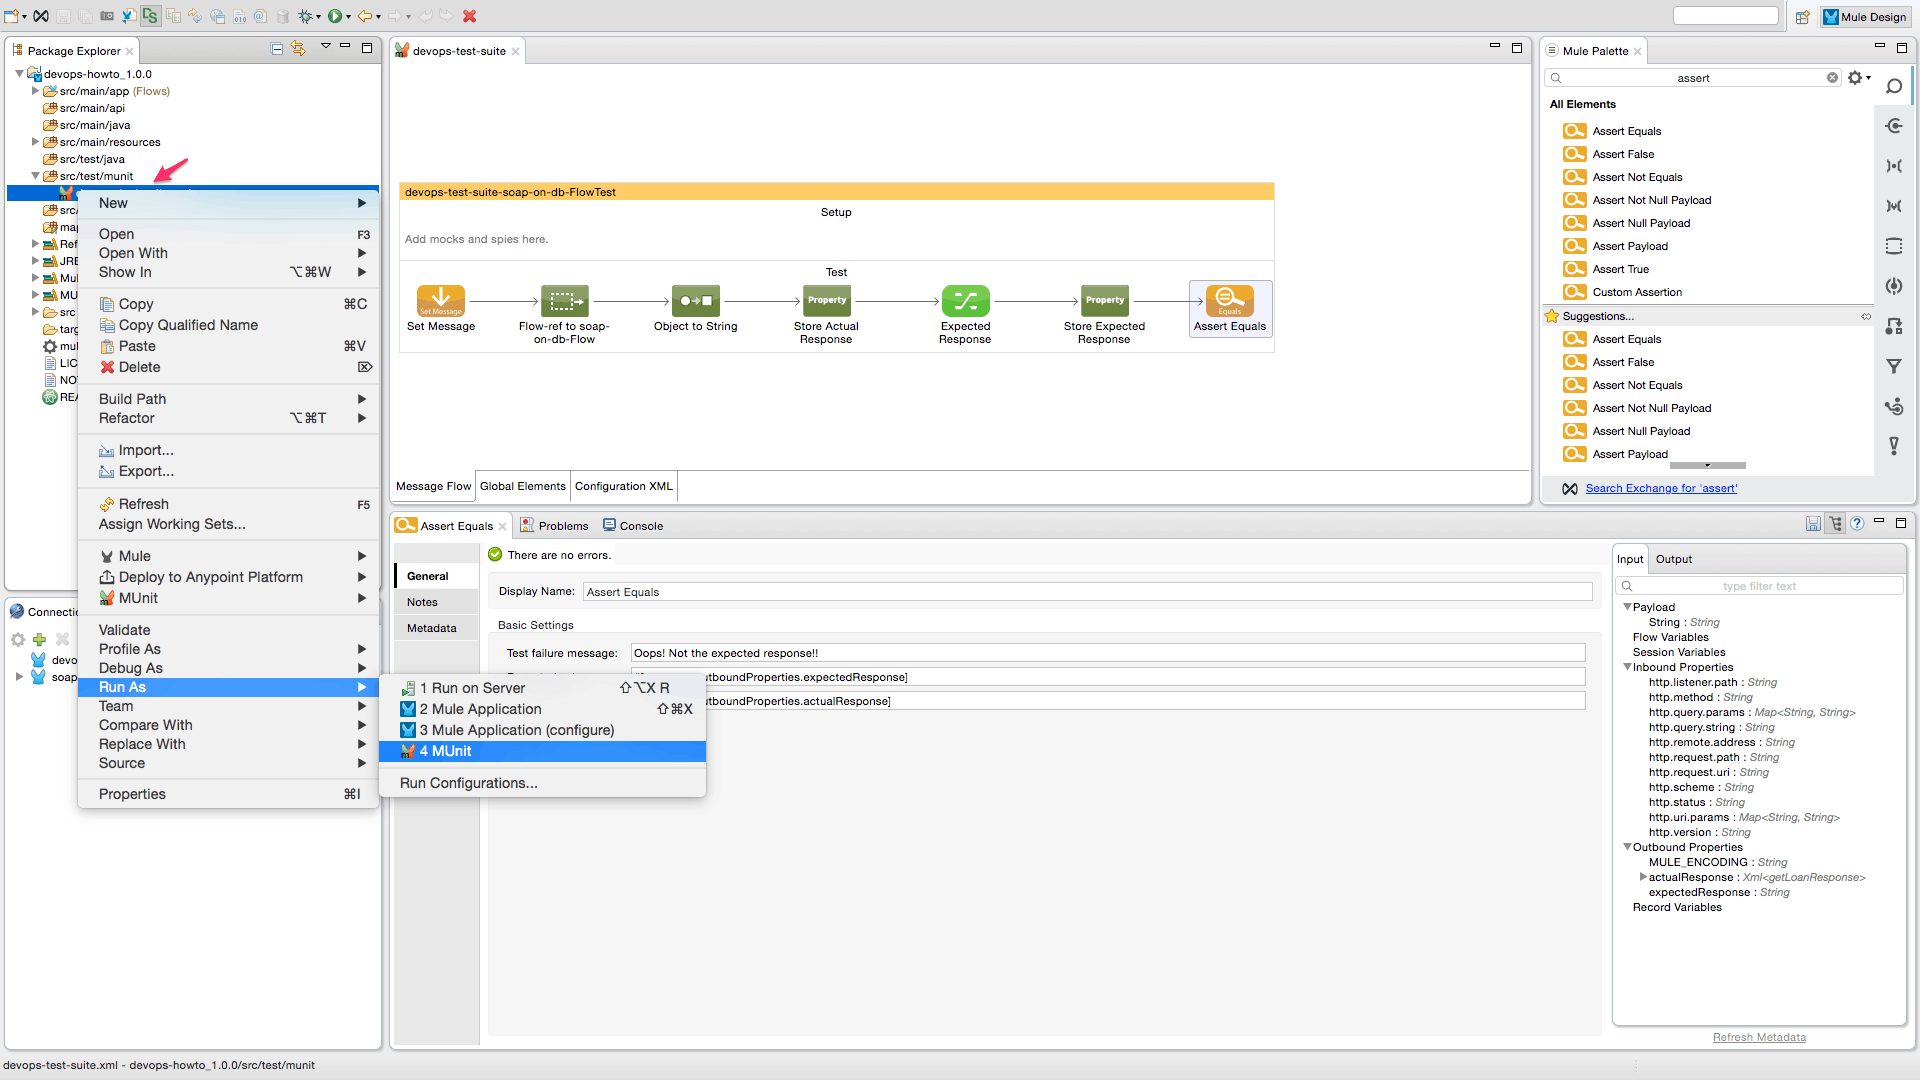
- Use “Assert Equals” message processor to compare the actual and expected response. If the responses do not match, the assertion will throw the configured exception in the generated report.

- Select and run the test suite.
- A test report is generated in the MUnit tab with a green bar indicating that the test executed successfully, also green checkmarks against the message processors in the web service flow indicates all processors that were tested as part of the flow.

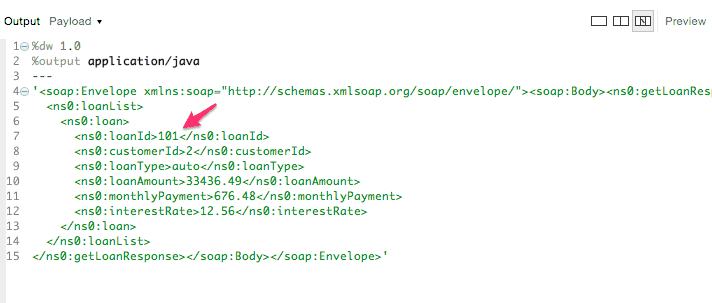
- To simulate an error report, modify the expected response as below in the ‘Expected Response’ processor, so change loan id to ‘101’.
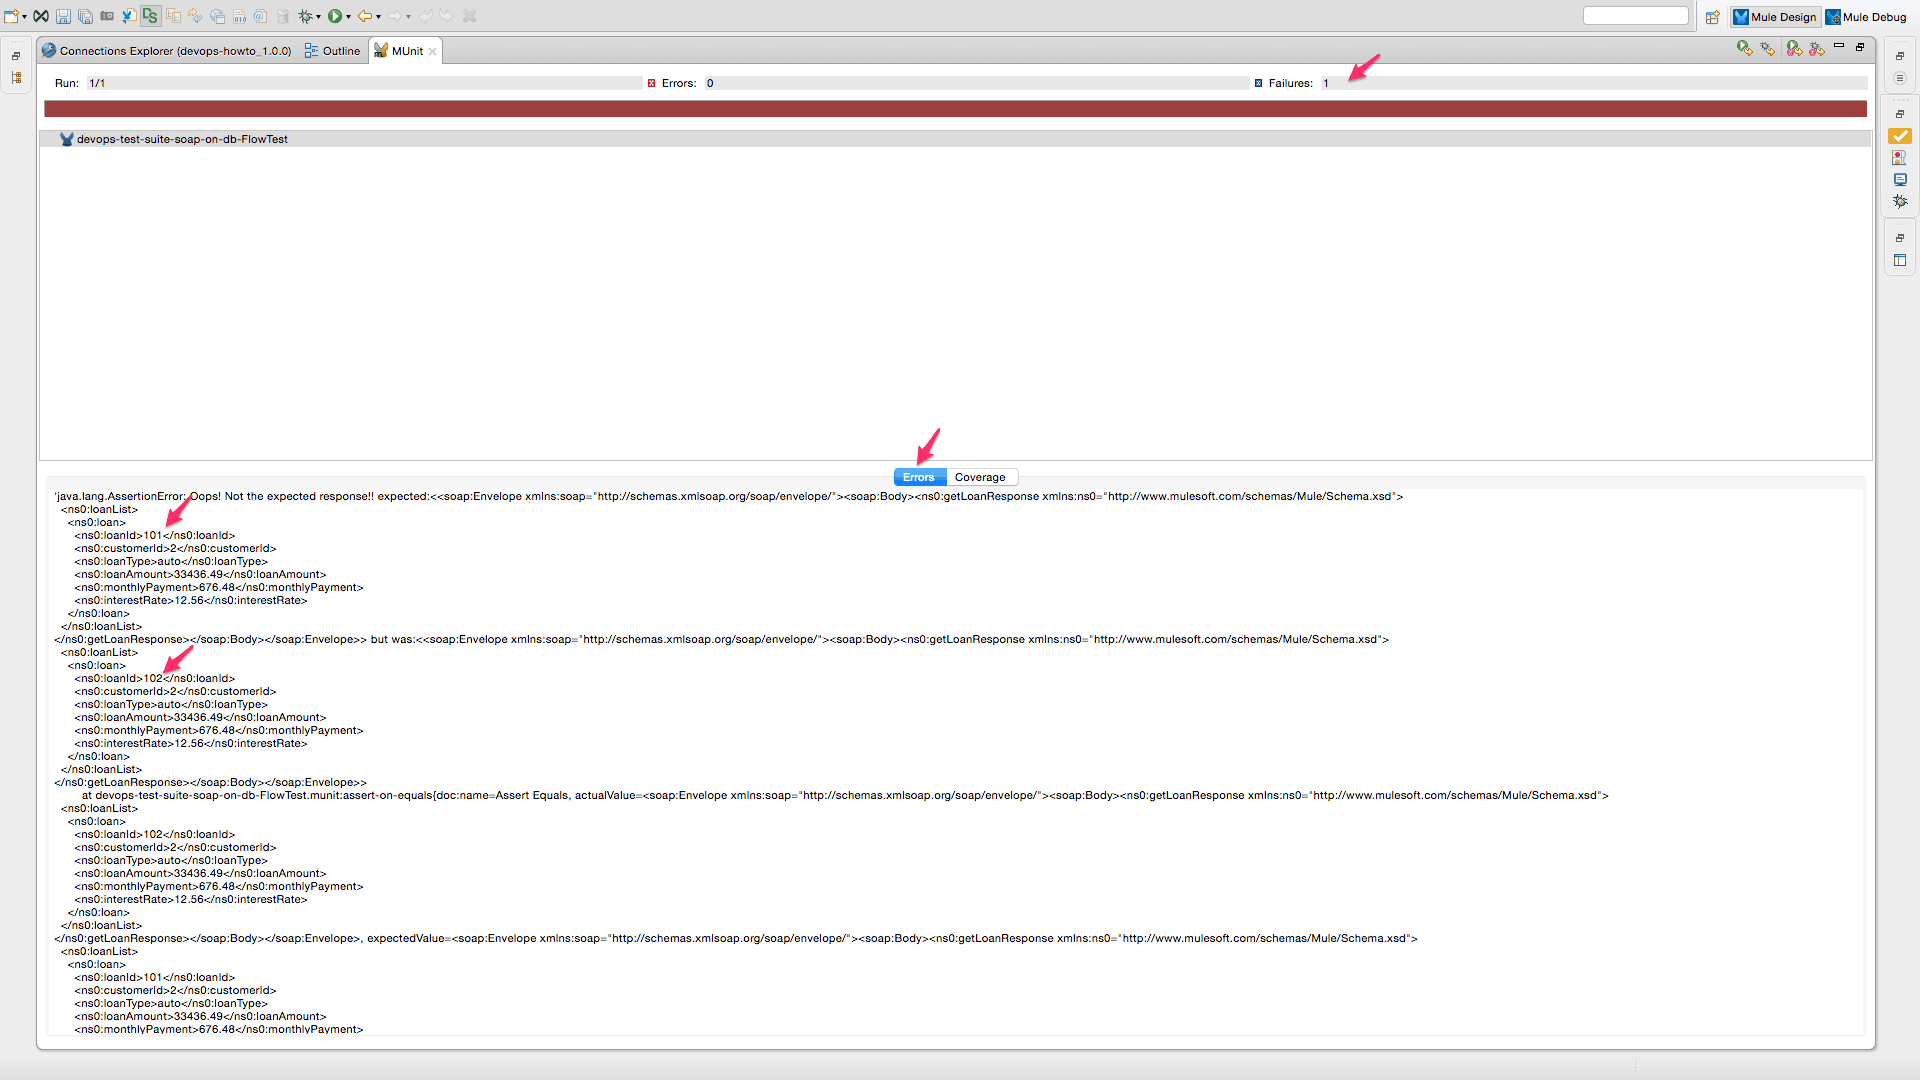
- Error report generated would then indicate the difference between expected and actual response, marking the test as a failure.

- To save time, you can also download the pre-configured MUnit project from github and execute the above tests, please make sure to configure per readme as well.
To summarize, MUnit is fully integrated with Anypoint Studio and provides a simple easy-to-use graphical interface to develop, debug and check coverage of test cases. It provides a full suite of unit and integration test capabilities and is fully integrated with Maven and Surefire ensuring comprehensive support for DevOps CI/CD processes. For complete list and details around Munit capabilities, refer to MUnit documentation.
Next in series will be article introducing build automation capabilities of the platform and will leverage Maven to automate the building of our application.
In the meantime, please check out our other HowTo articles to master the Anypoint Platform!