
While MuleSoft has a variety of uses for it’s API-led platform, there are certain cases that require using old-school tricks. These include integrating data from legacy systems, receiving and consuming data from third parties, all tasks which can inhibit the amount of time and resources the team has to create proper APIs.
Secure File Transfer Protocol, or SFTP, might be a popular choice for setting up a secure drop-site for files, but obtaining real-time data from file servers is a hassle and isn’t possible with modern APIs. In this blog, I’ll cover everything you should know about integrating data from SFTP in real-time using webhooks.
What is Secure File Transfer Protocol (SFTP)?
SFTP has been around for 20 years and stands for Secure File Transfer Protocol or SSH File Transfer Protocol. In SFTP the communication between client and server is encrypted, and authentication is based on passwords or public key authentication. Additionally, the SFTP server and command-line client are both bundled with any Linux distribution, which helped it gain popularity as a secure means for file sharing that used simple methods to automate this process.
However, SFTP doesn’t have an inherent way of notifying clients about real-time file system changes. The only way to do this is to conduct periodic polling of the server, obtain an updated list of files, and compare it to a previously fetched list. This process is cumbersome and costly if you set a short polling interval or if there are many files on the server.
SFTP To Go supplements with webhooks
To solve this problem, SFTP To Go combines SFTP with webhook notifications. This means automated messages are sent to notify custom apps about newly uploaded files using HTTPS requests with JSON payloads that contain information about the events. Now your team can stay in the loop with real-time updates and explore other benefits of SFTP To Go, the cloud-native SFTP as a service, focused on developers and automation use cases.
SFTP To Go is available as a Heroku add-on, so it is accessible to anyone who works with Salesforce technology without signing up for another cloud service.
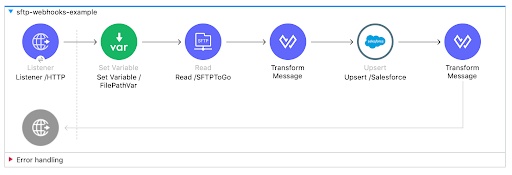
High-level SFTP architecture
The entire flow is comprised of the following building blocks:
- SFTP service with webhook notifications on filesystem changes.
- Webhook notifications triggered by file upload.
- MuleSoft flow that listens to a web port, triggering flow to read, transform, and load the data into the third-party system.
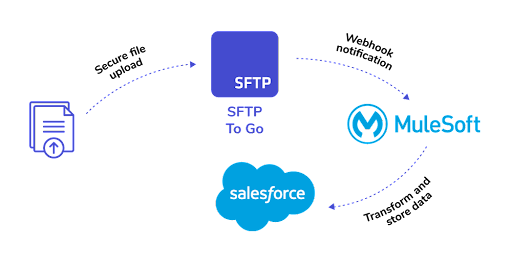
So now that we have the blueprint, we’ll cover how it’s put to use in a MuleSoft flow with the Salesforce Leads object:
- The user uploads a CSV file that contains lead information (name, company, phone number, email address, etc.) to SFTP To Go.
- SFTP To Go’s webhook notification triggers the MuleSoft flow.
- MuleSoft flow listens to the HTTPS port. Upon incoming webhook request, the payload is processed to retrieve the path to the newly uploaded file.
- The MuleSoft flow reads and processes the file, and then loads the data to its destination — and in this case — it is the Salesforce Leads object.
Setting up SFTP To Go
- If you don’t have a Heroku account, create one.
- Login and then add your billing information.
- Go back to the Heroku dashboard and create a new app.
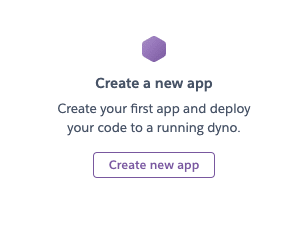
- After creating the new app, install SFTP To Go: Click the resources tab and then under “add-ons,” type in “SFTP To Go,” select it from the drop-down list, pick a plan that supports webhooks, and hit the button to install it in your app.
- SFTP To Go will show in the add-ons list and become available in a few seconds. Click it to open the dashboard and copy the credentials.
Prepare your local environment for testing
We’ll start by setting up the credentials to allow our Mule flow access SFTP and Salesforce:
- Download this jar, open your Anypoint Studio, and import the jar as a packaged Mule application.
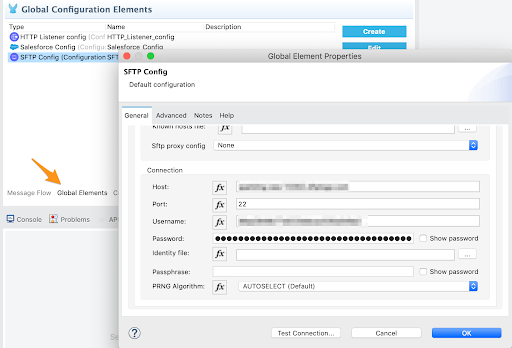
- Click on “global elements”, select “SFTP Config”, then edit the SFTP connection details. Paste the host, username, and password you copied from the SFTP To Go dashboard and click “OK.”
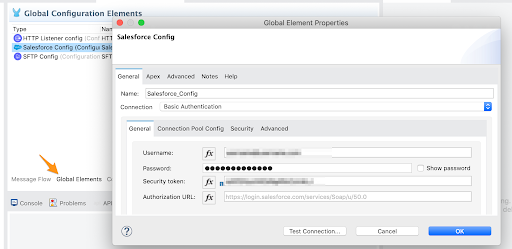
3. Edit the Salesforce org credentials (username, password, and security token) to connect to your Salesforce organization.
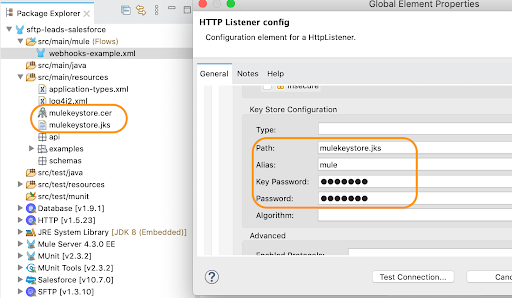
Now we have to configure our environment to let incoming webhook notifications trigger the flow. The package comes bundled with a self-signed keystore and truststore to ensure the flow listens to the HTTPS endpoint which is a good security measure.
We’ll also need to expose the endpoint to the public internet so the webhook can make the web requests from the public internet to your local computer. The simplest method to tunnel communication to your local computer is to use ngrok:
- Sign up and install ngrok on your computer.
- Follow the instructions to set up ngrok on your computer.
- Open your command line prompt and run the following command:
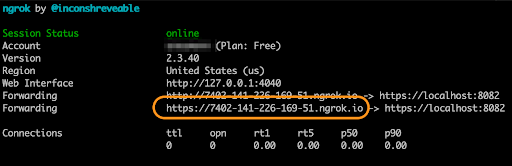
shell
$ ngrok http https://localhost:8082
- Once the ngrok session starts, the ngrok URL that forwards communications to your local computer will show on the screen. Copy the HTTPS URL to create the webhook:
Create the webhook
- Go back to SFTP To Go’s dashboard, click on “Webhooks” and then on the “Add webhook” button.
- Paste your ngrok URL in the endpoint URL, and select the “File Created” topic.
- Finally, click “Add webhook” to save the webhook configuration.
We are now ready to test the flow. Use your favorite SFTP client, like SFTP command line, Filezilla, or Cyberduck to upload the accompanying CSV file (located under src/main/resources) and watch the miracle happen.
Deploy to production
We won’t go into the methods to deploy your MuleSoft app to production in this post, as quite a few options depend on your setup.
The important bits to keep in mind are:
- Use an SSL certificate (preferably CA-signed) for your HTTP(s) listener.
- Allow inbound traffic to the app’s designated host and port.
- Configure the webhook’s endpoint in SFTP To Go to point to your production host and port.
Setting up webhook triggers with MuleSoft to allow real-time SFTP file processing is as simple as following the steps above. If you’re interested in learning more about webhooks on Anypoint Platform, you can read more on this blog post.


