Pretty Good Privacy (PGP) is a well-known encryption system that MuleSoft supports.
Steps for using MuleSoft with GnuPG
There are many PGP implementations; in this guide, we plan to cover how to use Mule PGP (Pretty Good Privacy) Encryption with GnuGP (GPG).
3 steps for Mule PGP Encryption
The following steps will allow users to encrypt Mule PGP with GnuPG.
1. Install GnuPG and generate keys
First, download GnuPG. Installation is straightforward. For this guide, we’ll be using version “GPG 2.2.32”.
GnuPG itself is mostly command line-based. If you use Windows, there is a UI tool you can use with GPG. If you use MacOS, the default GPG installation comes with a rudimentary UI with very limited functions.
Generate the public and private keys
The default install path for GPG is /usr/local/bin on MacBook. Using the command window, simply execute:
gpg --gen-key Follow the prompt to enter your name and an email address. Name and email are used as the identifier for the generated keys. When finished, you will end up with something like this:
pub  rsa3072 2022-01-26 [SC] [expires: 2024-01-26]  A112FB858721314133D89D53CB5B317A61C3BB9F
uid  john.doe <john.doe@foo.com>
sub  rsa3072 2022-01-26 [E] [expires: 2024-01-26]
Please save a copy of the output text, and note that depending on the GPG version, the output format can vary slightly.
It’s incredibly important to note that the “pub” section shows the fingerprint for the public key “A112FB858721314133D89D53CB5B317A61C3BB9F”. In the next section, when using the “gpg –list,” we’ll also see a subkey with a different fingerprint value.
Export the private and public keys:
%gpg --export-secret-keys --armor john.doe > "my-pri.asc"
%gpg --export --armor "john.doe"  > "my-pub.asc"
where the “--armor” option will output in ascii format.
As shown above, “my-pri.asc” is the private keyring file, and “my-pub.asc” is the public keyring file.
Viewing the keys:
%gpg --list-secret-keys --keyid-format LONGYou should see something like below:
/Users/john/.gnupg/pubring.kbx
-------------------------------
sec   rsa3072/CB5B317A61C3BB9F 2022-01-26 [SC] [expires: 2024-01-26]
      A112FB858721314133D89D53CB5B317A61C3BB9F
uid                 [ultimate] john doe<john.doe@mulesoft.com>
ssb   rsa3072/D69E938EF3F73BBE 2022-01-26 [E] [expires: 2024-01-26]
The output shows:
- The main public key (“sec”) and a subkey (“ssb”).
- The main key shows the full fingerprint and the last 16 digits CB5B317A61C3BB9F
- The subkey has a different fingerprint D69E938EF3F73BBE
The significance of these values will become clear when they are used inside the Mule project.
2. Encrypt and decrypt inside the Mule app
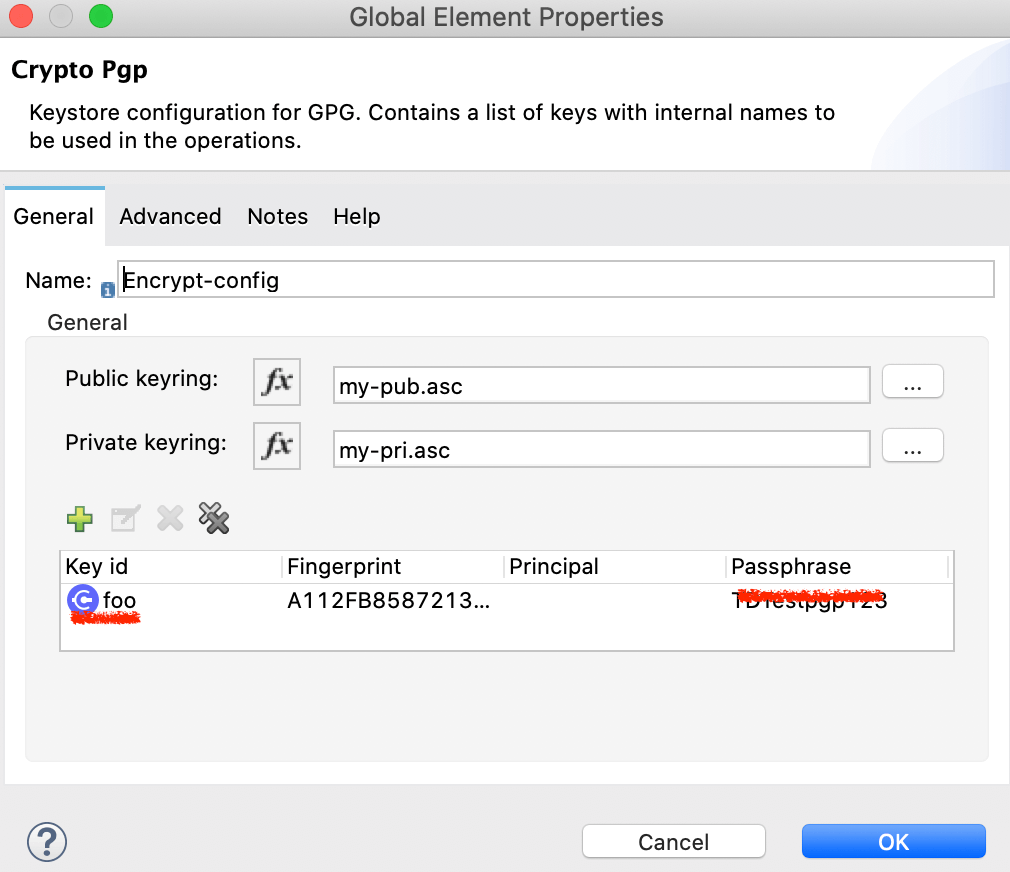
Create a Mule project, import the “crypto” module if needed by clicking the “Search in Exchange” button in the studio. Copy both the public and private key files to the project resource folder. Drag a PGP encrypt or PGP encrypt binary icon to the mule flow.
Configure the settings as below:

<crypto:pgp-config name="Encrypt-config"
doc:name="Crypto Pgp" doc:id="4bffef52-e115-4aba-9981-bcd56559fb8c"
publicKeyring="my-pub.asc" privateKeyring="my-pri.asc">
<crypto:pgp-key-infos>
<crypto:pgp-asymmetric-key-info
keyId="foo" fingerprint="A112F…A61C3BB9F"
passphrase="Testpgp123" />
</crypto:pgp-key-infos>
</crypto:pgp-config>
Please note the following:
“publicKeyRing” and “privateKeyRing”:
are the paths pointing to the respective key files.
“keyId”:
This value will have more significance if there are multiple keys (subkeys) inside the key file. In the test case, we have only one main key and one subkey. You can use any random string in this field. For a real project, it’s best to pick a meaningful name for readability.
“fingerprint”:
With the GnuPG and Mule PGP module, this field can be very tricky. The following descriptions are based on trial-and-error and observation. They are not published in the official Mule document:
- If both encryption and decryption are done using the Mule application, then you can use the fingerprints of either the main key or the subkey. The mainkey can be either the full key or the last 16 digits.
- If the encryption is done using the GPG tool outside of the Mule app, then the Mule application can only use the subkey fingerprint to decrypt. Please see the next section for details.
“Passphrase” – this is what you entered when generating the key with the GPG tool.
The code snippet shows a flow to both encrypt and decrypt a test input. Either CURL or Postman can be used to test the app:
<flow name="pgp-external-decrypt"
doc:id="c6380382-4eda-4478-8bce-8301006f2ffb">
<http:listener doc:name="Listener"
doc:id="131594a2-71e3-4dd0-9a88-db28f904a3c9"
config-ref="HTTP_Listener_config" path="/dec" />
<logger level="INFO" doc:name="input-log"
doc:id="f970a76f-1857-4b50-a517-3d7dfc170093"
message="#[{"key": p('secure::mysecret')}]" />
<crypto:pgp-decrypt doc:name="Pgp decrypt"
doc:id="a1e4c89e-b74e-4e51-8b53-f41d6f4206ef"
config-ref="DECRYPT-config" />
<logger level="INFO" doc:name="output-log"
doc:id="61c50bbb-d055-4cac-b1f6-0b92c4384f73" message="#[payload]" />
</flow>
3. Encrypt with GPG tool; decrypt with a Mule app
Using the Mule app to both encrypt and decrypt data is not very widely used. A more practical scenario would be to use the GPG tool to independently encrypt a data file, then using the Mule app to decrypt the data.
As it turns out, if you use the GPG tool to encrypt data outside of the Mule app, then you must use the subkey fingerprint to decrypt a payload.
In the sample configuration below, very importantly, the subkey fingerprint “D69E938EF3F73BBE” is used instead of the main key fingerprint. Also only the private key “my-pri.asc” is used because we’re only doing the decryption.
<crypto:pgp-config name="DECRYPT-config"
doc:name="Crypto Pgp" doc:id="1bd72dd6-867b-431c-9da6-fb1928113b45"
privateKeyring="my-pri.asc">
<crypto:pgp-key-infos>
<crypto:pgp-asymmetric-key-info
keyId="foo" fingerprint="D69E938EF3F73BBE" passphrase="TDTestpgp123" />
</crypto:pgp-key-infos>
</crypto:pgp-config>
Test step 1 – Encrypt with GPG command line tool:
gpg --encrypt --cipher-algo AES256 --armor test.txt > outputmsg.txt Please note: “--armor” option is for the ascii output.
Test step 2 – To decrypt using Mule app is straightforward, be sure the crypto config uses the subkey fingerprint as shown above.
<flow name="pgp-external-decrypt"
doc:id="c6380382-4eda-4478-8bce-8301006f2ffb">
<http:listener doc:name="Listener"  doc:id="131594a2-71e3-4dd0-9a88-db28f904a3c9"
config-ref="HTTP_Listener_config" path="/dec" />
<crypto:pgp-decrypt doc:name="Pgp decrypt" doc:id="a1e4c89e-b74e-4e51-8b53-f41d6f4206ef"
config-ref="DECRYPT-config" />
<logger level="INFO" doc:name="output-log"
doc:id="61c50bbb-d055-4cac-b1f6-0b92c4384f73" message="#[payload]" />
</flow>
CURL script or Postman can be used to test this flow, when submitting the encrypted content, please set the content-type to “text/plain”.
How to protect the private key file
To decrypt a PGP message in a Mule app, the private key file must be attached to the project as shown in the above example.
A passphrase is required to decrypt a message. This passphrase can be encrypted as standard Mule properties. This is the commonly used security practice.. However, some users may insist the private key file be encrypted.
There is no official solution to encrypt the key file. In this post, we’ll provide a solution to encrypt the keyring file. This is an undocumented solution. The solution hinges on an important behavior of how Mule runtime handles the app deployment that uses the PGP encryption. Users should evaluate the solution to determine whether the benefits warrant the extra work to encrypt the private keyring.
By default, the “privateKeyring” attribute is a file path. It needs to point to the correct keyring file. During the app deployment, the Mule runtime will validate the configuration. If any of the configuration fields or the file is incorrect, the deployment will fail. However, if a variable is used in the “privateKeyring” file, the deployment will skip the validation. We’ll exploit this behavior and use a “bait-and-switch” trick to build a solution.
Here is the summary of the solution:
- Generate the private key file in ascii format: “my-pri.asc”
- Use Mule JCE encryption to encrypt this file: “my-pri-jce.enc”, copy this file to the project resource folder. This is a one time operation. We’ll use JCE to decrypt this file to “my-pri-jce.as”, which will be the original private keyring. There are other encryption options, we selected JCE for the convenience.
- In PGP crypto-config, set “privateKeyring” to a variable: “priKeyPath”
- Set the variable priKeyPath to “p(‘mule.home’) ++ ‘/apps/’ ++ p(‘app.name’) ++ ‘/my-pri-jce.asc’” before the PGP decryption is invoked. This path resolves to the physical path where the Mule app is running. Also note the file ‘my-pri-jce.asc’ still needs to be generated when the app starts to run.
- Add a file read to load “my-pri-jce.enc” before PGP decryption. Use JCE to decrypt the file, which will result in the original keyring, save the payload to “p(‘mule.home’) ++ ‘/apps/’ ++ p(‘app.name’) ++ ‘/my-pri-jce.asc’”.
- Now PGP decryption will be able to use this newly generated keyring to decrypt the payload. If you have followed along, you may notice this solution is essentially a bait-and-switch. We first set “privateKeyring” to a file, but we only generate this file after the app has started running.
One obvious question is why not use Mule secure properties to encrypt the keyring file? The reason is the keyring file contains many lines and the isecure-properties-tool.jar is unable to encrypt a property value with multiple lines. Also, if you manually merge the keyring file to a single line, the key becomes invalid.

<crypto:pgp-config name="DECRYPT-config" doc:name="Crypto Pgp" doc:id="1bd7…b45"
privateKeyring="#[vars.priKeyPath]" publicKeyring="my-pub.asc">
  <crypto:pgp-key-infos>
<crypto:pgp-asymmetric-key-info keyId="foo" fingerprint="D69E938EF3F73BBE"
passphrase="TDTestpgp123" />
</crypto:pgp-key-infos>
</crypto:pgp-config>
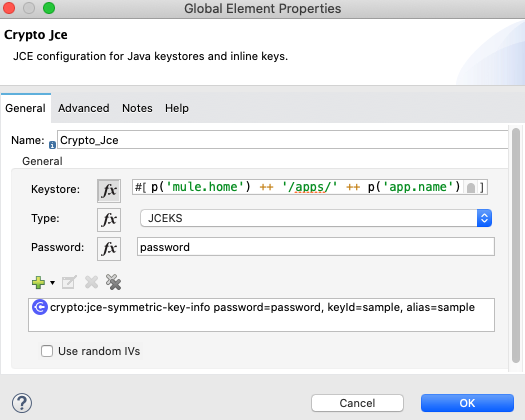
<crypto:jce-config name="Crypto_Jce" doc:name="Crypto Jce" doc:id="7fe0…6" keystore="#[p('mule.home') ++ '/apps/' ++ p('app.name') ++ '/sample.jceks']" password="password" type="JCEKS">
<crypto:jce-key-infos >
<crypto:jce-symmetric-key-info keyId="sample" alias="sample" password="password" />
</crypto:jce-key-infos>
</crypto:jce-config>
<flow name="pgp-encrypted-private-key" doc:id="c…fb" >
<http:listener doc:name="Listener" doc:id="1…c9" config-ref="HTTP_Listener_config" path="/dec"/>
<set-variable value="#[payload]" doc:name="save-inbound-payload" doc:id="05…8e7" variableName="origPayload"/>
<file:read doc:name="read-jec-encrypted-keyring" doc:id="f…c31a" path="#[p('mule.home') ++ '/apps/' ++ p('app.name') ++ '/my-pri-jce.enc']" />
<crypto:jce-decrypt doc:name="Jce decrypt" doc:id="c9…10" config-ref="Crypto_Jce" algorithm="AES" keyId="sample"/>
<set-variable value="#[p('mule.home') ++ '/apps/' ++ p('app.name') ++ '/my-pri-jce.asc']" doc:name="priKeyPath" doc:id="ea0…92" variableName="priKeyPath" />
<file:write doc:name="Write-unencrypted-keyring" doc:id="d6…57" path="#[vars.priKeyPath]"/>
<logger level="INFO" doc:name="show-payload" doc:id="fa7…a6" message="#[payload]"/>
<set-payload value="#[vars.origPayload]" doc:name="restore-original-Payload" doc:id="64…2c6b" />
<logger level="INFO" doc:name="show-payload" doc:id="f9…93" message="#[payload]" />
<crypto:pgp-decrypt doc:name="Pgp decrypt" doc:id="a…6ef" config-ref="DECRYPT-config" />
<logger level="INFO" doc:name="show-payload" doc:id="61…73" message="#[payload]" />
</flow>

This image still shows my-pri.asc in the resource folder. If you encrypt the private keyring, you can delete this file.


