
Grounding AI agents with real-time, accurate enterprise data is crucial. This is achieved through Model Context Protocol (MCP), the open standard for secure, reliable agent-to-tool communication. But does this mean that you need to completely change your enterprise architecture to build new MCP servers?
As a MuleSoft customer, you already possess a robust library of existing APIs that connect to your core systems. The most efficient and secure path to becoming an agent-ready enterprise is by adapting the existing APIs to the MCP standard, rather than undertaking the time-consuming and risk-prone effort of creating net new MCP servers from scratch. In addition, by leveraging existing APIs, you can capitalize on your current security measures, governance framework, and established connectivity.
We’ll walk through how you can transform your API into an MCP server that AI agents can use.
Why make APIs agent-ready as MCP servers?
Making your existing APIs agent-ready for Model Context Protocol (MCP) servers is the fastest way to bring AI capabilities into your enterprise. You instantly accelerate your AI adoption by reusing established APIs and integrations, saving significant time on planning and development. Crucially, this setup provides AI agents with direct, real-time data access, ensuring they are context-aware and grounded in accurate, live information.
When transforming APIs into MCP servers, best practice is to break down complex API endpoints into simpler tools that are perfect for agentic clients. This is because AI agents thrive with a reliable sequence of simple, predictable steps. This strategic simplification focuses the agent’s actions on what is straightforward, repeatable, and optimal for business processes, allowing them to execute reliable tasks at enterprise scale.
Why use MuleSoft?
MuleSoft is the ideal platform for transforming APIs into MCP servers. It provides a unified, enterprise platform that maximizes your existing API investments. Because MuleSoft customers already utilize API-led architecture, they can use existing Process and Experience APIs as powerful MCP servers. This lets agents immediately leverage business process led integrations without needing to call individual systems directly.
The MuleSoft Connector for MCP quickly makes your Mule apps and APIs agent-ready, instantly connecting them to AI agents like Agentforce, Claude, and more. You can host both MCP servers, surfacing legacy systems to agents, and MCP clients, orchestrating agents within workflows. This eliminates the need for custom hosting environments and instead, take advantage of the platform you’ve been using for integrations and APIs.
Furthermore, MuleSoft ensures governance and scale with Flex Gateway support for MCP. Flex Gateway applies enterprise-grade security and logging to every agent interaction. And with MuleSoft Agent Fabric, you can discover, orchestrate, and observe your entire agent network. With all these innovations, MuleSoft is the secure foundation for embedding AI into your business ecosystem.
Now that we’ve talked about the importance of using existing APIs to create MCP servers, let’s get started.
Step-by-step guide
To follow along with this guide, you’ll need:
- Anypoint Platform Account: Sign up for 30-day trial
- Anypoint Code Builder (ACB): For more information on how to set up Anypoint Code Builder, check out Getting Started with Anypoint Code Builder. Make sure you are logged into your Anypoint Platform account.
We’ a’re going to create a simple MCP server that gets information about a pet based on its ID through a sample API called Swagger Petstore.
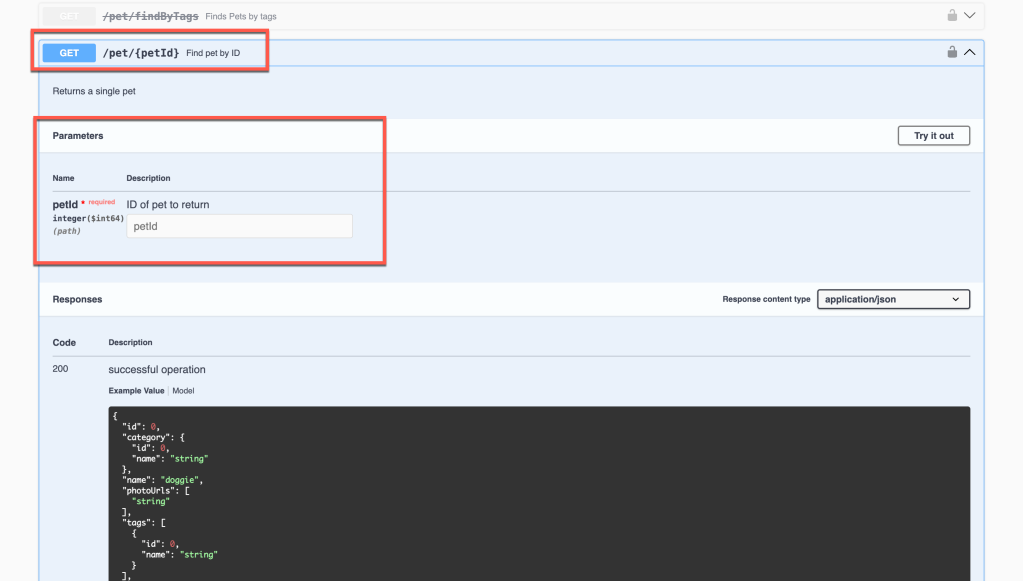
Study the API
Before we start building out the MCP server, we first need to get familiar with what the API offers. Swagger Petstore has many endpoints. For this guide, we will focus on /pet/{petId}. petId is the input parameter that we need from the user to get the information for the pet.
Implement the Flow
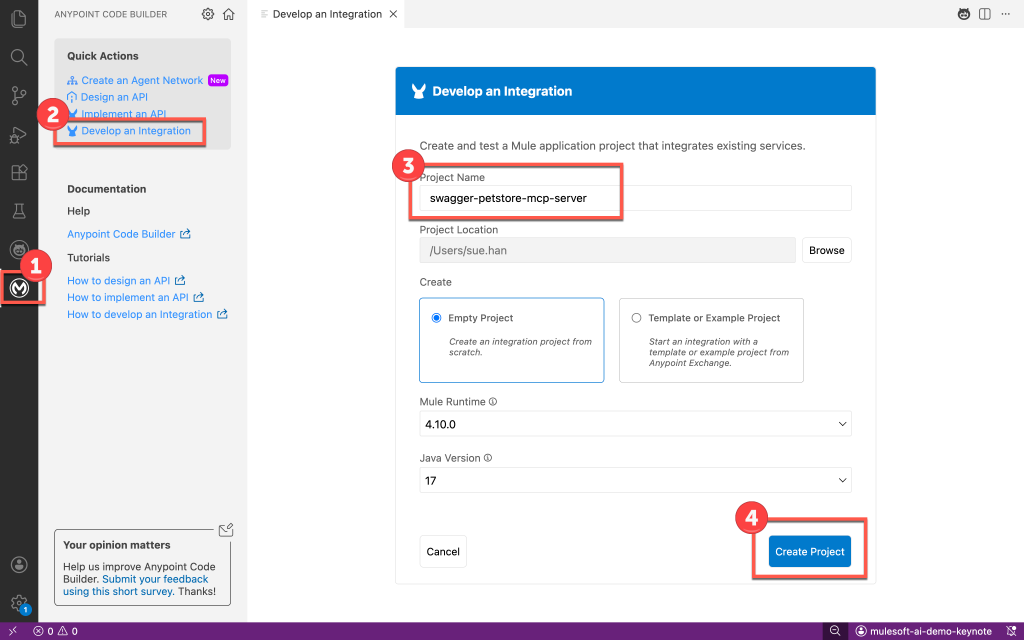
In ACB, we need to first create a new integration project.
- Open Visual Studio Code and click on the MuleSoft Logo in the left sidebar
- Click on Develop an Integration
- Place a project name such as swagger-petstore-mcp-server
- Click on Create Project
- Open swagger-petstore-mcp-server.xml (path: [project folder]/src/main/mule)
- Click on Create an MCP Server
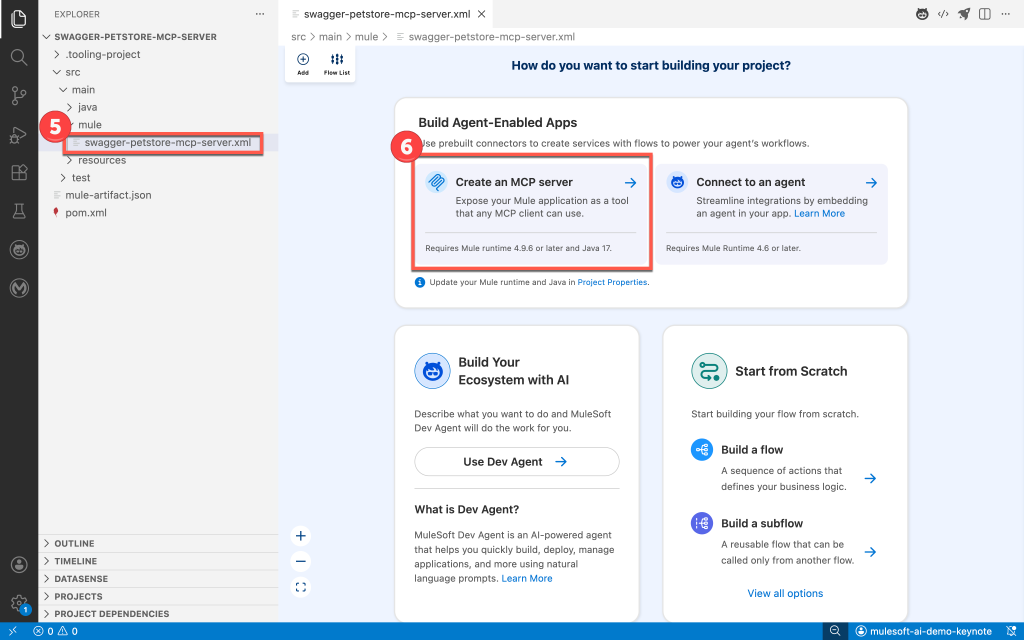
Once done, you will see a Mule flow with MCP connector already added as a listener for a tool. Each project can have multiple Mule flows which can translate to having multiple MCP tools within your MCP server. We will create an MCP server with 1 MCP tool.
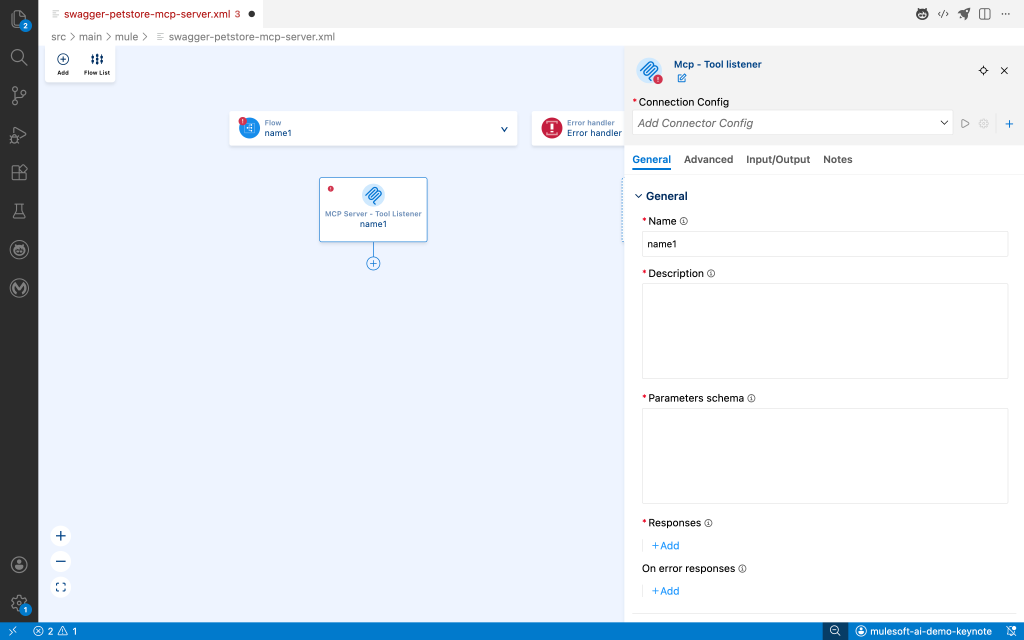
With the project created, let’s configure the MCP listener connection.
- Click on the + (Add New Connection) button under Connection Config section
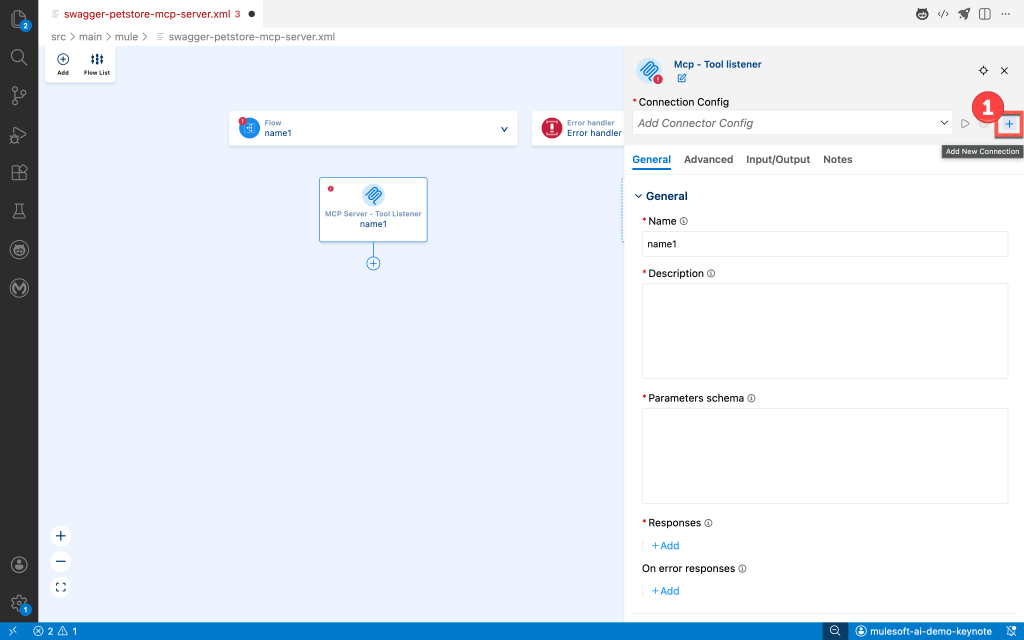
- Under connection, choose streamable http server
- Click + under Listener config to create a new HTTP connection configuration
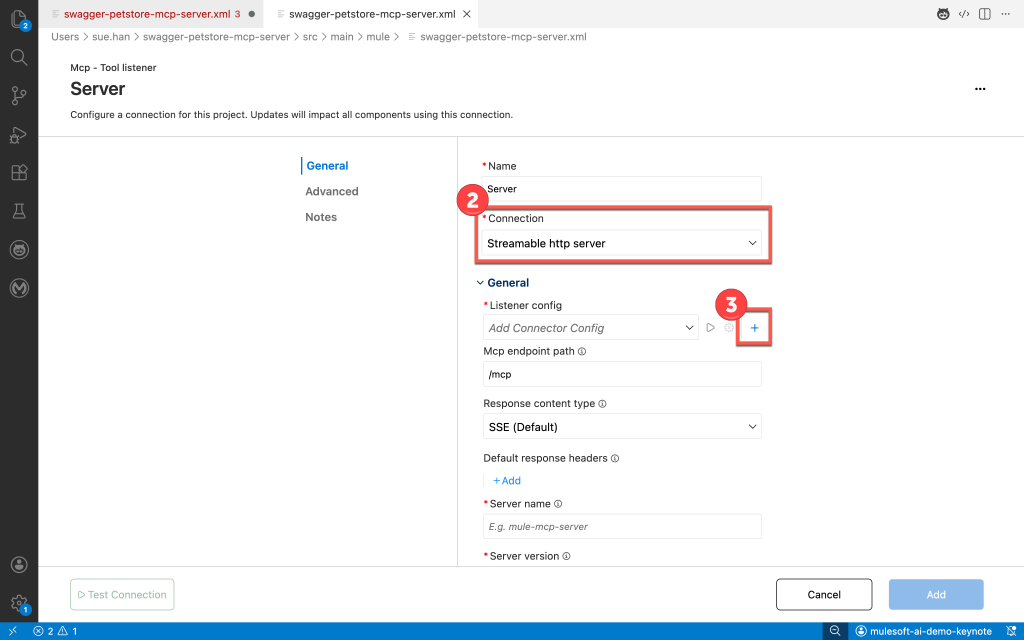
- For Host, put in 0.0.0.0 and for Port, put in 8081
- Click Add

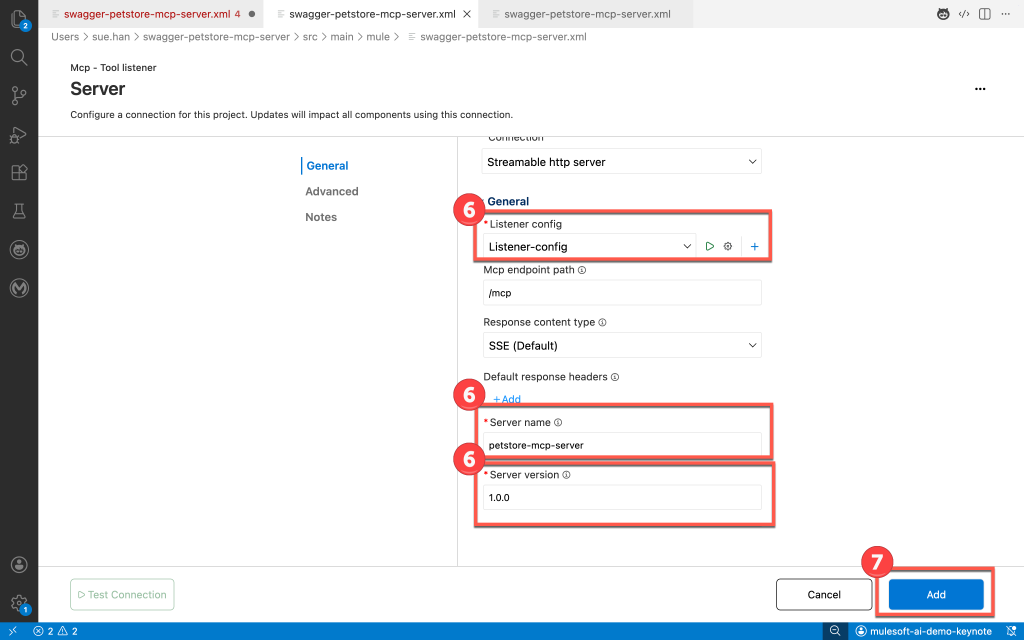
- Back in MCP – Tool Listener Configuration, fill out:
- Listener-Config set to the new HTTP Configuration
- Server Name: petstore-mcp-server
- Server Version: 1.0.0
- Click Add
With the connection created, now we need to configure the MCP – Tool Listener connector itself with the following information:
- Name: get-pet-by-id
- Description: Returns a single pet at Swagger Pet Store based on the ID provided by the user
- Parameter Schema:
{
                "$schema": "http://json-schema.org/draft-07/schema#",
                "type": "object",
                "properties": {
                    "petID": { "type": "string", "description": "Pet ID" }
                },
                "required": ["petId"]
            }
Parameter Schema defines the input parameters for a tool using a JSON schema, including natural language descriptions for each parameter to help the LLM in understanding and populating the required information. In this case, we are requiring the user to input in a petID.
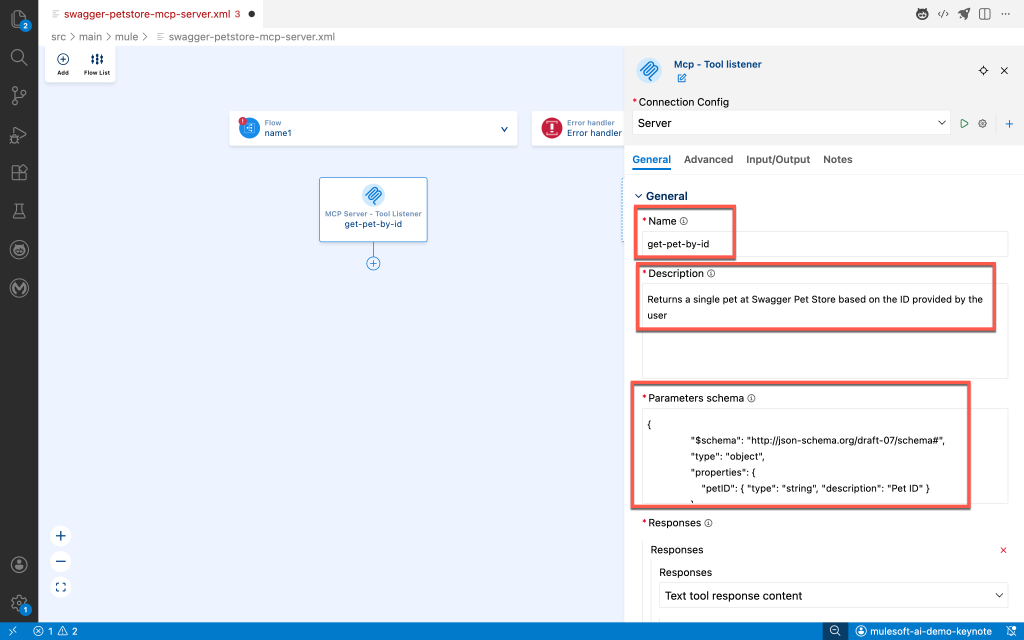
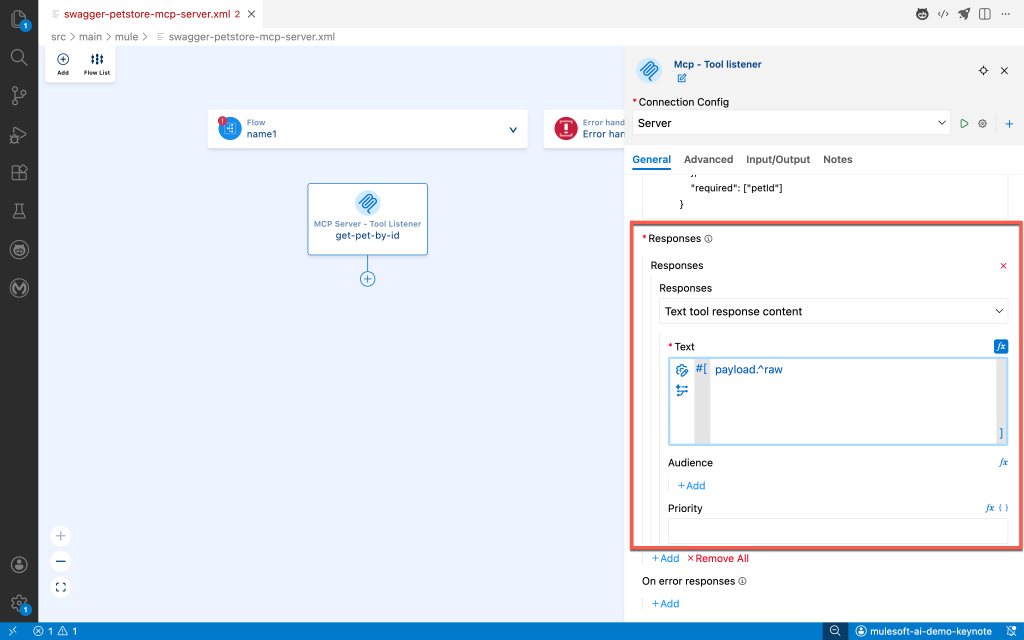
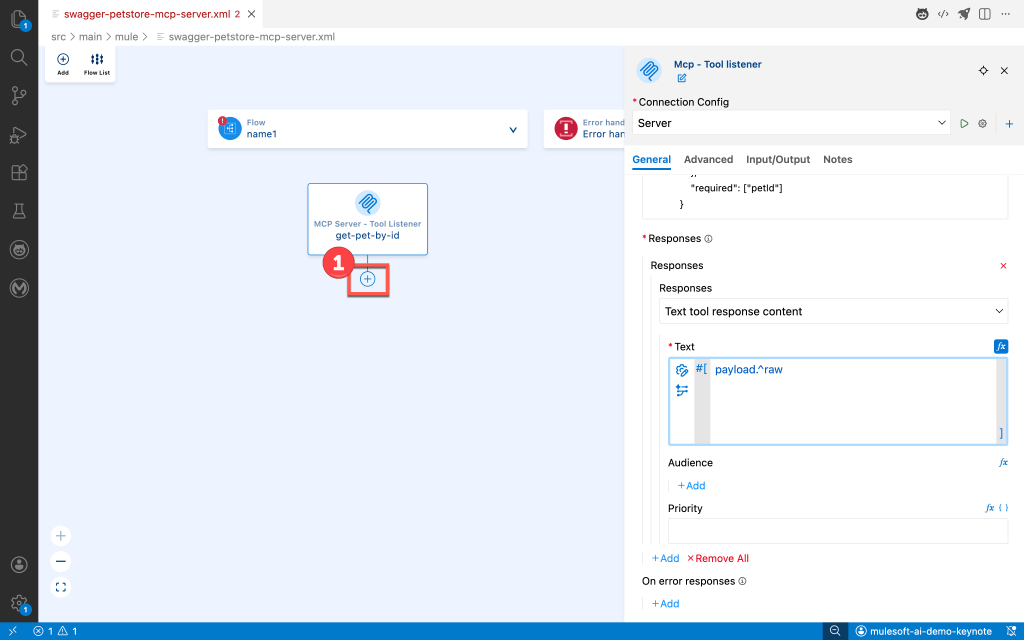
- Responses: click + Add and in Text, place #[payload.^raw]
Now that the set up for the listener is done, we need to connect to the Petstore API.
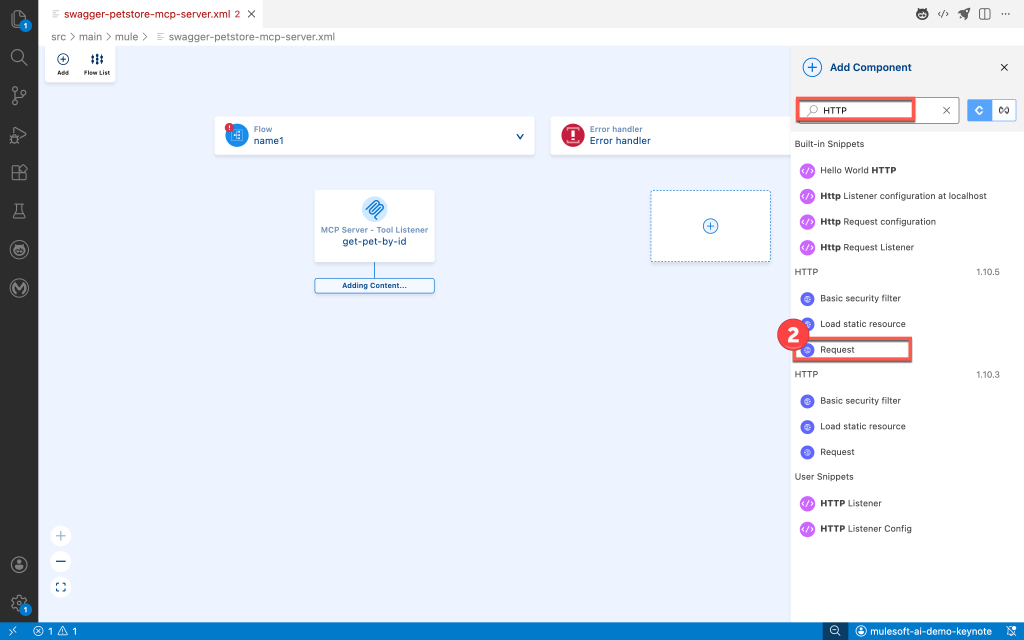
- Click on + button below the listener in the flow
- Search HTTP and choose Request under the HTTP Connector
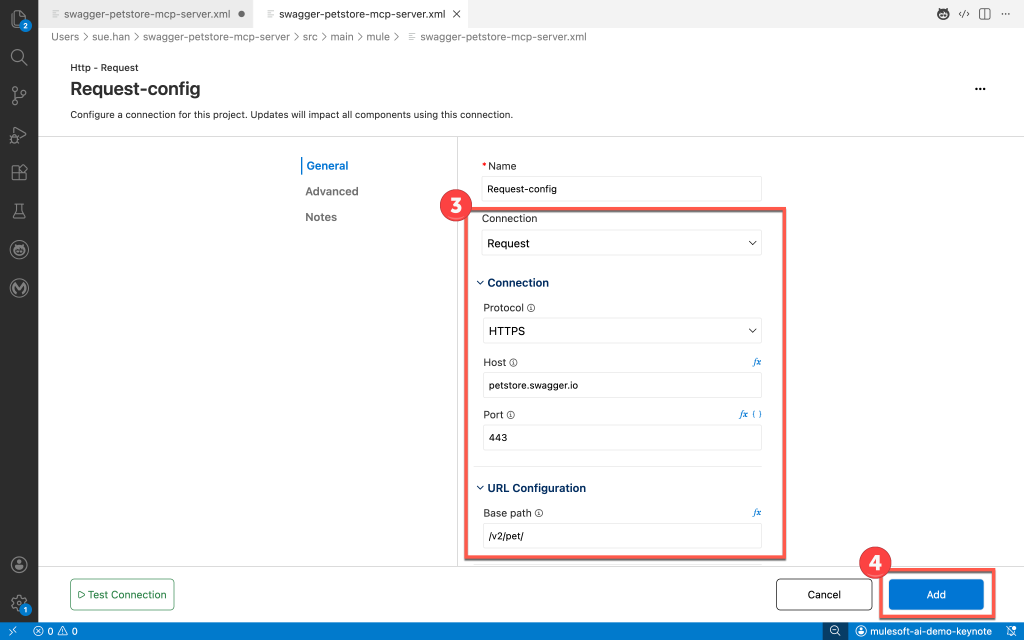
- Create a new connection configuration for HTTP request (click on + next to configuration)
- Choose Request under Connection
- Protocol: HTTPS
- Host: petstore.swagger.io
- Port: 443
- Base Path: /v2/pet/
- Leave everything else as default and click Add
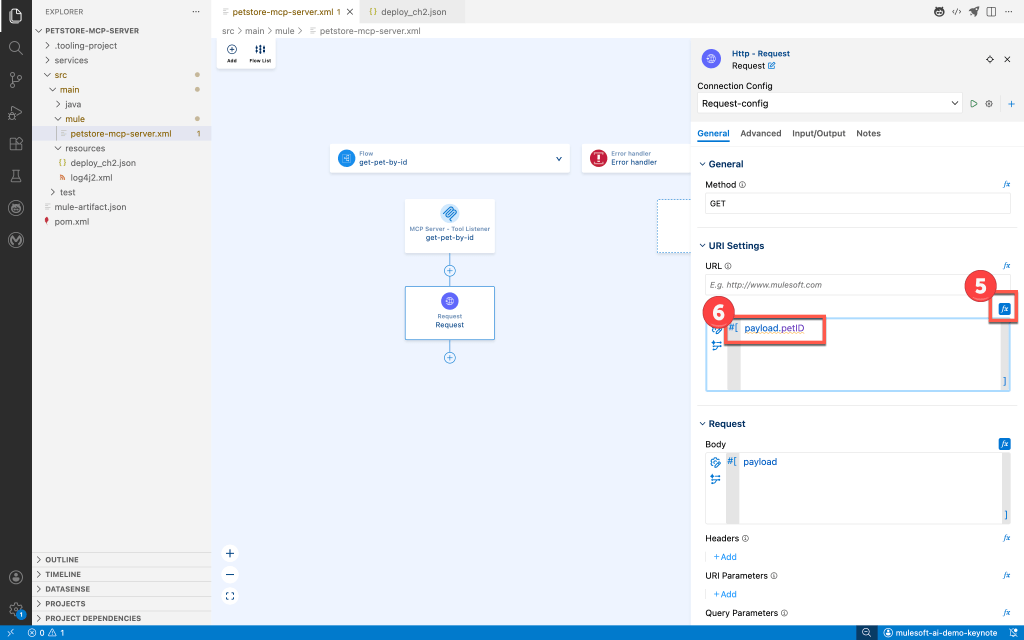
- Click on fx button next to path
- Put in payload.petID. Using Dataweave, we are able to get the petID value from the listener.
With the MCP server built out, let’s deploy the app to CloudHub 2.0.
Deploy
To deploy the application, follow these steps:
- Click on the rocket button on the top right.
- Choose CloudHub 2.0
- Deployment target of your choice. I chose Cloudhub-US-West-2 since that’s closest to me
- Choose sandbox for the environment
- When deploy_ch2.json file opens, leave as default and click deploy under notifications.

- Choose the latest runtime version
- For application version, put in 1.0.0
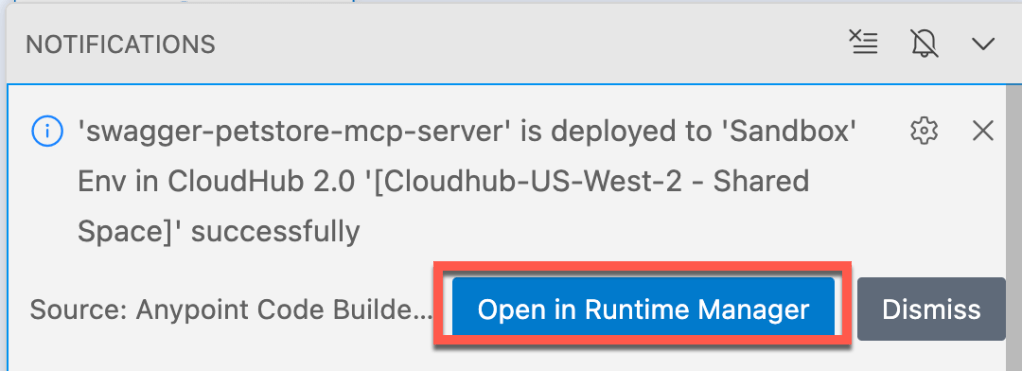
- Once the build is successful, you can check the status of the deployment by clicking on Open in Runtime Manager under notifications.
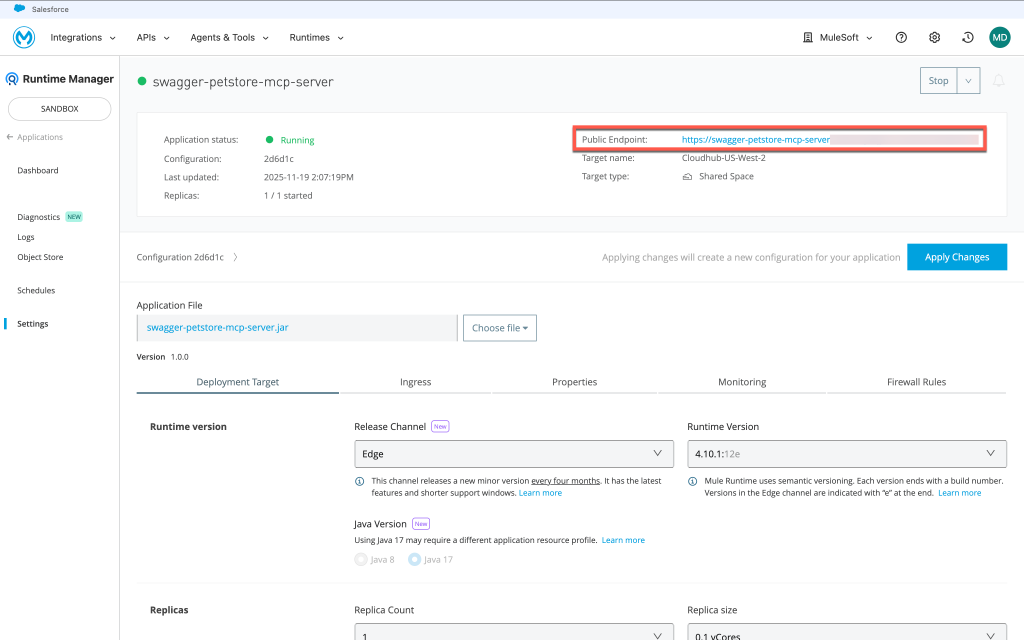
- In Runtime Manager, find your application and check that it’s running. Make sure to grab the public endpoint url to test the MCP server.
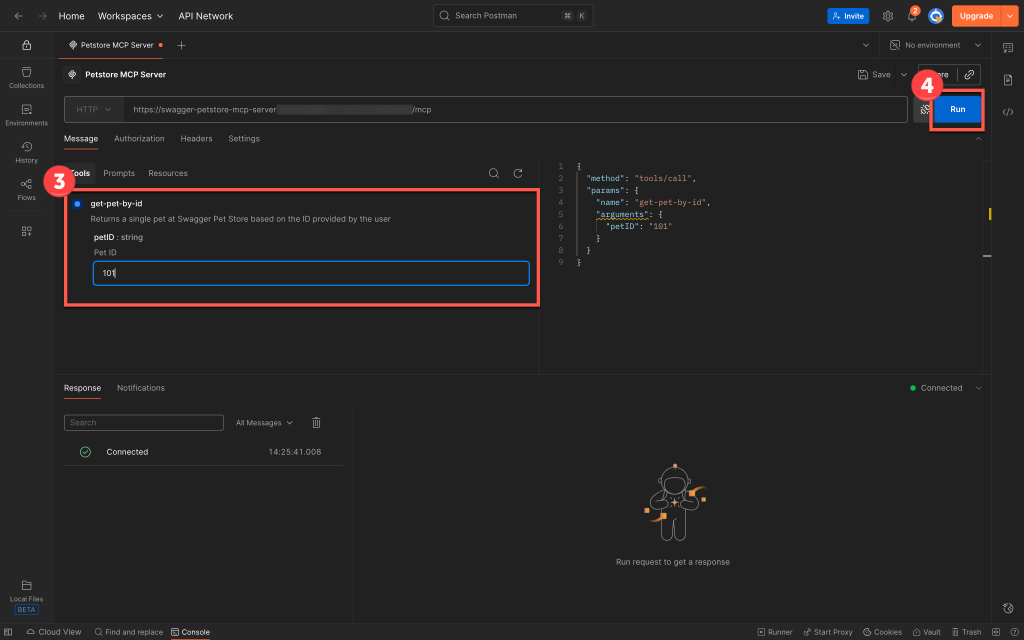
Test out the MCP server in Postman
To test out the MCP server, we will use the Postman Desktop since it’s widely available. You need to make sure you are using MCP as the protocol in Postman.
- Choose HTTP and add the url. The url is: [public endpoint from Runtime Manager]/mcp
- Click Connect
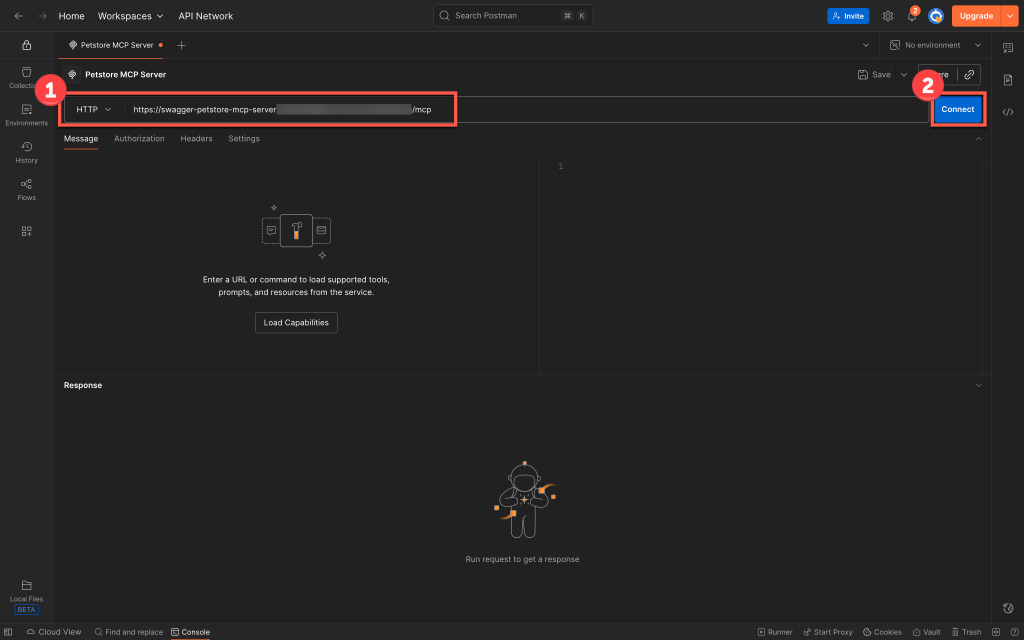
- Click on get-pet-by-id and put in 101 as the ID
- Click on Run
You should get a simple response back such as:
{
    "content": [
        {
            "type": "text",

            "text": "{\"id\":101,\"category\":{\"id\":1,\"name\":\"dogs\"},\"name\":\"Rex\",\"photoUrls\":[\"https://example.com/dog.png\"],\"tags\":[{\"id\":2,\"name\":\"pet\"}],\"status\":\"available\"}",

            "annotations": {

                "audience": []
            }
        }
    ],

    "isError": false
}
On your way to success
By following these steps, you can simply set up an MCP server with an existing API. With this as a starting point, you can go on with more advanced configurations and use all that Anypoint Code Builder has to offer to build your MCP servers with existing APIs.
What’s amazing is that you can bypass a lot of the configuration seen in this guide with the help of MuleSoft Vibes. With MuleSoft Vibes, you can use natural language to help you start building MCP servers.
Try out our interactive demo for some hands-on action. Lastly, do you have APIs you want to transform to MCP servers? Try it out with this guide as your starting point!


