
When you need to build an application and get it into production quickly, a template-driven, drag-and-drop development platform can save you hours of time. To streamline the integration process, MuleSoft has developed templates for Anypoint Flow Designer, packaging recurrent patterns to help developers work faster.
Templates are pre-built applications for common use cases that can be launched with just a few clicks and be configured via an intuitive interface. These templates can connect various systems, like Jira, email, Salesforce, Nexmo Message Service, internal APIs, Slack, and more.
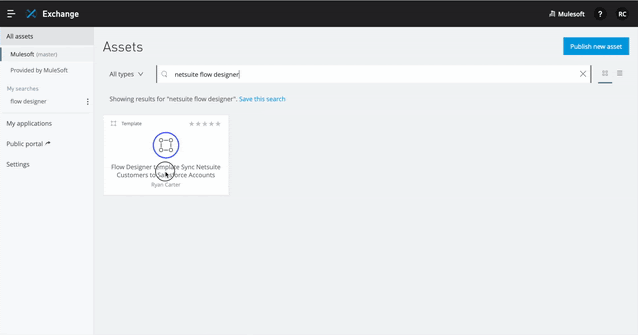
Netsuite to Salesforce integration example
Let’s take a look at an example. You can find the template on Anypoint Exchange and open it directly in Flow Designer.
Step-by-step walkthrough
- In Exchange, locate a template that you want to use: e.g. Sync NetSuite to Salesforce.
- Under All assets on the left side of the screen, click Provided by MuleSoft.
- Select Templates in the drop-down list to the left of the search bar.
- Search a term to filter the list of templates. e.g. NetSuite.
- Click on a template to see details about it. The details include:
- An overview of what the template does.
- A list of prerequisites for using it.
- A list of steps for configuring it.
- Look for the option Open flow in the top-right corner of the details page. The presence of this button indicates that the template is compatible with Flow Designer. If the only option is Download, then the template is compatible only with Anypoint Studio.
- Click Open flow.
Result: The template is opened in read-only mode in Flow Designer. Read-only mode lets you find out which connectors and operations are used, how data changes as it moves through the flow, and what connection configurations are already set up for your systems. - Once you’ve decided on a template, click Use this template in the top-right corner of Flow designer.
Result: A dialog box asks you to name the new project based on the template and to select the environment to create it in. After you click Create, the project is opened in edit mode. Red dots above the cards indicate places where fields need to be filled in before running the application. For example, you must provide credentials for authenticating to systems that are represented by cards. - Provide the required information.
- Click the Problems tab at the bottom of the screen to see the list of problems.
- Click on a problem and the application will direct you to provide more information. Click on the Notes tab for guidance.
- Continue down the list of problems until none remain.
Result: All of the red dots should now be gone. At this point, you could run the application. However, you may need to customize it for your particular use case. You can do that in the next step.
- Open each card, review the values in its fields, and customize any values unique to your use case. For guidance, while you are customizing, refer to the Notes section in each card.
- When you are ready, click Run to execute the application temporarily and test it. While an application is running, you can trigger its flows and verify that data moves through the flows correctly. After you click the Run button, the application continues to run for 60 hours unless you adjust it. Whenever a change is made the application stops running.
- When you are satisfied with the application, click the Deploy button to run the application in a sandbox environment or in a production environment.
Reusable connection configurations
During the above walkthrough did you notice how I did not have to add any credentials? Instead, I chose already created ones. Flow Designer allows you to create reusable connections for yourself and others.
Users can now reuse connector connections created in other projects and by other users. They can be centralized, shared and reused in future Flow designer projects. Thereby simplifying sharing and reducing credentials maintenance effort. There will be a future post on this topic.
Testing the integration example
Now with the template configured and executing, let’s put it to the test by creating a new customer in NetSuite and verifying that it is synchronized to Salesforce:
- Create a new customer in NetSuite.
- The application searches for new or updated customers in Netsuite.
- It then searches for a matching account in Salesforce using the NetSuite company name.
- If a matching account is found, the application updates the existing account in Salesforce.
- If no matching account is found, the application creates a new account in Salesforce using the templates default data mappings (they can be customized if required).
- Green check marks will appear on every successful processor (red ones will appear if any errors occur) as event passes through the flow. This feature allows you to debug your integration application visually in real-time.
- The integration application also needs to store the state of the last time a customer was updated (so that only new and update NetSuite customers are processed), this is called watermarking. If this application was developed by a Mule developer it might require some additional infrastructure to store state or in-depth programming knowledge. However, Flow Designer already has this logic developed and is ready to use out-of-the-box. A Citizen Integrator can use the Object Store to persistent data with the Object Store Connector without requiring any additional infrastructure or advanced programming expertise.
Conclusion
You can build powerful integration solutions with clicks, not code, all without leaving your browser. Credentials are secured and reusable, and debugging is made easy with the visual debugger. Development time is substantially reduced via ready-made templates that are reusable and highly configurable.
To see view other available templates and connectors, visit MuleSoft’s Anypoint Exchange.


