In part one of this blog series, we covered how there is more than one persona involved in consuming an API and we defined the hyper-personalized experiences we would create in our developer portal. In this follow-up post, we’ll look at how we can configure persona-based experiences in three parts in Anypoint Platform’s API Community Manager.
- Implement a way to identify CommunityApi names.
- Create a page variation.
- Edit audience assignments for specific page components on the new page variation.
#1 Create a tab in Salesforce to review the records available
To filter the page variation you’ll need to identify the CommunityApi name. To get started you’ll create a tab in Salesforce to review CommunityApi records available. Below are the steps to do so:
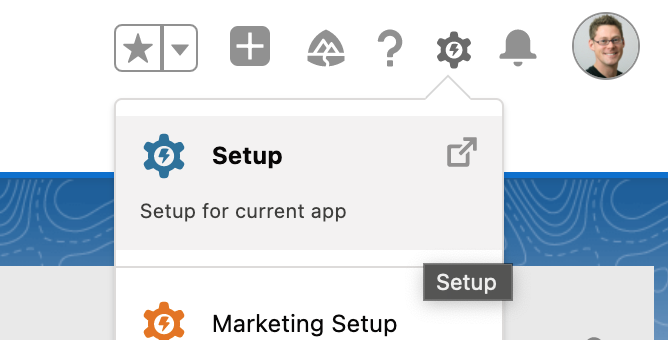
- Go to setup in Salesforce where your API community manager package is.
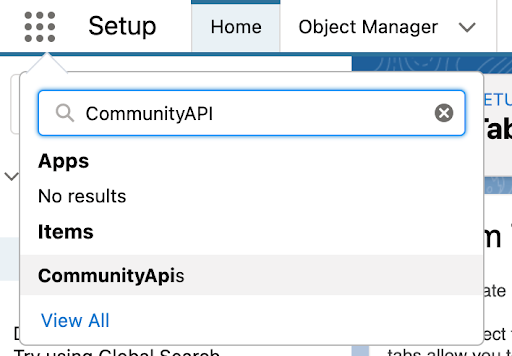
2. In the quick find search box, type and select the “Tabs” option under user Interface.
3. Select the “New” button.
4. In the object drop-down, select “CommunityApi.”
5. Select any tab style you prefer.
6. Select “Next” twice, then select “Save.”
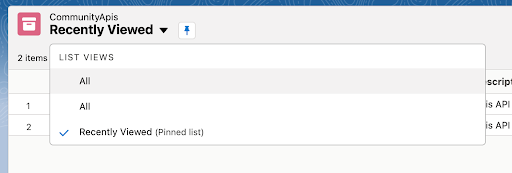
7. Open the app launcher and search for “CommunityApis.”
8. Change the list view to all.
9. You are now able to see the CommunityApi Name of all APIs in your Community.
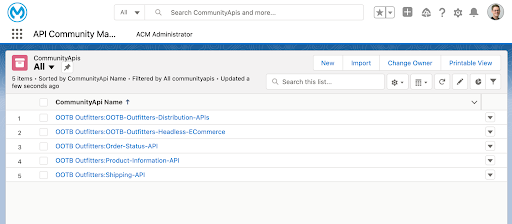
10. Capture the full name of each API that you want to specify within the user type page variation.
#2 Create a page variation for specific APIs
To achieve my user story, we’ll need to ensure that API buyers and API makers are redirected to a page variation where only specific components are visible to them. Remember that the regular members and guests will see the regular API detail page for these APIs.
- Go to the community builder within the ACM administrator indow.
- Navigate to the API detail page.

- When the API detail page has opened, select the cog next to the API detail heading and select “Page variations.”
- Select “New page variation.”
- Select a layout based on your preference.
- Name the page “User Type Specific Views.”
- Select the cog next to the API detail heading and select “Page variations.”
- Select the arrow next to the user type specific views page variation then select “Assign.”
- Select “New audience.”
- Input the following details:
- Audience name is “User Type Specific Views.”
- “Audience matches when” is set to “All Conditions Are Met.”
- Criteria type is record > CommunityApi > CommunityApi name.
- Operator is set to “Equals.”
- Value is [Any of the CommunityApi Names you noted down in Step 12 of Part 1].
- Select “Add condition.”
- Criteria type is set to “Profile.”
- Operator is set to “Equals.”
- Value is set to “API maker” and “API buyer.”
- Your configuration should look the same as the photo below.
- Select “Save & assign.”
- Publish your page.
#3 Assign user types to specific component visibility
To achieve my user story, I want to make sure that only the API maker user type can see the spec downloader component and API console component. The API buyer user type will not see these.
- Copy the layout of your existing page.
For this example, I will place the API header component at the top, followed by the spec downloader component, and the tab component with the nested API documentation viewer and API console. I will then add a second tab component with the nested API documentation viewer and tab called pricing (the Sales call-to-action).
Example below:
- Open the pricing tab on the bottom tab component.
- Drag an HTML editor lightning component into the tab space. On the tab, select “Edit markup” in the component configuration window.
- Copy and paste the following example HTML code into the window. Remember, this is simply an example, and you could do something more advanced such as redirect to a contact form:
<button href=”sales@example.com”>Contact Sales</button>
- Your page should now look like this:
- Select the “Spec downloader.”
- On the configuration window select the arrow and choose “Assign.”
- Select “New audience.”
- Input the following details:
- Audience name is set to “API maker.”
- “Audience matches when is set “to “All conditions are met.”
- Criteria type is set to “Profile.”
- Operator is set to “Equals.”
- Value is set to “API buyer.”
- Select “Save and assign.”
- Select the tab component with nested API documentation viewer.
- On the configuration window, select the arrow and select “Assign.”
- Select “New audience.”
- Input the following details:
- Audience name is set to “API buyer.”
- “Audience matches when” is set to “All conditions are met.”
- Criteria type is set to “Profile.”
- Operator is set to “Equals.”
- Value is set to “API buyer.”
- Select “Save & assign.”
- Select the tab component with nested API documentation viewer and API console.
- On the configuration window, select the arrow and choose “Assign.”
- Select the API maker audience we created in the previous steps.
- Select “Assign,” then “Done,” and then publish your Page
- When testing, make sure to refresh your browser cache (Cmd/Ctrl + Shift + R on Google Chrome) to ensure that you can see the changes you’ve made. Alternatively, you can do your testing in a private browser.
- Your setup is complete!
This is just one way to take advantage of page variations and component audience targeting for hyper-personalized user experiences. I hope this has given you the foundation to come up with other combinations of page variations and components to meet your user story needs!
To learn more about customizing your API community, consider watching our Customizing API Community Manager video series.