
Test fixtures, also known as a test context, sets up the conditions for a test to run. These test conditions will be a known good state that is specific to the code under test. When the test is completed, the state is restored or torn down. Conditions can be set up before a test suite executes and before a test runs. Test suites are extended further by parameterizing executions, enabling the same test to run different inputs.
Test fixtures
A test suite groups tests together and executes them as a batch. This organization allows test groups to be defined by themes and test suites to be executed on a subset of the application’s functionality.
In Java, a test suite is set up with class-level annotations that references test classes. The configurations before and after each test are defined by methods annotated retrospectively, @Before and @After.
@RunWith(Suite.class)
@SuiteClasses({MyFirstClassTest.class, MySecondClassTest.class })

public class CustomerPathTests {

    @BeforeClass
    public static void setUpClass() { }

    @AfterClass
    public static void tearDownClass() { }

}


public class MyFirstClassTest {

@Before
public void setUpTest() {}

@After
public void tearDownTest() {}

@Test
public void test1() {}

}
Fig 1: Junit test suite with setup and teardown.
An MUnit test suite is a collection of MUnit tests. An unlimited number of test suites can be created as needed. The test suite defines setup and tear down logic that executes before and after the suite of tests execute. Optionally, each test within the test suite, can configure a pre and post states which are set up and torn down for each test execution. The configuration element munit:config defines a MUnit suite file.
<munit:config name="implementation-test-suite.xml" />

<munit:before-suite name="implementation-test-before_Suite" ></munit:before-suite>

<munit:before-test name="implementation-test-before_Test" ></munit:before-test>

<munit:test name="Test-1-execution" description="Test">
<munit:execution >
<flow-ref doc:name="Ref to getFlights" name="getFlights"/>
</munit:execution>
<munit:validation >
<logger level="INFO" doc:name="Logger" message="Test 1 execution"/>
</munit:validation>
</munit:test>

<munit:after-test name="implementation-test-after_Test" ></munit:after-test>

<munit:after-suite name="implementation-test-after_Suite" ></munit:after-suite>
Fig 2: MUnit suite and test setup and teardown.
Parameterized tests
Parameterized tests are run with a set of parameters required to pass the test and are executed as many times as there are parameters defined. This allows the same test to be performed for a collection of different values.
In JUnit, an array of data is defined as the source of the parameters. When the test is executed, one of each value from the array is passed to the unit test for each execution.
@RunWith(Parameterized.class)
public class ParameterizedTest {

    @Parameter(0)
    public String pet;

    @Parameters
    public static List<String> data() {
        return Arrays.asList(new String[] { "cat", "dog"});
    }

    @Test
    public void testUpperPet() {
    assertEquals(pet, pet.toUpperCase());
    }

}
Fig 3: The String array defines the parameters passed to each test execution.
One difference between MUnit and JUnit is the ability to define an expected output value for use in the test assertion. For MUnit, test suite parameterization is defined at a configuration level. The input values are defined as attributes to the <munit:parameter> tag. This is also defined as an attribute of the <munit:parameter> tag.
<munit:config name="test-suite-parameterization.xml" >

  <munit:parameterizations>

    <munit:parameterization name="pet1">
      <munit:parameters>
        <munit:parameter propertyName="input" value="cat" />
        <munit:parameter propertyName="output" value="CAT" />
      </munit:parameters>
    </munit:parameterization>

    <munit:parameterization name="pet2">
      <munit:parameters>
        <munit:parameter propertyName="input" value="dog" />
        <munit:parameter propertyName="output" value="DOG" />
      </munit:parameters>
    </munit:parameterization>

  </munit:parameterizations>

</munit:config>
Fig 4: Parameterization configuration.
<munit:test name="parameterized-test">
  <munit:behavior>
    <set-payload value="${input}"/>
  </munit:behavior>

  <munit:validation>
    <ee:transform doc:name="Transform Message" >
      <ee:message >
        <ee:set-payload >
          <![CDATA[  %dw 2.0
                     output application/java
                     ---
                     upper(payload) ]]>
        </ee:set-payload>
      </ee:message>
    </ee:transform>
  <munit-tools:assert-equals
           actual="#[payload]" expected="${output}" />
  </munit:validation>

</munit:test>
Fig 5: Parameter passed via ${input} and expected output via ${output}.
Alternatively, the list of parameters can be set in the MUnit Configuration Global Element. This global element is created automatically for each MUnit test suit.
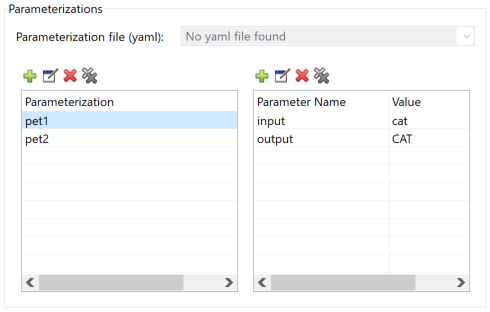
Fig 6: Configure the test parameters using the MUnit Configuration GUI.
Conclusion
MUnit provides the developer with the capability to construct test fixtures and parameterize tests with a similar logical approach that is familiar to Java programmers undertaking application testing.
If you are interested in learning more about MUnit and DevOps related activities essential for the implementation of production-ready Mule applications then consider our course Anypoint Platform Development: Production-Ready Development Practices (Mule 4).


