Ready to unlock the power of AI-driven integration? We’ll walk you through the process of building seamless connections using Agentforce capabilities within Anypoint Code Builder (ACB). Discover how to leverage the power of generative flows, transforming your natural language descriptions into fully functional Mule integrations.
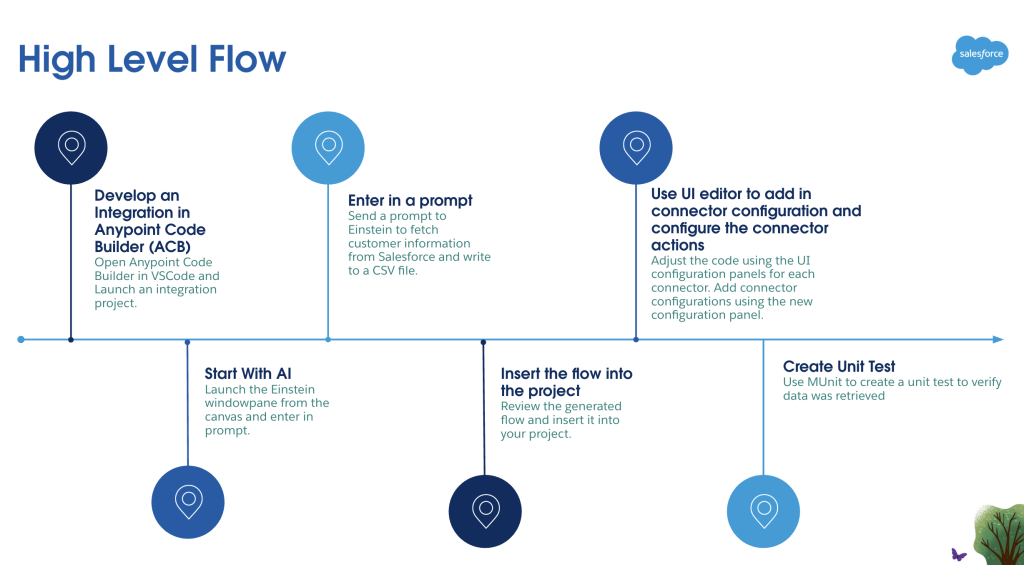
High-level Flow
We will develop an integration using Anypoint Code Builder. We will enter an English language prompt to ask Agentforce to build a Mule integration flow that works for our use-case. Once Agentforce generates the code, we insert it into our project with a click of a button and then we use the UI to configure elements of the flow. Once configuration is complete, we will run the project and generate a CSV file with data from Salesforce.
Check your setup
Before we get started, we need to ensure we have the right set up. There are a few things that need to be installed before we can build integrations using ACB:
- Install Git
- Install VS Code
- Install Anypoint Extension Pack in VS Code
When you search for “Anypoint” within the VS Code Extensions, you will see several extensions with Anypoint in the name. You just need to install the Anypoint Extension Pack and it will auto install all other required extensions.
Enable permissions to use Agentforce
In your Anypoint account, go to Access Management → Salesforce and ensure the Enhance Anypoint Platform with Einstein setting is enabled. Under Access Management → Users, select your user to ensure the following permissions under Anypoint Code Builder are applied:
- Anypoint Code Builder Developer
- Mule Developer Generative AI User
Create integration with Agentforce
Open VS Code and select the MuleSoft icon from the left bar. Choose Develop an Integration and enter in a project name. Click on Empty Project and select a Mule Runtime and Java Version you want to target. Click Create Project.
On the next screen, select the Use Agentforce option which opens the Agentforce panel. If you’re not already logged in to your Anypoint account within VS Code, it might prompt you to connect your Anypoint account to Anypoint Code Builder at this time. In the Agentforce panel, enter the following prompt as-is, and click Send your message.
Generate a flow that listens for requests on path /contactFetch, queries contact records from Salesforce, transforms the results to CSV format, and writes the output to a file.

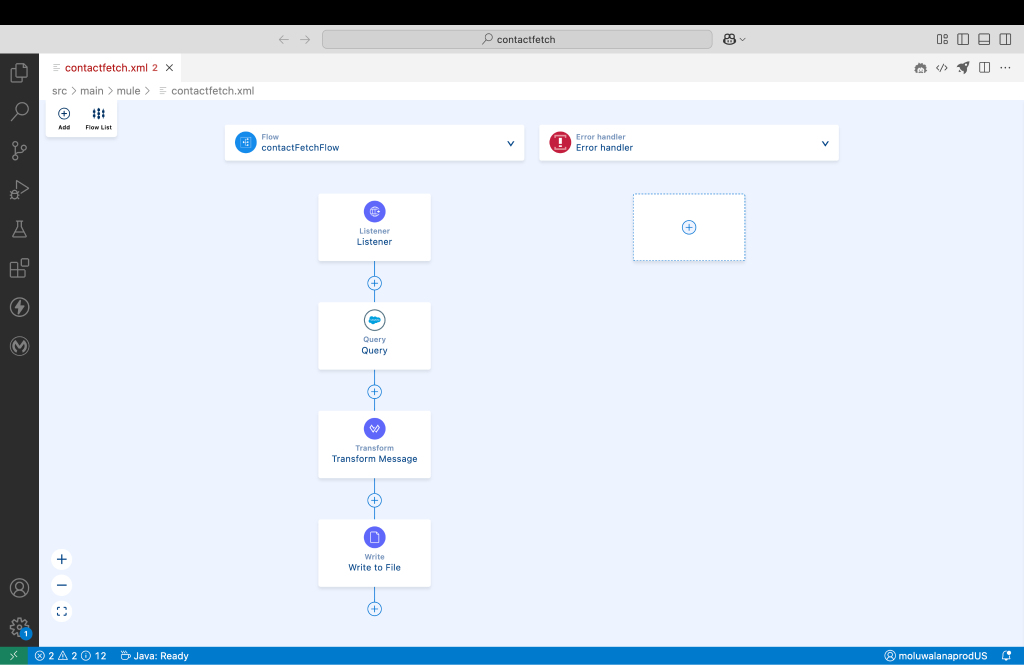
Click Insert above the code generated by Agentforce to insert the flow code generated into our project
Once the code is inserted, you can close the Agentforce panel and the text/code editor. Your project flow should look like this:
For some users, Agentforce might generate the Salesforce Query XML Stream operation instead of the Salesforce Query operation. If that occurs, replace the Salesforce Query XML Stream connector with the Salesforce Query connector manually.
Now that our flow has been generated by Agentforce, all we need to do is configure the operations within the flow, using UI based configuration settings.
Configure your application
Select the Listener within your flow and the configuration panel will open. From the configuration panel, click the + icon to create a new Connection Config for the Listener.
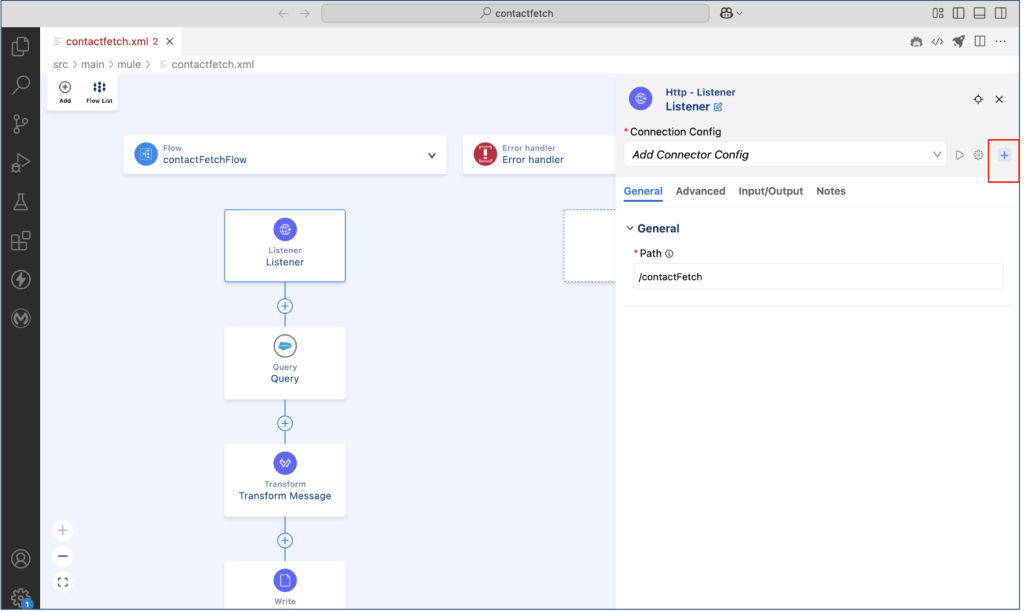
For Host enter 0.0.0.0, and for Port enter 8081 and click Add. This tells the API where to listen for HTTP calls. The host 0.0.0.0 represents localhost.
Select the Salesforce Query operation within your flow and its configuration panel will open up. From this configuration panel, click the + icon to create a new connection to your Salesforce instance. Enter your Salesforce Username, Password, and Security token in the configuration panel, then click Add.
Once the Salesforce connection info has been added, it is important to test the connection to ensure the credentials are working as expected. Click the small play icon next to the Connection Config box to test your connection. You should see a Connection is valid message at the bottom of your screen after it verifies the connection.

Ensure the Salesforce query box has the following query in it:
select Id, LastName, FirstName, Phone, Email from ContactFor the Write operation, update the Path so that the file is written to your preferred location on your machine. Now, we are done configuring our application and are ready to run it.
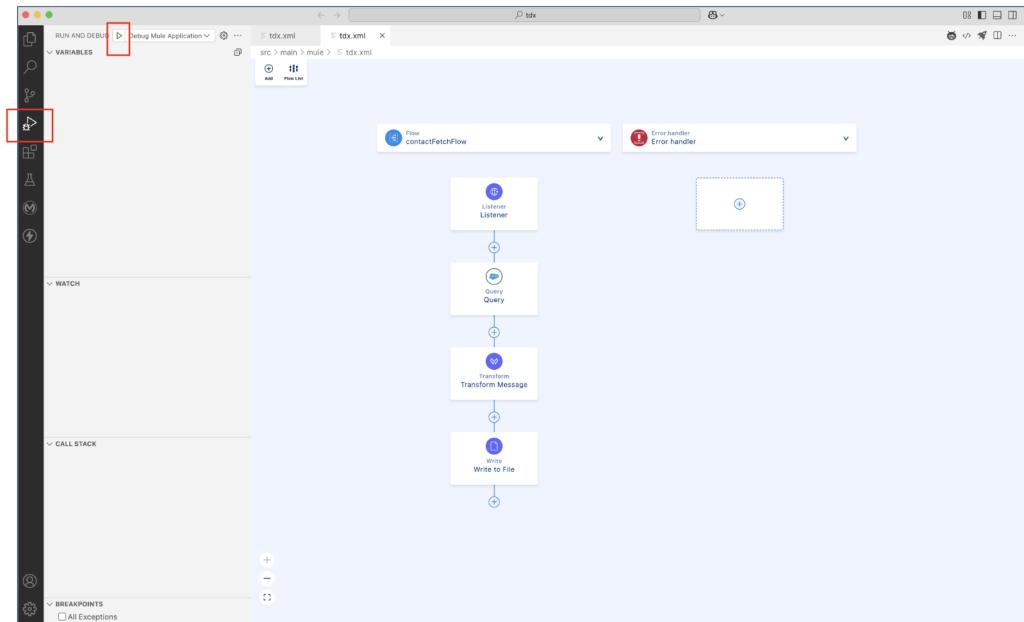
Select the Run and Debug option in the action bar and press the play button on top of the panel that opens up
Once the app completes compiling and is running, you can access the app in an API testing program of your choice via the URL http://localhost:8081/contactFetch, and a CSV file will be generated and saved on your computer.
A sample output generated using the project is seen in the screenshot below:

That was easy, wasn’t it? Happy building!