
Is it possible to create a conversational bot, fully functional, using Natural Language Processing (NLP), in minutes? Good news, it is.
In this post we will show you how to start from the ground up, giving you everything you need to create your own basic conversational bot, using 100% free accounts and software (yes, all this power for free).
The free accounts and software shown in this post have some limitations and it is designed for you to understand and learn the basics of:
- Natural Language Processing APIs from API.AI
- Integration with Slack, using Slack’s Real Time Messaging API (RTM)
- Creating conversation intents and entities in API.AI
- Create a simple software integration in the backend using Anypoint Studio and Anypoint Runtime Manager.
This guide should take you no more than 30 minutes to complete, that is if you have some previous experience with Anypoint Platform.
If you don’t then it should take you less than an hour, which I have to say, it’s nothing compared to what we’re about to accomplish.
Pre-requirements
Let’s begin with what we need before we start:
- Anypoint Studio latest version (at the time of this post it was 6.2.4) Download Link
- Inside Anypoint Studio we need to install the Slack connector, it’s easy, just search and install the connector from Anypoint Exchange, our home to the complete listing of connectors, templates, examples, APIs, and other learning information.
- An Anypoint Platform trial account
- An API.AI account, and the Agent’s Client Access Token
- A Slack Bot and its access token. To create a Bot and get the access token, follow Slack’s guide which is a simple walkthrough.
Once we have the Anypoint Platform and API.AI accounts created, Anypoint Studio downloaded and installed, Slack connector installed in Anypoint Studio, we can proceed with getting the corresponding authorization tokens we will need along our integration (we do this now to keep them close, so we don’t interrupt the flow of this guide).
Save these in a text file, or in a temporary text editor to later copy and paste them in the places we will need them.
API.AI
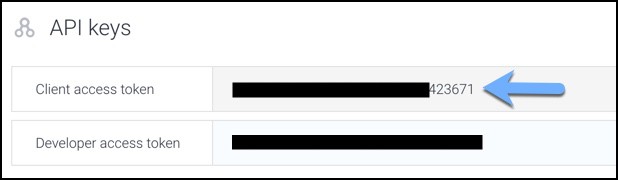
API.AI’s Client Access Token is really easy to get, but first we need to create an Agent to talk to.
An Agent is this bot or “person” we will be talking with through Slack, so we need a way to authenticate with API.AI’s API (ok, that’s a lot of I’s), and let them know we are a trusted client, that’s why we need the Client Access Token.
- Once you are logged in to API.AI, we will proceed to create a sample Agent.
- To do this, just click on the “create agent” button on the main screen or click on your agent’s name on the left sidebar and then click “create new agent”.
- Give your agent a name, a description, a language and timezone. In my case I also selected some sample data to initialize this new agent with so we make this process faster, we can later edit this sample data, for this guide I chose the PizzaDelivery sample data.
- After the Agent is created, press the “gear” icon next to the Agent’s name on the top left sidebar, and copy the long alphanumeric string into our temp text file so we can use it later.

Slack
For the Slack part, we need to first create the Bot in our team, and then get the Bot’s access token.
If you don’t have a Slack team or belong to one you can test Bots with, then you can create a Slack team here.
It’s easy, and you can start using Slack in just a few steps. Then, follow this guide to create your Bot.
If you belong to a Slack team already and want to create a Bot there, please follow this guide to create one.
Once you have your Slack bot created, let’s proceed to get the Bot’s access token, which will allow us to identify ourselves as the backend integration of that Bot, being able to receive and send messages in and out of Slack.
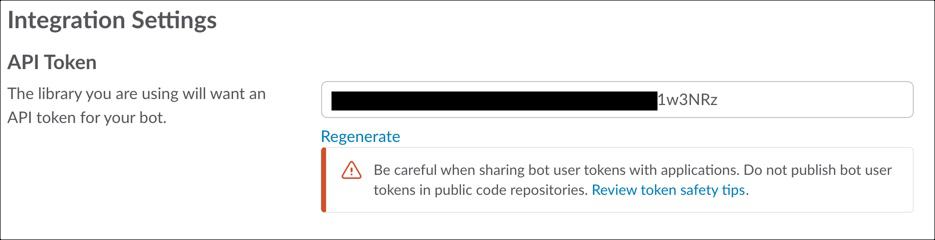
- Go to this link and login with your Slack credentials, then select “Bots” from the list.
- Then, under configurations, edit the Bot configuration by selecting the “pencil” icon to the right.
- Copy the API Token alphanumeric string into our temp text file so we can use it later.
The Backbone Integration
Now that we have our Bot created in Slack, and our Agent created in API.AI, you start getting the picture of the roles of each system and what is the missing piece that connects them all, that’s right, it’s MuleSoft’s Anypoint Platform.
I am going to provide you with a complete Mule project so we can focus on the topics we are talking about here, but you are free to investigate and modify the project as you wish.
Download the project from here, and import it in Anypoint Studio.
(Read this if you don’t know how to import projects into Anypoint Studio.)
The Project Structure
The project is divided into a main flow, and ‘n’ flows per intents of our bot. You might be asking what intents are:
An intent represents a mapping between what a user says and what action should be taken by your software. Read more about API.AI intents here.
That means that if I want my Bot to understand, process and answer about “employee information” and also about the “weather”, then I should create one flow to process and search for employee information and another to get the weather status, and so on and so forth.
The Main Flow
There are some things we need to do between receiving and replying to a message from a user on Slack. Please see the image below, and each block’s explanation (the block numbers correspond to the list numbers after the image):

- Receive the message and capture what we need
- Session management. API.AI needs to know who is talking to, the way it does this is by talking to a “session number”. We create and destroy these numbers, and the session lives until the bot has all the information it needs to fulfill the user’s query.We check if the user has a session alive, then:
- If the incoming message does not belong to a user with a session, then we create a session for this user.
- If the incoming message belongs to a user with a session, we retrieve this session number using the user’s channel ID as the key of the objectStore.
- Here is where we interact with API.AI’s API
- We prepare the structure of the query we have to send to API.AI’s API for interpretation.
- We use the HTTP connector to send the payload to the API
- We receive and capture all the parameters we need from API.AI’s API response.
- Here is where we decide if we should process the user’s query, or if we should keep asking for more information, or just returning a callback, for example If I tell the bot “list the flights of SFO airport” and the bot has no idea what to do with that, then the bot should say something like “I did not understand your question”, that callback would flow through the “default” path of the choice, because it did not match the following criteria:
- A valid intent I have a flow for.
- The action is complete, meaning that I don’t need to ask anything else to the user in order to process the intent.If these 2 are present and “true”, then the choice would route to the corresponding intent’s flow, in this case, if I have everything I need to process the order, then the choice routes to the fulfill order path, calls the flowReference processor, and executes the fulfill_purchase flow, which finalizes the user’s session, as I don’t need to continue the conversation, I just need to reply one last time with the final result of the intent’s fulfillment. These 2 criteria items, are represented by the following MEL expression in the choice:#[flowVars.apiAiResponse.intent == “order.pizza” && flowVars.apiAiResponse.incomplete == false]
Project Configuration
Now that we know how our project works, we can configure the tokens we’ve been so carefully saving. Remember? the API.AI Agent’s Client Access Token, and Slack Bot’s access token.
- In Anypoint Studio, go to the left side project navigator and double click on the file “mule-app.properties”
- Here I have pre-set what you need to configure, those 2 tokens. Paste the tokens respectively. Pay attention to the “Bearer ” prefix that API.AI’s token needs. Paste the token AFTER that “Bearer ” string. It should look something like this:
api.ai.clientToken=Bearer ab7d87bSA89&BBD&A8bdBD&A8bdB
slack.bot.token=xoxb-ab7d87bSA89&BBD&A8bdBD&A8bdB - Make sure you save the file.
That’s all you need to configure! we are ready to test this project.
Test the Project
- On the left side project explorer, right click the project’s name and click on Run As > Mule Application
- Wait for the project to start
- Go to Slack, and open a direct message conversation with your Bot. (basically search your Bot as if it was a person)
- The Bot’s status should be “active”, with a green circle indicating this. Say “Hello” to your bot! I mean, for real, type “hello” and press enter. The Bot should say hi back to you.
- You should be ready to order your first pizza! say “I want a pizza” to your Bot, and follow the conversation along, replying all the information needed to fulfill your pizza order, until you receive something like “All set! A delicious small margherita pizza is on its way to 456 Incredible Street. Stay hungry!”
Deploy the Project to Anypoint Runtime Manager
You might want your Bot to be available 24×7, 365 days of the year, come on, he’s not going to complain. For this reason, we are going to deploy our project to Anypoint Runtime Manager, from Anypoint Studio.
- If your project is running, stop it.
- On the left side project explorer, right click the project’s name and click on Anypoint Platform > Deploy to cloud
- This will open a login window. Login with your Anypoint Platform’s trial account credentials.
- After you login, configure the deployment. Choose a name for your worker, a worker size (0.1 vCores is enough for this low traffic integration)
- After the deployment is configured, click on “Deploy Application” at the bottom.
After 5~7 minutes, your worker should be up and running, and you will be able to re-test your Bot in Slack, but this time, our project is a sophisticated cross-cloud integration application, running in Anypoint Runtime Manager.
This was created and tested with:
- Mule Runtime v3.8.3
- Anypoint Studio v6.2.4
- Slack Connector v3.0.0


