
Here at MuleSoft, we talk a lot about how API-led connectivity can speed up your development cycles, and I’m here to guide you through how to do it. The API-led approach is a natural evolution from developing libraries, writing digestible markdown files, and sharing them on GitHub.
We’ve all inherited the benefits of someone taking the time to build a consumable library, and a resource like an API is an even more powerful version of that thought process. This process is worth doing and doing right from the ground up. This means designing your API specification first.
In this three-part series, I’ll walk you through a live example on how to build a complete end-to-end application powered by APIs for all of your flows.
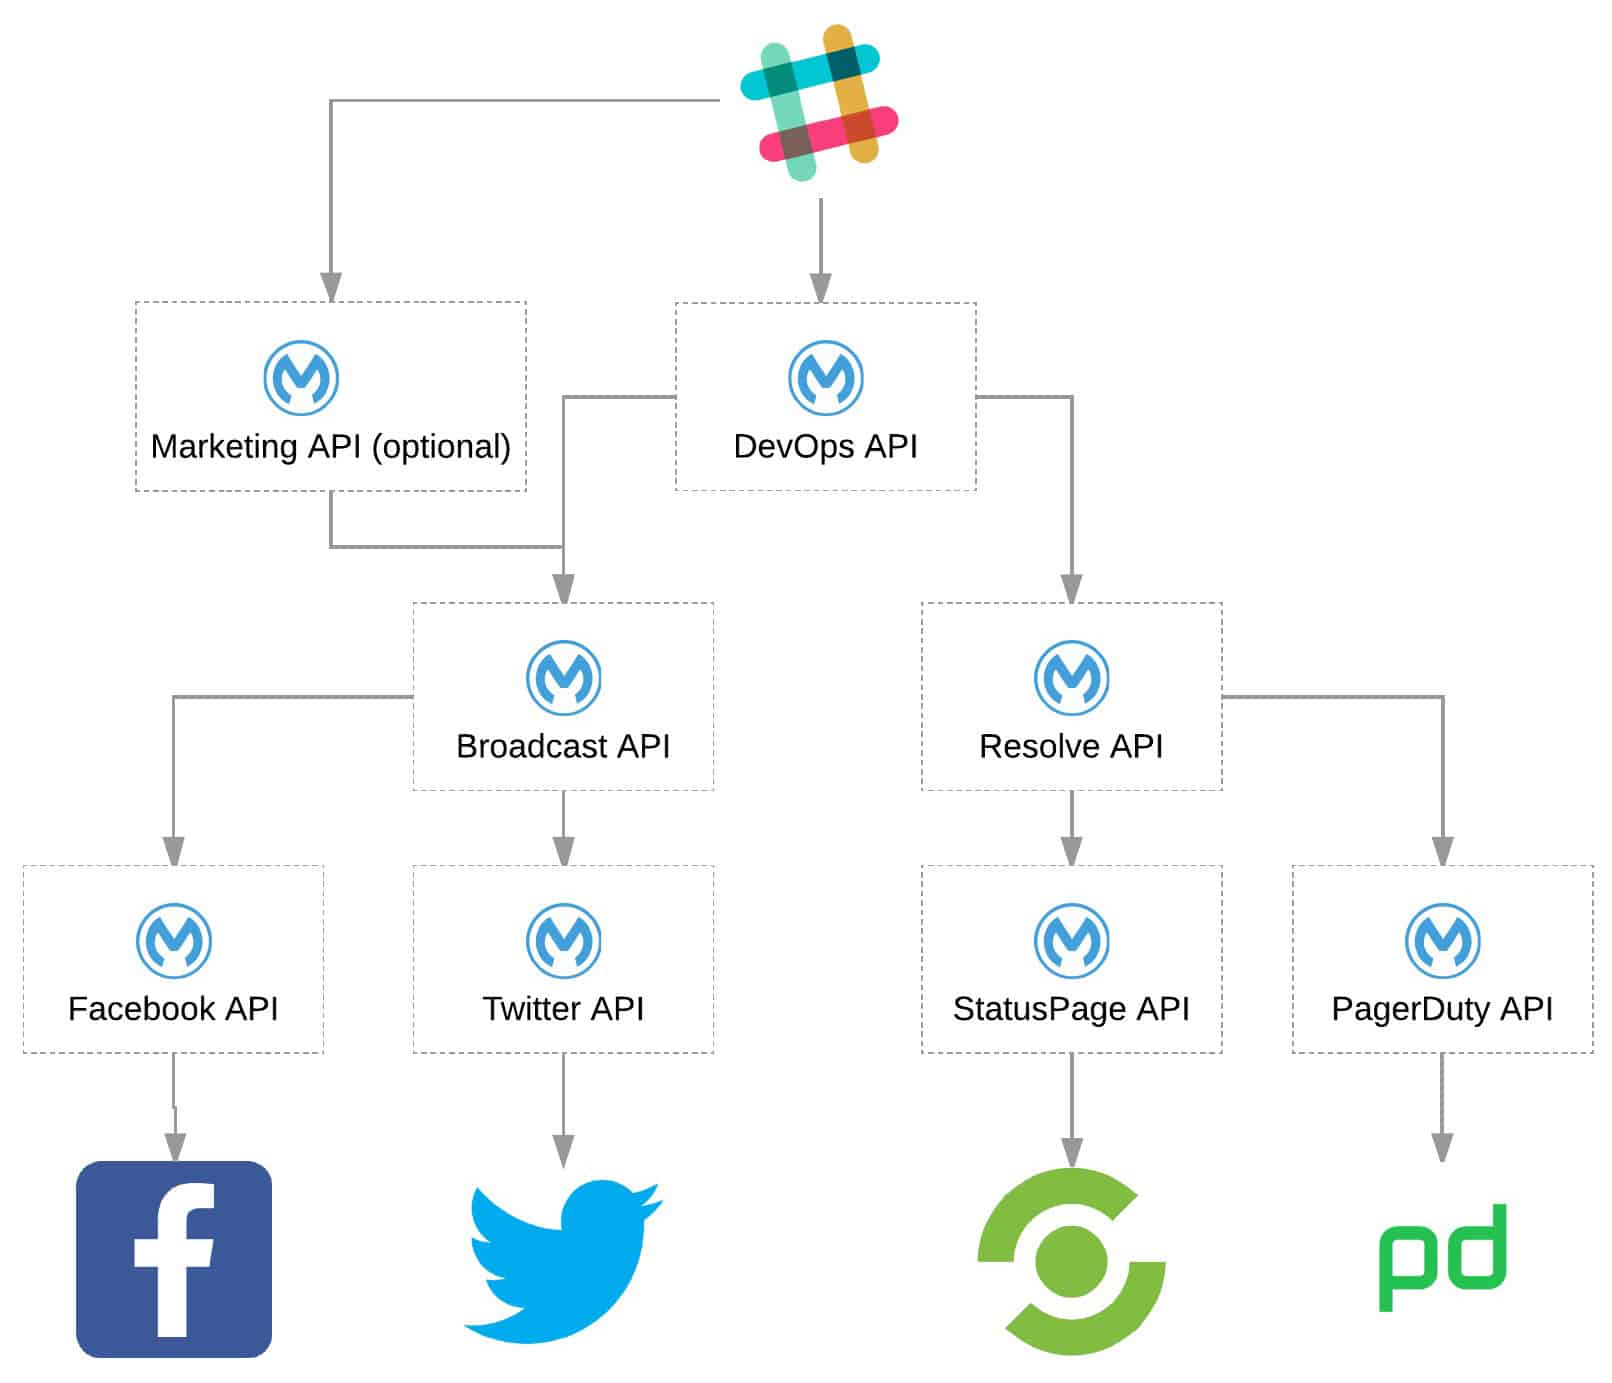
We’re going to use a Slack slash-command to resolve an incident in PagerDuty, and then broadcast to our customers via Twitter and StatusPage.io about the resolution through flexible and stackable APIs. We’ll also cover sharing resources into domains, deploying our API on-premise and/or CloudHub, and how to gain analytics insights with Runtime Manager.
In this first blog post, we’re going to leverage an existing API specification to consume an external REST API, generate RAML files to expose the systems and platforms we’ll be using and publish them to Anypoint Exchange, then we’ll create a process layer API and look at the considerations we need to be mindful of.
To start, sign up for a free trial of Anypoint Platform, if you don’t already have an account.
What is the API-led Approach?
If you’re curious about the different API-led approach layers, I highly recommend reading this excellent blog on the topic. It’s a concept that’s similar to breaking up a monolith into smaller services, but with the added benefit of being able to leverage these atomic resources by clients in infinite ways––and with self-descriptive simplicity.
When it comes to using Design First methodologies for development, the popular languages for designing APIs and describing them for easy consumption include Open API Specification(OAS) and Restful API Modeling Language (RAML). Both are incredibly powerful. For this how-to, we’ll be utilizing RAML.
Tools
- Anypoint Exchange
- Repository of available specifications, connectors, and templates.
- Anypoint Studio
- Desktop IDE for creating flows, connectors, and more.
- PagerDuty RAML Specification
- PagerDuty is a powerful DevOps tool used to gain insights and awareness of servers & services.
- Twitter Connector
- Facebook Connector
- StatusPage.io REST API
- A server/service status communication tool.
- Postman
- An amazing HTTP request tool for all devs.
- Ngrok
- An amazing tool for proxying requests to specific ports on your machine.
Designing Our System API
To kick things off, we need to expose all of the source data and source systems that we’ll be engaging with via APIs in order to gain the flexibility and benefits of reuse. This entails identifying the services, the data structures, and learning how we can interact with that service’s data now and in the future. Design-first requires you to sit and think about how people are going to use your APIs and what they need to know in order to do so when creating an API specification.
Using Existing Connectors to Create an API Implementation
The first system we’ll be providing access via APIs is Twitter. The goal is to set up a proxy that adds Twitter’s authorization parameters and limit the endpoints to a limited set for the API’s consumers.
Create Twitter API Spec using an Existing Connector
- Review Design Center API UI Reference.
- Open Design Center and click the + Create button to create a new API Specification with the project name “Twitter-GetStarted”.
- Let’s set up a description of our service, a describe an endpoint to accept POST requests to /tweet, and add a baseURI it can be reached for future consumers of our service.
- For the BaseUri, I’m going to use ngrok and paste the assigned URL here with the following format: “https://{{id}}.ngrok.io/api/twitter/v1”
- The RAML should look something like this. We thoroughly describe the service, endpoint, and method—including what it accepts and its responses.
- Publish this asset to Exchange. Now, not only can we leverage these specs for consumption, but anyone can incorporate it into their applications as long as they have access to it.
Creating our Tweeting Service
For this next step, skim through this tutorial to get a good understanding of Anypoint Studio’s UI.
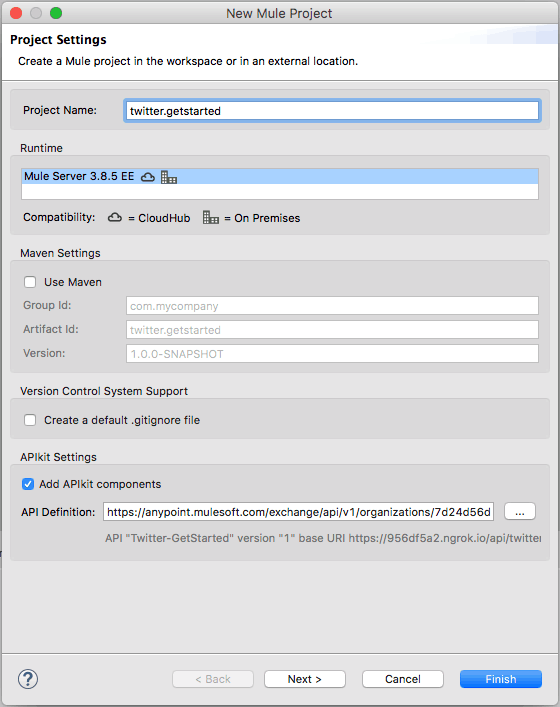
1. Open up Anypoint Studio, create a new project and use APIkit to take our specification and automatically generate a skeleton API, which will perform the endpoint/method routing for us. File → New → Mule Project and we should be able to locate the API spec as available in Exchange so it looks like this:
2. The “Message Flow” view should then pop up and this is where we can easily configure all of our flows and give our application some life. We’re going to start by editing the HTTP connector configuration in our api-main flow and change the Port to “8081” and Base Path to “api”. After clicking “Ok” we can change the connector setting’s Path to “/twitter/v1/*”. This allows us to reach this service at /api/twitter/v1.
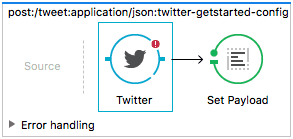
3. Next, search for “Twitter” in the Mule Palette and drag that connector into our “post:/tweet/” flow:
4. Now, follow this instructional video on how to get all the credentials from Twitter and configure them to your Twitter connector:
5. We need to place two DataWeave connectors before and after the Twitter connector so that our flow looks like this:
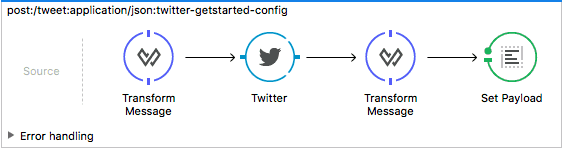
We need to place these transformations because the incoming request body is just a byte array that needs to be converted to a Java object for the Twitter connector, and the response from Twitter needs to be converted from a Java Object to JSON.
6. So for the first DataWeave connector, since we’re converting the payload to a Java Object, the output function should simply look like this:
%dw 1.0
%output application/java
---
payload
7. The second DataWeave connector will just be application/json instead of application/java
%dw 1.0
%output application/json
---
payload
8. Change the output value of our Set Payload connector to “#[payload]”
9. Update the Twitter connector to look like below. Take note of the “#[payload.status]” which picks up the payload from the previous DataWeave connector’s output and allows us to use that to dynamically fill that parameter.
10. Now we can press the Run button and test our application with either Postman or the following CURL command:
curl -X POST
http://localhost:8081/api/twitter/v1/tweet
-H 'content-type: application/json'
-d '{"status": "Tweet Tweet!"}'
Challenge: Use the above pattern with the Facebook connector and create your own API to post messages to Facebook.
Build an API to Consume an External REST API with a RAML Spec
So we built a connector from scratch, using pre-built connectors in order to consume our service. But what about when we don’t have an off-the-shelf connector and don’t want to take the time to develop and manage custom ones? We can use the flexibility of an existing spec to provide us with much of the functionality we need.
Creating Our PagerDuty API Spec
First, we need to find an API Spec for an external service so that we can see how we want to interface with it. Luckily, someone already wrote a RAML spec for PagerDuty’s V1 APIs. All we need to do is define the service for our needs and describe to the consumers of our API how to do so.
1. Start by resolving an existing incident by id—so we’re going to create the endpoint /resolve/{id} which accepts a PUT method. The result should look something like this.
2. Use the same naming convention and import it into Design Center and then publish it to Exchange.
3. Add an HTTP connector from the Mule Palette so that our PUT to the /resolve/{id} flow looks like below. Notice that the HTTP connector can handle the data without DataWeave transformations. We’ll follow a similar pattern as previous steps by creating a path of “/pagerduty/v1/*” and a base path in the connector configuration of “api”.
4. Go ahead and import the entire spec to the project’s src/main/api/ folder. Make sure to delete the connector folder & integration.raml file! You will get some unrelated errors otherwise.
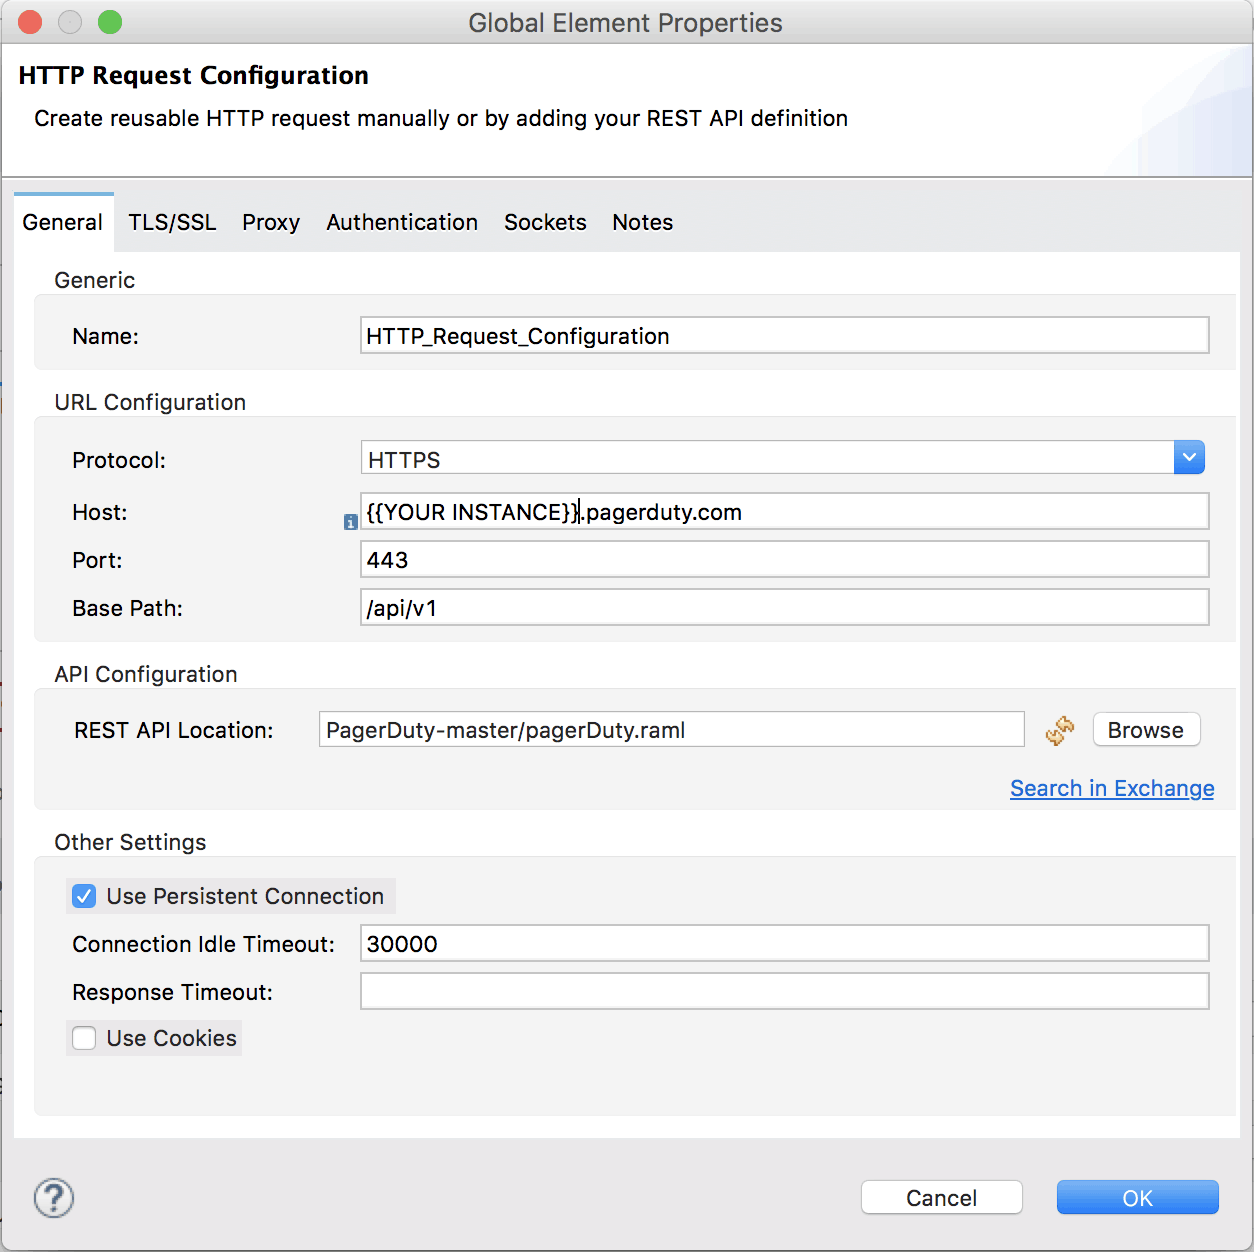
5. Go into our outbound HTTP connector’s settings and press the + for the configuration to get into our configuration screen to import the API and change a few of the fields:
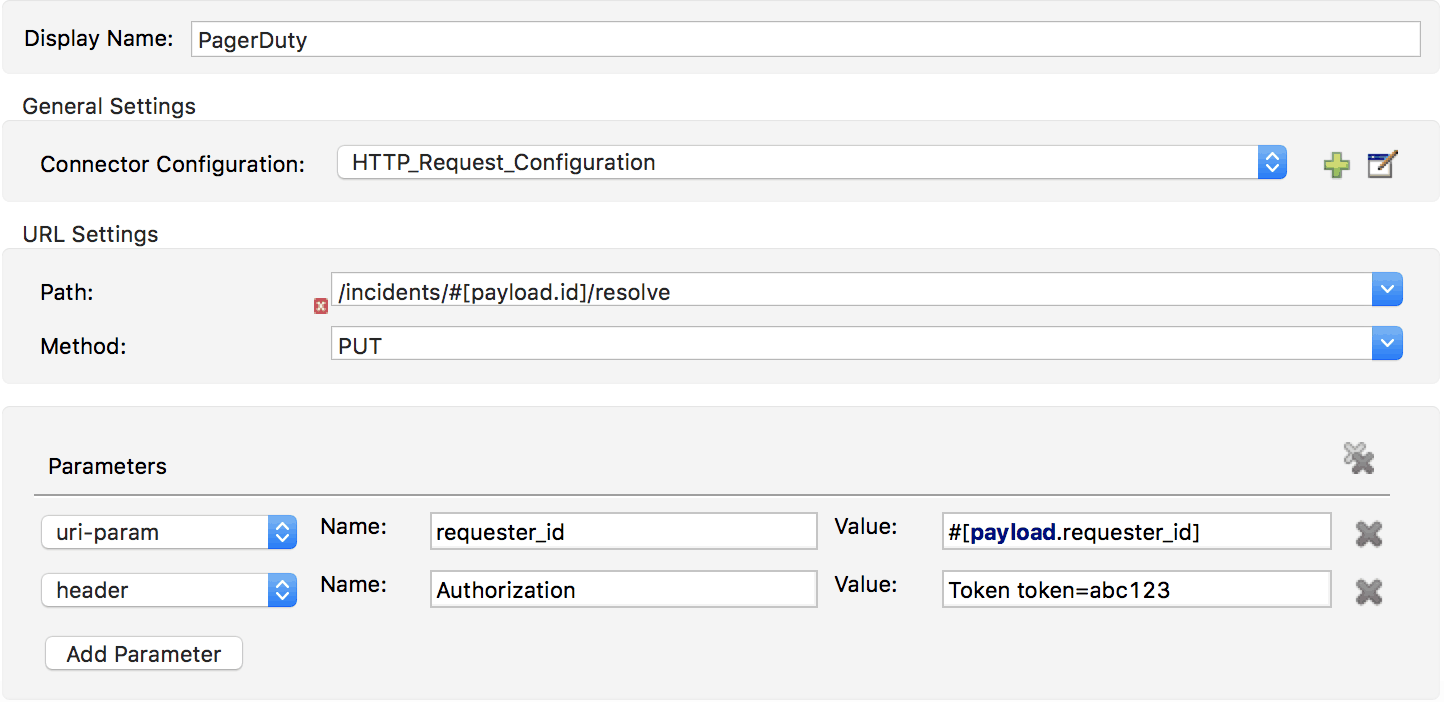
6. Next, dynamically fill the path and the requester_id parameter for the outbound HTTP connector (ignore the path error):
7. Go ahead and test this by hitting the run button and trying the request in APIkit Console or Postman with the example payload to verify everything is working.
Build an API to Consume an External REST API from Scratch
Now, so far we’ve built an API with a dedicated connector, then we built an API using just an existing RAML spec to import to the outbound HTTP connector. But how do we build an API when we don’t have a RAML spec to import? Well, we can build one from docs!
Creating the External REST API Spec
By looking at the documentation available from our external REST APIs, we can piece together our spec. In this scenario, I’m taking StatusPage.io and only POSTing to their /incidents.json endpoint.
Here is their documentation and here is my API spec, which I wrote in RAML, that reflects their API documentation. After just creating a few specs, you can see how easily a document can turn into a spec and, later, the frame for your application—and vice versa—almost seamlessly.
Creating Our StatusPage API Spec
We’re going to follow our current design-first principles and also do a bit of copying and pasting from the spec we created above to base the new RAML that we’re going to use for our API’s skeleton.
After doing this, you should have something like this (with the BaseUri changed of course). Let’s go ahead and publish this to our organization’s exchange as well.
Consuming our External REST API via our Custom Spec
1. Create another project and for nomenclature. Call this one “statuspage.getstarted” and import the downloaded StatusPage-GetStarted.raml file from the section above. Change the base path in the incoming HTTP listener connector to “api” and in the configuration, the path to “/twitter/v1/*”.
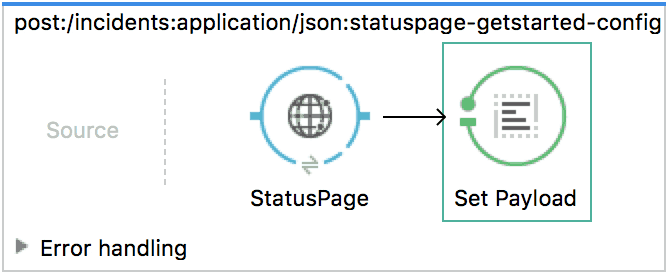
2. Add an HTTP connector from the Mule Palette so that our POST to the /incidents flow looks like below.
3. Go into our outbound HTTP connector’s settings and press the + for the configuration to get into our configuration screen to import the API and change a few of the fields to make things work. So let’s point the REST API Location to our RAML spec.

4. Modify the path to include your StatusPage page ID, and add the API Key that you received from StatusPage into the header for the requests. Also, change the Display Name to “StatusPage” for readability.
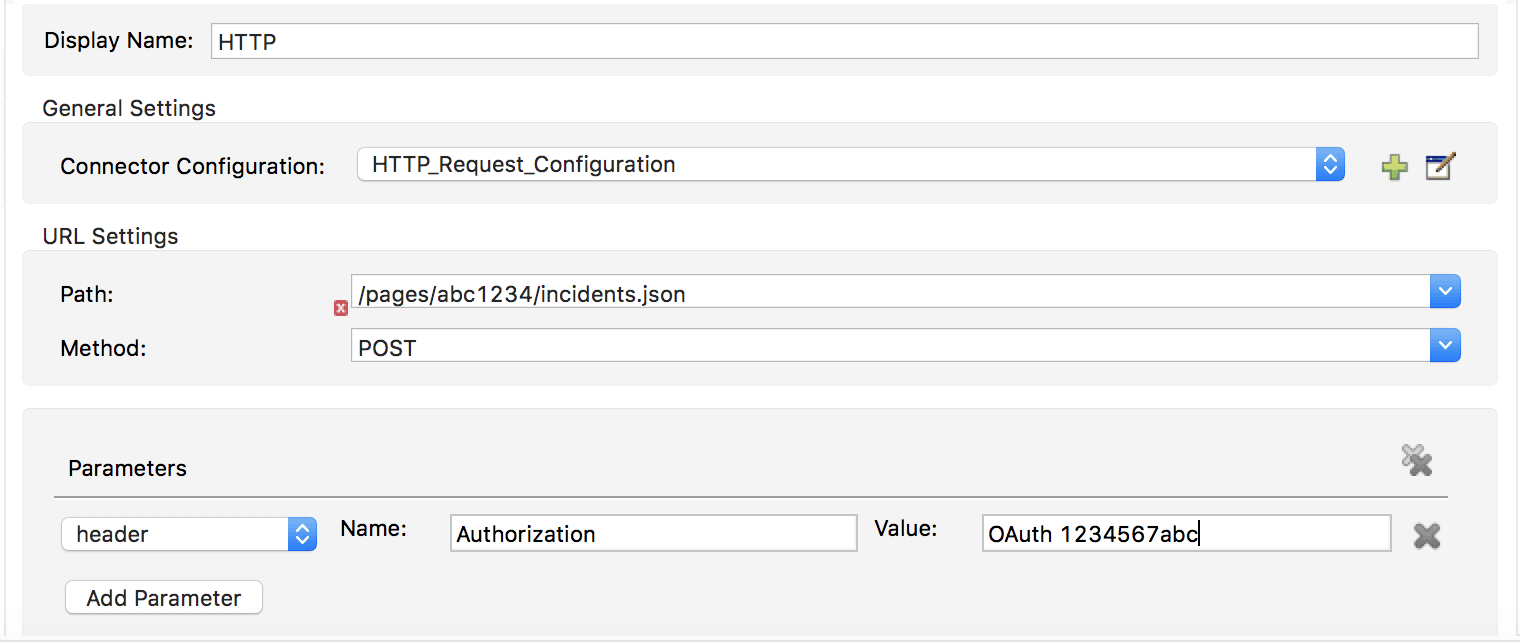
Note: Feel free to ignore the warning about the path not matching the api-configuration.
5. Run this service and test it out to make sure everything is working okay!
Looking Back
This how-to demonstrated multiple ways of creating RESTful API services with Anypoint Platform and Anypoint Studio. We also saw first-hand how the API’s are described and how they can help with consumption later. While a design-first approach takes a bit more time up front, you can see that creating the spec ends up saving some time when building the service itself and Anypoint Studio and/or Flow Designer can really help expedite how quickly you get an application together.
Looking Forward
In the next post, we’ll cover how to deploy these services and run all of them in one Mule Runtime instance, and show just how incredible the pattern and flexibility of the design-first approach can be.
API-led is the evolution of how developers produce and consume. As more and more individuals and companies adopt it, I am excited to see all the solutions that will be made available to make complex integrations just a few magical clicks and drags away!
Challenge: Outside of this DevOps story, think about how another part of the organization might leverage these reusable assets (hint: look at the Data Flow Diagram up top).
Read Ahead!
- Deploying Multiple Applications on One Runtime
- Deploying to CloudHub
- HowTo – Apply an OAuth Policy on a REST API


