
Before we get started with this blog, if you haven’t checked out Part 1 of this Dev Guide series, make sure you work through that first, where we went through developing a resilient, governable, and flexible API layer on top of your source systems—what we call system APIs.
In this second part, we’re going to continue using and reusing newly created or existing API specifications to scaffold your application. We’ll see how quick, powerful, and easy DataWeave transformations are when paired with API specs. We’ll also deploy those system APIs to CloudHub and build a higher level layer of APIs to consume them based on workflows, which we call process APIs.
Before you get started, make sure that you read Part 1 of the Series. Once you’re done, make sure you have the tools below!
Tools
- Anypoint Studio
- Desktop IDE for creating flows, connectors, and more.
- Postman
- An amazing HTTP request tool for all devs.
Designing and Building Process APIs
One of the easiest ways to approach designing Process APIs is to think of them as services that mimic team workflows. What use cases do I see the source systems being able to fulfill? What do teams in my organization need to do and what do some have in common? When should I allow read-only or read/write?
After understanding those requirements, we can build them out. Since multiple teams can have the same processes, we separate this out as an API layer, so that different users and experience layer interfaces can interact with it. Remember, we want to reuse as much of what we build as possible.

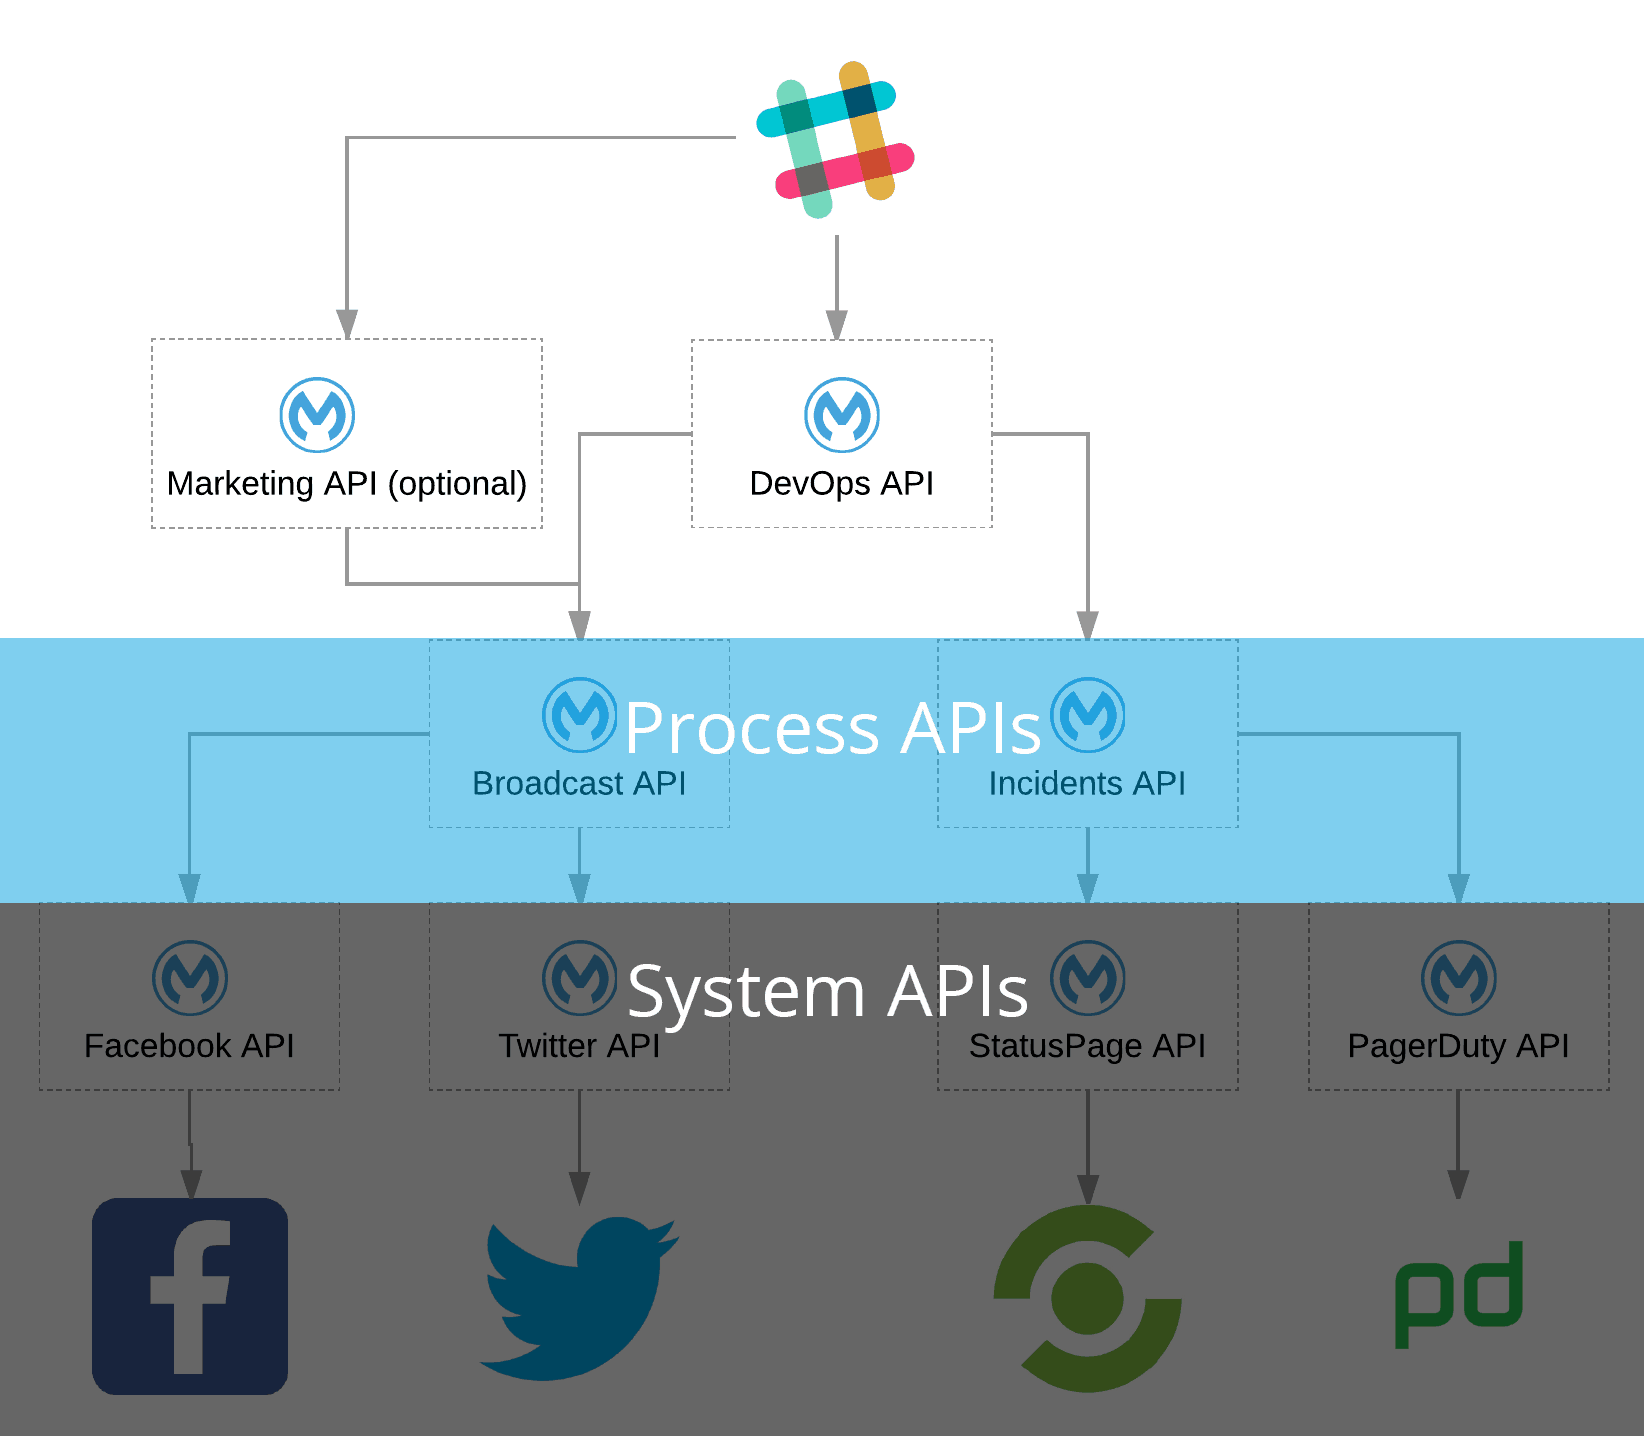
So now that we already have some high-level context, if you take a look at the diagram above, you can see we have two process APIs—Broadcast and Incidents. The reason I decided on those two APIs is that they mirror the process of an incident response. For example, in DevOps, we can choose to quietly resolve an incident and notify the technical members of customers, or broadcast it widely through a multitude of channels.
Building Our Process Level API Specs
So for your two process APIs, we need one that will broadcast to social media by calling the Twitter and optional Facebook system APIs we created, and the other will handle your incidents from your DevOps tools.
For broadcasting, we’re going to create new entities—requiring us to accept a POST request with just a 140-character string. For resolving your incidents, we’re going to update existing incidents, which requires us to accept an ID for PagerDuty and a name for StatusPage.
So the broadcast API spec should look something like this and the incident API spec should look like this.
We’ll create a new project in Anypoint Studio with the same steps from the last blog post and generate a new Mule Project using the RAML spec for your incidents APIs, and repeat that same process for broadcast.
Don’t forget to set up configurations for your HTTP listeners (port, host, path).
Sending Parallel Requests and Aggregating Payloads
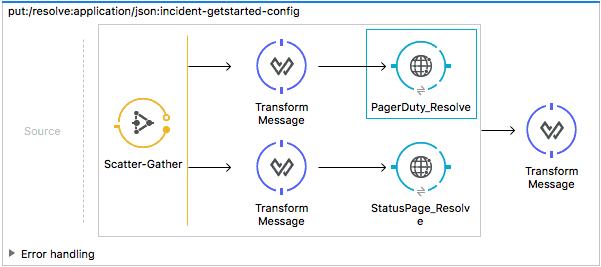
For your incident API, we need to send two outbound requests to your PagerDuty and StatusPage APIs, and aggregate their responses into one payload as the response to the original API call. Luckily for us, there’s the Scatter-Gather router from the Mule Palette that we can drag onto the PUT:/resolve flow, and will allow us to do exactly that. We’ll also add in a few other elements, so your flow looks like below:

When your flow starts, it will transform your incoming payload accordingly so that it can match your System API’s requirements. After the response returns, the Scatter-Gather router will aggregate the message into a Mule Message Collection, and we will output that in your response.
Consuming APIs Using Just RAML Specs and HTTP Connectors
Similar to the steps in the last blog post, we’ll edit each of your HTTP connectors and automatically prefill the configurations with RAML specs. We’ll start with the PagerDuty service that we just deployed and use the PagerDuty-GetStarted RAML spec we created to help prefill. We’ll repeat this same pattern again for StatusPage and use that spec.
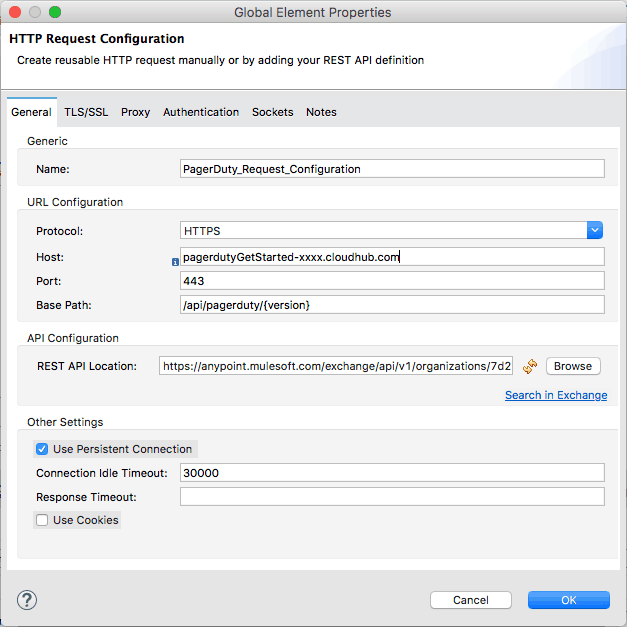
Note: You need to paste the correct CloudHub URL for the appropriate service that you received from the section above.
Dynamically Transforming your Requests with DataWeave Functions
Our request that is going to kick off our flow will have a body with a few objects and parameters in the body (hope you noticed what they are in the RAML), but your system APIs, that we’ll be calling, require different payloads. What we need to do is modify your incoming payload to work with the system API’s schema and in order to do that, we can use DataWeave to manipulate the data in a simple and performant way.
Now, to show you the beauty of writing detailed API specs, DataWeave’s Data Sense feature automatically displays the schema of your payload and output, so your transformation will look like this in PagerDuty:
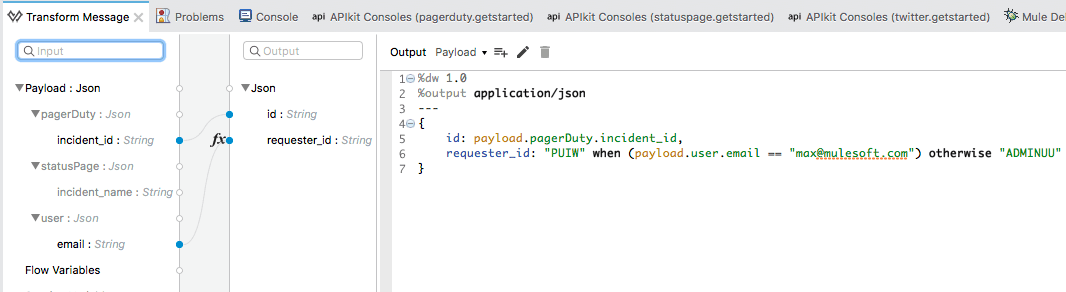
Let’s take a look at what’s going on.
%dw 1.0
%output application/json
---
{
     id: payload.pagerDuty.incident_id,
     requester_id: "PUIW" when (payload.user.email == "max@mulesoft.com") otherwise "ADMINUU"
}
We can visually map our key/value pairs by dragging the dots, and then convert incoming payload’s parameters to something that your service can use. The “requester_id” parameter has a when-otherwise conditional statement which is similar to an if-then. We are returning a value if the e-mail from your payload matches, otherwise we return a default. How cool is that?!
Challenge: Instead of using default values, use a database with e-mail to PagerDuty requester ID relationships.
Hint: This will require the use of a database connector and aggregate the data from the request and the database together before they enter the Dataweave Connector.
For your StatusPage service, your transformer’s output should look like the following:
%dw 1.0
%output application/json
---
{
incident: {
name: payload.statusPage.incident_name,
status: "resolved"
          }
}
Setting Response Body with DataWeave
We need to modify your last “Transform Message” DataWeave connector in order to ensure your endpoint sends the correct output. If we open it up, we can see what the output should look like. We just need to add the following output function:
%dw 1.0
%output application/json
---
{
responses: payload
}
After we complete the steps above, with some meaningful names for the HTTP connectors to help tell each of them apart, we have something like this:
We’ll repeat the same steps above for your Broadcast APIs, except we match it to the Twitter-GetStarted API spec. And if you did the optional Facebook challenge, you would use the RAML you built to consume that service.
Deploying Your APIs to CloudHub from Anypoint Studio
It’s time for us to deploy your system APIs so that we can then consume them with our Process APIs. For absolute ease of deployment, we’re going to be using CloudHub and the seamless integration in Anypoint Studio to host our system APIs. However, do note that the Mule runtime has the flexibility to run in cloud, hosted, or hybrid environments.
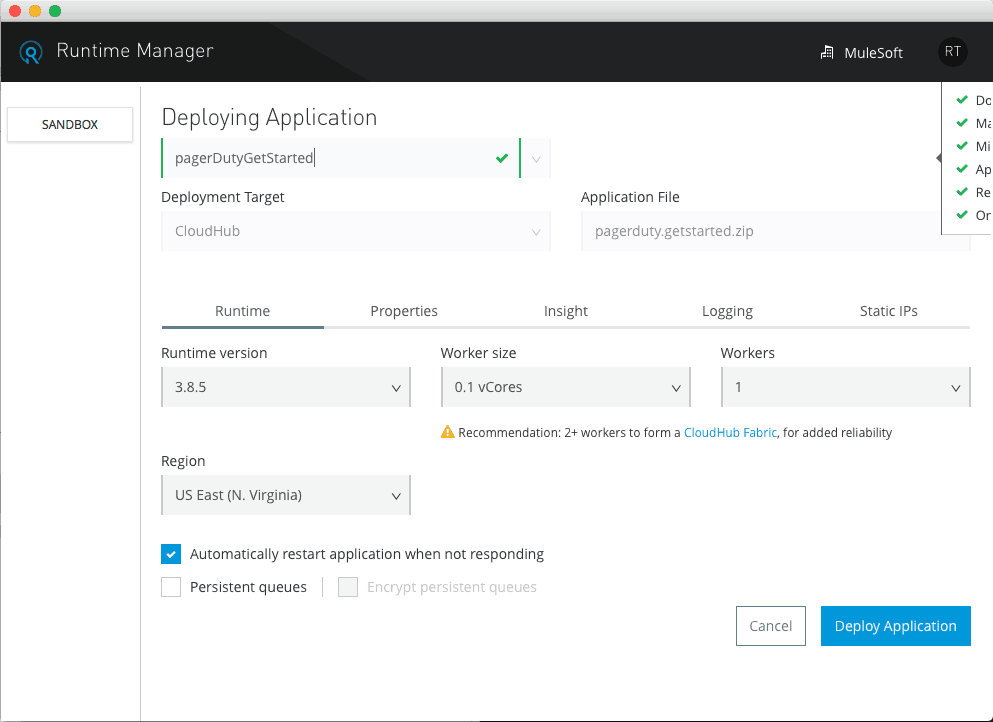
So the easiest way to deploy our first application is to right-click the Twitter project folder in Anypoint Studio and select Anypoint Platform → Deploy to Cloud. We’re going to leave everything as default except for Worker Size, which we’ll select 0.1 vCores since we don’t need much for resources right now.
You can hit “Deploy Application” and you’ll receive a base URL where your application is running. Be sure to note these down somewhere as we’ll be using these URLs shortly.
That’s it! That’s all it takes to Deploy a Mule Application! Now, let’s repeat this process for the other system APIs and then you’ll consume these system APIs with your process APIs.
Buttoning Up & Testing Our Process APIs
Now, in order to test your Incidents APIs using Postman or CURL with the structure below, making sure to send the appropriate body. It should send a request to the already deployed applications and return a message object with an array:
curl -X PUT
  http://{{your host}}/api/incidents/v1/resolve
  -H 'content-type: application/json'
  -d '{"user":{"email":"max@mulesoft.com"},"pagerDuty":{"incident_id":"PUPSHS1"},"statusPage": {"incident_name":"bigServer"}}'
We can test the Broadcast APIs (w/o optional Facebook API) using CURL or Postman to verify it works:
curl -X POST
  http://{{your host}}/api/broadcast/v1/post
  -H 'content-type: application/json'
  -d '{"message":"dlroW olleH"}'
Looking Back
In this post, you not only uploaded your applications to CloudHub, but learned how to approach consuming those system-level APIs in a way that gives you the most flexibility for reuse. You also saw a glimpse of how powerful DataWeave can be by being able to perform highly performant conditional operations.
Most importantly, you should be seeing and feeling the benefits of generating API specs. From it creating the scaffolding for your flows and using them in HTTP connectors to easily consuming a service and making drag-and-drop data transformations in DataWeave.
Looking Forward
In the next post in this series, you’re going complete the end-to-end solution by creating a front-end experience as a Slack slash command that reaches out to another API to facilitate this experience, which will consume the two process APIs we just created.


