Mule School: The MuleMessage, Property Scopes and Variables

Reading Time: 10 minutes

Last updated: August 11, 2016

Overview

Mule Properties and Flow Variables are one of the most widely used features in Mule. Nevertheless, Mule newcomers may have a hard time understanding how the different property scopes and variables compare to each other, and how to choose the right one for their use cases.

The idea behind this blog post is to clarify those differences, comparing side by side INBOUND, OUTBOUND, INVOCATION and SESSION property scopes. We will also cover “flow variables” and “session variables”. For more detailed information, you can go to each scope´s section in the User’s Manual.

Quick Recap: Mule Message Anatomy

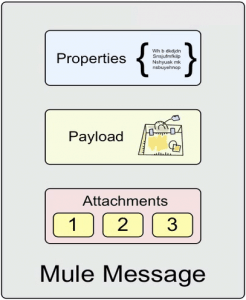
The MuleMessage is the object used to pass any data through Mule.  It enables universal access to any type of message format an encapsulates properties and attachments associated with the current event being processed. Let’s do a quick review of what a Mule message looks like:

mule message anatomy

A Mule message consists of three parts

  • the header, which contains sets of named properties, partitioned into scopes
  • the payload, which consists of business-specific data
  • optional attachments
You can find more information in this document.

In this article, we will focus on the message properties contained in the message header and how to choose the right scope for them.

The Transport Barrier

One key concept you must bear in mind to understand what follows is something I will call “transport barrier.” It´s just a fancy way of saying we are sending a message across a transport. Calling subflows, for example, does not cross the “transport barrier”. Sending a message across an endpoint does cross the “transport barrier”.

In the following examples, we will use a VM transport as a “barrier”.

Mule Inbound Properties

  • Inbound properties can’t be set by you.
  • Message sources (such as inbound endpoints) set them for you when they receive a message.
  • Inbound properties are lost when crossing a “transport barrier.”

Mule Outbound Properties

  • Outbound properties can be set by you.
  • When crossing a “transport barrier”, outbound properties are automatically turned into inbound properties, and no longer exist as outbound properties.

Mule Invocation Properties

  • Invocation properties can be set by you.
  • Invocation properties are lost when crossing a “transport barrier”.

Mule Session Properties

  • Session Properties can be set by you.
  • Session properties are preserved when crossing a “transport barrier”.

Mule Flow Variables

  • They behave like instance properties.

Mule Session Variables

  • They behave like session properties.

Examples

The following examples are contained in the Mule Scopes Demo App. Feel free to download it and examine its configuration (we suggest using Mule Studio to import the example project).
All examples use a similar structure:
  • An HTTP call is received.
  • Optionally set some properties/variables (with different scopes).
  • Log the message contents to see which properties/variables are present.
  • Cross a VM “transport barrier”
  • Log the message contents on the other side to show the effects on the different scoped properties/variables of crossing the “transport barrier”.

Inbound-Scoped Properties Example

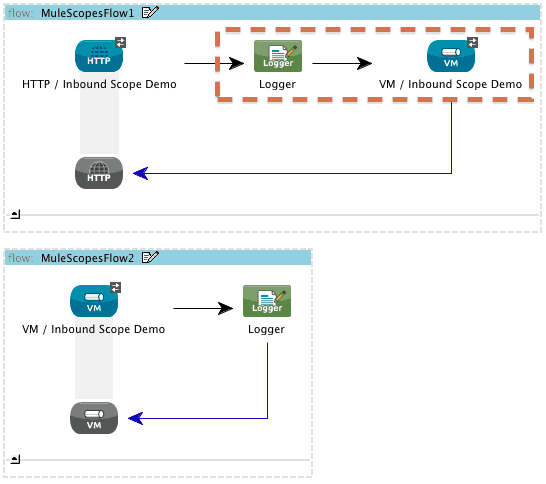
See flows “MuleScopesFlow1” and “MuleScopesFlow2”.
Since inbound properties cannot be set by you, we will just use the ones that have already been set for us by the HTTP Inbound Endpoint. Let’s take “http.method” as an example.
With your app running, open the following URL (or use curl): http://localhost:8081/inbound
  • The first flow log entry will contain http.method as an inbound property.
  • The second flow log entry will not contain http.method, since it was lost crossing the “transport barrier”.
Therefore, this property will be accessible in the areas highlighted below.
Inbound Property Example

Outbound-Scoped Properties Example

See flows “MuleScopesFlow3” and “MuleScopesFlow4”.
We will set an outbound property called “Meal” to “Soylent Green” and see what happens.
With your app running, open the following URL (or use curl): http://localhost:8081/outbound
  • The first flow log entry will contain “Meal” as an outbound property.
  • The second flow log entry will also contain “Meal”, but this time as an inbound property, since it was converted crossing the “transport barrier”.
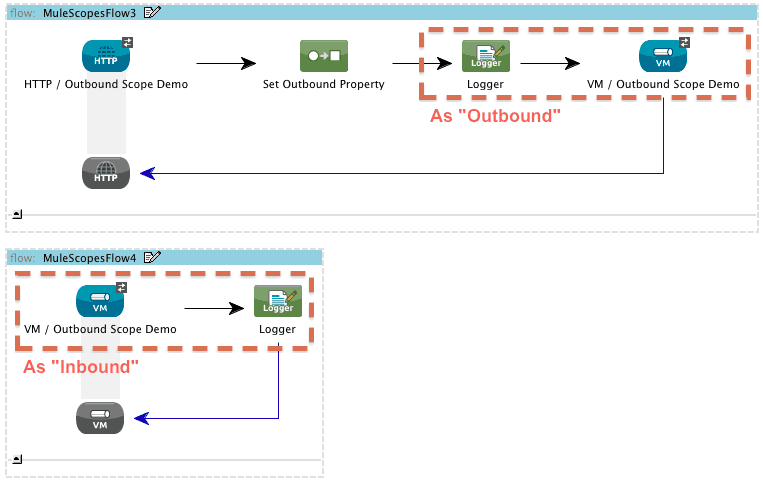
Therefore, this property will be accessible in the areas highlighted below.
Outbound Property Example

Invocation-Scoped Properties Example

See flows “MuleScopesFlow5” and “MuleScopesFlow6”.
We will set an invocation property called “Organism” to “Plankton” and see what happens.
With your app running, open the following URL (or use curl): http://localhost:8081/invocation
  • The first flow log entry will contain “Organism” as an invocation property.
  • The second flow log entry will not contain “Organism” since it was lost crossing the “transport barrier”.
Therefore, this property will be accessible in the areas highlighted below.
Invocation Property Example

Session-Scoped Properties Example

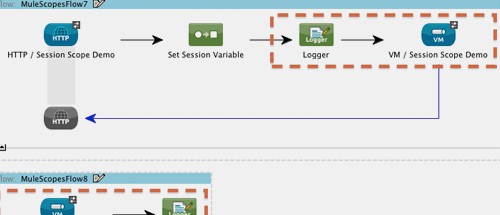
See flows “MuleScopesFlow7” and “MuleScopesFlow8”.
We will set a session property called “Profession” to “Therapist” and see what happens.
With your app running, open the following URL (or use curl): http://localhost:8081/session
  • The first flow log entry will contain “Profession” as a session property.
  • The second flow log entry will also contain “Profession” as a session property since it was preserved when crossing the “transport barrier”.
Therefore, this property will be accessible in the areas highlighted below.
Session Property Example

Flow and Session Variables Example

See flows “MuleScopesFlow9” and “MuleScopesFlow10”.
Remember, flow and session variables behave just like invocation-scoped and session-scoped properties, respectively. We will set a flow variable called “Years” to “7500000” and a session variable called “Answer” to “42”, and see what happens.
With your app running, open the following URL (or use curl): http://localhost:8081/variables
  • The first flow log entry will contain “Years” as an invocation-scoped property (this is correct since “flow variables” is just a friendlier name for invocation properties).
  • The second flow log entry will not contain “Years” since it was lost when crossing the “transport barrier”.
  • The first flow log entry will contain “Answer” as a session-scoped property (this is correct since “session variables” is just a friendlier name for session properties).
  • The second flow log entry will also contain “Answer” as a session-scoped property (this is correct, since “session variables” is just a friendlier name for session properties) since it was preserved when crossing the “transport barrier”.
Therefore, these variables will be accessible in the areas highlighted in the two diagrams below.
Flow Variables Example
Session Variables Example
I hope this helps you understand how the MuleMessage works as well as aiding you to choose the right scope for your properties and variables.

Making SFTP testing portable

Reading Time: 2 minutes

Our integration tests should be portable, meaning that if we shared our project, everyone would be able to run our tests on any platform without needing to install any framework or application. This is a very common issue when we test flows that have an SFTP outbound endpoint. In order to do an integration test of our flow, we need to start an SFTP server on our machine or use a public SFTP server, which implies adding network overhead to our tests.

A simple solution to portable SFTP testing is embedding an SFTP server into our tests. A good and really light weight framework to do so is Apache Mina.

Let’s suppose we want to test the following flow:

Could not embed GitHub Gist 1667047: Not Found

We want our test to look something like this:

Could not embed GitHub Gist 1667086: Not Found

With Apache Mina we can make this test portable by creating this class:

Could not embed GitHub Gist 1667101: Not Found

And calling it from our functional test:

Could not embed GitHub Gist 1667122: Not Found

Now you can share your flow test with the world.

How to Build Multi-Tenant iApps using Mule Studio

Reading Time: 7 minutes

When building applications in the cloud, a common challenge is to create applications that can serve multiple customers with just one instance of the application running.  Now with Mule Studio and CloudHub, the effort required to do just that has been greatly reduced.  Here I will like to walk through one example to illustrate how easily it can be done.  For this example, we will use Zuora, a popular SaaS billing system for subscription services, and Amazon RDS MySQL to demonstrate the steps involved.  We will build a simple Data Warehousing integration App (iApp) that will retrieve invoice records for different Zuora customers and store them in a relational database (e.g. for reporting purpose).   Please note that the information presented here is general enough that the same basic configuration can work with other SaaS systems.

Continue reading

Cross domain REST calls using CORS

Reading Time: 7 minutes

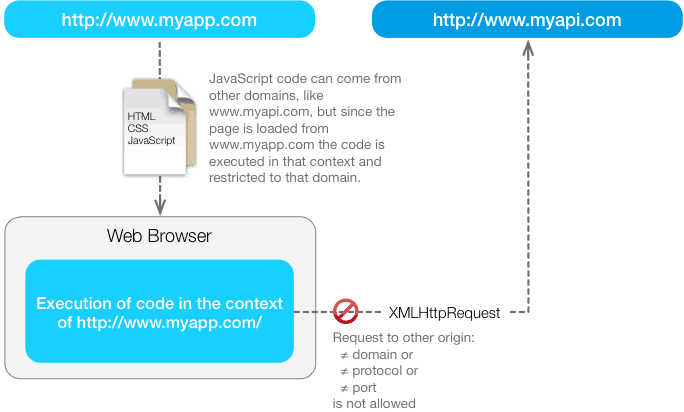
To fight XSS attacks, the web browser imposes the same origin policy for HTTP requests made by JavaScript code:

But there are a lot of use cases where this kind of cross domain HTTP request is desired, so developers came up with some workarounds:

  • Server side proxy: the idea is to avoid cross domain requests in the browser by doing them on the server:To do that in Mule you can use the HTTP proxy pattern as explained in this post.
  • JSONP: it consists of adding a <SCRIPT> tag dynamically. The src attribute of the script tag can point to another domain, and the browser will load and execute the JavaScript code that comes from it. But here is the twist: since the script can be generated dynamically on the server, you can use it to pass data to the JavaScript program in the browser.
    The suffix means padding, because the server needs to pad the returned JSON with a function call to make it a executable JavaScript code.Then your JavaScript code provides the definition of the function that gets called with the data.
    Clever trick right? But it has some limitations: only GET requests can be done in this way.

Is there another option?

Fortunately, yes. Modern browsers supports a W3C Working Draft  called CORS: Cross-Origin Resource Sharing, and probably the browser that you are using to see this page already supports it.

How CORS works?

The browser sends the request adding the Origin header:

If the origin is accepted by the  HTTP server it adds the Access-Control-Allow-Origin header to the response:

When the browser receives this header it continues reading the payload of the HTTP response, if not the request is rejected.

How it looks in your JavaScript code? If you use jQuery is business as usual:

jQuery is smart enough to detect the kind of CORS support that your browser has and uses XMLHttpRequest or XDomainRequest if the page is running in IE8.

“You’re allowed a wand…”

In Harry Potter and the Goblet of Fire movie, there is an scene were Harry is about to fight a dragon, and he best chance to win is to flight with the broom:

Harry: – But I’m not allowed a broom.
Professor Moody: – You’re allowed a wand…

Having access to an external domain in your JavaScript code, is like having a wand. Even if your web server is limited to deliver static HTML content, you can create powerful web applications using JavaScript and REST APIs located elsewhere.

I’m going to show you that with a simple example. It consist of a HTML file shared on Dropbox, which is not a hosting service but allows you to share static content. And from that file we are going to call a service hosted in Cloudhub.

Create a Cloudhub application using MuleStudio

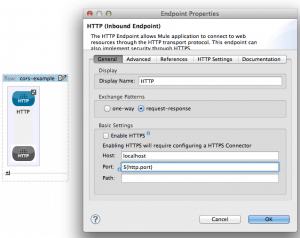
Create a new project with MuleStudio and add a flow with a HTTP endpoint. To make it work with Cloudhub you have to use ${http.port} as port number for the endpoint:

Expose your REST API

In this example I’m going to use a JAX-RS, just because I’ve a background on Java programming and I’ve used JAX-RS services before. But, a good alternative to try is the REST module from MuleForge.

Following the JAX-RS way of things, we need a Java class to define the resources:

Then we need to wire it into the flow using a REST component:

Add Access-Control-Allow-Origin header to the response

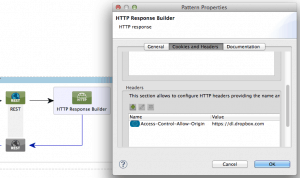
An here comes the most important part, we need to add the Access-Control-Allow-Origin header to the response. To do that we are going to use a HTTP Response Builder:

In this case we are using https://dl.dropbox.com. Take account that: you can put multiple origins separated by space, and that http is a different origin than https.

Deploy to Cloudhub

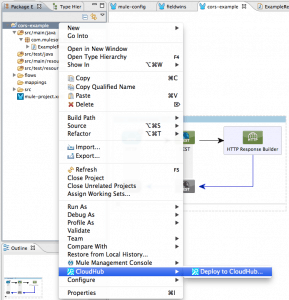
On MuleStudio, right click into the project and choose “Deploy to Cloudhub…”

Fill up the credentials, and we are done with the service. Next step the client code.

Client code

The client code is straight forward:

This example takes the list returned by the server and shows a list from it.

You can see the running example here. That’s all folks!