MuleSoft Image

Metadata Driven Development with Anypoint Studio

Reading Time: 9 minutes

The idea of this post is to clarify some concepts around metadata, what is it, where is stored, how to use it and how it help us to develop our applications.

So, what is it?
Metadata is a term used in many places in the Software industry and its meaning may vary depending on what it’s used for. In the context of Anypoint Studio we are always talking about types and types related information. This information can be provided by the used Connector or can be manually defined by the developer to help him understand what’s going on or use it to design a DataWeave script. It is only for design time propose as it’s supposed to represent what will flow during the execution of your application (runtime).

Levels of Metadata
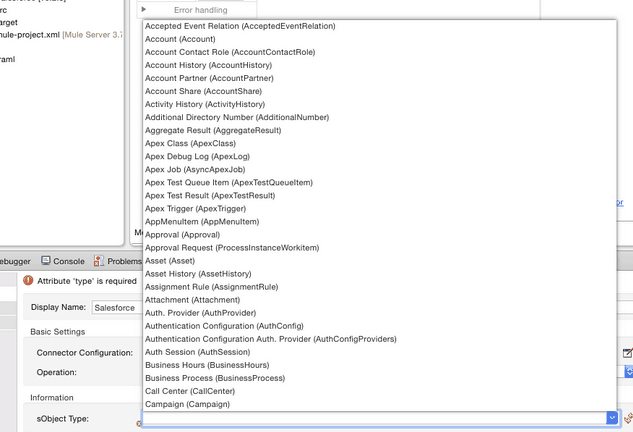
There are two levels of types information that can be retrieved in Studio, you can obtain the list of types and then each type structure, for example, when using Salesforce and configuring the Global Connector’s configuration you first retrieve the list of all the Salesforce types: Account, Opportunity and so on. Later on, when configuring a particular Salesforce operation you may or may not need to use the type structure, so to follow the example if you want to create an Account you will need to specify what are the values of some of the field inside the object Account and this would be the second level of Metadata.

List of Types:
Screen Shot 2015-08-05 at 10.44.37 AM

Type Structure:

Screen Shot 2015-08-05 at 10.44.58 AM

It’s good to note that this Metadata retrieval operation runs in a job in the background, allowing you to keep configuring your connector or whatever you need till the structure is retrieved. If you observe the right bottom corner of Studio you should see something like this:

Screen Shot 2015-08-05 at 10.45.11 AM


Where is stored?
All this type of information is project related so in order for you to be able to export, import and commit and share all this, there is Catalog folder at the root of your project where all is stored to disk. It is not very human readable but Studio provides you a UI to refresh and delete types from your project’s Catalog.

Screen Shot 2015-08-05 at 10.45.30 AM

In the Package explorer you can right click on the project and see the DataSense menu options

Screen Shot 2015-08-05 at 10.45.42 AM
Screen Shot 2015-08-05 at 10.45.56 AM

The Manage Metadata Types option will provide you the UI to delete and refresh types and these operations will impact over the files stored in the Catalog folder mentioned before:

Static Metadata vs Dynamic Metadata
Depending on the Connector that you are using there are two types of Metadata, you have static Metadata and Dynamic metadata. The difference here is whether or not the connector needs to hit some Page or Webservice to retrieve this information. Connectors as the mentioned Salesforce Connector have dynamic metadata as you, as a Salesforce user, can create custom Types and if you want to use this Type information in your Mule Application you need to go to Salesforce and download it.

There are other Connectors that have metadata but all the information is stored locally in the connector as the list of types and structures doesn’t change depending on an account. Regardless of what is the type of metadata the connector uses this should be transparent for you but is good to understand how it works.

Connector’s Metadata vs Custom Metadata
Finally there is one more case; what happens when you are using a File or FTP Connector and you don’t have provided information about the files that will be consumed in your flow? Here is where the Custom Metadata mentioned before takes place. You can manually specify the type and structure using different formats: CSV, JSON, XML or a POJO.

In each Message Processor you have a Metadata tab, where you can specify what goes in and what goes out of it.

Screen Shot 2015-08-05 at 10.46.17 AM

Metadata Propagation
One of the important aspects of defining what comes in and  what goes out is that this information is propagated in your flow. In the Metadata tree at the right side of Mule Properties window you have the input and output tab. Those represent what flows through the Message Processor. The input received and expected by a connector operation and the result that the operation will generates if there isn’t any exception.

Screen Shot 2015-08-05 at 10.46.24 AM
Screen Shot 2015-08-05 at 10.46.34 AM

Example of Mismatch:

So, having all the metadata of your flow specified will help you to understand what’s going on in any given point.

  • What should pass through,
  • What’s the output and how this goes to the next Message Processor.
  • What happens with your Mule Message when you adda a new Message Processor in a flow.
  • How your payload, variables and properties are transformed

And all this without the need of running your application saving you lot of time.
Then, sharing this information will help other developers to understand your work done and make it much easier to contribute.

And finally, all this is especially helpful when transforming data structures and types using DataWeave; if prior to generating a mapping you configure all the Metadata information, when adding DataWeave in the middle, it will already know what the input is and what you are trying to generate as the output and with this information it will help you create the script needed to transform the data structures and types.

All these reasons are why thinking about the Metadata while developing your Mule Application is helpful and important.

Anypoint Data Gateway and Lightning Connect

Reading Time: 5 minutes


Anypoint Data Gateway Download

Salesforce unveiled Lightning Connect with the promise of allowing you to expose the data stored in your legacy data source into Salesforce in real time, without needing any migration. The only requirement is exposing such datasource through an OData endpoint.
So you have your datasource on one end, and Salesforce supporting OData on the other. The question now is: how do you connect the dots?

Enter Anypoint Data Gateway

c1

Anypoint Data Gateway is MuleSoft’s solution to connect those dots. Released as a Salesforce app (available at Salesforce’s appExchange), it allows you to quickly create a cloud based Data Gateway that exposes data from your legacy datasource as OData, and sets up your Salesforce account to consume it, all in less than 5 minutes.


How to enable your database in Salesforce in 5 minutes

Step 1: On your Mark…
Get Anypoint Data Gateway from the Salesforce AppExchange and install it in your Salesforce organization. Once installed, go to the MuleSoft App in the menu, and select the MuleSoft tab to complete the initial login to the Anypoint Platform. You can even sign up for a trial account at this stage.

Step 2: Get set…
Now you are ready to create your first Data Gateway. Let’s first define the connection parameters to the datasource. To do that, select your datasource type and enter the connection parameters.

c2


Is your database behind a firewall? worry not, you can use Cloud Extender during the trial phase to overcome this issue. Once the connection is created, you just need to complete the Data Gateway details and authentication credentials. It takes almost 2 minutes to provision and setup the Data Gateway.

c3


Now you are ready to pick the objects you want to expose through the Data Gateway and publish it to Salesforce.

c4

Step 3: Go!
Done. You have everything in place to see real time data in Salesforce now, by creating tabs or embedding the new objects in others.

c5


Taking a look under the hood

What has happened under the hood is that a new Data Gateway application has been created for you, to expose the objects you picked from your datasource as OData. While publishing it to Salesforce, a new External Data Source and a set of External Objects were created in Salesforce to enable it to consume your datasource.

The Data Gateway Designer also allows you to do other things, like managing roles, business groups and environments, or submitting a request for a VPC.

What’s next?

You can try Anypoint Data Gateway right now, just get it from the Salesforce’s AppExchange and connect your data source to Salesforce in no time.

Anypoint Data Gateway Download


Reliable Acquisition using the Sftp connector

Reading Time: 9 minutes

A high-reliability application (one that has zero tolerance for message loss) not only requires the underlying ESB to be reliable, but that reliability needs to extend to individual connections. If your application uses a transactional transport such as JMS, VM, or DB, reliable messaging is ensured by the built-in support for transactions in the transport. This means, for example, that you can configure a transaction on a JMS inbound endpoint that makes sure messages are only removed from the JMS server when the transaction is committed. By doing this, you ensure that if an error occurs while processing the message, it will still be available for reprocessing.

In other words, the transactional support in these transports ensures that messages are delivered reliably from an inbound endpoint to an outbound endpoint or between processors within a flow.

A reliability pattern is a design that results in reliable messaging for an application even if the application receives messages from a non-transactional transport. A reliability pattern couples a reliable acquisition flow with an application logic flow, as shown in the following diagram.

reliabilty_pattern

The reliable acquisition flow (that is, the left-hand part of the diagram) delivers a message reliably from an inbound endpoint to an outbound endpoint, even though the inbound endpoint is for a non-transactional transport. The outbound endpoint can be any type of transactional endpoint such as VM or JMS. If the reliable acquisition flow cannot deliver the message, it ensures that the message isn’t lost.

Up to this point, I haven’t said anything which isn’t already explained in the Reliability Patterns article of our developers documentation. So, why am I writing this? What’s new? Let’s consider this other example:

The above flow polls a sftp folder and processes the obtained files through a flow called “myErrorProneBusinessLogic“. If everything goes ok, the files are moved to an archiveDir so that they’re not reprocessed. But what happens if the business logic fails? After all, the flow is called “myErrorProneBusinessLogic“.

Reliability for the win!

On Mule versions prior to the 3.7 release, a failure scenario would have been a problem because the sftp wasn’t in the list of connectors which support reliable acquisition, meaning that upon failure, the file gets moved to archiveDir . In that case I’m sorry to say that the information in the file would be lost, because the file gets moved to a file on which we’re not polling.

But fear not! We fixed this for the 3.7 release and now you can do the same as follows:

Let’s analyse the above:

  • An idempotent-redelivery-policy is now supported for the sftp connector. What this component does is to control how many times can each individual message be redelivered. It acts as a way of controlling how many times are we going to retry.
  • The idExpression is a MEL expression used to give each message a unique id, so that we can quickly identified each message (needed for the idempotent part) without consuming the payload or performing CPU expensive computations.
  • The maxRedeliveryCount is pretty descriptive, it’s up to how many times are we willing to retry a failing message. Note that in the worst case scenario, the message is processed maxRedeliveryCount+1 times (+1 is the original attempt)
  • There’s a dead-letter-queue in the redelivery policy, which is the place where the message gets sent if the give up condition is met.
  • Also not that the flow’s processing strategy was set to synchronous. That’s because if processing is asynchronous, the thread that’s polling (and owns the redelivery policy) does not get any potential exceptions raised by the business logic flow.

With the configuration above, reliable acquisition is achieved because if the file can’t be successfully processed, it gets send to the dead-letter-queue so that it can be appropriately handled, while on the sftp folder, the file is still removed because it makes no sense to keep trying. At the same time, the redelivery policy is of great help in the cases in which the error is caused by a short timed glitch, such as a network timeout, a DB being temporarily exhausted, etc.

Exception strategies

Although it is only supported for sftp since the 3.7 release, the idempotent-redelivery-policy component is not new to the Mule ESB, chances are you’re already familiar with that guy. You’re probably also familiar with the rollback-exception-strategy construct:

This alternate configurations works in a pretty similar way but using an exception strategy, which unlike the dead-letter-queue allows more than just one outbound endpoint, there’s more complex logic you can use in this case. Notice however that in this case, the reliable acquisition part is up to you! You could choose to simply write a few lines to the log without saving the message in any persistent manner, in which all that you built was a retry mechanism.

Wrapping up

The reliable acquisition pattern is important when dealing with non transactional endpoints. Although it can always be implemented manually (as shown on the first figure), we keep trying to make it simpler by supporting OOTB it in more and more components. Whether we automatically support it or you do it by manually, remember that what any world class integration should see is:

reliability_everywhere

Shared Resources and Testing

Reading Time: 5 minutes
test_blog

Testing is essential to all code, it’s a warranty on the expected behavior and a measure of quality. Having a large and thorough test suite increases the confidence we have on a system. That’s why Mule offers a number of options for testing, like our Functional Test Framework or MUnit, a good example of the former being FunctionalTestCase.
By extending from this class we can create our own tests around a Mule configuration XML file (or many) that will be run as an app in a Mule server. We can then run flows or use MuleClient to send requests and verify that the responses are the expected ones, for example.

Now, this works fine for most applications but when it comes to domains you also need a way to specify that configuration so that all shared resources specified there are taken into account. With DomainFunctionalTestCase you can override getDomainConfig to return the filename of the domain configuration. Adding the app’s config files is a bit different since the idea behind this test class is to be able to have several apps running for that domain. So, to set up these apps we override getConfigResources, where we should return an array of ApplicationConfigs. An ApplicationConfig consists of an app name and it’s resources (the ones you would have returned in FunctionalTestCase’s getConfigFiles). That name is important since then from our test we’ll be able to lookup the MuleContext for that app with it. Let’s look at an example.

On our domain we’ll have a shared HTTP Request config set up to hit www.httpbin.org, which is a service to test HTTP requests and responses. Sending a request to httpbin.org/status/404, for example, will return a response with a 404 status code. So, we’ll have two apps that use it to make a request to different status codes.

Our first app will hit /200 to get that status code and set it as payload, this request being triggered by an HTTP Listener.

The second app will hit /204 instead, set that status code as payload and be triggered by a VM endpoint.

Finally, our test class looks like this:

As you can see in getResponseFromApp, the main difference with FunctionalTestCase is that we need to ask for the specific MuleContext of each app using the method getMuleContextForApp. Once we have it, we can use MuleClient to send data to the HTTP and VM entry points of each app. Then we can make sure the response payload is the one we expected. Notice we are using JUnit and Hamcrest to do so, which make assertions very easy to read. These libraries are part of the Functional Test Framework as well, which is added as a Maven dependency to the project.

You can check out the entire example here and learn more about Shared Resources here on our docs site.