Recently, I discussed how to build mule integrations using Gradle. This is a follow up post to discuss how to work with this plugin and mule studio, and to discuss some relevant enterprise features. This post assumes you already know how to do the basic setup of the gradle plugin (discussed on my previous post), so if you have not done it before, please go ahead and read it before continuing.
Creating a Mule Studio Project
From your gradle project, you can easily change it to a Mule Studio type just by applying the ‘mulestudio‘ plugin and selecting the appropriate mule version, here is an example:
Now you can simply run ‘gradle studio’ from the command line and it will create the necessary files so you can import the project into your workspace.
Importing it into Studio
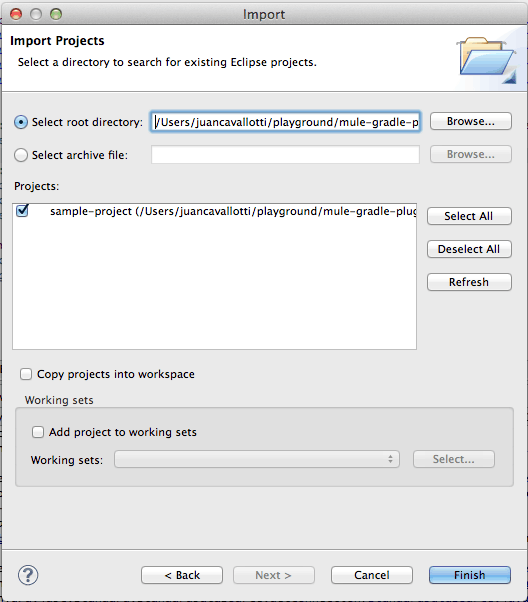
In order to import your newly created project into Mule Studio, you can proceed in the following way:
Right click on your project and select ‘Import’
Pick ‘Existing projects into workspace’ and click on ‘Next’.
Navigate to your project’s path and select it, to confirm, Studio should display it in the ‘projects’ panel. After this just click on finish.
The resulting project should be no different than a project created from Mule Studio, now we can focus on discussing how the build path will be configured.
Digging into the build path
The gradle plugin will include in your project’s build path all the non-provided dependencies that you have declared as well as the configured runtime (specified in mule-project.xml) and the JVM configured in your build. I decided to exclude all provided dependencies to maintain the same semantics as the non-studio build, we suppose that provided dependencies are part of the container and since mule studio already provides a build path for a container it would be up to the user to install the jars there, the same case as if the app was to be deployed on a standalone container. This design decision can be worked-around easily from your build if required by taking advantage of normal gradle features.
Enterprise Users, you’re not Forsaken!
The latest version of the plugin has incorporated a flag to switch from community version to enterprise (by default turned on) and take advantage of the enterprise artifacts. These artifacts are hosted on our exclusive nexus repository and the plugin allows you to simply enter your repository credentials and get the artifacts online from this repository, here is an example on how your build script would look with credentials:
Final words
Last but not least, since the writing of my previous post I’ve seen great community interest around this plugin. I’d like to thank those users who have contributed to the project either by submitting bug reports as well as pull requests, your contribution is greatly appreciated, thank you very much!
Be sure to check out part 3 of the Gradle series!


