We live in a world of automation where it’s better to take a few minutes of your day to automate a few repetitive tasks than to keep doing said repetitive tasks every day. Not only will it help you save time in the long run, but automating when possible helps mitigate human error.
A great example of automation we try to do in software projects is to set up a CI/CD pipeline that will trigger a set of tasks to be performed when there is a code change. For example, check for code standards, run automated testing, build and deploy to the cloud, and more.
One way to automate your MuleSoft deployments is to use the Mule Maven Plugin. But what happens when you need more functionality that’s not available using this plugin? The answer? Using the Anypoint CLI.
How to automate CI/CD pipelines with GitHub Actions and Anypoint CLI
We’ll go over the basics of setting up the Anypoint Platform CLI from a CI/CD pipeline in GitHub Actions. You can use these steps to replicate in any other platform of your choice like Azure or Jenkins.
Set up a Connected App
The first step toward creating our CI/CD pipeline is to set up a Connected App with the minimum required permissions to avoid security issues.
To create one, sign in to your Anypoint Platform account and head to Access Management > Connected Apps. Click on Create App, add any name of your choice, and select App acts on its own behalf (client credentials). Add the following scopes to your business group and environment (Sandbox) and click on Save.
- Manage APIs Configuration
- Exchange Contributor
- View Environment
- View Organization
- Profile
- Create Applications
- Delete Applications
- Manage Application Data
- Manage Runtime Fabrics
- Manage Settings
- Read Applications
Make sure you copy the ID and Secret. We will use these in the next steps. Once you are done, we can start setting up our GitHub Actions file.
Set up Anypoint CLI in GitHub Actions
Inside your GitHub repository (where you’ll be running the pipeline from), head to the Settings tab > Secrets and variables > Actions. Click on the New repository secret button and add the two following secrets with their appropriate value from your Connected App.
- CONNECTED_APP_CLIENT_ID
- CONNECTED_APP_CLIENT_SECRET
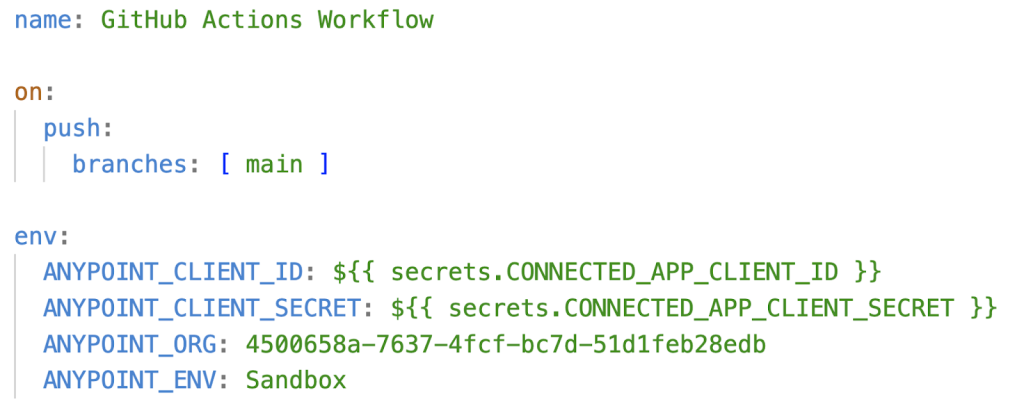
After that, make sure you have a build.yml file in your repository under .github/workflows. Inside, we have to create the following environment variables to properly use the Anypoint CLI from the pipeline:
- ANYPOINT_CLIENT_ID: Your Connected App’s Client ID
- ANYPOINT_CLIENT_SECRET: Your Connected App’s Client Secret
- ANYPOINT_ORG: Your Organization ID
- ANYPOINT_ENV: The Environment you want to use for the commands (like Sandbox)
Below is an example of how this file would look like with the proper variables.

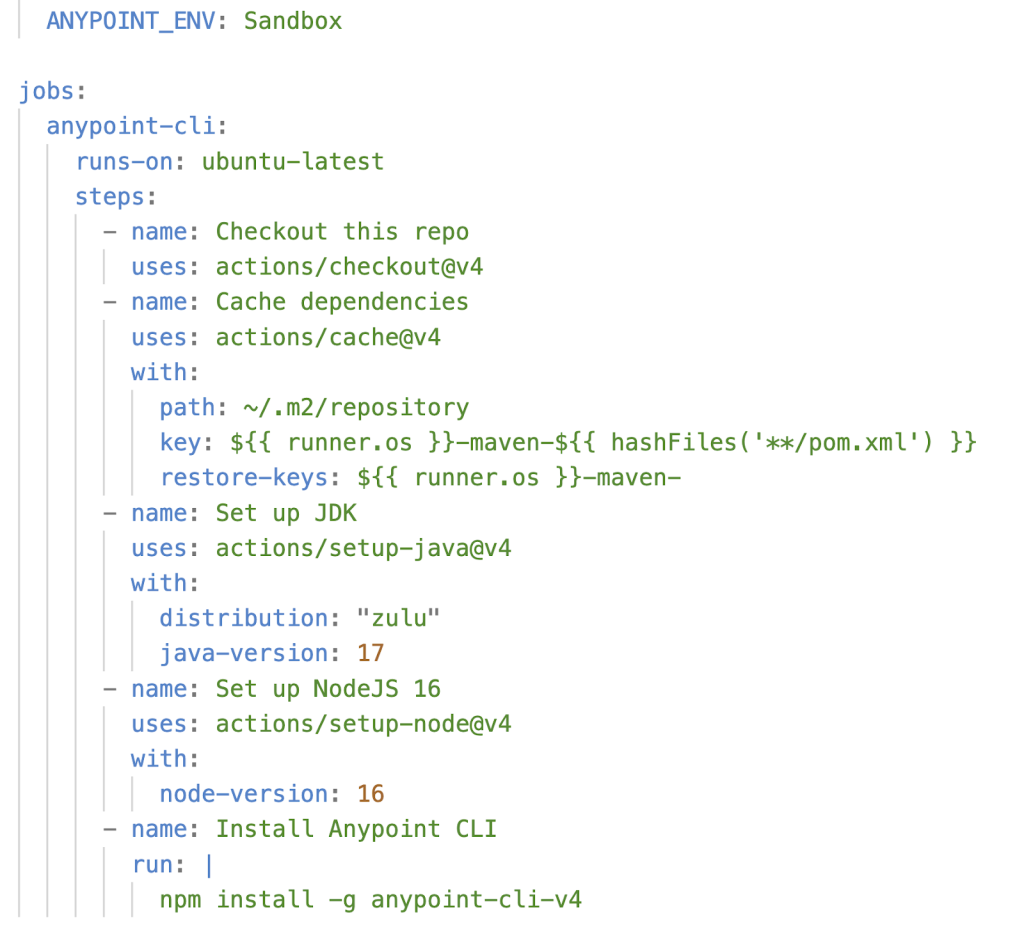
Finally, make sure you set up a valid version of NodeJS in your file (you can verify this here) and install Anypoint CLI. Like so:

After setting this up, you can start use the anypoint-cli-v4 command in your pipeline!
Add a basic command
For more, find the full list of commands you can use with Anypoint CLI. A simple example would be to list all the applications currently available in Runtime Manager from the Org ID and Environment you added on your variables at the top. To do so, you can use the following command:

This will return the full list in a JSON format so you can consume this information however you need for your pipeline. You can also play around with API Manager, Exchange, API Catalog, and more. Let’s see a more complex example to grasp how the CLI becomes really useful in our pipelines.
Reviewing a complex example
Let’s say we want to retrieve the URL from Runtime Manager (from our deployed application) and add it to API Manager. We would have to break this down into several steps:
- Retrieve the application name from the repository’s POM file
- Retrieve the ID for the application matching the previous name
- Retrieve the URL for the application matching the previous ID
- Update the URL from the given API in API Manager
First, we retrieve the application name from the project.name field in our pom.xml file and we assign the value to the appName variable using the following command:
appName=$(mvn help:evaluate -Dexpression=project.name -q -DforceStdout)Next, we retrieve the full applications list with the runtime-mgr:application:list command. With this list, we use the jq command to extract the ID that matches the application with the name we extracted previously in appName. We use grep to remove the quotes from the value and we assign this value to the appId variable:
appId=$(anypoint-cli-v4 runtime-mgr:application:list --output json | jq '.[]|select(.name=="'"$appName"'").id' | grep -Eo '[^"].+[^"]')Then, we retrieve the application data (for the app with the appId ID) with the runtime-mgr:application:describe command. We use the jq command to extract the value of the publicUrl field and we use grep to remove the quotes from the value. We assign this value to the appUri variable:
appUri=$(anypoint-cli-v4 runtime-mgr:application:describe --output json $appId | jq '.target.deploymentSettings.http.inbound.publicUrl' | grep -Eo '[^"].+[^"]')Finally, we update the data from the API in API Manager with the api-mgr:api:edit command, using the appUri variable and the example API ID of 12345678.
anypoint-cli-v4 api-mgr:api:edit --uri $appUri 12345678Looking at this whole process inside our workflow file, it would look like the following.

Your first CI/CD pipeline with GitHub Actions and Anypoint CLI
Congratulations on creating your first CI/CD pipeline with GitHub Actions and Anypoint CLI! To learn what else you can do with CI/CD, check out the following resources:


