
In this series, we’ve standardized Maven and created a developer pipeline to automate the development lifecycle up to and including committing code to the release process. Next, we will automate the process that standardizes the promotion of the Mule (application in its binary form) to higher testing environments.
Common characteristics of an automated release pipeline:
- Consistent transition of the deployment process to the DevOps team from the developer.
- Consistent, well understood interface to perform the deployment.
- Only “tested” binary artifacts are deployed, no-rebuilding of code.
- A controlled process that requires a specific action to trigger the deployment.
The type of release pipeline depends on whether we are working with a set of components, or just one:
- If we are building foundational components (such as a System API) that can stand on its own, then we are probably looking at a component release pipeline. Each component is released independently.
- If we are building many components that should all be released at the same time because of co-dependencies or other release planning criteria, then we are looking at a coordinated release pipeline.
Component release pipeline
Checkout this example of a component release pipeline that allows the deployment of a single component. To create a component release pipeline:
- Copy the component.release pipeline file and place it into a Git repository holding your pipeline scripts.
- Create a “pipeline” item under the Jenkins folder that contains the component release pipelines and give it a suitable name.
- Configure the pipeline item as an SCM pipeline in Git specifying the Git repository name from the first step and the pipeline script name.
- Select “This project is parameterized” and click “Save.”
- The component release pipeline should appear in the Jenkins folder and when you click on the pipeline name, you should see “Build Now” in the left hand menu. Click this to run the pipeline for the first time. It should fail as it was not run with any parameters.
- Reload the Jenkins folder names and click on the pipeline name again, you should see the “Build Now” replaced with “Build with Parameters.”
Build now configuration
When “Build Now” starts, the parameters configure it something like this:

The above example uses more parameters than are normally implemented. For instance, the groupId is usually the same across an organization. So you may consider reworking the pipeline to reduce the number of parameters that can be selected.
When the build is triggered (click the Build button at the bottom), the Git repository is searched for the version tags published by the developer pipeline (release branch). The five most recent versions will be displayed for one to be chosen. The choice will be shown in a pop-up window when the browser cursor hovers over the “Choose Version” phase. It looks like this:
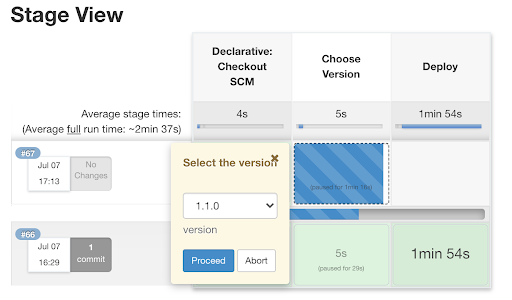
Once selected, that version (exactly as shown in the drop-down) will be retrieved from the artifact repository and deployed to the specified Mule runtime environment. There are plug-ins available for different artifact repositories that allow the version of an artifact to be chosen from the artifact repository instead of from Git. You may wish to change to one of these plugins instead of using the Git tags.
There are many variants of the component release pipeline. This example uses functions to perform the deployments, separating the user interface logic from the deployment logic. This makes it much easier to customize the user interface.
We will be using the same functions for the coordinated release pipeline below.
Coordinated release pipeline
See an example of a coordinated release pipeline that deploys multiple components which are specified in the pipeline script using the deploy() function. To create a coordinated release pipeline:
- Copy the coordinated.release file and give it a meaningful name of the release (such as marketing-release-2).
- Edit the new file and re-work the deploy() function calls at the end of the file to specify the artifact particulars as well as the deployment particulars.
- Normally, the same release pipeline will be used for deploying to all environments, so the first deploy() function example would be used for each of the components to deploy. For instance, if we are deploy two experience APIs and four system APIs, we would code:
deploy("${groupId}", "mktg-exp", "1.0.0", "${targetEnvironment}", "CloudHub public-lb", "1", "MICRO", "${ANYPOINT_USR}", "${ANYPOINT_PSW}", "${muleSettings}")
deploy("${groupId}", "sales-exp", "1.0.0", "${targetEnvironment}", "CloudHub dlb", "1", "MICRO", "${ANYPOINT_USR}", "${ANYPOINT_PSW}", "${muleSettings}")
deploy("${groupId}", "orders-sys", "2.1.5", "${targetEnvironment}", "RTF", "1", "MICRO", "${ANYPOINT_USR}", "${ANYPOINT_PSW}", "${muleSettings}")
deploy("${groupId}", "customers-sys", "1.1.0", "${targetEnvironment}", "RTF", "1", "MICRO", "${ANYPOINT_USR}", "${ANYPOINT_PSW}", "${muleSettings}")
deploy("${groupId}", "inventory-sys", "1.0.10", "${targetEnvironment}", "RTF", "1", "MICRO", "${ANYPOINT_USR}", "${ANYPOINT_PSW}", "${muleSettings}")
deploy("${groupId}", "catalog-sys", "2.0.1", "${targetEnvironment}", "RTF", "1", "MICRO", "${ANYPOINT_USR}", "${ANYPOINT_PSW}", "${muleSettings}")
Each component has different versions and one is deployed to CloudHub using a dedicated load balancer. Others are deployed to Runtime Fabric or CloudHub using the shared public load balancer.
- Save the release pipeline you have created to a Git repository holding your pipeline scripts.
- Then perform the same steps as described above (for creating a component release pipeline) to create the coordinated release pipeline in Jenkins using the new pipeline file.
What’s next?
This is the basics for release pipelines. The next step is to choose the specific functionality you want for deploying your releases and modify the release pipelines accordingly.
Further articles in this series will look at other aspects that can be standardized with the Maven foundation we have built.


