Tableau is the leading visual analytics platform transforming the way we use data to solve problems — it empowers people and organizations to make the most of their data. Tableau can connect to pretty much any data source, including data exposed through REST APIs. In this post, you’ll learn how Tableau can be set up to consume an Experience API to build new dashboards.
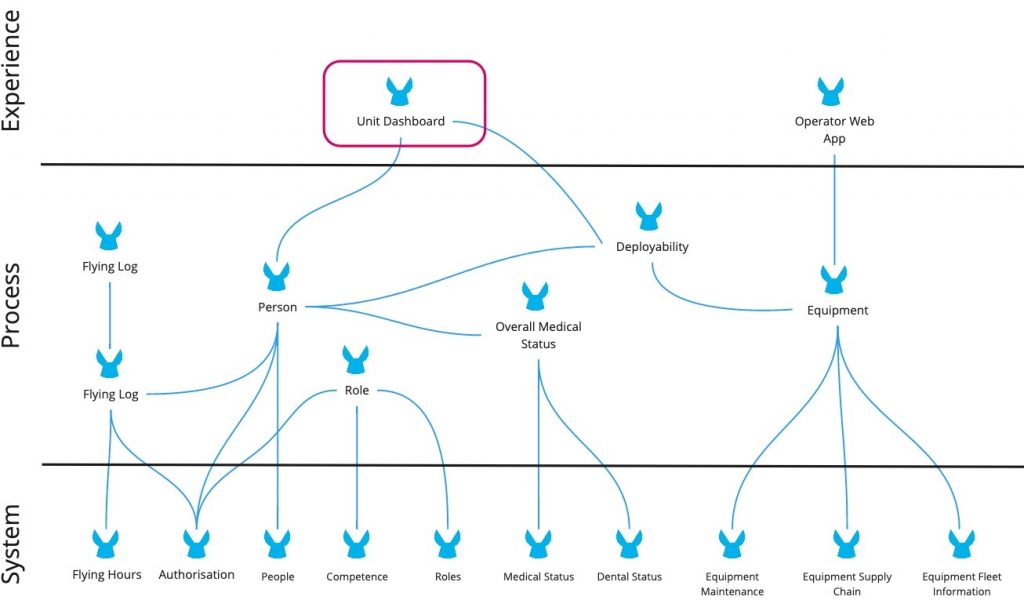
Tableau allows users to build dashboards by connecting several data sources using a wide range of pre-packaged connectors. A list of available Tableau connectors is available here. For this article we’ll use the following API-led architecture design to show how Tableau can be configured to consume an Experience API:

The objective of the above system is to build a Tableau dashboard that would allow a fleet commander to select the best pilot for a mission based on the pilot’s competencies, flight hours, health, etc. The Unit Dashboard API is the Experience API providing the data needed to build the dashboard, data that will be consumed directly by Tableau. In the remainder of this article, we’ll show how to configure Tableau and design the Unit Dashboard API so it is suitable for consumption by Tableau.
Tableau Web Data Connector
In the previous section, we mentioned that we will configure Tableau to consume data exposed by the Unit Dashboard experience API. To do this, we will leverage Tableau Web Data Connector (WDC)
A WDC allows connecting to data sources accessible over HTTP and for which there is no Tableau connector available to access the data source natively.
| Note: Tableau WDC is not available on Tableau Online. It is only supported on Tableau Desktop and Tableau Server and must be properly whitelisted. |
To allow Tableau to connect to our Unit Dashboard API, we will need to build a simple Web Data Connector. This is easy to achieve and requires just a bit of HTML and Javascript knowledge. A WDC consists of two files:
- An HTML file that allows users to pass certain parameters to the Experience API. This is useful if there is a need to extract incremental updates (ex: provide all data starting from a certain date). This file must also reference the Tableau Javascript library and the custom Javascript file described in the next bullet point.
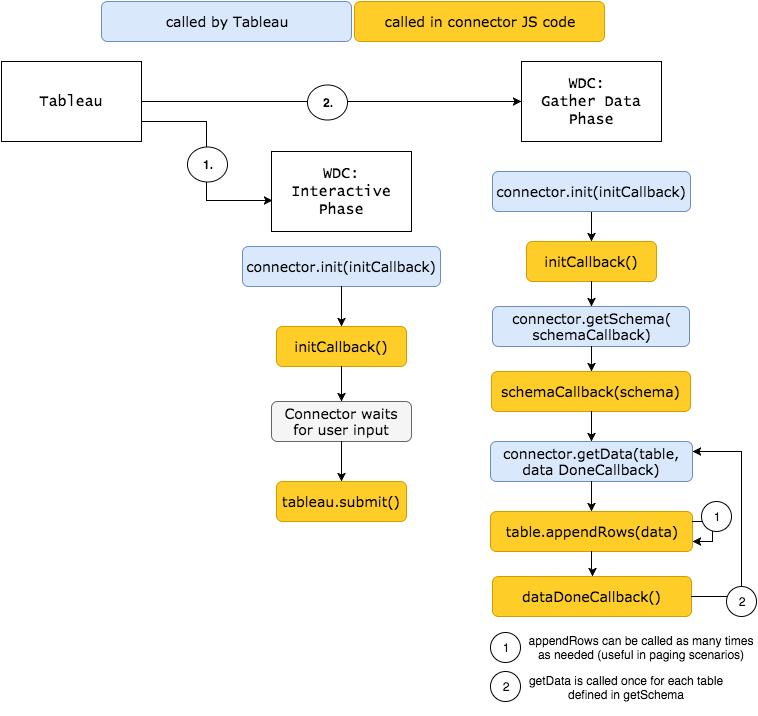
- A Javascript file which will implement the two lifecycle phases that Tableau will execute during the data refresh, as shown below:

For our Unit Dashboard API we have two files.
The first file (wdc.html) is used by Tableau to display a page which allows users to specify an offset or any other parameter required by the Experience API to narrow down and reduce the size of the data retrieved (ex: timeframe).
<html>
 <head>
    <title>Flights Logs</title>
    <meta http-equiv="Cache-Control" content="no-store" />
    <link href="https://maxcdn.bootstrapcdn.com/bootstrap/3.3.6/css/bootstrap.min.css" rel="stylesheet" crossorigin="anonymous">
    <script src="https://ajax.googleapis.com/ajax/libs/jquery/1.11.1/jquery.min.js" type="text/javascript"></script>
    <script src="https://maxcdn.bootstrapcdn.com/bootstrap/3.3.6/js/bootstrap.min.js" crossorigin="anonymous"></script>


    <script src="https://connectors.tableau.com/libs/tableauwdc-2.3.latest.js" type="text/javascript"></script>
    <script src="raf.js" type="text/javascript"></script>
 </head>


 <body>
    <div class="container container-table">
        <div class="row vertical-center-row">
            <div class="text-center col-md-4 col-md-offset-4">
                <button type="button" id="submitButton" class="btn btn-success" style="margin: 10px;">Get Flights Log Data!</button>
            </div>
        </div>
    </div>
 </body>
</html>
wdc.html
The second (Javascript) file – raf.js – implements the logic for defining the Tableau datasource structure, invoking the Experience API and transforming the data returned by the API according to the datasource structure. The code is pretty straightforward so I will leave it to you to analyze to understand the logic.
(function () {
    var rafFlightsConnector = tableau.makeConnector();

    rafFlightsConnector.getSchema = function (schemaCallback) {
    var cols = [
        {
          id: "id",
          dataType: tableau.dataTypeEnum.int
        },
        {
          id: "name",
          alias: "Pilot Name",
          dataType: tableau.dataTypeEnum.string
        },
        {
          id: "serviceNumber",
          alias: "Service Number",
          dataType: tableau.dataTypeEnum.string
        },
        {
          id: "preferredRank",
          dataType: tableau.dataTypeEnum.string
        },
        {
          id: "substantiveRank",
          dataType: tableau.dataTypeEnum.string
        },
        {
          id: "branchArmGroup",
          dataType: tableau.dataTypeEnum.string
        },
        {
          id: "jpan",
          dataType: tableau.dataTypeEnum.string
        },
        {
          id: "trade",
          dataType: tableau.dataTypeEnum.string
        },
        {
          id: "organisation",
          dataType: tableau.dataTypeEnum.string
        },
        {
          id: "location",
          alias: "Location",
          dataType: tableau.dataTypeEnum.string
        },
        {
          id: "assignmentType",
          alias: "Assignment Type",
          dataType: tableau.dataTypeEnum.string
        },
        {
          id: "roleName",
          alias: "Role Name",
          dataType: tableau.dataTypeEnum.string
        },
        {
          id: "flightHours",
          alias: "Number of Flying Hours",
          dataType: tableau.dataTypeEnum.float
        },
        {
          id: "compToDate",
          alias: "Competence Effective to Date",
          dataType: tableau.dataTypeEnum.datetime
        },
        {
          id: "compName",
          alias: "Competency Name",
          dataType: tableau.dataTypeEnum.string
        },
        {
          id: "compFromDate",
          alias: "Competence Effective From Date",
          dataType: tableau.dataTypeEnum.datetime
        },
        {
          id: "futureAvailabilityDate",
          alias: "Future Availability Date",
          dataType: tableau.dataTypeEnum.datetime
        },
        {
          id: "isOfficer",
          alias: "Officer?",
          dataType: tableau.dataTypeEnum.bool
        }
      ];

    var tableSchema = {
        id: "flightLogs",
        alias: "Flight log entries",
        columns: cols
    };

    schemaCallback([tableSchema]);
};

    rafFlightsConnector.getData = function (table, doneCallback) {
      try {

        $.ajax({
            beforeSend: function(request) {
              request.setRequestHeader("client-id", 'bla');
              request.setRequestHeader("client-secret", 'bla');
            },
            dataType: "json",
            url: "http://experienceapidashboard.us-e2.cloudhub.io/api/get-dashboard",
          //  url: "https://anypoint.mulesoft.com/mocking/api/v1/links/38e68660-22be-4f15-996f-5af3e04eef1e/get-dashboard",
            success: function(resp) {
              tableau.log("in $.ajax")
              var feat = resp,
                  tableData = [];

              // Iterate over the JSON object
              for (var i = 0, len = feat.length; i < len; i++) {
                  tableData.push({
                      "id": feat[i]['Service-Number'],
                      "name": feat[i]['Name'],
                      "serviceNumber": feat[i]['Service-Number'],
                      "preferredRank": feat[i]['Preferred/Only Rank'],
                      "substantiveRank": feat[i]['Substantive Rank'],
                      "branchArmGroup": feat[i]['Branch Arm Group'],
                      "jpan": feat[i].JPAN,
                      "trade": feat[i]['Main Trade'],
                      "organisation": feat[i]['Organisation'],
                      "location": feat[i]['Location'],
                      "assignmentType": feat[i]['Assignment-Type'],
                      "roleName": feat[i]['Role-Name'],
                      "flightHours": feat[i]['flyingHours'],
                      "compToDate": feat[i]['Competence Effective To'],
                      "compFromDate": feat[i]['competenceEffectiveFrom'],
                      "compName": feat[i]['competenceName'],
                      "futureAvailabilityDate": feat[i]['Future-Availability-Date'],
                      "isOfficer": feat[i]['isOfficer']
                  });
              }

              table.appendRows(tableData);
              doneCallback();

          }
        });

        } catch(err){
          tableau.log("Error: " + err.message)
        }
      };

    tableau.registerConnector(rafFlightsConnector);
})();

$(document).ready(function () {
    $("#submitButton").click(function () {
        tableau.connectionName = "RAF Flights Logs";
        tableau.submit();
    });
});
raf.js
Load the Web Data Connector in Tableau
Once the WDC is ready and tested using the WDC Simulator it will need to be made available through an URL that is accessible by Tableau Desktop. Assuming we are testing this locally, open a terminal window, navigate to the folder where wdc.html, and raf.js are located and type:
python -m SimpleHTTPServer 8080
| Note: The approach above is for testing purposes only and is the only option whilst the Experience API has not yet been implemented. That’s because once the Experience API implementation has been completed and deployed the WDC should be made available through the API itself (see Loading Static Resources or Parsing a Template) |
In Tableau, select File > New (unless already on the welcome screen), then in the Data Source tab, select More (To Server section), and then Web Data Connector.

In the subsequent screen type the following URL:
localhost:8080/wdc.html
Click on Get Flights Log Data
Tableau will first load the Datasource structure as defined in raf.js. After clicking on Update Now, it will:
- Invoke the Experience API.
- Transform the data (based on the raf.js logic) to map it with the datasource structure.
- Make the data available to the analytics team to start building a dashboard.
Experience API requirements:
In order for the Experience API to be invoked by Tableau, the following requirements must be met:
- OPTIONS method must be implemented. This is required by the pre-flight check the browser (or Tableau Desktop) performs when invoking an URL using the Ajax pattern.
- CORS headers must be present. Specifically:
- Access-Control-Allow-Origin: this can be either “*” or whatever domain Tableau is running behind (if Tableau server. If Tableau Desktop it must be “*”).
- Access-Control-Allow-Headers: Assuming authentication is performed by simple client-id/client-secret authentication, this header must contain the names of the headers specified to pass the credentials. Example: Access-Control-Allow-Headers: “client-id, client-secret”
- (Optional) To leverage the accelerated delivery benefit that the Anypoint Platform provides, the API RAML should define some sample data (see next section).
Prototype Tableau dashboards with the mocking service
After defining a contract for Unit Dashboard Experience API in Design Center and making sure that examples are also specified for any response and request body of, Anypoint Mocking Service will expose an URL that can be consumed by the custom WDC to start building the dashboard before any time has been spent yet on the actual API implementation.
This also allows the analytics team to provide feedback and validate the quality of the API design ahead of time.
Once the API contract is exposed by Anypoint Mocking Service, the analytics team can start building the Tableau dashboards while the Unit Dashboard API (and potentially any other required API) is being implemented, considerably reducing the delivery time.
To start building a dashboard while leveraging the Mocking Service URL, the mock URL in the raf.js file (line 110) must be specified, as shown below:
url: “https://anypoint.mulesoft.com/mocking/api/v1/links/38e68660-22be-4f15-996f-5af3e04eef1e/get-dashboard”,
The RAML API definition for get-dashboard API resource looks like this:
get:
  displayName: get-dashboard
  description: Get data required for dashboard.
  queryParameters:
    Officers?:
      example: true
      type: boolean
    Date-of-Deployment?:
      example: 2020-05-11
      type: date-only
  responses:
    "200":
      headers:
        Access-Control-Allow-Headers:
          example:
            "client-id, client-secret"


        Access-Control-Allow-Origin:
          example:
            "*"
      body:
        application/json:
          example:
            [
              {
                "Service-Number": "10000001[0]",
                "Name": "Jones, Peter",
                "Preferred/Only Rank": "OR4",
                "Substantive Rank": "CPL",
                "Branch Arm Group": "4",
                "JPAN": "2020000",
                "Main Trade": "ICT TECH",
                "Location": "",
                "Assignment Type": "",
                "Role-Name": "AX JNCO|2020000",
                "flyingHours": 7.3,
                "Competence Effective To": "2020-02-29T00:00:00",
                "competenceEffectiveFrom": "2019-02-28T00:00:00",
                "competenceName": "CMS|ANNUAL FIRE TRAINING|RAF|",
                "Future-Availability-Date": "2020-05-21T12:13:50.829Z",
                "Organisation": "90SU OP ISW C AND I SQN",
                "isOfficer": "FALSE"
              },
              {
                "Service-Number": "10000002[1]",
                "Name": "Smith, John Paul",
                "Preferred/Only Rank": "OR2",
                "Substantive Rank": "SAC(T)",
                "Branch Arm Group": "4",
                "JPAN": "2020001",
                "Main Trade": "ICT TECH",
                "Location": "",
                "Assignment Type": "",
                "Role-Name": "AX|2020001",
                "flyingHours": 16,
                "Competence Effective To": "2020-10-31T00:00:00",
                "competenceEffectiveFrom": "2019-10-31T00:00:00",
                "competenceName": "CMS|Annual Military Security Training|Joint|",
                "Future-Availability-Date": "2020-05-21T12:13:51.258Z",
                "Organisation": "90SU OP ISW C AND I SQN",
                "isOfficer": "FALSE"
              },
              {
                "Service-Number": "10000003[1]",
                "Name": "Owen, Clive",
                "Preferred/Only Rank": "OR6",
                "Substantive Rank": "SGT",
                "Branch Arm Group": "4",
                "JPAN": "2020002",
                "Main Trade": "ICT TECH",
                "Location": "",
                "Assignment Type": "",
                "Role-Name": "AX SNCO|2020002",
                "flyingHours": 15.3,
                "Competence Effective To": "2008-08-31T00:00:00",
                "competenceEffectiveFrom": "2008-07-09T00:00:00",
                "competenceName": "CIS-B180|Sign 1st signature within trade boundary.|RAF|",
                "Future-Availability-Date": "2020-05-21T12:13:51.749Z",
                "Organisation": "90SU OP ISW C AND I SQN",
                "isOfficer": "FALSE"
              },
              {
                "Service-Number": "10000003[2]",
                "Name": "Owen, Clive",
                "Preferred/Only Rank": "OR6",
                "Substantive Rank": "SGT",
                "Branch Arm Group": "4",
                "JPAN": "2020002",
                "Main Trade": "ICT TECH",
                "Location": "",
                "Assignment Type": "",
                "Role-Name": "AX SNCO|2020002",
                "flyingHours": 15.3,
                "Competence Effective To": "2010-03-31T00:00:00",
                "competenceEffectiveFrom": "2010-02-01T00:00:00",
                "competenceName": "CIS-C182|Sign 2nd signature within trade Boundary.|RAF|",
                "Future-Availability-Date": "2020-05-21T12:13:51.749Z",
                "Organisation": "90SU OP ISW C AND I SQN",
                "isOfficer": "FALSE"
              }
            ]
Note how the API contract provides a response body example. This can be used by the analytics team to start shaping the Tableau dashboards.
Once the API has been implemented and deployed, all we have to do is to change line 110 in raf.js to point to the live API URL:
url: “http://experienceapidashboard.us-e2.cloudhub.io/api/get-dashboard”,
We should now get live data and the dashboards should finally come to life.
Conclusion
In this post we have shown how MuleSoft and Tableau are able to work together with minimal setup. We also showed organizations can benefit from Accelerated delivery by adopting a contract-first approach paired and leveraging the value brought by Anypoint Mocking Service. Analytics team will start working on dashboards while the API(s) implementation is being implemented. This allows parallel and agile development of Tableau dashboards and also gives the analytics team to provide feedback on the quality of the API before any time has been invested with the implementation.
And obviously, leveraging the API-led connectivity approach, the analytics team now does not care where the data comes from, they will not need to request access to specific data sources and try to understand their structure. It’s actually the analytics team now who decides how the data should look like to best accommodate their dashboard requirements.
Learn how MuleSoft and Tableau can unlock your data silos by checking out our webinar.


