
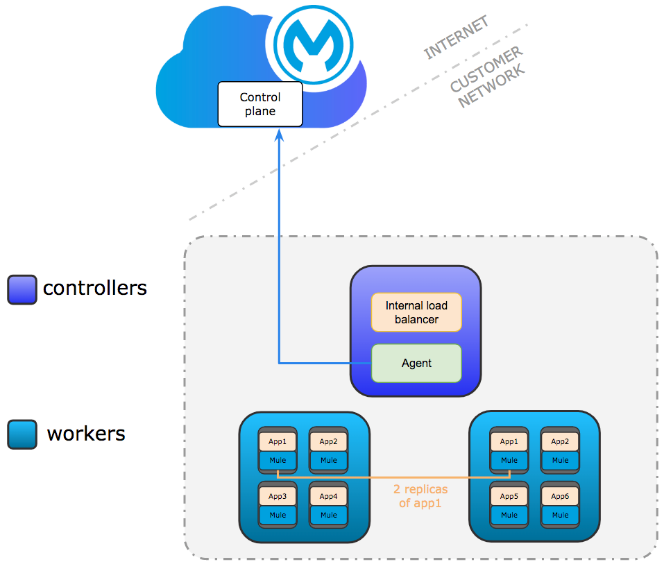
Anypoint Runtime Fabric is a container service that automates the deployment and orchestration of Mule applications and API gateways. Runtime Fabric runs within a customer-managed infrastructure on AWS, Azure, virtual machines (VMs), and bare-metal servers.
Some of the capabilities of Anypoint Runtime Fabric include:
- Isolation between applications by running a separate Mule runtime engine per application.
- Ability to run multiple versions of Mule on the same set of resources.
- Scaling applications across multiple replicas.
- Automated application failover.
- Application management with Anypoint Runtime Manager.
Current deployment options
Current Runtime Fabric deployment instructions for public clouds include deployment on AWS and Azure. There is no deployment documentation for Oracle Cloud. This article will walk you through the process of manually installing and deploying Runtime Fabric on an Oracle Cloud Infrastructure. It also highlights some necessary changes required to successfully install Runtime Fabric.
Setup
Make sure you meet the installation requirements — mentioned here — before continuing the setup. Anypoint Runtime Fabric supports development and production configuration. Each of these supported configurations specify the minimum nodes and resources required.
In this setup, we will use the development configuration. This configuration requires at least one controller and two worker nodes.
We will need to first create the required infrastructure in Oracle Cloud. The required minimum configuration for a development configuration is listed below.
Build the infrastructure in Oracle Cloud
First and foremost, you need to build the infrastructure required to deploy Runtime Fabric. Since we are going to deploy a development configuration with one controller and two worker nodes, we will need three virtual machines that meet the infrastructure and OS requirements.
Launch virtual machines

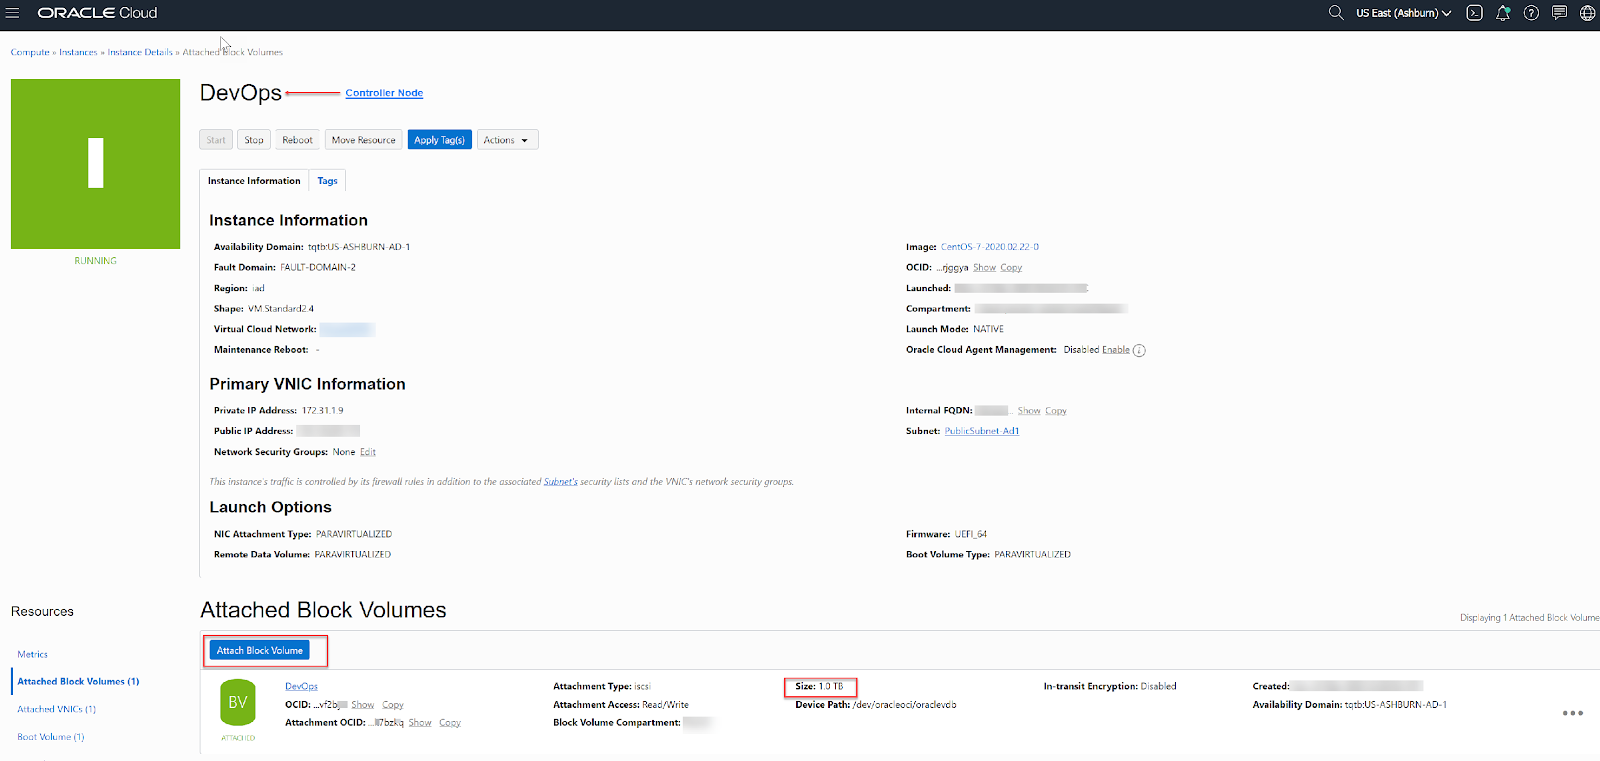
Create three VMs. One for controller node and one each for two worker nodes with the below minimum requirements. You can choose either RHEL or Centos OS within the supported versions listed under OS requirements.

Additionally, create and attach block volumes to each of the corresponding VMs. These block volumes must also meet the storage requirements and the IOPS requirements mentioned in the documentation.
Controller node:
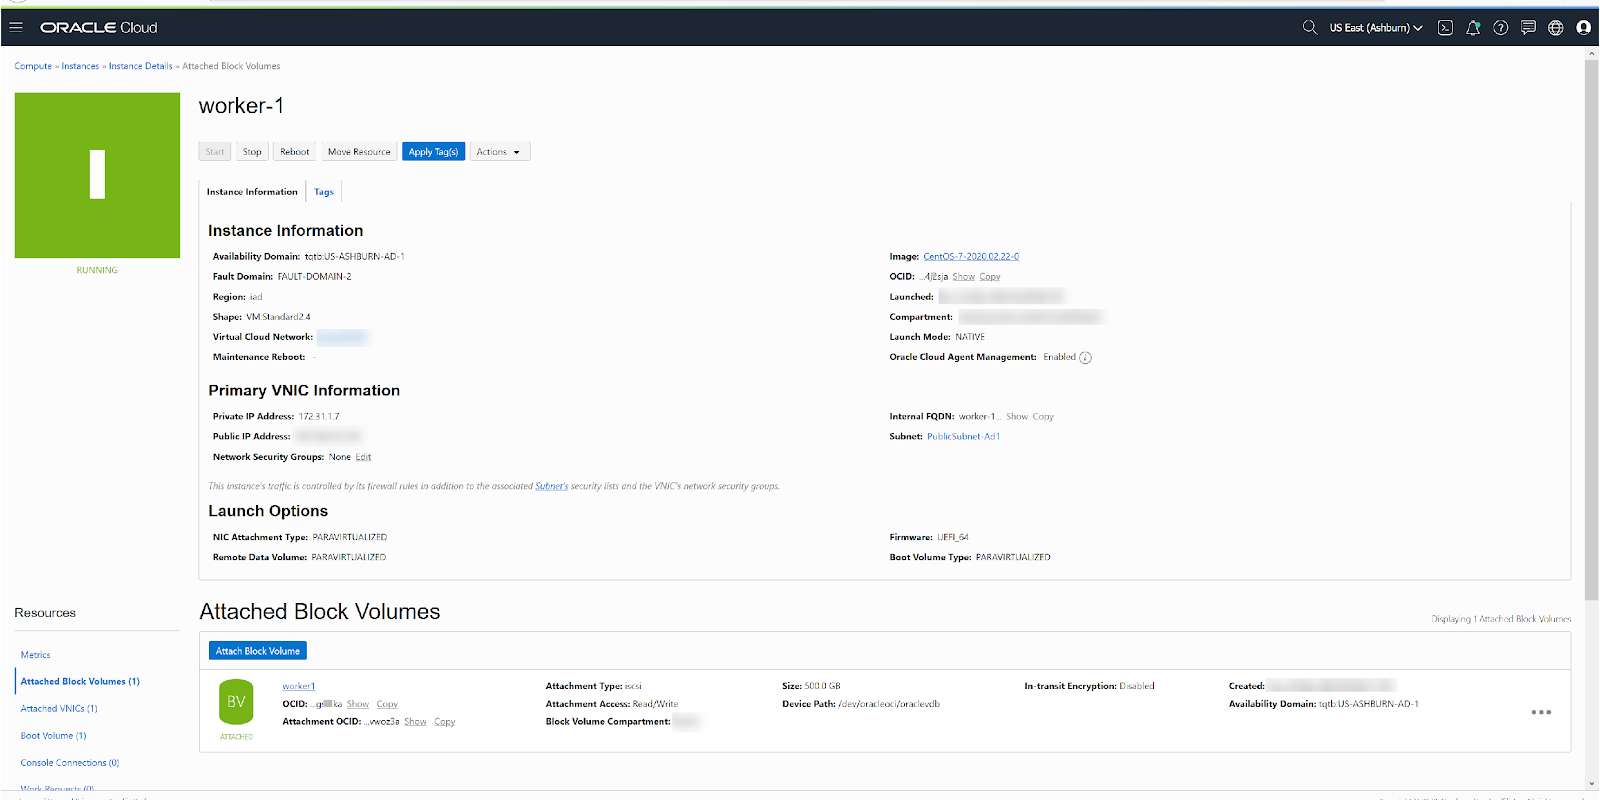
Worker node/s:
Network port requirements
It’s recommended to only open the firewall ports as documented in the network port requirements.
The following picture represents the ingress ports that were opened to allow traffic to the instances and allow access to the Ops center from the web. 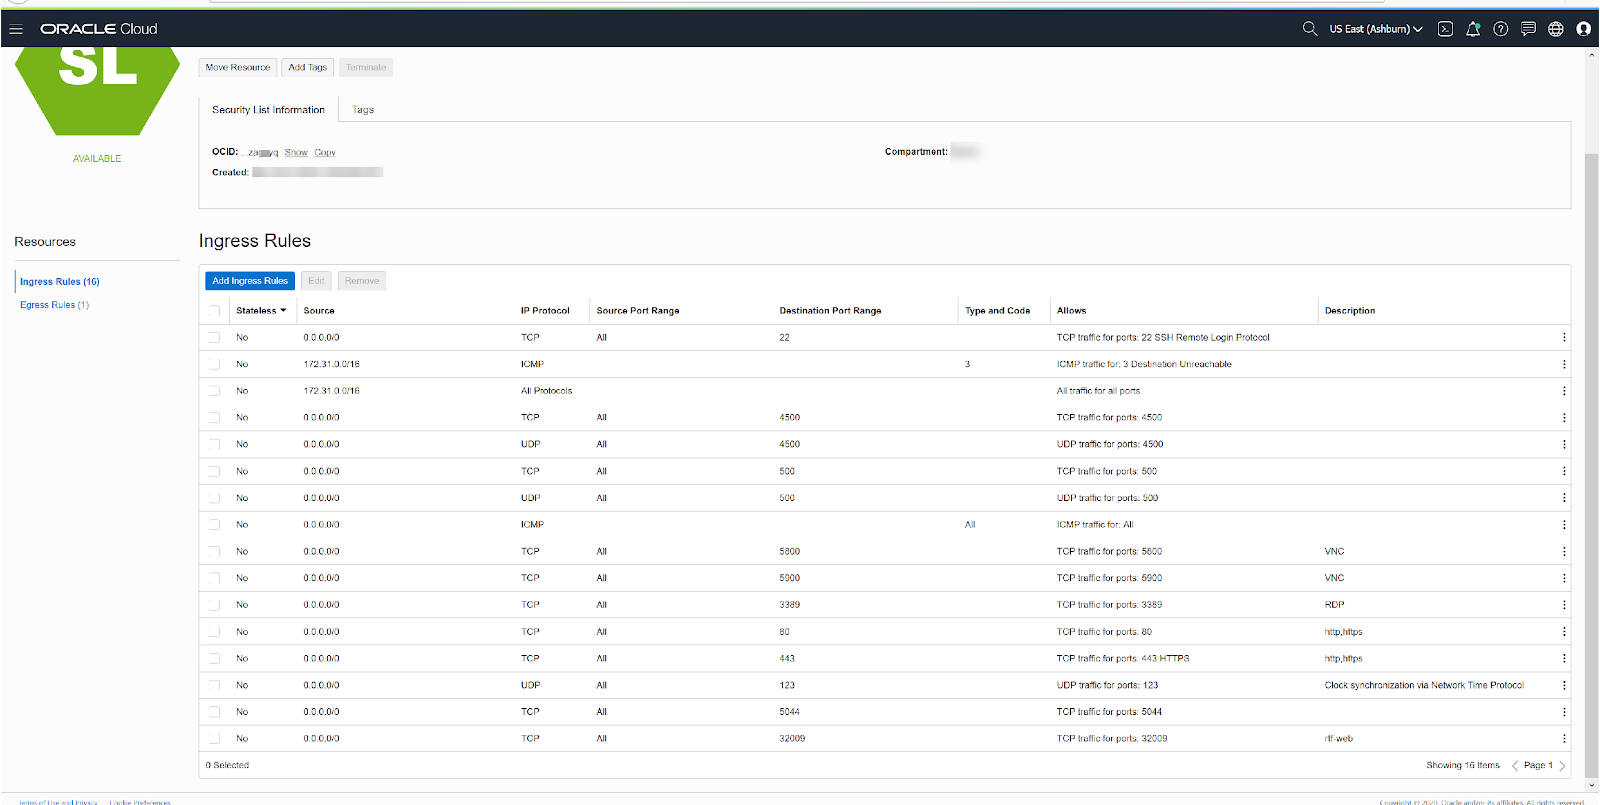
Runtime Fabric installation
Log into the controller node and follow the manual installation steps as described here.
- Base64 encode your Mule license keys.
- Define variables:
- RTF_CONTROLLER_IPS=”172.31.1.9″
- RTF_WORKER_IPS=”172.31.1.7 172.31.1.8″
- RTF_ACTIVATION_DATA=”YW55cG9pbnQubXVsZXNvxxxxxxmQ4NzViYjQ5LTFjZTktNDk0NC05ZjlmLTFkMjQ4YTE0NDczMQ==”
- RTF_DOCKER_DEVICE: /dev/sdb2
- RTF_ETCD_DEVICE: /dev/sdb1
- RTF_MULE_LICENSE:== “2414asdfgdDSFSDFSD31234098f”
- Use the ./generate-configs.sh script to generate the environment variables for each VM. This should output a set of instructions and a script to run on each of the VMs (controller, worker node one and worker node two).
- Execute the snippet generated above on each VM (controller node and the two worker nodes) based on the IP address to apply the environment variables.
- On each VM, copy the ./scripts/init.sh file to /opt/anypoint/runtimefabric and make it executable.
- Run the init.sh script in a privileged mode.
[opc@devops runtimefabric]$ sudo chmod +x /opt/anypoint/runtimefabric/init.sh- This should begin the installation process. The installation process will run through some pre checks and availability of necessary packages. If all requirements are met the script continues the installation process. Installation completes after executing through 15 steps.
If you run into issues during installation, you will need to monitor the error in the terminal window or view the logs in the /var/log/rtf-init.log file. You will then need to correct the problem and rerun the init.sh script.
Things to watch out during installation in Oracle Cloud
To survive a VM restart and attach block device to the compute instance
Edit the /etc/fstab file to include ‘_netdev’ option into the two lines automatically added by the Runtime Fabric installation program.
[opc@devops runtimefabric]$ cat /etc/fstab
....
...
UUID=f7012342-32ba-1234-b207-13123470741b       /var/lib/gravity        xfs     defaults,_netdev,nofail 0       2       # Added by RTF
UUID=fe4e4de2-8b0f-4c83-84d8-2a44321c93b8       /var/lib/gravity/planet/etcd    xfs     defaults,_netdev,nofail 0       2       # Added by RTF
Debugging DNS resolution
Create a simple Pod to use as a test environment. Then create a busybox pod named ‘busybox’ using the following command:
[root@devops ~]# kubectl create -f https://k8s.io/examples/admin/dns/busybox.yaml
pod/busybox created
Once that pod is running, you can execute nslookup in that environment. If you see something like the following, DNS is working correctly.
[root@devops ~]# kubectl exec -ti busybox -- nslookup kubernetes.default
Server:    10.100.174.177
Address 1: 10.100.174.177 kube-dns-worker.kube-system.svc.cluster.local

Name:      kubernetes.default
Address 1: 10.100.0.1 kubernetes.default.svc.cluster.local
[root@devops ~]#
If the nslookup command fails, check the following:
- Check the local DNS configuration.
- Take a look inside the resolv.conf file.
- Verify that the search path and name server are set up like the following:
[root@devops ~]# kubectl exec busybox cat /etc/resolv.conf
nameserver 10.100.174.177
nameserver 10.100.210.58
search default.svc.cluster.local svc.cluster.local cluster.local rtfvcn.devvcn.com publicsubnetad1.rtfvcn.devvcn.com
options ndots:5
[root@devops ~]#
Errors such as the following indicate a problem with the coredns or associated services:
kubectl exec -ti busybox -- nslookup kubernetes.default
Server:    10.100.174.177
Address 1: 10.100.174.177

nslookup: can't resolve 'kubernetes.default'
To solve this, check if the DNS pod is running. Then use the kubectl get pods command to verify that the DNS pod is running.
[root@devops ~]# kubectl get pods --namespace=kube-system -l k8s-app=kube-dns
NAME            READY   STATUS    RESTARTS   AGE
coredns-kpxmr   1/1     Running   0          6d21h
[root@devops ~]#
If you see that no pod is running or that the pod has failed/completed, the DNS add-on may not be deployed by default in your current environment and you will have to deploy it manually.
Verify that the DNS service is up by using the kubectl get service command.
[root@devops ~]# kubectl get svc --namespace=kube-system
NAME              TYPE           CLUSTER-IP       EXTERNAL-IP   PORT(S)                    AGE
gravity-site      LoadBalancer   10.100.200.123   <pending>     3009:32009/TCP             6d21h
kube-dns          ClusterIP      10.100.210.58    <none>        53/UDP,53/TCP              6d21h
kube-dns-worker   ClusterIP      10.100.174.177   <none>        53/UDP,53/TCP              6d21h
log-collector     ClusterIP      10.100.144.45    <none>        514/UDP,514/TCP,8083/TCP   6d21h
[root@devops ~]#
You can verify that DNS endpoints are exposed by using the kubectl get endpoints command.
[root@devops ~]# kubectl get ep kube-dns --namespace=kube-system
NAME       ENDPOINTS                       AGE
kube-dns   10.244.22.3:53,10.244.22.3:53   6d21h
[root@devops ~]#
Learn more about the product and the manual installation process in the documentation. Start your free trial of Anypoint Platform and test out Anypoint Runtime Fabric now.


