
As the world innovates at a faster and faster rate — it’s critical for businesses to see changes in the market and address them quickly to keep pace with customer demand. This is why modern IT teams are looking for the fastest possible way to deploy an application.
With Runtime Fabric you can use spare CPU capacity on your worker nodes to speed up deployment.
Runtime Fabric as a runtime plane
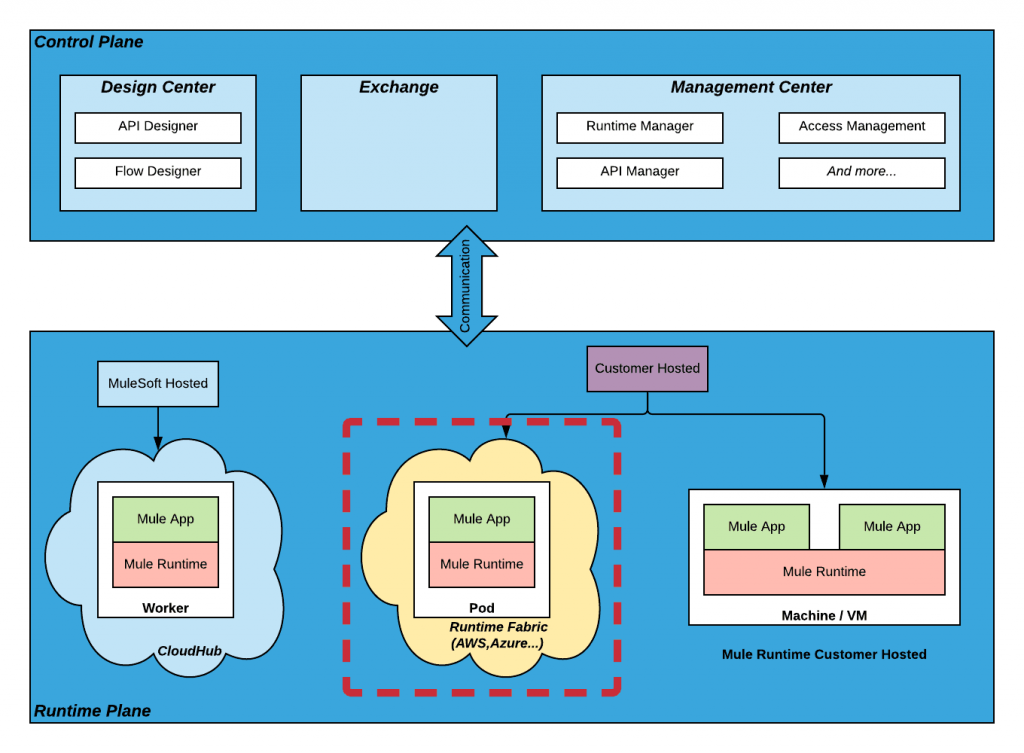
Figure 1: The control and runtime plane showing Runtime Fabric deployment option
When you want to deploy Mule applications, you’ll need to specify where you want to run it — this is called the runtime plane. See figure 1 above.
There are three deployment options:
- CloudHub: Deploy applications in a MuleSoft-hosted environment.
- Customer-hosted Mule runtime: Deploy applications in your own environment.
- Runtime Fabric: Deploy applications on your infrastructure, but MuleSoft will manage, deploy, run, and monitor your applications.
Runtime Fabric can be installed onto VM or bare metal using the Runtime Fabric appliance or into a self-managed existing Elastic Kubernetes Service or Azure Kubernetes Service environment. Regardless of the incarnation of Runtime Fabric, you choose the advice given here applies equally.
Perhaps you would like to experiment with Runtime Fabric, take a look at this blog post about how to install Runtime Fabric on a local PC using virtual machines.
Let’s see how Runtime Fabric can reduce the deployment time of an application.
Runtime Fabric architecture
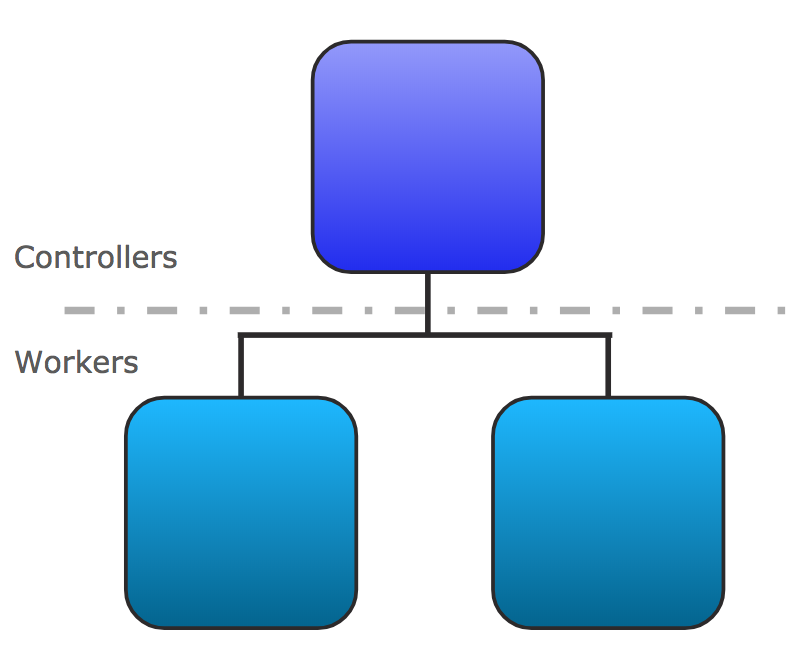
Figure 2: Overview of Runtime Fabric architecture
Runtime Fabric architecture is based on Kubernetes, it runs on nodes where a node can be a physical or virtual machine.
There are two types of nodes:
- Controller node for managing the Runtime Fabric cluster
- Worker node for running Mule applications
The number of nodes you configure depends on the target environment you want:
- Development: 1 controller node, 2 worker nodes
- Production: 3 or 5 controller nodes and at least 3 worker nodes
Runtime Fabric worker nodes

Figure 3: Runtime Fabric worker nodes in which Mule applications are deployed
A worker node is a physical or virtual machine characterized by:
- CPU or vCPU
- Memory
When you deploy an application to Runtime Fabric, it automatically deploys the application to a worker node (you cannot select which one). In reality, the application is not directly deployed. Runtime Fabric creates a POD composed of two containers. One container will run your application, the other will run the monitoring agent, as shown in figure 3.
Under normal running conditions, the Mule application will not consume the whole CPU of the workers. Since the release of Runtime Fabric version 1.4, you can use the CPU bursting feature to dynamically provide more CPU capacity as required.
Explaining CPU bursting

Figure 4: Example of how CPU bursting works
Runtime Fabric CPU bursting is based on Kubernetes CPU bursting technology. When CPU bursting is activated, a container in a POD can consume more CPU resources than originally requested by the application. This is taken from spare CPU resources on the worker node. CPU bursting occurs when a CPU overload of the application is detected perhaps caused by higher than expected API invocations.
Ensure that you will not consume more CPU than you paid for, even when you use CPU bursting. See CPU and Licensed Cores in the documentation.
Deploy an application without CPU bursting

Figure 5: Configure reserved and CPU limits on application deployment
When you deploy a Mule application to Runtime Fabric, as shown in figure 5, you have to configure:
- Reserved CPU the CPU reserved for your application
- CPU Limit the maximum CPU your application can use if needed
When you set the Reserved CPU to equal the CPU Limit, it does mean CPU bursting is disabled. The result is that your application will not deploy as fast as it potentially could, depending on the Reserved CPU you set.
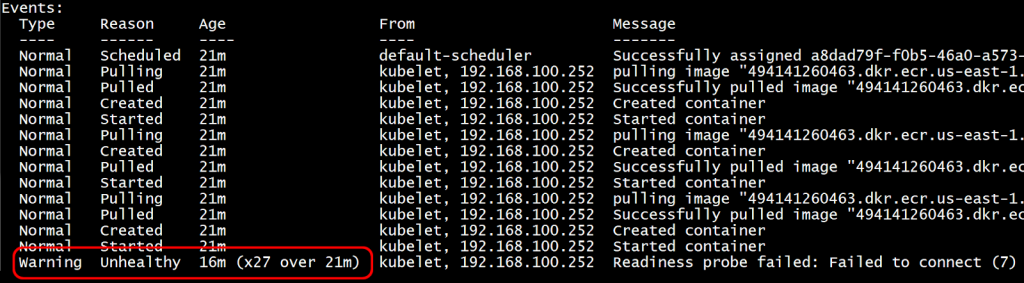
Figure 6: Application starts after 16 minutes due to reserved CPU being set equal to the CPU Limit
In figure 6, the application was unhealthy 27 times for 16 minutes. This means that you need to wait 16 minutes before using your application.
Deploy an application with CPU bursting
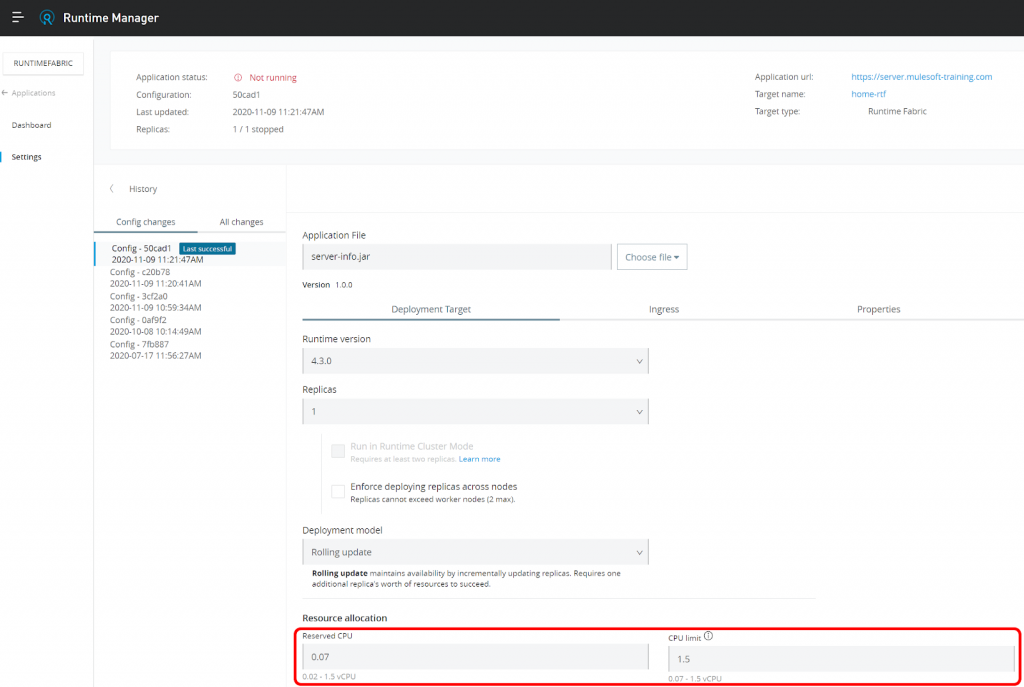
Figure 7: Configure reserved and CPU limits on application deployment for CPU Bursting
To enable CPU bursting you have to set a greater value for CPU limit than Reserved CPU. The default value for CPU Limit is the maximum CPU for a worker node. The result is faster deployment of your application. Of course, it depends on the amount of unused CPU on your worker.
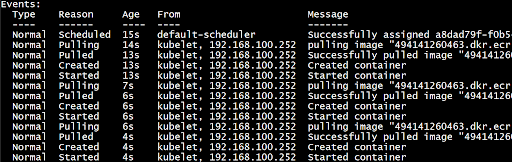
Figure 8: Application starts within a few seconds due to reserved CPU being set greater than the CPU Limit.
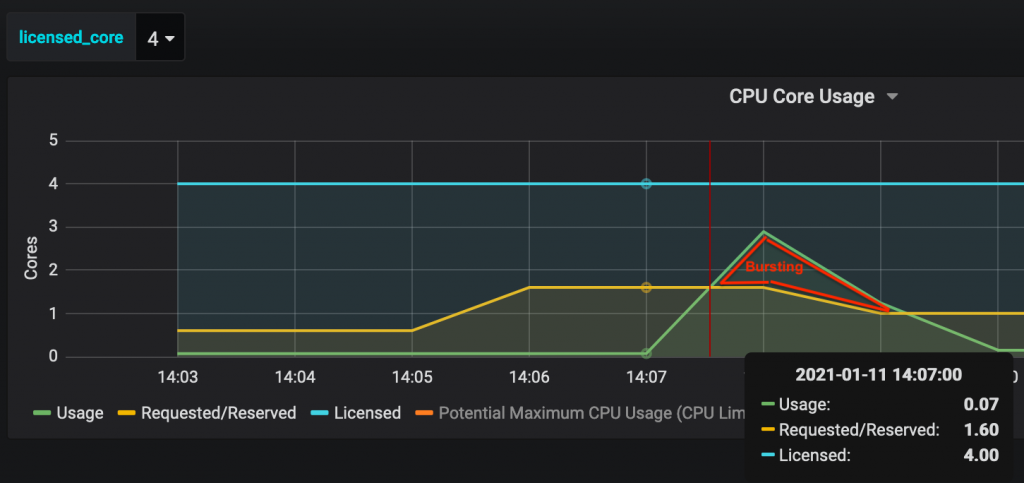
Figure 9: Monitoring CPU bursting in OPS Center
In figure 8, we can see that there is no unhealthy application message. The application was deployed in just a few seconds.
In figure 9, we can see that for a short period of time the CPU usage is greater than the requested CPU, so CPU bursting takes place during that time.
Nevertheless, be careful, the unused CPU can be used by any Mule application with CPU bursting enabled. The unused CPU should be considered as a shared pool, so there might be contention between Mule applications for those resources.
Conclusion
Enabling CPU bursting allows you to take advantage of unallocated CPU resources on your worker nodes to increase the deployment speed of your application. CPU bursting is also useful for applications with activity spikes. That’s why it is always useful to have some unallocated CPU on your worker nodes.
If you want to learn more about Runtime Fabric consider taking our Anypoint Platform Operations: Runtime Fabric course. It covers all that you need to know to install and operate Runtime Fabric on VMs and bare metal.


