SOAP, JMS, Restful, SFTP… Sometimes your integration just comes to the point in which you need to be able to download a file from your browser. From Ubuntu One all the way to Dropbox and Google Drive, the number of file storage services on the cloud just keeps climbing. One that is particularly gaining a lot of momentum and putting a lot of effort on cloud to cloud integration is Box, so we decided to build a Cloud Connector for it and we’ll show it to you in this post.
So we could go with really quick examples of each of the many operations that the connector exposes but let’s face it, you can see that on your own looking at the connector’s documentation. Instead, let’s take a quick tour looking at how you can use the connector and the power of Mule Studio to download an Attachment from SalesForce and upload it into your box account.
Install the connector
If you want to use the connector on an application developed “the traditional way”, you can find the connector’s install guide and API reference here.
However, this post is all about using Studio so let’s take a look at how to make the connector available in Studio using the new Eclipse update sites!
First, go to the help menu and click on “Install New Software”
Then, click on the add site button:
Then register the new update site using this URL: http://repository.mulesoft.org/connectors/releases
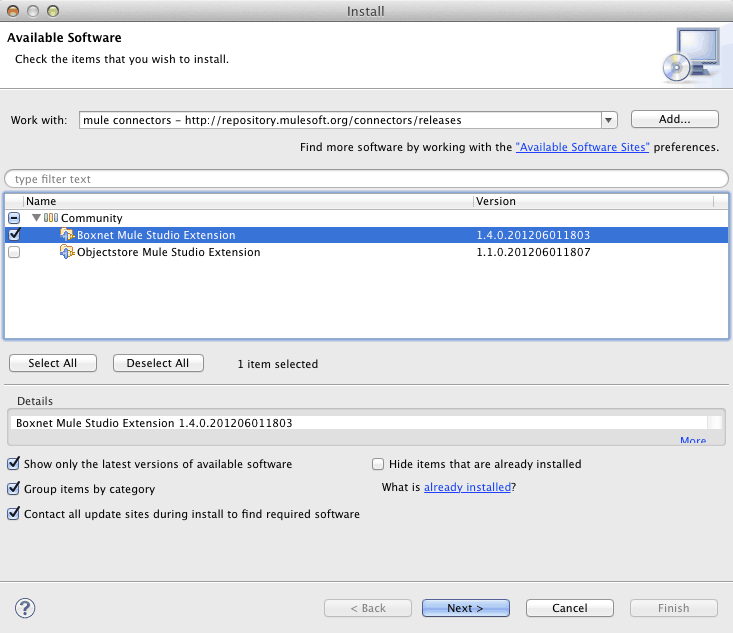
Then Select the box cloud connector and install it:
Last step! Accept the license agreement:
You’re all set! After finishing the installation, Studio will restart and you’ll have the box connector available on the Cloud Connectors pallete:
Getting Started with Box authentication
box uses an authentication mechanism that is very similar to OAuth although it’s not OAuth. However, the principle is the same, you register your application and in return get an apiKey. You then use that apiKey to request an access token which you’ll use on your requests. The details of how to set this up on the Box side are in this page.
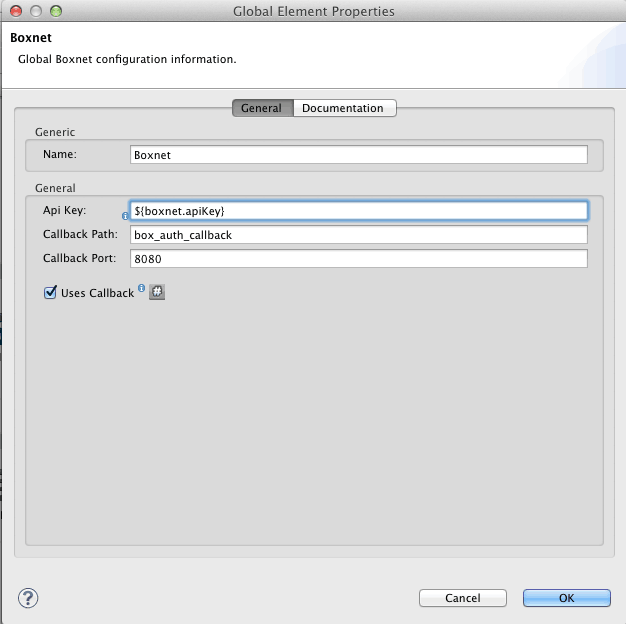
From the Mule side of the house, it is also very simple! First, create a configuration for your connector:
Let’s take a close look at this config. The really important and mandatory value here is the Api Key, which you obtained when you registered your app at box. Then, what are the other params all about? Well, let’s see it with an example!
Get the Ticket
Whatever approach you take, you need to start by requesting a ticket, using the Get Ticket operation.
What this operation does is to go to box with the Api Key you supplied and request access to the system. box replies with a ticket id that the connector will return on the payload but will also store internally. You then need to navigate to https://www.box/api/1.0/auth/<<your_ticket_here>> where you will be prompted for your credentials. This way, only box is aware of your account and password.
Get the Authentication Token
Once you have validated your ticket using your credentials, the cloud connector will store the ticket internally and will use it to retrieve the second piece of the security puzzle which is the authentication token. There are two ways of getting the token:
The first approach is to use a separate flow to manually go fetch it. All you have to do is use the Auth Token operation. This operation takes no parameters because the connector already knows the ticket. Your authentication then consists of these two flows:
The other alternative is to use the callback params. This basically means that you will provide a url and port in which you will ask box to deliver the authentication token using a callback post. Notice that for this to work, you have to:
- Configure this very same url and port in box when you’re registering your application (the link provided before explains how to do this as well)
- If your application is running behind a firewall, make sure to expose the proper host and port to the outside world
Let’s get ready to rummmmble!
let’s create a flow that takes these steps:
- Listens for an http call that will trigger the integration process. For simplicity sake, we’ll assume that you’re already authenticated to box and that the id of the attachment to be transferred is known and provided as a query parameter. Again, this is not a realistic scenario, but we’ll assume that in order to maintain the example simple and demonstrative.
- Then, we’ll query salesforce for this attachment
- Finally, we’ll upload it to box
First, drop a new http inbound endpoint and create a new flow with it. Let’s have this endpoint listening to the path “integrate”.
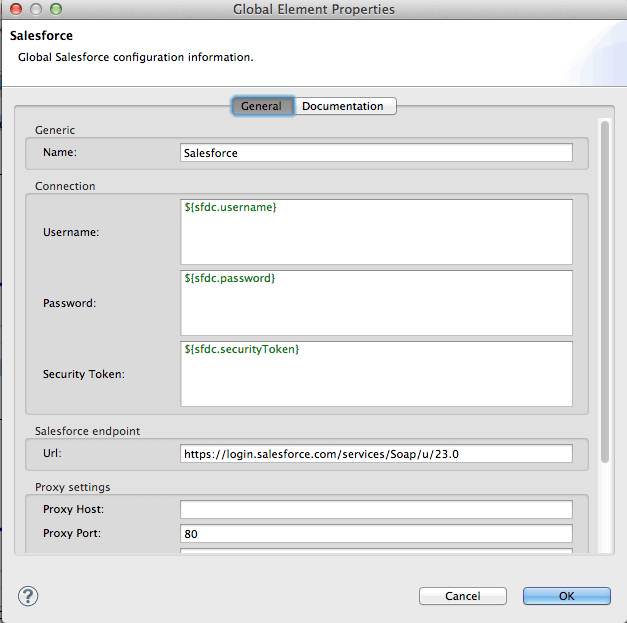
Now, it’s time to hit Salesforce. Go to the Cloud Connectors section on Studio’s components pallet and drop a SalesForce connector on the flow. Then create a new configuration that looks as follows (notice how placeholders are used for credentials and sensitive information):
So, we need to query sales force for the attachment with with the id we just got on the http query parameters. So set the connector to perform the query operation using this value:
Once the query is completed, the Sales Force connector will have changed your message’s payload to a List<Map<String, String>> in which each element of the list is a map that represents an attachment (in our case this list will be empty or have only one element since we requested an specific id).
At the same time, this map will contain three entries, each for the Id, Name and Body fields we just requested.
In order to upload this to box, we need to extract the file name and the attachment contents from the payload. But there’s a catch! the Sales Force API uses Base64 encoding to broadcast file contents over http (many web based applications do this, including box). So, we need to take that Base64 encoded content and transform it to a java.io.InputStream, which is what the box connector expects to perform an upload.
All of this can easily be done with the new Mule Expression Language (MEL) and some of the processors introduced in Mule 3.3 for easy message handling. You can totally use these features from Studio’s palette, but for the sake of shortness I’ll show you how to use those processors in the final XML:
Ok, so one final step! Go to the Cloud Connectors pallet and drop a box component at the end of your flow. Set it to perform the Upload Stream operation as described in this image:
A couple of things to notice about this last operation:
- There’s no reference to the actual contents to be uploaded. The Upload Stream operation already knows that it should look for an InputStream on the message payload. The transformer on the prior step already did us the favor or guaranting that for us.
- The Folder Id parameter is set to a default value of zero. In box, folder zero means the root folder. If you want to put it elsewhere just provided the corresponding id.
- Last but not least, notice how the attachName property set on the message is used to tell box how the file should be named. Here we chose to use the same name it had on Sales Force, but you can use any naming convention you like.
That’s pretty much it! Let’s wrap this up by taking a look at how the completed flow looks like:
I know what you’re thinking: “Pictures look pretty but where can I get the actual Mule config for this example??” Well, I uploaded it to box, you can get it following this link
So, that’s it! Here’s a simple example of how to take files hosted on a popular cloud service like Sales Force and share them in box. We also did it easily and in style using Mule Studio.
I hope you find this useful and feel free to shoot questions any time!
PS: I’d like to give a BIG thank you to Mariano Merlo for his great help at testing the connector and this sample iApp


