With the rise of large language models (LLMs), many businesses want to be able to replicate the user experience and power of ChatGPT while also protecting their internal data. As IT teams look to bring these powerful AI models into their businesses, they will inevitably stumble across a previously minor technology called Server Sent Events (SSEs).
Until recently, SSE was a minor blip on the technological radar, but has risen to prominence thanks to it’s use in OpenAI’s API to provide realtime streaming from their models. We’ll explore what SSE is, where it’s used, and then how you can leverage it with MuleSoft.
What are Server Sent Events (SSEs)?
The best analogy for SSE in my opinion is a faucet in your house. When you open the spigot, you “make a request” for water to your sink. Unless you have a pump on your faucet, your sink has very little control over actually getting the water from your water main, all you’ve done is opened the pipe and made the request. If everything in your house is working properly, the water flows through pipes and into your sink.
SSE is very similar to this. Much like traditional REST, you make a request to the server and data is returned. Unlike REST, the connection stays open, much like your house plumbing. The server can continue to send data through the pipe in little chunks until the event stream is complete or you terminate the connection.
SSE sits in a middle ground between REST and WebSockets. Like REST, SSE utilizes HTTP as it’s transit protocol, allowing you to work with SSE in pretty much the same way you’d work with REST. Like WebSockets, SSE can send a stream of data to the client while keeping a connection open. But unlike WebSockets, SSE is a “one-way” pipe. You aren’t able to send data back to the server without opening a new request. Returning to our plumbing analogy, you can’t send any water back to your water main, you only receive water from it.
Where are Server Sent Events used?
SSE has made its most recent, prominent appearance in AI. OpenAI decided to use SSE as its protocol for allowing developers to stream the response from the model instead of waiting for the entire response to be generated. In practice, OpenAI utilizes SSE to allow ChatGPT to “type” its response back to you. Many other vendors utilize this technology as well, and you can even set up an LLM on your personal computer that can push SSE streams with Ollama.
SSE has also been used for a long time as a real-time notification tool. For use cases that only require data to flow in one direction, like a stock market ticker or push notifications, developers have utilized SSE as an efficient alternative to things like long polling or WebSockets.
Utilizing SSE in Mule
Due to its nature as a middle ground, SSE is actually more challenging to architect around than you might think. SSE also utilizes a response mime type that’s unusual, adding to the challenge. Luckily, there are a few architectural principles to keep in mind as you work with SSE.
- Keep it simple: This applies to almost all architecture, but is especially true when you’re dealing with realtime data streams. The more you try to manipulate the data as it streams, the harder and more brittle your architecture will get.
- Isolate your SSE logic: Due to the nature of SSE streams, it tends to work best if you isolate the streaming logic to its own area. In keeping with Principle 1, keep things separated and simple to work with. The last thing you want to deal with is debugging a complex flow that also involves SSE.
- Maintain good stream hygiene: Since SSE is fundamentally a data stream, you don’t have context on what you’ve seen or what you will see. You only know what you’re looking at right now. Things get complex quickly when you try to maintain some context as you go, so minimize this as much as you can. Allow the data to flow through, and only do the bare minimum data manipulations.
How to build a Mule Flow with SSE
To make this a little easier, we’ll work off this image of a Mule Flow:

You’ll notice a few things here. First, the initiation of the SSE connection with the server is located in the HTTP Request Operation called Streaming LLM Invocation. From there, we run it through parsing and detokenization. The SSE connector plays a role in branching the stream. In some use cases, you might want to continue streaming data to the client while simultaneously logging out complete telemetry of model responses to a separate datastore. The connector enables this.
The second thing we want to highlight is that we are able to use basic data transforms, like you would in a more traditional Mule flow, to operate on the data in the stream. We leverage two Transform Message components and a Choice component to parse the event and perform detokenization.
You can stack as many or as few of these here as you want as DataWeave supports this stream operation. It’s important that you review the DataWeave streaming documentation in order to do this properly. The output of our SSE Request operation is a JSON stream, so you have full access from that point until you want to return the data as a stream from the end of the flow.
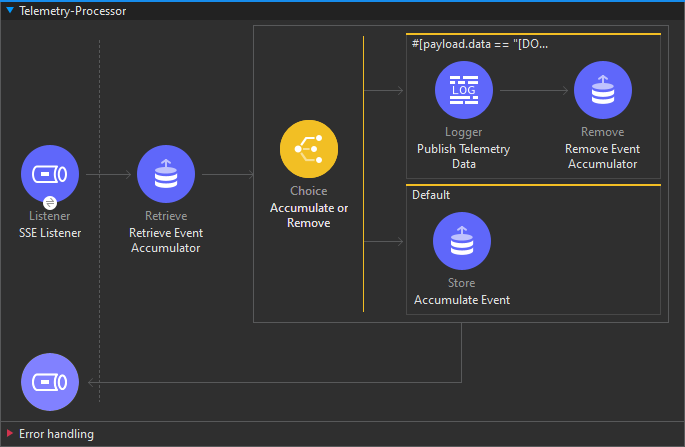
The third important thing is contained within this second flow. Many organizations want to log the data that flows through their SSE endpoints, but attempting to accumulate this data in the main Mule flow will cause the stream to breakdown and buffer all of the data before returning.
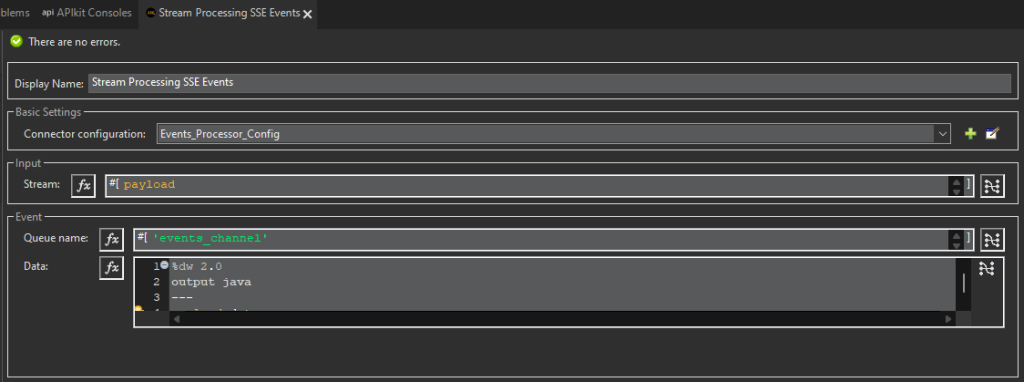
To allow for this, the SSE Stream operation includes an event channel parameter that sends out the data to another flow as it occurs. Returning once again to our plumbing analogy, you could think of this as a T-joint. It separates the data out, without interrupting the primary flow of the stream. You can see the configuration of the event stream parameter below. We’re able to accumulate the data passed through to the listener and perform whatever logic we want without causing the main stream to break down.
Next steps
If you’re interested in using this connector, you can access the source code on GitHub. We also recommend that you thoroughly review the streaming documentation for DataWeave and Mule Flows to best prepare yourself to use this connector.