
For many, a continuous integration (CI) and continuous deployment (CD) pipeline is an important aspect of software development that provides wide benefits––from reducing error-prone deployment work to providing early visibility into bugs. This blog post will cover the API lifecycle through different phases––from designing and managing APIs to deploying and discovering them. The blog will provide a step-by-step guide for implementation and configuration using Anypoint Platform, including:
- Anypoint Design Center: Design
- Anypoint API Manager: Managing
- Anypoint Runtime Manager: Deploying
- Anypoint Exchange: Discovery
The following diagram outlines the high-level abstracted tasks usually involved in each phase in the API lifecycle.

Phase 1 – Design
In the design phase, architects and lead developers can use Anypoint Design Center to design APIs. APIs are authored in RAML files, which include all different resources such as API fragments, specifications, and examples.
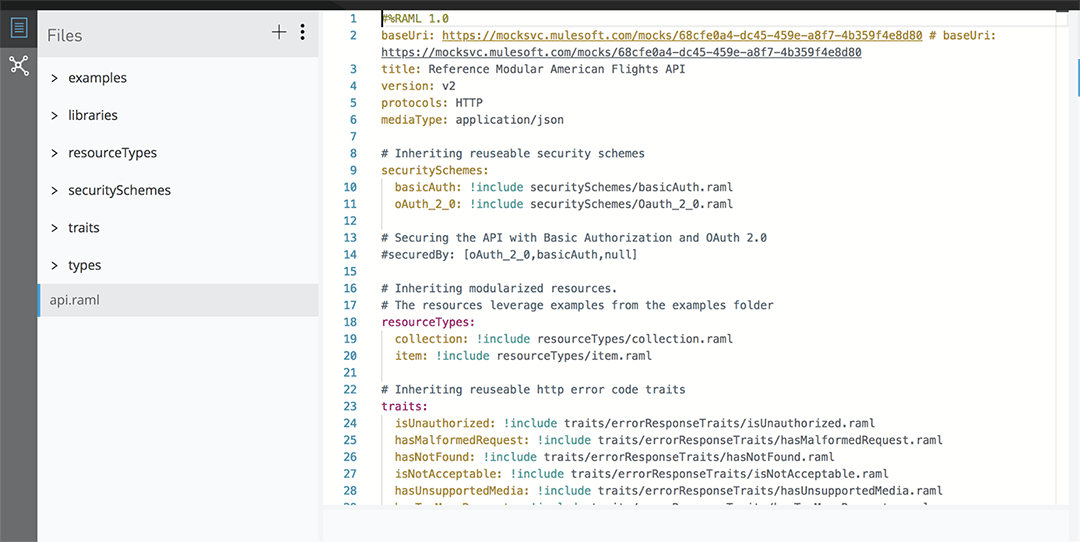
Once the API spec files are ready, API designer can publish the API RAML files to Anypoint Exchange. To publish the API RAML files to Exchange, you can use the “Publish” Option in Design Center.
Phase 2 – Publish
Every resource published to Exchange is considered an asset, which means it has an asset ID, asset versioning, and other meta info.
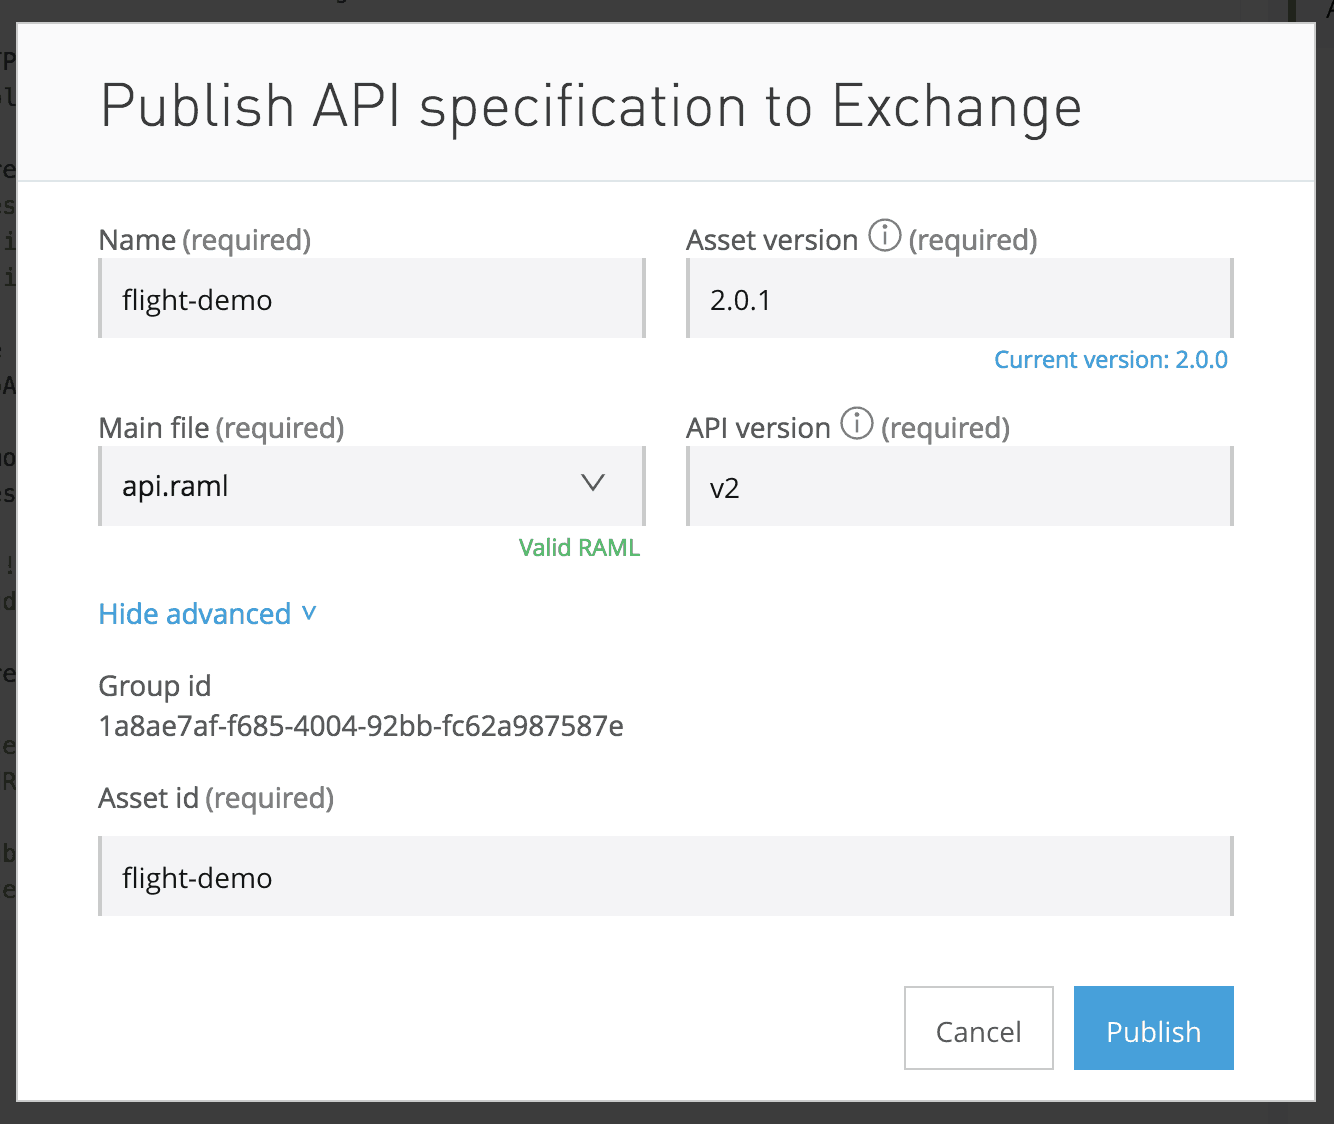
Please note the following:
- The “API version” field is derived from the “version” field in the main RAML file (value “v2” in the above example.) The “Asset ID” and “Asset version” are unique attributes associated with this API asset.
- For every change published to Exchange, if the “version” field in the main RAML file is not changed, Exchange will only update the last digit of the Asset Version (PATCH info, i.e., if current asset version is 2.0.0 it will be changed to 2.0.1). But if the “version” value is changed, Exchange will consider the change as a major one. As a result, the asset version will will be increase by 1, i.e, 2.0.0 → 3.0.0
Phase 3 – Development
Once the design and contract are finalized, a developer would need an API asset from Exchange to start implementing the API in Anypoint Studio. Once the development is complete, we are ready to move to managing and deploying the API.
Phase 4 – Manage and deploy
The type of API endpoint in API Manager “Basic endpoint” versus “Endpoint with Proxy” will decide the deployment pipeline. In both cases, an API instance needs to be created with reference to the Exchange asset, but for the basic endpoint, you need auto-discovery properties generated by API Manager to pair an API instance with a Runtime Manager application.
Please note this flow changed in November 2017, in the previous version of Anypoint auto-discovery properties were user-defined, but now those properties are provided by the platform.
In case of the “endpoint with proxy,” you can either deploy using API Manager or download the proxy application to be deployed with Runtime Manager Management API.
Additionally, the following information can also be provisioned in API Manager:
- Client applications
- Policies
- SLA settings
- Alerts
Pipeline in Action
First, we will define the system properties for username, password, organization, and environment ID of the Anypoint account, and we will also define two helper methods that will be used in the pipeline. This pipeline provides a basic CI/CD framework using Groovy scripting.
//defining common properties like username, password, ordId, envID
 def init ()
{
def props = ['username':System.properties.'anypoint.user',
 'password': System.properties.'anypoint.password',
 'exchangeFileName': System.properties.'exchangeFileName',
 'orgId': System.properties.'orgId',
 'envId': System.properties.'envId',
 'targetPropFile' : System.properties.'targetPropFile',
'userId':System.properties.'anypoint.user.ID'
]
return props;
}
//Method for http callouts
static def doRESTHTTPCall(urlString, method, payload, headers)
{
log(DEBUG,  "START doRESTHTTPCall")
log(INFO, "requestURl is " + urlString)
def url = new URL(urlString)
def connection = url.openConnection()
headers.keySet().each {
log(INFO, it + "->" + headers.get(it))
connection.setRequestProperty(it, headers.get(it))
}
connection.doOutput = true
if (method == "POST")
{
connection.setRequestMethod("POST")
def writer = new OutputStreamWriter(connection.outputStream)
writer.write(payload)
writer.flush()
writer.close()
}
else if (method == "GET")
{
connection.setRequestMethod("GET")
}
connection.connect();
log(DEBUG,  "END doRESTHTTPCall")
return connection
}
//method to iterate over a collection
 def collectMaps(e) {
  e.with{
      if (it instanceof Map) {
          [it] + it.values().collect{ collectMaps(it) }
      } else if (it instanceof Collection) {
          it.collect{ collectMaps(it) }
      } else {
          []
      }
  }.flatten()
}
Getting the authentication token
The first step is to get the authentication token using Anypoint credentials, the snippet shows how to call the accounts/login API to obtain a token.
def getAnypointToken(props)
{
log(DEBUG,  "START getAnypointToken")
def username=props.username
def password=props.password
log(TRACE, "username=" + username)
log(TRACE, "password=" + password)
def urlString = "https://videos.mulesoft.com"
def message = 'username='+username+'&password='+password
def headers=["Content-Type":"application/x-www-form-urlencoded", "Accept": "application/json"]
def connection = doRESTHTTPCall(urlString, "POST", message, headers)
if ( connection.responseCode =~ '2..')
{
}else
{
throw new Exception("Failed to get the login token!")
}
def response = "${connection.content}"
def token = new JsonSlurper().parseText(response).access_token
log(INFO, "Bearer Token: ${token}")
log(DEBUG,  "END getAnypointToken")
return token
}
Getting Design Center project details
First, we need to get the project and branch ID from Design Center, these will be used to publish the asset to Exchange.
def getProjectID(props, token)
{
log(INFO,  "START getProjectID")
def urlString = "https://anypoint.mulesoft.com/designcenter/api-designer/projects"
def headers=["x-organization-id":props.orgid, "Authorization": "Bearer " + token]
def connection = doRESTHTTPCall(urlString, "GET", null, headers)
   def response = "${connection.content}"
   if (connection.responseCode = ~'2..') {
    log(INFO, "the project details retrieved successfully! statusCode=" + connection.responseCode)
   } else {
    throw new Exception("Failed to retrieve project details! statusCode=${connection.responseCode} responseMessage=${response}")
   }
   def projectDetails = new JsonSlurper().parseText(response)
   log(DEBUG, projectDetails)
   Matcher myMatcher = projectDetails.id = ~/[([a-zA-Z0-9-s]+)]/
   def originalProjectId = myMatcher[0][1]
   def result = ["projectId": originalProjectId]
   log(DEBUG, result)
   log(DEBUG, "END getProjectID")
   return result;
  }
Publishing to Exchange
This step publishes a Design Center project to Exchange. Please note this is only meant for RAML/OAS asset types. If you wish to manage a SOAP/HTTP asset type please publish the asset into Exchange directly using this API.
You can also use Anypoint CLI for automating design center projects, for more information please see this documentation.
//project details result from the previous step is used here
def publishProject(props, token, result)
{
 log(INFO, "START publishProject")
 def requestTemplate = '{"name":null, "apiVersion":null, "version":null, "tags": [],"main":null, "assetId":null, "groupId":null,"classifier":"raml"}'
 def request = new JsonSlurper().parseText(requestTemplate);
 // This request can be parameterized depending on the requirements. For demo purpose they have been hard-coded.
 request.name = 'flight-demo'
 request.apiVersion = 'v4'
 request.version = '4.0.0'
 request.main = 'api.raml'
 request.assetId = 'flight-demo'
 request.groupId = props.orgid
 def message = JsonOutput.toJson(request)
 log(INFO, "create publish request request message=" + message);
 def urlString = "https://anypoint.mulesoft.com/designcenter/api-designer/projects/" + result.projectId + "/branches/master/publish/exchange"
 log(INFO, "create publish request url" + urlString);
 def headers = ["content-type": "application/json", "x-organization-id": props.orgid, "Authorization": "Bearer " + token, "x-owner-id": props.userId]
 def connection = doRESTHTTPCall(urlString, "POST", message, headers)
 def response = "${connection.content}"
 if (connection.responseCode = ~'2..') {
  log(INFO, "the asset published successfully! statusCode=" + connection.responseCode)
 } else {
  throw new Exception("Failed to publish asset! statusCode=${connection.responseCode} responseMessage=${response}")
 }
 def publishProjectDetails = new JsonSlurper().parseText(response)
 log(DEBUG, "END publishProject")
 return publishProjectDetails;
}
Getting details of an asset in Exchange
Refer to this code in case you need to fetch the details of an asset published in Exchange, such as the Asset ID, API version, Asset version, and group ID.
def extractExchangeAssetDetail(props, assetID, token)
{
 log(DEBUG, "START extractExchangeAssetDetail")
 def urlString = "https://anypoint.mulesoft.com/exchange/api/v1/assets/"+props.orgid+assetID
 def headers = ["Content-Type": "application/json", "Authorization": "Bearer "+ token]
 def connection = doRESTHTTPCall(urlString, "GET", null, headers)
 if (connection.responseCode = ~'4..') {
  log(INFO, "Asset detail not found " + connection.responseCode)
 } else if (connection.responseCode == 200) {
  log(INFO, "Asset details found")
  def response = "${connection.content}"
  def exchangeDetail = new JsonSlurper().parseText(response);
  log(INFO, exchangeDetail)
  log(DEBUG, "END extractExchangeAssetDetail")
  return exchangeDetail;
 }
Managing an asset from Exchange in API Manager (Get from Exchange)
This step is the equivalent UI step of “Get from Exchange,” we will manage an Exchange asset in API Manager in order to apply policies and other runtime governance.
The snippet below shows how to create a basic endpoint for a Mule 3.x API that is available at URI:
//exchangeDetail & token from the previous steps are passed as arguments

def createAPIInstance(token, exchangeDetail)
def requestTemplate = '{ "endpoint": { "deploymentType": null, "isCloudHub": null, "muleVersion4OrAbove": null, "proxyUri": null, "referencesUserDomain": null, "responseTimeout": null, "type": null, "uri": null }, "instanceLabel": null, "spec": { "assetId": null, "groupId": null, "version": null } }'
def request = new JsonSlurper().parseText(requestTemplate);
request.endpoint.deploymentType = 'CH'
request.endpoint.uri = ''
request.endpoint.type = 'rest-api'
request.spec.assetId =  exchangeDetails.assetId
request.spec.groupId =  exchangeDetails.groupId
request.spec.version = exchangeDetails.version

def message = JsonOutput.toJson(request)
log(INFO, "createAPIInstance request message=" + message);
def urlString = "https://anypoint.mulesoft.com/apimanager/api/v1/organizations/"+props.orgId+"/environments/"+props.envId + "/apis"
def headers = ["Content-Type": "application/json", "Authorization": "Bearer "+ token]
def connection = doRESTHTTPCall(urlString, "POST", message, headers)
def response = "${connection.content}"
if (connection.responseCode = ~'2..') {
 log(INFO, "the API instance is created successfully! statusCode=" + connection.responseCode)
} else {
 throw new Exception("Failed to create API Instance! statusCode=${connection.responseCode} responseMessage=${response}")
}
def apiInstance = new JsonSlurper().parseText(response)
log(DEBUG, "END createAPIInstance " + apiInstance)
return apiInstance;
}
The response apiInstance contains an id unique identifier for an API in API Manager. This ID is used for other API operations like applying a policy, API promotion, API deprecation, deleting an API, finding out autodiscovery properties.
Tip: To create a Mule 3 proxy type API on CloudHub for an implementation endpoint request body will change to the following:
request.endpoint.deploymentType = 'CH'
request.endpoint.uri = ''
request.endpoint.type='rest-api'
request.spec.assetId=exchangeDetail.assetId
request.spec.groupId=props.orgId
request.spec.version=exchangeDetail.version
To manage a Mule 4 API, you must set this property to true muleVersion4OrAbove.
Getting Auto-discovery details for an API
This step is optional and only needed if an API type is a basic endpoint type. This endpoint is invoked to get auto-discovery (API name and version for Mule 3), which will be used when deploying to Runtime Manager. The examples below get auto-discovery for a Mule 3.8.5 API.
// apiInstance, props & token from the previous steps are passed as arguments

def getAutoDiscovery(token,props, apiInstance)
{
  def urlString = "https://anypoint.mulesoft.com/apimanager/api/v1/organizations/"+props.orgID+"/environments/"+props.envId+"/apis/"+apiInstance.id+ "/autodiscoveryProperties?gatewayVersion=3.8.5"
log(INFO, "URL: "+ urlString);
def headers=["Content-Type":"application/json", "Authorization": "Bearer " + token, "Accept": "application/json"]
  def connection = doRESTHTTPCall(urlString, "GET", null, headers)

  def response = "${connection.content}"

  if ( connection.responseCode =~ '2..')
  {
  log(INFO, "the API auto discovery properties found" + connection.responseCode)
  }
  else
  {
  throw new Exception("Failed to find auto discovery statusCode=${connection.responseCode} responseMessage=${response}")
  }
  def apiAutoDiscovery = new JsonSlurper().parseText(response)
log(INFO, "the API auto discovery properties found " + apiAutoDiscovery)
  return apiAutoDiscovery;
  }
Note: For Mule 3 APIs, you need api.name and api.version, but for Mule 4 APIs only api.id is needed. For more details, please see read this documentation.
Getting the details of an API instance
This step fetches all the available instances in an API environment and filters the result based on an Asset version and Asset ID.
//props, exchangeDetail & token from the previous steps are passed as arguments
def getAPIInstanceDetails(props, token, exchangeDetail)
{
  log(DEBUG,  "START getAPIInstanceDetails")
  def apiInstance
  def urlString = "https://anypoint.mulesoft.com/apimanager/api/v1/organizations/"+props.orgId+"/environments/"+props.envId + "/apis"
 def headers=["Content-Type":"application/json", "Authorization": "Bearer " + token, "Accept": "application/json"]
  def connection = doRESTHTTPCall(urlString, "GET", null, headers)

  def response = "${connection.content}"

  if ( connection.responseCode =~ '2..')
  {
  log(INFO, "the API instance retrieved successfully! statusCode=" + connection.responseCode)
  }
  else
  {
  throw new Exception("Failed to retreive API Instance! statusCode=${connection.responseCode} responseMessage=${response}")
  }
  def apiInstanceDetails = new JsonSlurper().parseText(response)
//Finding an instance details based on assetId and assetVersion
def instanceDetails = collectMaps(apiInstanceDetails).findAll{ it.assetId=='flight-demo' && it.assetVersion=='1.0.1'}
  log(INFO, "apiInstance for env is " + instanceDetails);
  return instanceDetails;
  }
Applying policies to APIs
After creating an API instance, you can apply policies to secure access. For example, the following code shows how to use the “Client ID Enforcement policy” on an API
//exchangeDetail, apiInstance & token from the previous steps are passed as arguments

def applyPolicy(token, exchangeDetail, apiInstance)
def requestTemplate = '{"configurationData":{"credentialsOrigin":"customExpression","clientIdExpression":null,"clientSecretExpression":null},"pointcutData":null,"policyTemplateId":"client-id-enforcement"}'
def request = new JsonSlurper().parseText(requestTemplate);
request.configurationData.clientIdExpression = '#[message.inboundProperties['http.query.params']['client_id']'
request.configurationData.clientSecretExpression = '#[message.inboundProperties['http.query.params']['client_secret']'
    def message = JsonOutput.toJson(request)
    log(INFO, "Applying client enforcement" + message);
    def urlString = "https://anypoint.mulesoft.com/apimanager/api/v1/organizations/"+props.orgID+"/environments/"+props.envId+"/apis/+apiInstance.id+"/policies"
    def headers=["Content-Type":"application/json", "Authorization": "Bearer " + token, "Accept": "application/json"]
    def connection = doRESTHTTPCall(urlString, "POST", message, headers)
    def response = "${connection.content}"
    if ( connection.responseCode =~ '2..')
    {
    log(INFO, "Policy is applied successfully! statusCode=" + connection.responseCode)
    }
    else
    {
    throw new Exception("Failed to apply the policy! statusCode=${connection.responseCode} responseMessage=${response}")
    }
    def policyResponse = new JsonSlurper().parseText(response)
           log(DEBUG,  policyResponse)
    return policyResponse;
    }
Deploying an API
Once the parameters required for auto-discovery are discovered and an API is secured via policies, the next step is to deploy the application to Anypoint Runtime Manager and use auto-discovery properties to manage that API.
Basic Endpoint Type
In this example, we will deploy an application to CloudHub using Anypoint CLI and use property placeholders for configuring auto discovery properties.
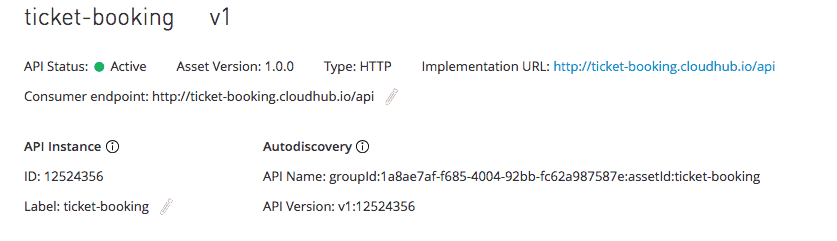
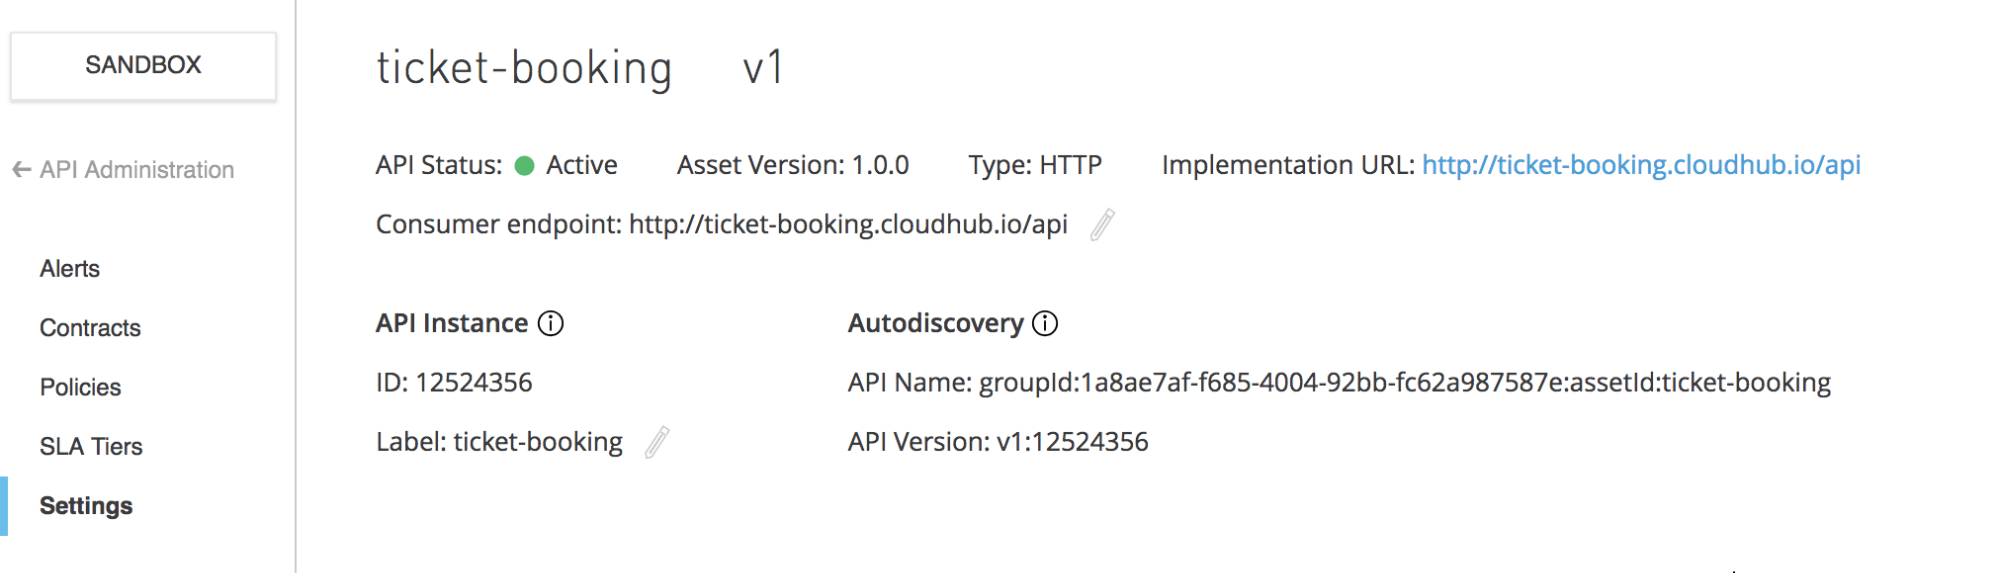
This step of the process is essential to managing a particular application implementing the API. The link between Mule runtime (implementing the API) and the API instance (in API Manager) is done thanks to four different properties:
- API Name
- API Version
- client_id
- Client_secret
The combination of these two values: API Name and API Version (see the diagram above), identify a unique instance in API Manager. This information is important to link this API instance to the running application that will implement the API. It also allows its management (apply policy, statistics, alerts, etc.).
The client_id and client_secret identify the environment where the Mule application is running. Therefore, these parameters should be passed to the application to be used by the component “API Auto-discovery” as part of the configuration management process prior to deploying any environment.
--property "api.name=${apiAutoDiscovery.name}"  //This is retrieved from “Get Auto Discovery details” API call
--property "api.version=${apiAutoDiscovery.version}"  //This is retrieved from “Get Auto Discovery details” API call
--property "anypoint.platform.client_id=${var.anypointProductionClientId}"  //This is the environment/organization credential
--property "anypoint.platform.client_secret=${var.anypointProductionClientSecret}" //This is the environment/organization credential

Usage: runtime-mgr cloudhub-application deploy [options] <name> <zipfile>
Options:

    --help                                                   output usage information
    --runtime [runtime]                                      Name of the runtime
    --workers [workers]                                      Number of workers, Supported Values: 1, 2, 3, 4
    --workerSize [workerSize]                                Size of the workers in vCores. Supported Values: 0.1, 0.2, 1, 2, 4
    --region [region]                                        Name of the region to deploy to
    --property [property]                                    Set a property (name:value). Can be specified multiple times
    --propertiesFile [propertiesFile]                        Overwrite all properties with values from this file. The file format is 1 or more lines in name: value format
    --persistentQueues [persistentQueues]                    Enable or disable persistent queues. Supported Values: true, false
    --persistentQueuesEncrypted [persistentQueuesEncrypted]  Enable or disable persistent queue encryption. Supported Values: true, false
    --staticIPsEnabled [staticIPsEnabled]                    Enable or disable static IPs. Supported Values: true, false
    --autoRestart [autoRestart]                              Automatically restart app when not responding. Supported Values: true, false
    -o, --output <format>                                    Output format. Supported values are: table, text, json. Defaults to `text` for non-interactive and `table` for interactive sessions.
    -f, --fields [name][,name2...]                           Name of fields to output. Provide multiple comma-separated values to limit output to multiple fields. E.g.: "--fields 'Email,First name'".


cloudhubApplicationNameTarget=${appName}
cloudhubApplicationList=$(anypoint-cli --username=${var.anypointUsername} --password=${var.anypointPassword} --environment=${var.muleProductionEnv} runtime-mgr cloudhub-application list)
if [[ $cloudhubApplicationList =~ $cloudhubApplicationNameTarget ]]
then
    executeAppPresent=$(anypoint-cli --username=${var.anypointUsername} --password=${var.anypointPassword} --environment=${var.muleProductionEnv} runtime-mgr cloudhub-application modify --runtime ${var.muleRuntime} --workers ${var.muleNoOfWorkers} --workerSize ${var.muleWorkerSize} --region ${var.muleRegion} --property "mule.env=${muleTargetEnvSuffix}" --property "api.name=${name}" --property "api.version=${autodiscoveryInstanceName}" --property "anypoint.platform.client_id=${var.anypointProductionClientId}" --property "anypoint.platform.client_secret=${var.anypointProductionClientSecret}" ${cloudhubApplicationNameTarget} "${pathToZip}")
    if [[ $executeAppPresent =~ "Status" ]]
    then
        echo "Application was Staged and is now being deployed"
    else
        echo $executeAppPresent
        echo "There was a problem deploying your application"
        exit 1
    fi
Deploying an API Proxy
This demonstrates how to deploy an API proxy for a proxy endpoint API to CloudHub 3.8.5 runtime using API Manager proxy API.
def deployAPI(props, token, apiInstance)
{
def requestTemplate = '{"applicationName": null,"environmentName": null,"environmentId": null,"type":null,"overwrite": true,"gatewayVersion":null}'

      def request = new JsonSlurper().parseText(requestTemplate);

      request.applicationName ='groovyApp-test'
      request.environmentName = 'Sandbox'
      request.environmentId = props.envid
      request.type = 'CH'
      request.gatewayVersion= '3.8.5'

      def message = JsonOutput.toJson(request)
      log(INFO, "Deploying proxy to CloudHub" + message);

      def urlString = "https://anypoint.mulesoft.com/proxies/xapi/v1/organizations/" +props.orgID+"/environments/"+props.envid"/apis/"+apiInstance.id+"/deployments"

     def headers=["Content-Type":"application/json", "Authorization": "Bearer " + token, "Accept": "application/json"]

      def connection = doRESTHTTPCall(urlString, "POST", message, headers)

      def response = "${connection.content}"

      if ( connection.responseCode =~ '2..')
      {
      log(INFO, "Proxy deployed successfully! statusCode=" + connection.responseCode)
      }
      else
      {
      throw new Exception("Failed to deploy proxy! statusCode=${connection.responseCode} responseMessage=${response}")
      }

      def proxyResponse = new JsonSlurper().parseText(response)
      return proxyResponse;
      }
Tip: There is an alternative for proxy deployments, which is to download the proxy application using the API Manager management API and then deploy the application using either Anypoint CLI or Runtime Manager API.
Promoting an API to a different environment
Once the developer has completed testing in the development environment, the next process is promoting the API from the development environment to the test environment in API Manager. This promotion can include policies, tiers, alerts.
Note: To promote an API from one environment to another, you must have access to both the source and target environment. The URI property contains the target environment. The source environment is specified by originApiId as shown in the following example:
//apiInstance, props, token and target environment ID are passed as arguments
def promoteAPI(props, token, apiInstance, targetEnvID)
{

def requestTemplate = '{"instanceLabel":"secured","promote":{"originApiId":apiInstanceID,"policies":{"allEntities":true},"tiers":{"allEntities":true},"alerts":{"allEntities":true}}}'

def request = new JsonSlurper().parseText(requestTemplate);
request.promote.originApiId =apiInstance.id
def message = JsonOutput.toJson(request)
log(INFO, "Promoting an API" + message);

def urlString = "https://anypoint.mulesoft.com/apimanager/api/v1/organizations/"+props.orgid+"/environments/"+targetEnvID+"/apis"

def headers=["Content-Type":"application/json", "Authorization": "Bearer " + token, "Accept": "application/json"]

def connection = doRESTHTTPCall(urlString, "POST", message, headers)

def response = "${connection.content}"

if ( connection.responseCode =~ '2..')
{
log(INFO, "API promoted successfully! statusCode=" + connection.responseCode)
}
else
{
throw new Exception("Failed to promote an API statusCode=${connection.responseCode} responseMessage=${response}")
}


def apiPromotionResponse = new JsonSlurper().parseText(response)

return apiPromotionResponse;
}
After promoting the API, you may need to do either of the following:
- If the API is of basic endpoint type, then promote the application in Runtime Manager to the test environment and use the new auto-discovery properties that will be retrieved using the “Getting Auto-discovery details for an API” step.
- If the API is of proxy endpoint type, then deploy a new proxy application in the Runtime Manager TEST environment.
This concludes the basic of building a CI/CD pipeline using Anypoint platform.
Important resources
If there’s an API call that you’re planning to use for CI/CD, which is not covered in this blog, please refer to our API portal for more information or let us know in the comments
- Design Center Management APIs
- API Manager Management APIs
- API Manager Proxy API
- Exchange Experience API
- Exchange Graph API
- CloudHub API
- Runtime Manager – Hybrid Applications
- JSonSlurper
- Auto-discovery documentation
Anypoint CLI
Anypoint Platform provides a scripting and command line tool to interact with:
- Anypoint Exchange
- Access Management
- Runtime Manager for Mule applications deployed to MuleSoft-hosted (CloudHub) and customer-hosted Mule runtimes
- VPCs
- CloudHub load balancers
- Design Center
- Anypoint Exchange
This is done through both interactive shell and standard CLI modes for both Anypoint Platform and Anypoint Platform Private Cloud Edition.
To know more about CLI and to install it on the server that runs the CI/CD tool, look at the documentation.
Which use case are you planning to use for CI/CD? Let us know in the comments!


