
Testing is an essential part of the software development process used to ensure code quality, but the reality is that it can be a daunting and arduous task — especially in larger applications. This can make it difficult for some users to know where to begin when they’re ready to test their Mule applications in MUnit.
Enter the MUnit test recorder: a new tool designed to help you build your next test in a few simple steps. In this blog, you’ll gain an overview of how to use MUnit test recorder, how to get started building MUnit tests, and how to ensure code quality and proper test coverage. For a more in-depth exploration of the tool, check out this tutorial.
What is MUnit?
MUnit is the Mule application testing framework that allows you to build tests for your Mule integrations and APIs. With MUnit, users can:
- Create and build tests for Mule apps in the same familiar dev tooling.
- View test coverage reports.
- Verify Message Processor calls.
- Mock Message Processor.
- Mock outbound endpoints.
- Disable outbound endpoints.
- Disable flow inbound connectors.
- Disable inbound endpoints.
- Debug tests.
- Create assertions on payload data.
- Spy Message Processor.
You can learn more about MUnit from this introduction for Java developers blog, or by reading the documentation with detailed examples.
What is the MUnit test recorder?
The test recorder is a new tool baked right into Studio 7.5 that automatically writes MUnit tests to perform mocks and assertions on your Mule flows without needing to write any code. The recorder provides explanations and links to documentation along the way and fills in sensible default values to provide a foundation to be built upon as needed. No prior experience with MUnit required.
This is accomplished by executing your Mule application in a recording session. In the background, MUnit will automatically intercept the changes made to an event going through a flow.
With this information stored, a configuration wizard will then guide you through the process of creating a new test customized to your needs. In this step you will pick and choose what and how your application should be validated, using a visual-only interface all the way through. Once you are happy with your configuration, click finish and the test recorder will do all the heavy lifting of creating the test for you.
What does the MUnit test recorder look like?
Creating MUnit tests

To start building an MUnit test, users will see two options:
- Create a blank test for this flow. This will allow you to create an MUnit test suite from scratch.
- Record test for this flow. This will allow you to use the MUnit test recorder to automatically generate tests.
Using the MUnit test recorder
After selecting “Record test for this flow,” your application will launch and a recording session will start. A pop up will appear to notify you of the state of the recording.

To continue with the test creation process, you will provide a sample request that triggers the flow. This can be an HTTP request to an exposed endpoint, or an execution of a scheduler. Once the request and response are recorded, you can start configuring your test.
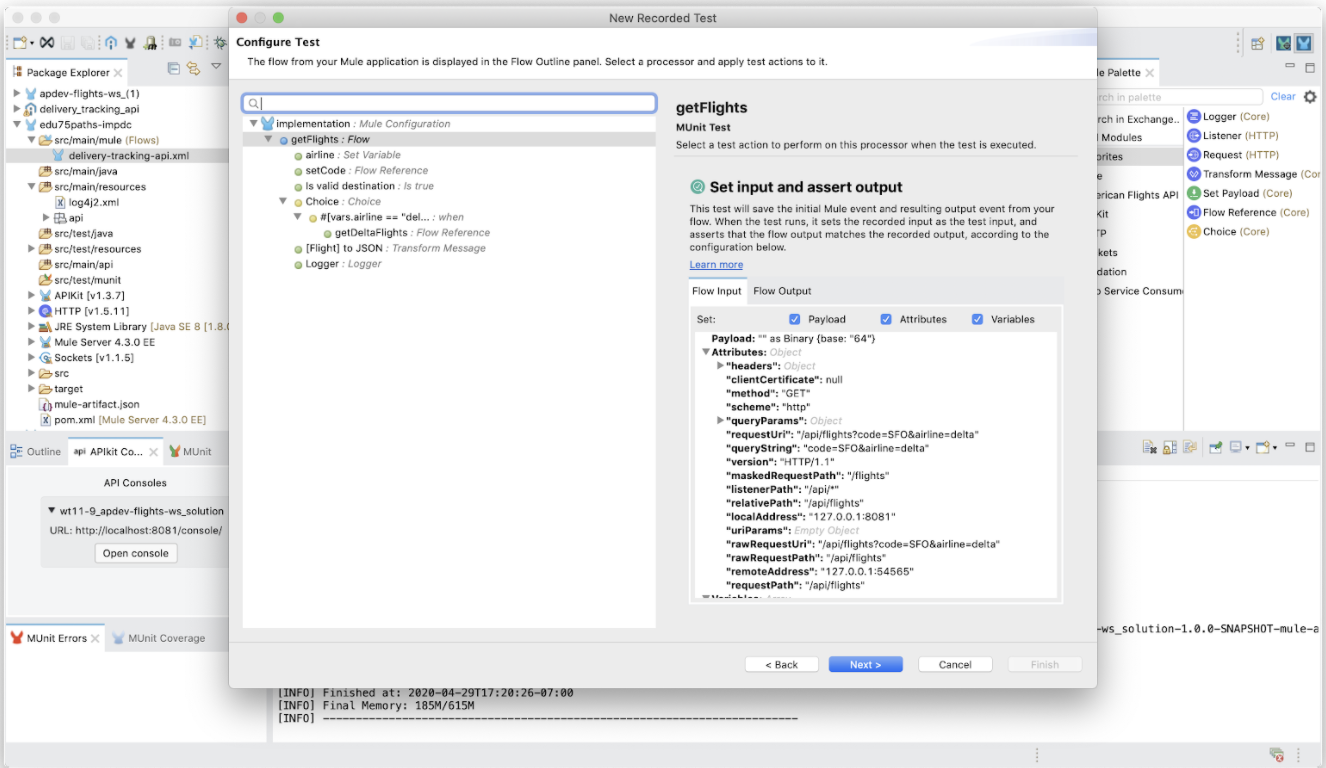
After finishing the last step, a click-through appears. It is split into two views, where the left is the outline of your flow and the right is the different MUnit actions that can be configured and applied to a selected processor from the outline view.
As you click through elements in the flow outline on the left, the right panel will dynamically update to allow you to use and configure the appropriate MUnit processors.
There are also in-app links to documentation so users can learn why certain MUnit processors are used, how to configure them, and when to best use them.
Saving and executing your newly configured test

When you are done configuring your test, MUnit will display a high-level summary of the test. Click finish and your new test will be created.

From here, users will be able to take advantage of all MUnit actions, such as running the test, debugging it, ignoring other tests, or reading the raw XML.
When you run the app from Studio/Maven, a coverage report is generated. Use the coverage tab to identify which flows or processors are not covered in the test. Users can use this as a starting point to create additional tests to increase the coverage.
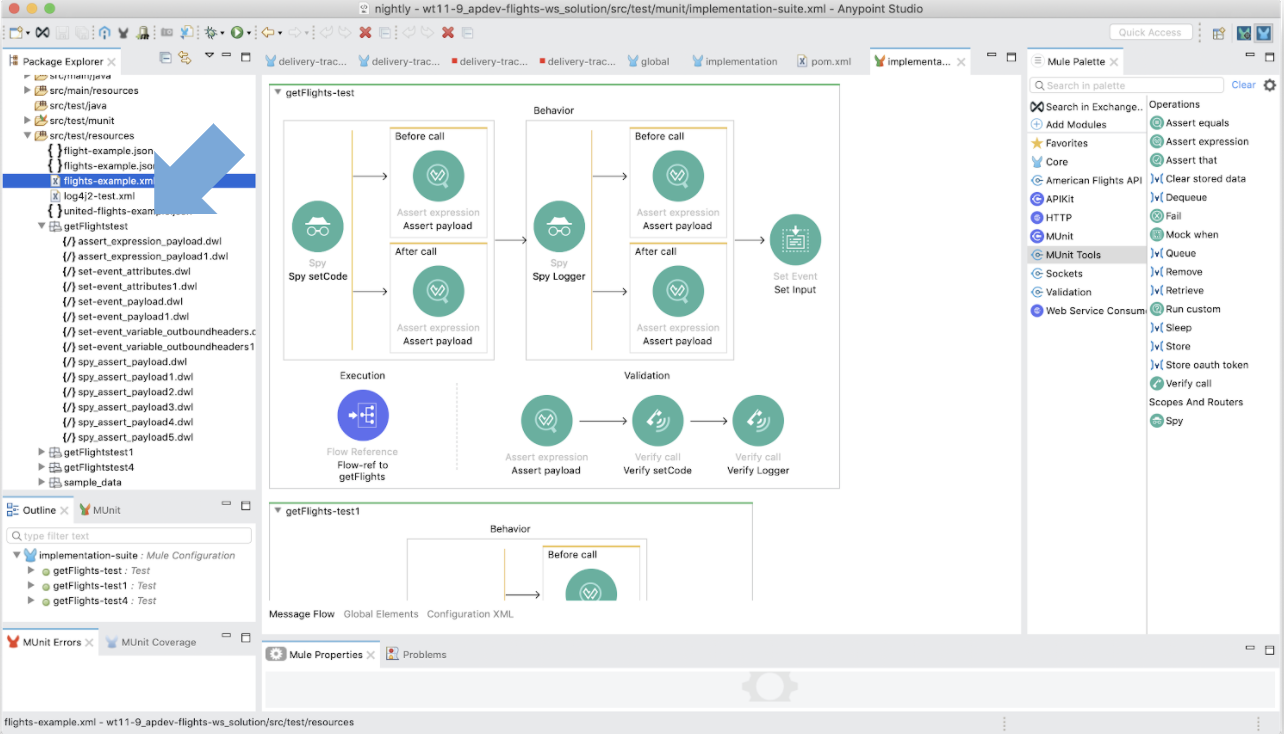
To ensure these tests can be maintained in addition to improving the overall readability of the test, the test recorder will create several files inside src/test/resources with the different DataWeave scripts used for the test.
Getting started using the MUnit test recorder
The MUnit test recorder provides new opportunities for everyone to develop their MUnit tests. We hope that it will make it easier to start testing your own projects and avoid many headaches that come with testing.
Check out our new tutorial with step-by-step guidance on how to configure your first MUnit test with the test recorder, and download the new version of Anypoint Studio 7.5 today to start using the MUnit test recorder on any projects using Mule runtime 4.2.2 and later.


