I’ve always wondered how other software teams work. From the design experiences at Airbnb to the development practices at Spotify – these kinds of backstage stories are a great source of inspiration for me. So when Alex Li, Product Manager of Studio, asked me to write about custom policy support in Studio 6.1, my answer was, “Yes, of course! But I’d love to write about what happened behind the scenes.”
What is a custom policy? In a Mule server, a “policy” is an XML file deployed into the “policies” folder. It contains logic to handle HTTP requests before and after a Mule application. For example, using a policy you can add authentication without changing the API implementation.
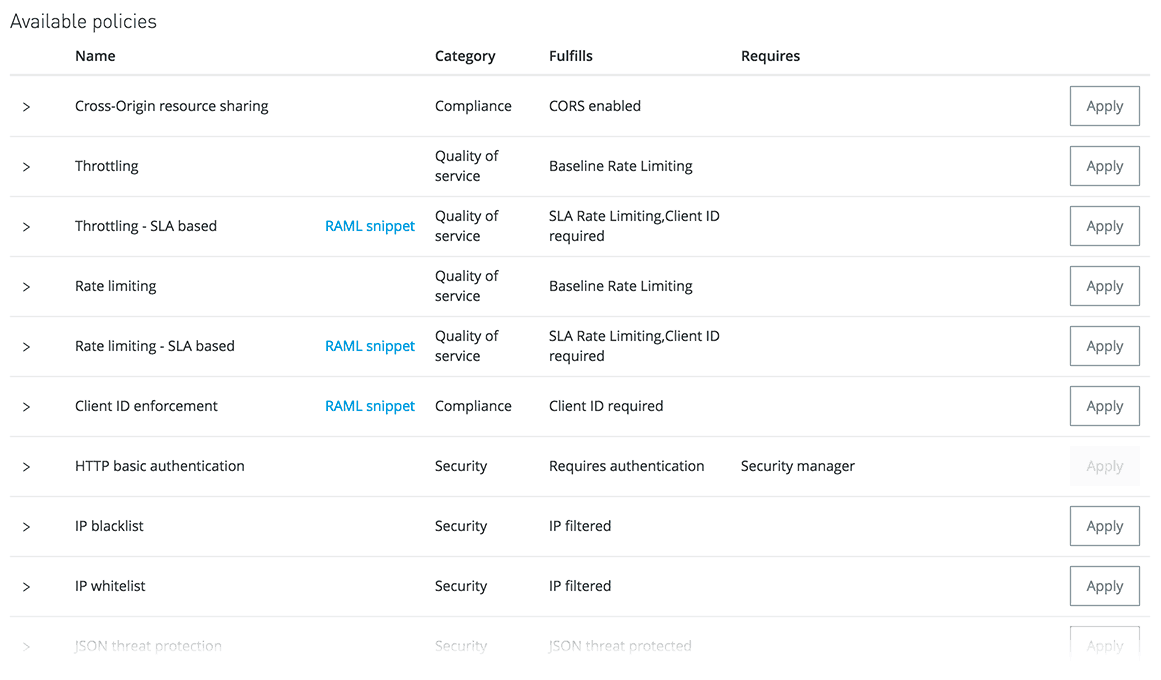
Anypoint API Manager provides a set of policies that you can apply with the click of a button. But, if you need policies that are specific to your organization, you can write your own – and that’s what we call a custom policy.
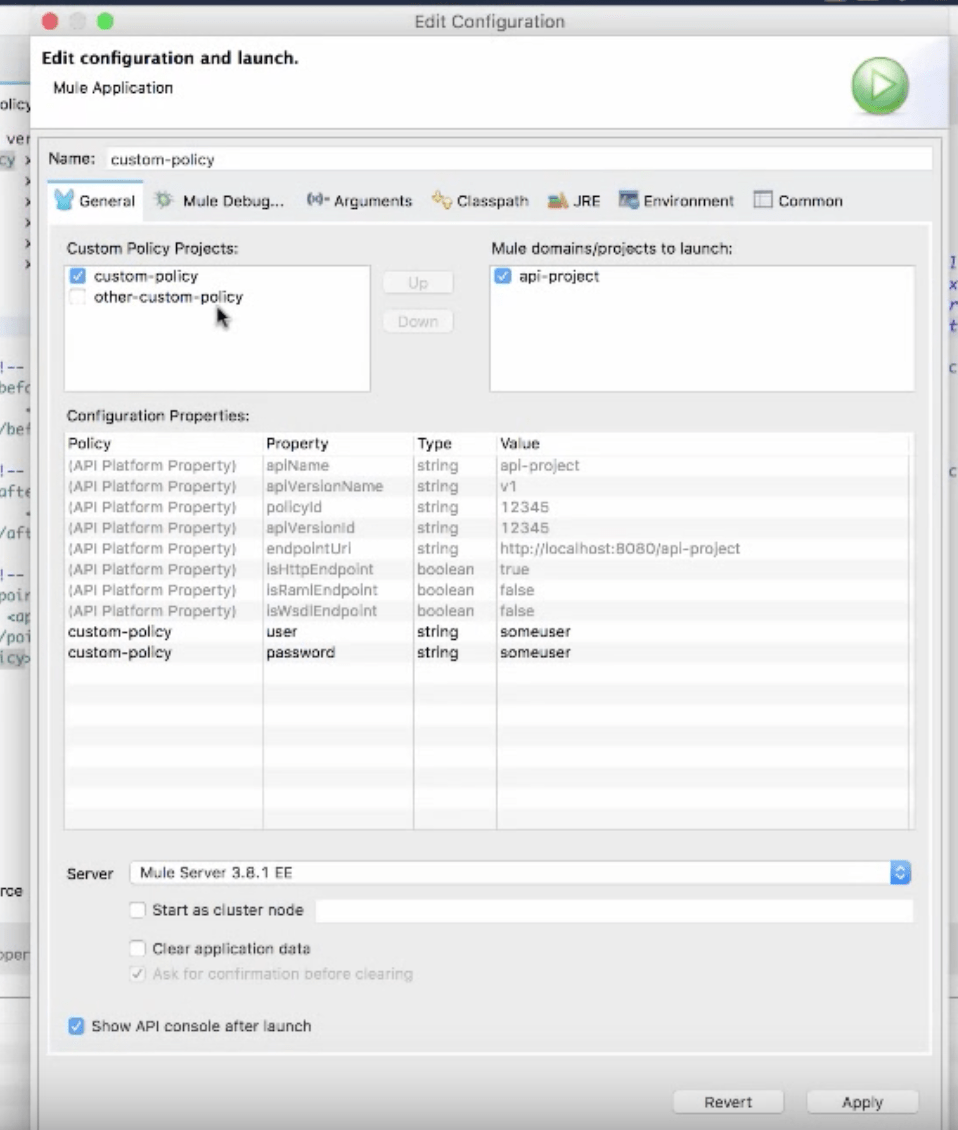
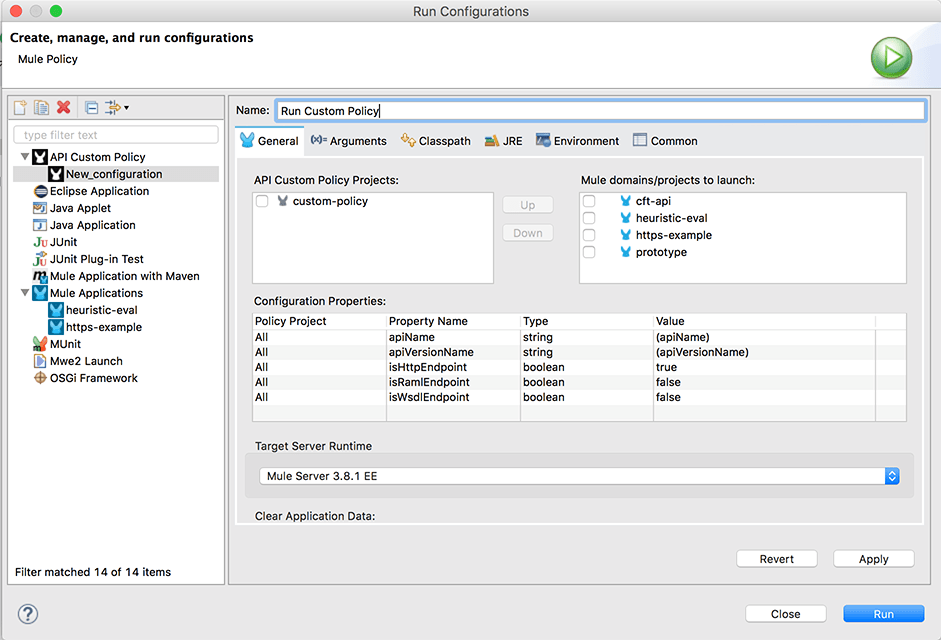
In API Manager, policies are actually templates. A policy template is completed with configuration values when you apply it. There are two types of configuration values: ones provided by the platform, like the API name and version, and the ones provided by the user. The latter requires a YAML file containing the configuration parameter names and types.

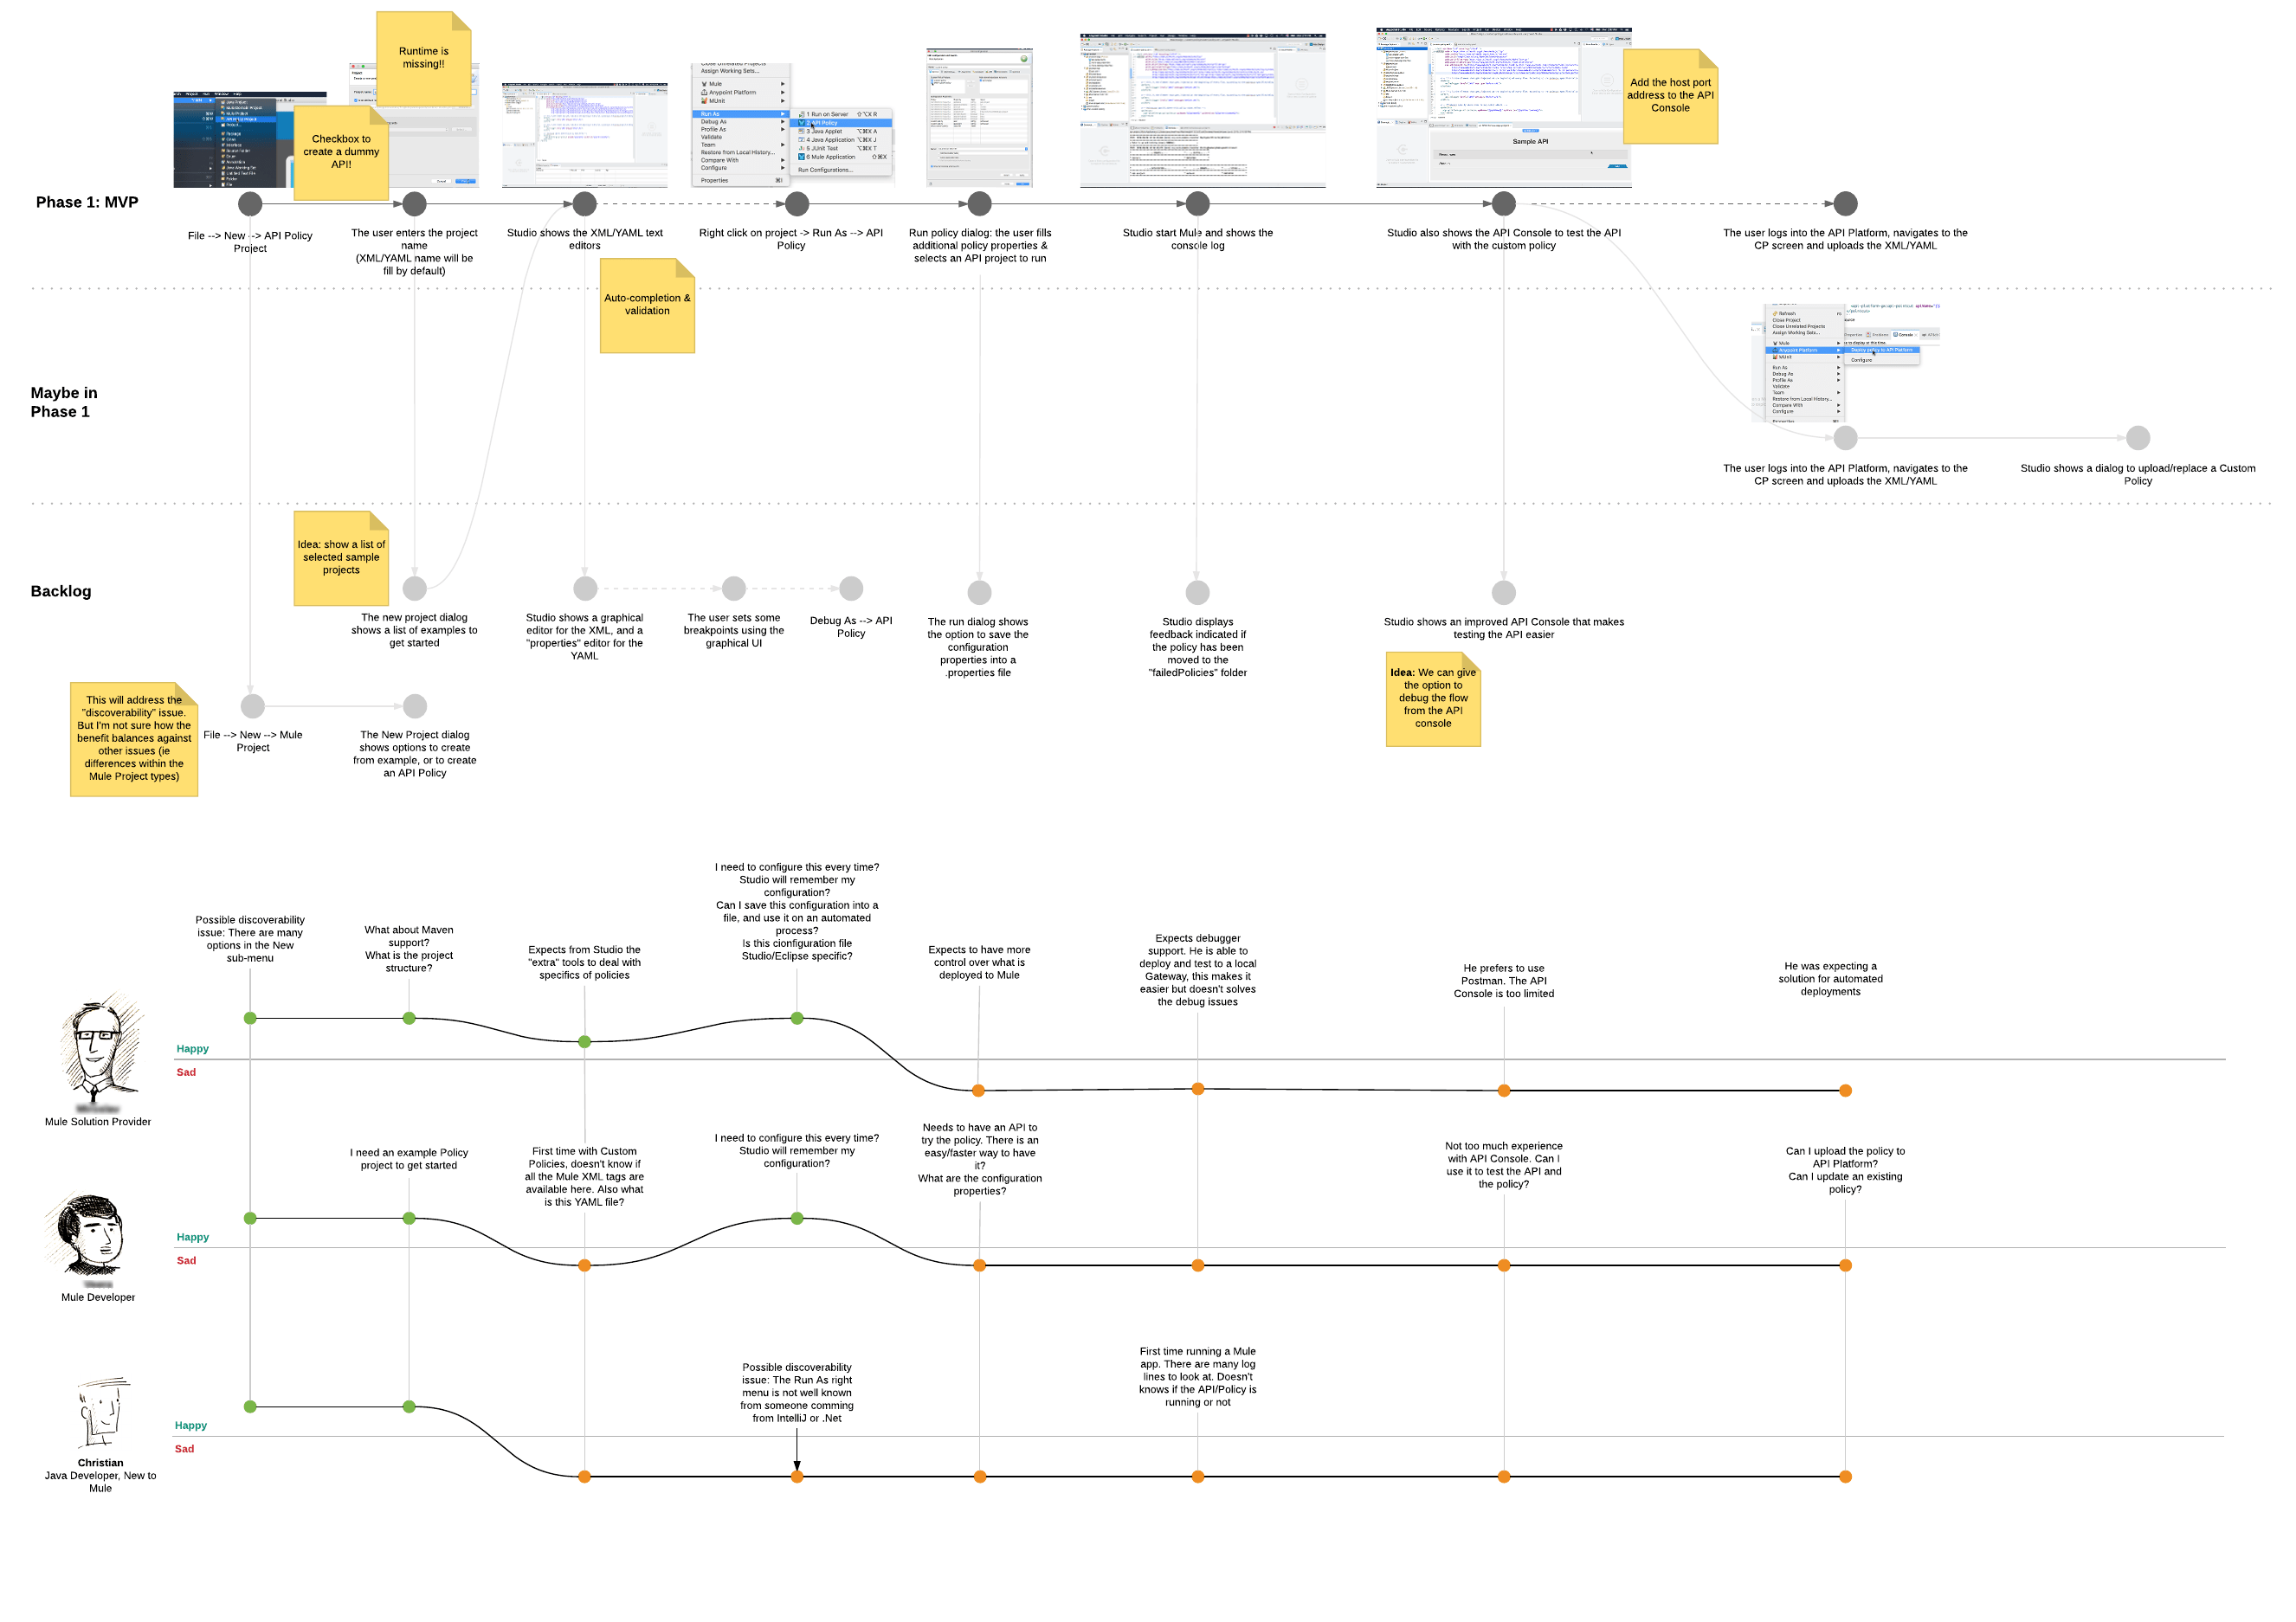
With Studio 6.1, users can create and run custom policy projects. In this new version, you can try a custom policy template without deploying to API Manager. And both policy XML and YAML descriptor have code editors with auto-complete support. You will notice that the feature is labeled as beta. I will explain later the reasoning for this. Also, to clarify, the “beta” label applies only to the creation of custom policies within Studio, as custom policy support for the Mule server and API manager has existed for quite some time now.
Now that you know the basics of this release, I want to share some backstories since the creation of this feature introduced some changes in our software development practices. Like the stories from Spotify or Airbnb, I hope that our story triggers ideas for your own team.
Incremental Design
If you hang out for a little bit at MuleSoft, you’ll hear the word “user experience” a lot. But of course delivering a great user experience is much easier said than done.
The user experience is the sum of all details. From an icon to the system model, everything contributes to make your experience wonderful or frustrating. And those details are the result of multiple teams’ interactions. That’s why, to improve the user experience, the software construction process should be reviewed.
Internally, we use agile methodologies following the usual Scrum practices with a two-week sprint. Of course, to create a good user experience, we must learn from the users, but listening to what users say can be misleading. You have to watch what they actually do. User-centered design is a cycle of ideation, prototyping, and learning.
These activities take time and together with development, are hard to fit into one sprint.
The usual advice is to make UX designers work one sprint ahead of the development team. This is good advice because, on an agile project, designers need to think holistically but work incrementally.
But if the interpretation of “working one sprint ahead” means that the team is split in two, then it’s terrible advice. Why? Because communication between UX and development is broken by increasing the documentation handoff. UX designers are not aware of the technical issues. And developers are not aware of the context that leads to the design decisions. This leads to the teams becoming less agile and problems being caught too late. The solution: break the silos. But, how?
Incremental design and collaboration are two ways that summarize how we approached this problem. The key to working incrementally is to start with a vision of the end goal.
From the point of view of a UX designer. What are the ideal elements required to build a good user experience?
- A product value proposition: usually few sentences or a visualization exercise like “Tomorrow Headlines“.
- A study about your target users: usually summarized with Personas.
- A story of how the user interaction will be: usually represented with User Journeys.
- Quantitative data to make design decisions.
- Prototypes and evaluations like usability testing or heuristic evaluations.
Working on the design incrementally meant that all these things were done, but they started in a rough state.
It is worth highlighting that practices like Scrum or Kanban are about incremental improvement, but when it comes to software development, the focus is often put on the incremental implementation, leaving out exploration and design research. In our experience, doing an incremental design with the team was beneficial.
Iterations Diary
How do these iterations look? I’ll try to give you a simplified version of how the iterations looked like in our team. In other words, my description in this article will look more sequential and orderly.
Iteration 1
Our product manager created a document with the vision and requirements the feature. The initial requirements were too focused on “what” instead of “why”. Based on the document, the team did several things in parallel:
- A draft of the use cases using User Story Mapping
- Initial mockups
- Conversations with the API Manager team, to get information about custom policy usage in production
- Our first customer interview to see if some assumptions were correct.
Iteration 2
Usage data and customer interviews gave us a better idea of technical requirements. The initial use case was too broad, so we started to discuss scope. We continued doing customer interviews, and we improved the initial requirements document, emphasizing the pain areas to resolve instead of the specifics of what to do.
Iteration 3
After some interviews and discussions about scope, we decided to work on the “Run Policy” use case first. We created initial “Run Policies” prototypes. The refinement of the use case continued – it went from a User Story Map to a more detailed User Journey.
The User Journey included information about “ad-hoc personas” and other possible areas for improvement.
Iteration 4
This stage included more refinement and conversations about scope. The implementation started to take shape: the auto-complete on editors and “run policy” was good enough to demo. We started to do internal demos and heuristic evaluations of the use case.
Iteration 5
We nailed down the final scope of the release. The User Journey became more detailed and included information about personas and pain points. QA started to test the initial implementation and documented the first release limitations. The documentation team started to write the docs. The UI implementation went through several improvements, based on the issues found along the way.
At this point, there wasn’t any significant design change. The development team eliminated bugs and improved the implementation.
Studio 6.1
During these iterations, we revisited the scope many times. In the beginning, the requirements were to create a visual editor and a debugger for custom policies. But when the team analyzed the technical implications, given its complexity, the original scope wasn’t possible to deliver.
Of course, complications can be resolved, but the problem is how long it takes. Should we delay the release of this feature? Incremental design and team collaboration had a lot to do with this decision. Usually, a development team without good communication with the product manager will try to move the release. In our case, the team reviewed the basic premise. From the feedback received from our interviews, we determined that the biggest value-add would come with making the process of running policies easier. It’s not our final desired state, but it’s a huge step forward. So we decided to pursue this goal, and that’s we labeled the feature as beta.
As a result of this journey, we launched custom policies as a beta in Studio 6.1, and I’m happy with the results. If you use custom policies in Studio, just click “Run Policy”, pick the projects to deploy side-by-side with the policy, and you are done. It will improve your efficiency by orders of magnitude.
Appendix
What tools do we use? We use:
- Slack for daily team communication.
- JIRA for issue tracking.
- Bamboo for the continuous integration.
- Studio is built on top of Eclipse, so we automate the build using Maven and a plugin called Tycho.
- On the UX side, we use multiple tools to create and share mockups: InVision, Sketch, Axure. And also some SWT prototypes.
Interested in these kinds of inside stories?
Take a look to Designing Interactions from Bill Moggridge. It’s a great book with tons of stories from computer pioneers like Doug Engelbart.
Also please subscribe to our blog newsletter if you liked this article from MuleSoft blogs! You can subscribe on the top right corner of the page.