
Is your organization undergoing a digital transformation? Is your IT department under pressure to move all the applications and infrastructure to the cloud? An increasing number of organizations today are looking to iPaaS solutions that provide integrated software and hardware stacks for quick deployments, management, and a higher ROI. SaaS products like Salesforce, Workday, and ServiceNow have the system of records in the cloud which is another reason companies are moving to the cloud. This reduces the infrastructure maintenance cost and dependencies from different teams such as Network, InfoSec, Infrastructure Team etc.
CloudHub is MuleSoft’s iPaaS offering, a fully cloud-based solution that provides a true unified connectivity platform for developers to build packaged integration applications. Increasingly organizations are moving their MuleSoft applications from on-premises to CloudHub for a modern approach that improves operational efficiency and promotes faster development cycles. Migration to CloudHub may seem like a daunting task, as it requires a holistic approach with a strong understanding of the CloudHub Architecture and CloudHub Application development best practices to be successful. However, with careful planning and leveraging the available resources, we have seen many successful migrations for MuleSoft applications from on-premises to CloudHub.
This guide will help you address some of the initial considerations for migrating from on-prem to CloudHub (VPC/VPN/DLB) configuration.
CloudHub vCore provisioning:
- For deploying applications on CloudHub, you need to provision vCores for the organization. You can either purchase new vCores or use the existing on-premises cores that can be converted to CloudHub vCores. Note: 1 on-premises core = 1vCore.
- Consider taking a phased approach by converting a few on-premises cores to vCores. Sizing of the application needs to done in the early phases to plan for the future migrations. CloudHub has different worker sizes to run an application. 0.1 vCore and 0.2 vCore which offer limited CPU and Memory for simple integrations. More Complex integrations can use larger worker sizes (1vCore, 2vCore and so on) for extra storage needs and more processing capabilities.
VPC setup
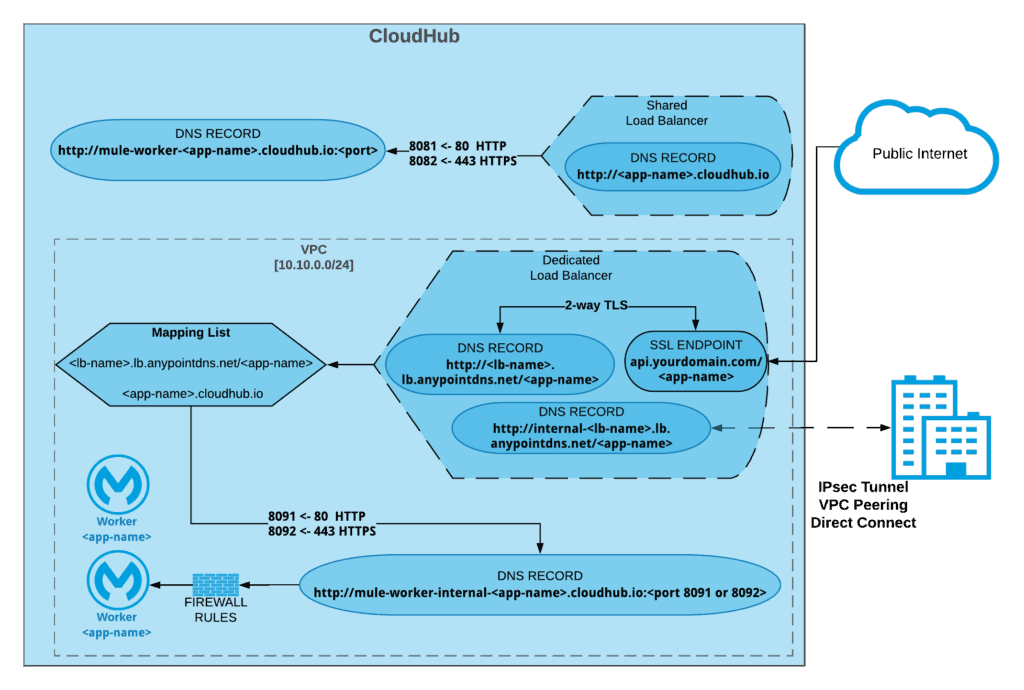
- Base Anypoint VPC subscription includes two Anypoint VPCs and each Anypoint VPC can be associated with multiple environments. If you do not create a VPC then the applications are deployed in the Shared Worker Cloud. For example the most common setup has one isolated network for your production environment, and another for your non-productions environments, which can be QA and staging.
- Place an VPC in Anypoint Organization in business group within your main organization. Usually, create the VPC in your master organization and then it can be shared with different business groups.
- Anypoint VPC supports different Amazon regions. During the VPC setup you will need to assign Amazon region that will be used to host CloudHub workers. Usually, the region selected is one that is closest to the customer data center.
- Determine the CIDR block size and range for the VPC. VPC cannot be resized once application are deployed so it a very important step size the VPC large enough to accommodate enough IPs for all services and instances.
- Rule of thumb: Expected application instances * 10 to allow for expansion.
- The address space reserved by MuleSoft workers should not conflict with address space in customer data center.
- Configure the VPC firewall rules. Before you implement firewall rules, or make changes to existing rules, you should fully understand all security implications
- Add the DNS search domains so you can use the internal host names of your private network.
- Identify the applications that need static IPs as one VPC provides only two static IPs.
Create VPN to connect to data centers
- Anypoint Platform base subscription comes with 2VPCs+ 4 VPNs. There is no cost in setting up VPN as it is a self-serve process. Documentation here walks you through the steps to create a Anypoint VPN.
- Some of the commonly supported connectivity options available are: VPC Peering, IPSec VPN, AWS Direct Connect.
- Once the VPN connection setup is completed, connectivity to the other networks can be tested using the Network tools application.
- For more information, read the more in our Help Center: https://help.mulesoft.com/s/article/Anypoint-VPN-Knowledge-Articles
Shared Load Balancer
- Shared load balancer (SLB) provides the basic load balancing capabilities. You cannot add any custom SSL certificates in the shared load balancer.
- SLB sends the HTTPS traffic to port 8082 and HTTP traffic to port 8081.
- If you need a custom load balancer configuration then you will need to provision a Dedicated Load Balancer entitlement.
- More details on the connectivity can be found here.
Configure Dedicated Load Balancer
- Dedicated Load Balancer (DLB) is an optional component of the Anypoint Platform. DLB configuration will be different from the existing on-premises load balancer. The dedicated load balancer routes both external and VPC-internal traffic to CloudHub workers deployed into that Anypoint VPC. It acts as a single entry point from external networks.
- Recommended best practice is to provision one DLB for each VPC but a VPC can have multiple DLB’s.
- While configuring the DLB, create API name patterns. For Example: <env> –api.yourcompany.com/ api/<version>/<name>
- Customers can create custom domains with their own vanity URL using the DLB.
- Create Mapping rules that can support routing for different versions of an API.
- Add a CA certificate of your company. DLB requires to have at least one certificate.
- Determine the ingress rules to block HTTP and allow only HTTPS (as per requirement). This is an important step and engage your Security teams to make sure you follow the standard guidelines in your organization.
- Here are the steps to create a Dedicated Load Balancer.
High availability and disaster recovery
- High availability in MuleSoft can be achieved by deploying the Mule Application in multiple workers in a region.
- For Disaster Recovery, deploy the Mule application in multiple regions. You will need use your own load balancer or proxy to distributes the traffic between these applications.
IP/Ports/URLs to be whitelisted
- Involve your network security teams to verify that all the ports and IPs are whitelisted from list mentioned here.
Developing applications for CloudHub
Once you have completed the configurations for your CloudHub environment, categorize the on-premises applications in order of priority and start deploying to non-production environments. Think of redesigning application when moving to CloudHub to take advantage of advanced capabilities, for example: Object Store (V2).
- Shared resources: CloudHub does not support the usage of Domain Shared resources. CloudHub’s architecture ensures that there is always one application deployed to a dedicated single Mule Runtime. If your on-premises application have a domain project with shared configs, you will need to refactor these configurations and have local configs for each application in CloudHub. For example: HTTP/HTTPS listeners, DB configuration, etc.
- In some scenarios, sharing the application logic in CloudHub may be required. For example: error handling. You can achieve this by creating separate project packaged as jar. This project can be added as a dependency using a dependency management tool, such as Maven or Gradle. More details on the steps are mentioned here.
- Ports for the HTTP listener are different for CloudHub applications. Mule apps deployed in CloudHub must listen on host 0.0.0.0 and to either the HTTP port (8081) or to the HTTPS port (8082). If you want to restrict access to the applications directly from internet then you can use the port HTTP port (8091) and HTTPS port (8092), which will accept incoming request only on private network.
- Environment properties that are set in the on-premises runtime need to moved to the CloudHub properties in the runtime manager.
- DataWeave transformation logic in the existing on-premises applications can be reused in CloudHub applications.
- Make changes to the applications that use connectors that are not supported in CloudHub. For example: File Connector can be replaced with the FTP connector.
- Two Static IPs are allocated for each VPC. This may be required if you have consumer applications that need to whitelist you server IP.
- Differences between Persistent VM queues, ObjectStores, and Schedule Services.
- If the on-premises server was Windows machine, you can run user authentication to the Runtime using the domain authentication. In CloudHub, you will need to setup SSO or use service account to sign in to the platform to access CloudHub runtime. If on-premises Windows runtime connect to MS Dynamics, PowerShell etc., you will need to install the Windows Gateway services to the Windows machine to be able to connect to CloudHub.
- CloudHub persistent VM queue does not maintain the order of the message sent because of the underlying architecture limitations. If you need to preserve the message order you can consider Anypoint MQ (Subscription required) for persistent messaging functionality.
- Caching in CloudHub: CloudHub workers are not clustered and hence the default in-memory ObjectStore that is intended for use across a cluster through hazelcast replication as the backend mechanism, it fails when deployed on CloudHub. Caching can implemented in CloudHub using the ObjectStore v2. Object store can be used to store the data within a Mule application of single worker or multi workers. If there is a need to share the data across different components OSv2 provides the REST API to access entries.
- JVM level tuning is not available in CloudHub. CloudHub workers are allocated with default JVM parameters set.
Monitoring and logging
- If the on-premises system has any log aggregation agents installed, like SPLUNK or ELK, you will need to change the strategy as CloudHub does not allow installing external agent on the runtime.
- Shared log4j.xml for multiple Mule applications is not supported in CloudHub. Each CloudHub application will need to package a custom log4j.xml with appenders added for external logging system if needed. Example: SPLUNK or ELK. Request for “Disable CloudHub Logs” feature to send events to the external systems. Please note that this solution results in the logs no longer being stored on our platform.
- CloudHub logs can also be extracted and published to the external logging systems using TCP API or HTTP API. You can use the command line tool Anypoint CLI commands or CloudHub API to download the logs.
- Logging FAQs are here.
- Make the necessary changes to the existing Alerts on the platform or add new Alerts specific to the CloudHub runtime. More information on available alerts for CloudHub can be found here.
- Enterprise License Agreement (ELA) customers can have the Auto-Scaling feature in CloudHub, which can be used to scale up and scale down the processing resources for an application.
DevOps
- Make needed changes to the CICD pipeline to deploy the new integrations to CloudHub.
- If using Mule Maven Plugin to deploy to CloudHub, change the pom.xml for the Mule projects and in plugin element configure your CloudHub deployment.
- Some of the other options are:
- Deploy Applications to CloudHub using CloudHub Platform API.
- Deploy Applications to CloudHub using Anypoint CLI.
- Deploy Applications to CloudHub using Runtime Manager.
Testing
- Once the development is completed, promote the applications to the QA environment and run a full regression test suite.
- Performance testing is a very important step when migrating the applications to CloudHub to ensure that the sizing is adequate for the peak loads in production. For on-premises Mule runtime, all the applications share the same runtime and resources and hence can support different peak loads. CloudHub Applications CPU and Memory allocation is determined by the size of the worker allocated to it.
- CloudHub provides bursting capabilities for 0.1vCore and 0.2vCore and it important to have a quantifiable metrics after conducting performance tests to make informed architecture decisions for sizing of Mule Applications. More details on burst capability can be found in the documentation.
- Penetration testing if required can be done on the CloudHub runtimes after notifying the MuleSoft Security team. More details can be found in the documentation for penetration testing policies.
The above mentioned steps are not an end-to-end migration plan for CloudHub, but an outline of the Anypoint features that will be required and application code changes to the Mule Applications. To reduce technical debt, consider adoption of advanced Mule 4 runtime when migrating from on-premises for existing Mule 3 applications. If you need guidance on migration plan specific for your organization’s MuleSoft applications, please contact MuleSoft Professional Services or a MuleSoft Partner.
In my next blog, we will cover discuss the steps for migration of On-premises Mule Applications to Runtime Fabric.


