As organizations embrace APIs for exchanging information with internal or external customers and partners, it’s critical not to sacrifice visibility or governance. That’s where API management comes in. API management policies can be layered on top of the implementation of the APIs to provide the governance, security and visibility required.
Out-of-the-box the Anypoint platform provides a full number of policies. Policies are grouped into categories of:
- Security: Authentication schemes such as OAuth 2.0 or IP Whitelist/Blacklists, Ping/Open AM token enforcement, XML/JSON Threat Protection, LDAP Security
- Compliance: Such as ClientID enforcement or Cross-Origin Resource Sharing (CORS)
- Quality of Service: Rate limiting or traffic shaping policies, throttling, SLA-based throttling
For more information on out of the box policies see: https://docs.mulesoft.com/api-manager/using-policies#available-policies
Custom Policies
While the out-of-the-box API management policies cover the majority of use cases, you may need to create a custom policy to meet your business needs. Creating a custom policy is quick and powerful. Powerful because you implement the policy on a Mule runtime where you can leverage any of the message processor components, 150+ Anypoint Connectors, enterprise integration patterns, etc. you’d use in normal integration flows. The remainder of this article will cover the steps and resources required to create and publish a custom policy template. This policy can be uploaded as a reusable policy into API manager and can be applied to any API registered with API manager.
The steps required to create a custom policy and apply it to an existing API are:
- Create the policy definition (YAML)
- Create the policy configuration/implementation (XML)
- Load the policy into the Anypoint Platform
- Apply the newly created policy to an API
A Real World Example: HTTP Header Parameter Validation Policy
For the example scenario we will:
- Check each incoming request for a specific HTTP header parameter and a specific value of that parameter.
- We want the policy extensible so that the header parameter and accepted value can be defined when the policy is applied to an API.
- Requests that don’t conform to the policy will be rejected with an HTTP response status code of 403.
Pre-Requisites:
- An Anypoint Platform Account with API Management entitlement. You can sign up for a 30-day trial account here if you don’t have one.
- AnypointStudio or an alternative editor for creation of YAML and XML files.
- Any API under management that you can apply the newly custom policy.
Project Download:
The final custom policy is available in the Anypoint Exchange here
1. Creating the policy definition: validate-request.yaml
The first 10 lines of the validate-request.yaml file defines the global properties of this policy. The name, description, category, type, providedCharacteristics and requiredCharacteristics fields will be visible in the Anypoint Platform.
The configuration section, lines 11 – 23, defines the two properties, headerParam, and regexFilter, that will be set by the administrator/API Owner when this policy is applied to an API.
2. Create the policy configuration: validate-request.xml
The policy configuration file defines the implementation and execution of our custom policy. You can use any Mule application elements in the policy configuration. This configuration provides you a powerful way to implement simple to complex custom policies.
A few notes about the structure of the policy configuration file for our example:
- <policy id=”{{policyId}}” name=”validateHeader”> : the {{policyId}} pulls the id value, from the policy definition YAML file. The name will be used for Analytics reports.
- <expression-filter name=”expression” expression=”#[message.inboundProperties.{{headerParam}}!=null ? regex(‘{{regexFilter}}’,message.inboundProperties.{{headerParam}}) : false]”>: the expression attribute contains the MEL expression for our filter. Here we want to check if the {{headerParam}} specified at configuration/application of the policy is null on the incoming request. If it is not null, we do our regex function against the value of the incoming request to see if it matches what was specified at configuration as {{regexFilter}} variable.
- <processor-chain name=”policyViolation”> : processor-chain is a common conventional component. Inside the processor-chain we can provide a linear chain of message processors which process a message in order. Which we do to 1) set the property values for the http.status, 2) content-type, and 3) payload of the http.response. What’s important is the attribute name value of policyViolation will be referenced in our message-filter, see below.
- <before> : section executes on every incoming request
- <message-filter onUnaccepted=”policyViolation”> : name=“policyViolation”
- <filter ref=”Expression”> : references the <expression-filter> element with the attribute name=”Expression”.
- <pointcut> element defines which APIs this policy is applied.
- <api-platform-gw:point-cut apiName=”{{ apiName }}” apiVersion=”{{apiVersionName}}”> : This example assumes our APIs are running in CloudHub so we specify that. For more information on pointcuts
This complete example among other custom policies examples available in the Anypoint Exchange.
3. Load the Custom Policy into the Anypoint Platform
Now that you’ve completed the custom policy, you can load it into Anypoint Platform so that it can be applied to your APIs.
- Login to Anypoint Platform: API Management
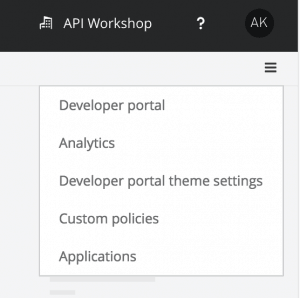
- In the upper right corner click on the three dashed icon
- Select Custom policies from the drop down menu.
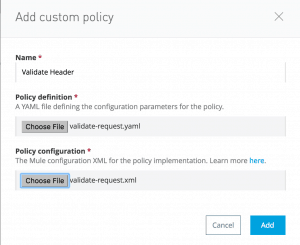
- Click the blue Add Custom policy button
- Specify:
- A policy Name: Validate Header
- Load policy definition: validate-request.yaml
- Load policy configuration: validate-request.xml
- Click the Add button.
The custom policy is now available to be applied to APIs.
4. Apply and Test the Custom Policy
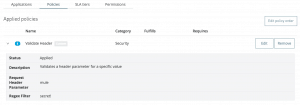
The custom Validate Header policy should now be available in your list of available policies. If the policy is not available, confirm that you are in the same business group as you were when you added the custom policy.
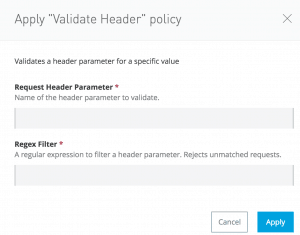
When you apply the policy, specify the name of the headerParam and the accepted value for that parameter. The policy will enforce that every request has the respective values you specified. In the screenshot below I’ve specified the name of the header as: mule and the accepted value as: secret!
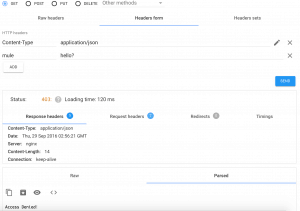
Using the Advanced Rest Client (you can use something else to test with), test calling your API that you’ve applied the Validate Header policy too. Try calling the API in the following ways to view the results:
- Without the mule header
- With the mule header and the value something (or anything other than secret!)
- With the mule header set and the value of secret!
Using the Advanced Rest Client and testing with an invalid header value combination you should see a 403 response code and the payload set to Access Denied! Just as we defined in the implementation of our custom policy, validate-request.xml
A correct header parameter and value combination should result in the normal payload and response of your API.
Summary
If an out-of-the-box API policy does not meet your needs or you can’t find a custom policy in the Anypoint Exchange, you can quickly create a reusable policy. Creating custom API policies in the Anypoint Platform allows you to take advantage of any of the Mule application components to implement the policy. This results in tremendous flexibility and power to meet unique business needs.
Project Download:
The final custom policy is available in Anypoint Exchange.
Additional Resources:
Creating a Custom Policy Walk Thru
Anypoint Studio 6.1 Custom Policy Editor (Beta)


