
Ipswitch recently released its new MOVEit Transfer connector to Anypoint Exchange. This connector will enable MuleSoft users to easily integrate secure managed file transfer capabilities into their Mule applications, leveraging the power of Ipswitch’s MOVEit product family, which is making the networked world a safer place to share data.
MOVEit Transfer keeps important files and data secure when information is at rest or in transit. It is ideal whenever you handle data that requires integrity checks, audit trails, or robust policies and controls needed to ensure confidentiality.
From Mule applications, the connector can remotely interface with Ipswitch MOVEit Transfer to perform a rich set of file operations. The MOVEit Transfer Server is available via either a cloud-based service or a backend server.
Getting started
If you already have access to Anypoint Platform, it will only take a few easy steps to start benefiting from the connector.
- If you are not yet a MOVEit Transfer customer, you can contact Ipswitch to sign up for the MOVEit Cloud service (free trial available), or purchase a MOVEit Transfer product license for hosting the server yourself.
- Once you’ve gained access to MOVEit Transfer, you can start developing Mule applications with the connector. The connector is publicly available directly from Anypoint Exchange. There is no additional fee for using the connector itself.
- Deploy your Mule applications and check the results.
An example
To illustrate how to use the connector in a Mule application, let’s walk through an example.
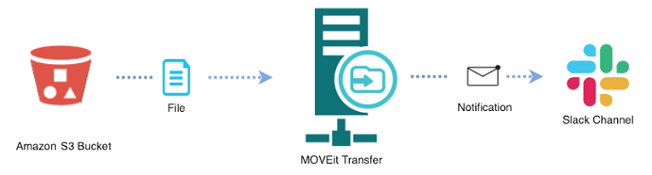
Suppose you need to develop a flow on Anypoint Platform that transfers a file from an Amazon S3 bucket to MOVEit Transfer Server and notifies recipients via a Slack channel. The flow will be triggered by an HTTP request.
You may use either Anypoint Studio or Design Center for the development. But to keep it simple, let’s use Design Center for this tutorial.
Create Mule application
Log into Anypoint Design Center and create a new Mule application project with name “MOVEit Demo.” Click on “Go straight to canvas” to skip the wizard.
Add trigger
On the canvas, click the Trigger card, select “HTTP Listener,” and enter “demo” as the path. Keep everything else as is.
Add Amazon S3 Connector
Click the “+” icon to add “Amazon S3 Connector” and “Get Object” operation. Enter the bucket name and the key of the source file. Configure the connection information, including access key, secret key, and region. Select “Non Repeatable Stream” as the streaming strategy on the Advanced tab, as we are streaming the file directly from S3 to MOVEit Transfer.
Add MOVEit Transfer Connector
Click the “+” icon to add “MOVEit Transfer” and “Upload File to Folder” operation. Enter the folder ID and filename. You can get the target folder ID from the MOVEit UI, or retrieve it dynamically with the connector. Please note that the “File Content” field is set to the payload of the previous step by default. In our case, it is the output of the S3 “Get Object” operation.

In addition, configure the connection with your MOVEit Transfer URL and user credentials. The connection configuration can be shared by multiple flows within the same project. If desired, you can also specify user credentials per request. Please refer to the user guide for more instructions.
Add Slack Connector
Add “Slack Connector” and “Chat – Post Message” operation. Enter the channel name and connection information. Specify the message text, such as below:
%dw 2.0
output text/plain
—
“Transferred the file ” ++ payload.name ++ ” ID: ” ++ payload.id
Test the application

Now it’s the time to run and test the application. Just click the “Run” button on the top of the screen to start the application, and then issue an HTTP request from a browser and any other HTTP client using the URL displayed next to the “Run” button followed by “/demo.”
To be certain, you can verify the uploaded file from MOVEit Transfer UI and the notification message on the Slack channel.
More considerations
To make your Mule applications more robust for production development, you should add error handling and logging. You can find more details on the error codes from the user guide.
You can find the MuleSoft MOVEit Transfer connector here.
This post originally appeared on Ipswitch’s blog.