The Mule IDE does not natively support Mule 3’s new application structure yet, but not to worry, with the new 2.1 release of the Mule IDE you can still keep it hot when working in the IDE. Just follow a few simple steps and your apps will be doing the tango with Mule 3 while you code away in Eclipse.
If you haven’t installed the Mule IDE, follow the instructions here to get up and running. Don’t forget to download and install Mule 3.
Before starting in Eclipse, create a new application directory in your Mule 3 installation called <Mule Home>/apps/<project name>. Create a subdirectory in it called classes. (For more on the application structure in Mule 3, go here)
Your Mule project will deploy to the output directory you specify when you created it. Eclipse defaults to <project name>/bin. To deploy to the Mule 3 application deployment directory, you need to set up a linked folder and then create source-specific output folders for the Java build path properties.
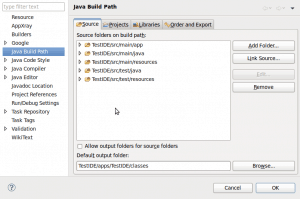
- Open the Java Build Path properties dialog in Eclipse and create a new default output folder under your project directory and call it “apps”. Create a linked folder underneath it that maps to the application directory you previously created.
- Make <Mule Home>/apps/<project name>/classes the default output folder
Your Build Path should now look something like this:
Almost there. Because of a bug in Eclipse, the Mule configuration cannot be deployed to the root application directory. We created the conf folder in our application directory as a workaround. This requires an application deployment descriptor to tell Mule where to look for your configuration (by convention Mule expects it in the root folder). Create a new file called mule-deploy.properties in your <Mule Home>/apps/<project name> directory and add the following:
config.resources=classes/mule-config.xml
Now just start up mule using the new application parameter:
<mule home>/bin/mule -app <project name>
Your application should start up. Now, anytime you rebuild in Eclipse, the project will reload automatically in Mule. You are hot deploying! Go ahead and try it by making a change to your mule configuration and watch it reload. Mule only monitors the configuration files today, so if you modify any of your class files or other dependencies, you will need to touch your configuration file for it to pick up the changes. If you have any problems or need to distribute additional third-party libraries with your application, I have posted more detailed instructions in the Mule IDE documentation.
Now that you have Mule 3 up and running in your IDE, go check out some of the other great new features available in Mule 3!


