The SOAP standard was created to address the communication needs between different applications independently of the programming language, platform or technology in use. It is a standardized protocol based on XML over a variety of communication protocols such as HTTP, to invoke methods on remote objects. In this blogpost we’re going to consume SOAP web services implemented with the Microsoft Windows Communication Foundation framework (WCF) from a Mule application. WCF is part of the .NET framework since version 3.0 and provides the building blocks to expose C# and VB.NET methods as SOAP web services, hosted on the IIS web server.
Let’s build a simple Mule application for order processing. We would like to receive orders through a simple HTML form, and depending on the quantity of ordered products, we send a retail order to a WCF SOAP service for orders of less than 100 units, or a wholesale order to a file on the filesystem for orders of 100 or more units.
Let’s start by creating a WCF project using Visual Studio Express 2012, to expose the retail order service:

Visual Studio will provide template artifacts for the service class, interface and configuration file, with the name “Service1”:
Let’s refactor our template service to call it “WCFRetailService”. Use the refactor option on the context menu, right clicking on the class or interface name on both IService1.cs and Service1.svc.cs source code files:
Remember also to rename the artifacts on the solution explorer, so you end up with IWCFRetailService and WCFRetailService, as follows:
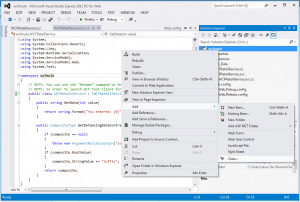
Now, we need to provide the method of our retail service, to receive orders from the outside world. But first, let’s create an Order class, that will be used to store the details of the orders and to pass those to our service. Right click on the wcfmule project on the solution explorer, and click Add -> Class:
Name the new class “Order”, and define it as follows:
Observe the “[DataContract]” and “[DataMember]” annotations. We use to mark the Order class a serializable and to define the properties that are going to be included on the serialized format, that’s going to be exchanged with consumers of our service.
Now it’s time to create the service interface and implementation. Let’s modify first the service interface, by opening the IWCFService.cs artifact on the solution explorer. The service interface defines the signatures of the operations (methods) that are going to be exposed as SOAP operations on the web service. Our service interface should look like this:
The “[ServiceContract]“marks our interaface as a web service, and the “[OperationContract]” defines that the “CreateOrder” method is going to be one of the operations available on the SOAP service we’re building.
Next, we must provide the service implementation, that is, the actua code that will be called when a remote client invokes our service. For this, open the WCFService.cs class file on the solution explorer, and update it to look like this:
In this case, we don’t need to add any annotations since we’re declaring that our service implementation class implements our previously annotated service interface IWCFService.
The final step on the .NET side of the house is to run our sample service directly from Visual Studio. Right click on the wcfmule project on the solution explorer and click on “Debug -> Start new instance” menu option:
Visual Studio will open your default web browser and point it to the IIS instance that hosts your service. Click on the “WCFRetailService.svc” link to go to the service details page:
Observe that the URL of the service WSDL in this case is ” http://localhost:49676/WCFRetailService.svc?wsdl”.
Now, let’s switch to Mule Studio to begin building our sample application. Create a new project going to File menu or right clicking on the Package explorer and selecting “New -> Mule Project”:
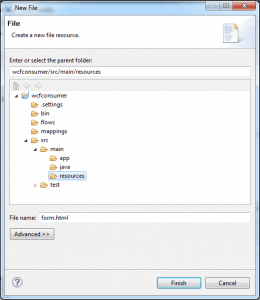
Since we want our Mule application to receive orders using a HTML form, create the “form.html” file and save it on “src/main/resources” folder:
The HTML file should contain the form that we’re going to use to send orders to our Mule application:
Now, let’s create our mule application by dragging and dropping each components from the palette to the canvas as follows:
The shown flow will receive order requests through the HTTP protocol, transform the POSTed request into a Map with the HTML form input elements and then, using a Choice message router, according to the quantity ordered, the flow will branch to call our .NET WCF SOAP web service using the SOAP component and the HTTP outbound endpoint, or, send a file to the filesystem using the File outbound endpoint.
Since our SOAP .NET service needs an Order object, we will use a Groovy script to construct the Order object, but using a Java representation generated automatically from studio (as we will see in a moment). The SOAP component prepares the SOAP XML request, and the HTTP outbound endpoint sends it to our .NET service. On the other hand, if we are sending a file to the filesystem, we transform the Map first to a XML representation using the Object to XML transformer and then a File outbound endpoint writes the file out.
Finally, in either case, we transform the message to a string, to be returned to the browser. In the first case, it will be the order Id generated by the .NET service, and in the second case, it will be the XML that gets stored on the output file.
Let’s configure each of the flow’s building blocks. The form will send POST requests to the URL “http://localhost:8081/submitOrder”. Double click on the HTTP endpoint and configure it to listen on port 8081 and path submitOrder as follows:
Double-click on the Choice message router to configure the expressions to drive the flow on each of its branches:
Here we use the new Mule Expression Language to determine if the ordered quantity is less than 100 to branch the flow execution to our .NET service, or otherwise, send a file to the filesystem.
Now, let’s configure our SOAP component to generate a request for our WCF service. Studio automatically generates the source code of the SOAP web service client and any complex objects required directly from the service WSDL. Double-click on the SOAP component to open the properties window, and click on the “Generate from WSDL” button. Enter the URL of the .NET service and a package name to generate the SOAP client and classes as follows:
Now, after Studio generates the SOAP client code, change the operation on the properties window to “JAX-WS client”, enter the name of the operation exposed on our .NET web service (“CreateOrder”) and change the Service class to “com.mulesoft.wcfconsumer.IWCFRetailService“:
You can see the generated source code on the package explorer. Observe that now you have a Order class, which is our Java representation of the .NET Order object:
Next, we can provide the Groovy script to build an Order object from the data in the Map that comes from the HTML form. Double click on the Groovy component and enter the following script:
Observe how we use the generated source code from the WSDL by Studio to construct an instance of the Order object Java representation. It’s fundamental to employ the generated ObjectFactory class to create the contents of the Order attributes, in order to send them correctly and to allow the WCF service to receive them.
Now, the SOAP component that we just configured on our flow, will be in charge of the preparation of the SOAP request. The next step is to actually send the request to our .NET service, by using the HTTP outbound endpoint. Let’s double-click on it to enter the port and path of the .NET service as follows:
Finally, let’s configure our File outbound endpoint, to send files to the filesystem in the case when an order of more than 100 items is received. Double-click on the File outbound endpoint, and enter the output path as follows:
Here you can see the final look of our Mule application:
Finally, it’s time to test our simple application by running it on MuleStudio. Right click on the flow file and hit Run as -> Mule application and observe how the application starts on the console:
Now, right click on the form.html file and click on Open With -> Web browser:
Enter an order of less than 100 products:
and observe the generated ID of our .NET web service:
Also, observe the output on our WCF service, right on the console of VisualStudio:
Now, a order of 100 or more products:
you’ll get an XML response, and a new file on the “src/test/resources” folder:
To summarize, we have shown on this post how to build a very simple SOAP web service using .NET framework WCF, and successfully consumed it from a small Mule application. As with any other SOAP standard compliant web services, Studio provides the tools to easily generate and consume web services.


