
Nearly every company today is making strides toward agility — and being agile often requires organizations to not only act fast, but act in real time. This is only possible with fast, real-time streaming of data, leveraging microservices built based on an event-driven architecture.
This is where the combination of MuleSoft and Apache Kafka shines. In this blog post, I’ll review the Kafka ecosystem and tools and discuss the different options for MuleSoft and Kafka collaboration.
What is Apache Kafka?
Apache Kafka is an open source distributed event streaming platform. As an evolution of more traditional AMQP-based messaging systems, Kafka is capable of handling massive amounts of events in parallel that implements an abstraction of a distributed commit log.
Over the years, Apache Kafka has become the de-facto event streaming platform and is widely adopted by companies to implement high-performance data pipelines, streaming analytics, data integration, and other mission-critical applications. Like any other event streaming platforms, Kafka offers a few different ways to produce and consume data, leveraging its client API ecosystem. With particular relevance to this post are Kafka Rest Proxy and Kafka Connect, which allows clients to integrate with Kafka via an HTTP interface or custom-built connectors.
Integrating MuleSoft and Apache Kafka
There are three ways to integrate MuleSoft and Apache Kafka:
#1 MuleSoft Kafka Connector
MuleSoft offers an Apache Kafka connector, which allows MuleSoft applications to produce/consume data to/from Kafka topics as this leverages the standard Apache Kafka Client library.
The Apache Kafka connector supports operations for publishing and subscribing to topics and supports can be configured in different ways used and configured to support these types of operations:
- Consume: Receives messages from one or more Kafka topics.
- Message listener: Similar to consume operation, receives messages a Kafka topic, producing a single message to the flow.
- Commit: Commits the offsets associated to a message or batch of messages consumed in a Message Listener.
- Publish: Produces message to specified Kafka topic (can be transactional).
- Seek: Sets the current offset value for the given topic, partition, and consumer group of the listener
#2 Kafka REST Proxy API
Another approach to integrating MuleSoft and Kafka via API-led connectivity is MuleSoft’s HTTP connector to make calls to the underlying Apache Kafka REST Proxy API.
This approach works best when the client application either does not support (or does not have) a Kafka client library or does not want to deal with Kafka directly. By taking this, MuleSoft can be integrated with Kafka REST Proxy API by simply using MuleSoft’s HTTP connector with a POST method to call the API.
#3 Kafka Connect
Lastly, the communication channel between MuleSoft and Kafka can be started by Apache Kafka rather than MuleSoft, through the use of Kafka Connect. This is where this last one sends messages to Kafka to be processed by a MuleSoft application.
With a relatively simple and straightforward configuration, Kafka Connect instances can be configured to subscribe to Kafka topics and dispatch events to MuleSoft applications. For example, a Kafka Connect could be created to invoke a RESTful API exposed by MuleSoft or it could drop a file to a FTP location for MuleSoft to pick-up and so on, leveraging MuleSoft’s connectors without having to lean on Kafka directly.
Use of Kafka Connectors is done via a simple configuration, based on a standard JSON structure. Later on in this blog post, I will demonstrate how to create one.
Time to code
Now we’ll explore the different ways to integrate MuleSoft and Apache Kafka. To follow on and build this exercise, you must have connectivity to a Kafka cluster and Kafka connect, either running locally, on a container or in the cloud and create a Kafka topic named customers360view.
MuleSoft as Kafka client
Implementing a Kafka client in MuleSoft is relatively easy and straightforward when using the Apache Kafka Connector. All we have to do is to drag-and-drop the desired operation into the canvas and configure the connector properties.
Producer
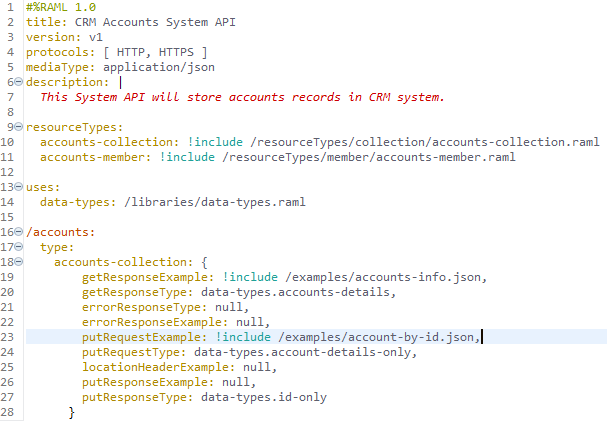
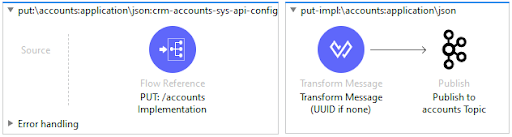
For this example application, we can create a very simple RAML specification for a CRM accounts API that exposes an accounts resource that supports a POST request, which when called simply publishes to a Kafka topic named “customers_topic.” The screenshots below illustrate how the RAML and Mule flow would look like when the implementation is done:
Consumer
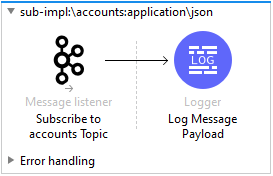
Once again, to implement a consumer we are going to leverage the MuleSoft Apache Kafka connector and for simplicity of this flow, upon arrival of a new message we will simply log its contents, so that when the Mule flow is finished, it would look like this:
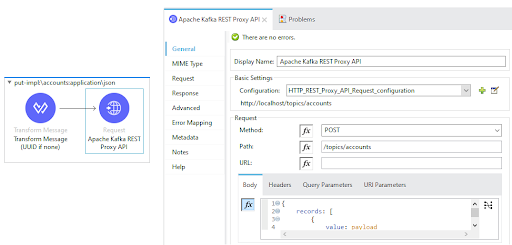
Producer (Using REST Proxy API)
All and any MuleSoft developers and architects would be absolutely comfortable and familiar with this one since it is quite simple as it leverages the HTTP request connector to call the Kafka REST Proxy API. When implemented, it should like this:
Kafka as MuleSoft client
This is another interesting approach to integrating them, where — as mentioned before — an inversion of control takes place so that Kafka becomes the client and a MuleSoft application becomes the server processing events.
To implement this, first we are going to modify the code that supports HTTP method PUT as part of the Accounts API in MuleSoft, so that it becomes the publisher of messages to Kafka and then we are going to configure a Kafka HTTP Sink Connector that subscribes to the customers360view topic and sends HTTP PUT requests to that accounts API.
MuleSoft – Producer/Processor
With the MuleSoft application (server) receiving HTTP requests coming from Kafka (client), we can now have an implementation flow to handle and process PUT requests that leverages the MuleSoft connector for Apache Kafka to produce messages. Notice that now we have introduced some additional code to control the execution and avoid an infinite loop, but this is still fairly straightforward. After modifying the flow, this is what it would look like:

Kafka Connect – Sink Connector
Having our Account API up and running, we have to define how our connector should behave, what Kafka topic to subscribe to receive messages and so on. Unlike for MuleSoft applications in Anypoint Studio, there is no UI to create Kafka Connectors, so defining the contents of the JSON file that comprises the connector has to be made in an ordinary text file editor. The below code is the representation of a Kafka HTTP Sink connector that points to our MuleSoft Accounts API. When done this is what it would look like:
{
  "name": "CRM_Sys_API_HttpSinkConnector",
  "config": {
    "connector.class": "io.confluent.connect.http.HttpSinkConnector",
    "tasks.max": "1",
    "key.converter": "org.apache.kafka.connect.storage.StringConverter",
    "value.converter": "org.apache.kafka.connect.storage.StringConverter",
    "topics": "customers360view",
    "http.api.url": "http://host.docker.internal:8092/api/accounts",
    "request.method": "put",
    "headers": "X-Source:Kafka|Content-Type:application/json",
    "reporter.result.topic.name": "success-responses",
    "reporter.result.topic.replication.factor": "1",
    "reporter.error.topic.name": "error-responses",
    "reporter.error.topic.replication.factor": "1",
    "reporter.bootstrap.servers": "broker:29092",
    "bootstrap.servers": "broker:29092",
    "value.format": "json",
    "value.converter.schemas.enable": "false",
    "schemas.enable": "false"
  }
 }
Deploying the connector can be made using UI if you are running a commercial version of Kafka, otherwise by using the Connect REST Interface, posting the contents of the connector configuration to that API.
You can find more great tutorials by Eduardo here.


