
More Mule customers are adopting MuleSoft Runtime Fabric. This mini-series covers several Runtime Fabric topics — including how to install, configure, test, and troubleshoot Runtime Fabric. Part one of the series will cover the Runtime Fabric installation on AWS.
The AWS Runtime Fabric install process is different from the traditional software install. With the traditional software install, users start with provisioning of the servers that will host the software. With the AWS Runtime Fabric install, by default, users do not provision the AWS EC-2 instances beforehand. The install script automates the provisioning process and runs from your laptop.
The overall AWS Runtime Fabric install steps comprise of the following:
- The preliminary steps: acquiring AWS resources and enabling Runtime Fabric in Anypoint Runtime Manager.
- The install script from your laptop will provision the EC-2 instances remotely and install the base Runtime Fabric package onto these EC-2 servers. User only needs to set the parameters in the install.sh script which tells AWS to carry out the actual tasks.
- After Runtime Fabric is installed in AWS, users need to configure the inbound traffic to Mule runtime on these EC-2 servers.
For a comprehensive Runtime Fabric documents, reference MuleSoft online resources:
Due to the generic nature of these documents, they don’t include many alternate scenarios. This article will try to fill in the gaps, and explore some what-if conditions during the install, and provide a single document that includes the install, configuration, and basic testing.
Step 1: Create a Runtime Fabric Cluster in Cloudhub
Before starting this step be sure to do the prerequisites, following the instructions here to begin Runtime Fabric install.
The following screen shows an active Runtime Fabric instance. It shows a newly created (“test-rtf”) instance with “Ready for activation” status. This “test-rtf” is just a place holder at the moment, it will be connected to where your final installation is (AWS, Asure, on-prem, etc.).
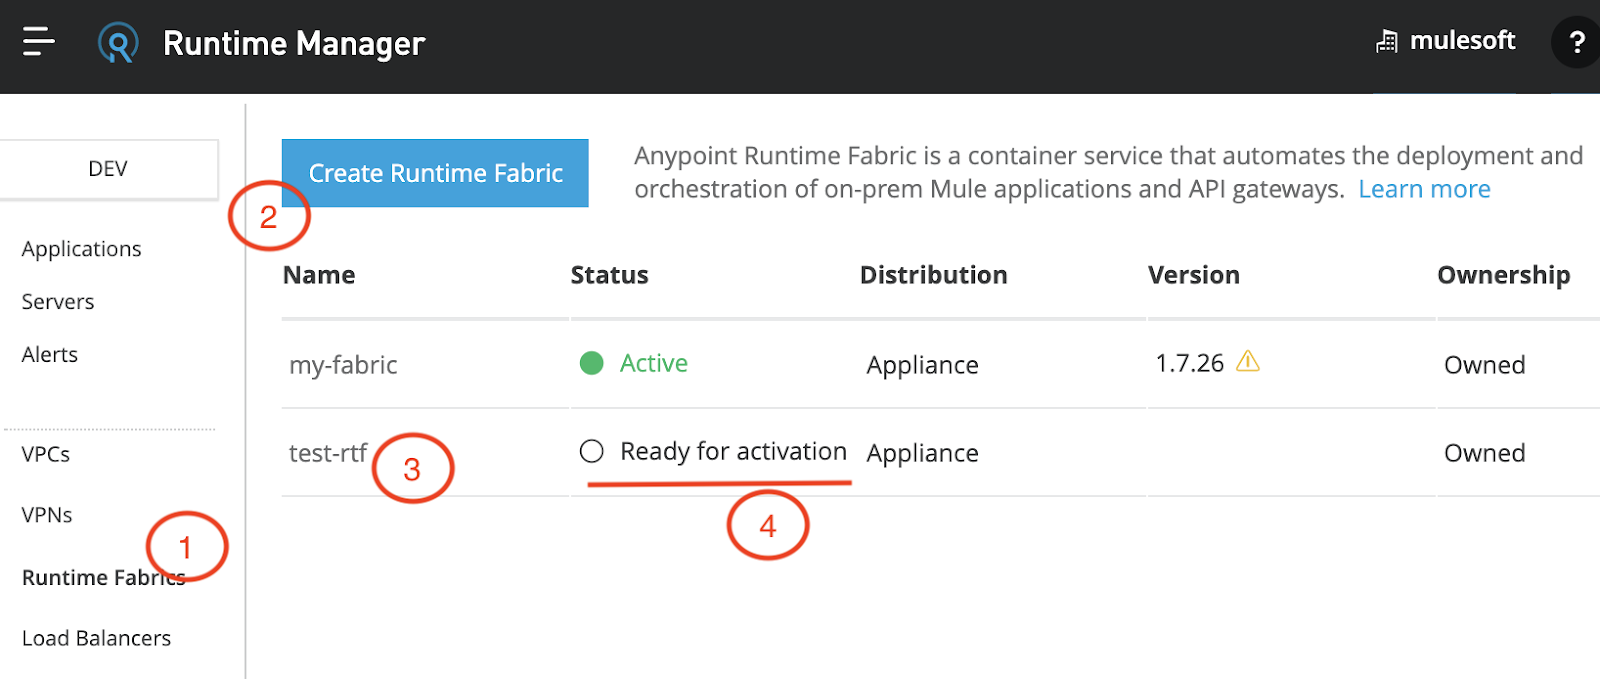
If you click on “test-rtf” on the screen, you will get to a page shown below, for lack of terminology, this page will be referred to as Runtime Fabric pre-install screen. You need pay attention to these three sections:
- “install scripts” download link
- This is the latest version of a generic install script file, not specific to your install.
- “activation data”
- This is specific to your install. This data will tie your Runtime Fabric instance to the Runtime Manager.
- “delete Runtime Fabric”
- Remember this link in case you need to delete and restart the install again.

After you successfully completed all the steps from the online document, everything will change to green on this page. If your install doesn’t complete successfully, you may see errors on the new page. That’s when you need to decide whether to fix the install or start a new install from scratch again. If you decide to start from scratch again, you will use the delete button on this screen.
Step 2: Collecting parameters
The Runtime Fabric install is just to execute a script. However, most of the work goes into the preparations before you execute the script.
Create a text file to keep these values as you gather these parameters. This document contains the list of all AWS parameters. For the standard install, pay attention to the following parameters.
AWS parameters:
- AWS_ACCESS_KEY_ID, AWS_SECRET_ACCESS_KEY: you get these from your AWS admin.
- EC2 key pairs: save your key pair to a file, e.g.: “my-keypair.pem.” See this link if you want to know how to obtain a key pairs
- AWS_REGION: example values are “us-west-2”, “us-east-1” etc.
Base64 Encoded Mule Runtime License File
Mule License file can appear in several formats:
1) binary
2) hex encoded text
3) XML file with base64 encoded content
4) raw base 64 encoded.
Pro-tips:
- If your license file is already base64 encoded, do not run base64 encode again. A simple way to tell if your license is base64 encoded already, try to decode it with “base64 -d.” For example, with the XML format, the content inside the <property> tag is already base64 encoded content. Use the value inside the <property> tag for the install.
- If you are installing for an enterprise customer, you should have access to your company’s license file. You can also validate your license file from here.
- If you are just testing Runtime Fabric on your own. You can download a trial server here. After install (unzip) it locally, go to “{mule-home}/bin folder, run “./mule,” then go to “{mule-home}/config,” you should see “muleLicenseKey.lic.”. Keep in mind this license is only good for 30 days. If you try to verify with the online tool, it may say it’s invalid or expired. But you can still use it to test install Runtime Fabric.
- If you put in an incorrect license file, your install will complete; but your app deployment will fail. You may use the steps in the final section of this document to check the log file to see if you have an invalid license error.
- You can use the following two commands on EC2 servers if you need to read or update the license directly:
sudo ./rtfctl apply mule-license BASE64_ENCODED_LICENSE
sudo ./rtfctl get mule-license
Step 3: Download the Install Script File
This document assumes the install is run on MacBook, and you already have Terraform installed. Check here if you need to install “terraform” on your laptop.
Download the install scripts to your laptop: on the Runtime Manager Runtime Fabric pre-install screen, click on “Download files” (labeled as step 2 on the screen), save it as “rtf-install-scripts.zip” (if you don’t use this file name, pay attention to the actual downloaded file name). unzip the file into a folder “rtf-install-scripts.” Open a command window, go to “rtf-install-scripts/aws” directory.
Step 4: Create a Shell Script
Inside “rtf-install-scripts/aws” directory on your laptop, create a shell file, called it “rtfinstall.sh”
#!/usr/bin/env bash
AWS_ACCESS_KEY_ID=AKIAR…5G65
AWS_SECRET_ACCESS_KEY=/ci/BLe…M6HC4
AWS_REGION=us-west-2
terraform apply
-var activation_data=YW55cG9…Ni1iYmZjLTlmMmYxYTk5YzRmNg==
-var key_pair=my-keypair
-var controllers=1
-var workers=2
-var enable_public_ips=true
-var mule_license='2+…4iYlUFB6U0PrFzWvatZncarQ=='
-state=tf-data/rtf.tfstate
Run “chomd +x rtfinstall.sh” to make it executable.
Step 5: Execute the install script
Inside the “rtf-install-scripts/aws” directory, run “./rtfinstall.sh.” If it has run correctly, you will see the following in the command window (error conditions are discussed in the later sections of this document):
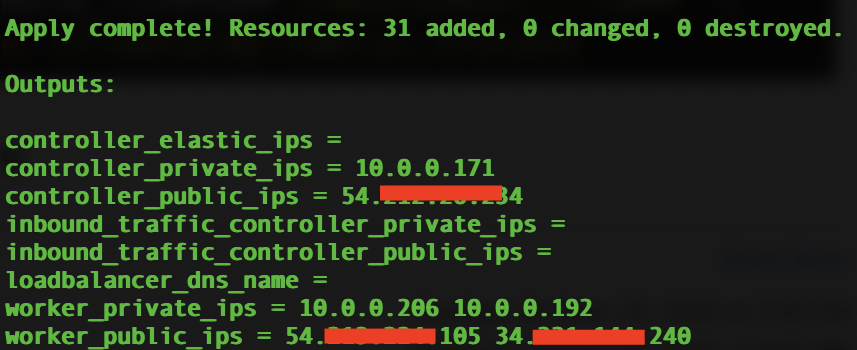
It shows one controller and two worker EC-2 nodes are created with their public and private IPs.
Copy and save these lines to a file. You will need these IP addresses.
Post install check
The Runtime Fabric install on the EC-2 servers may take 20 minutes to finish.
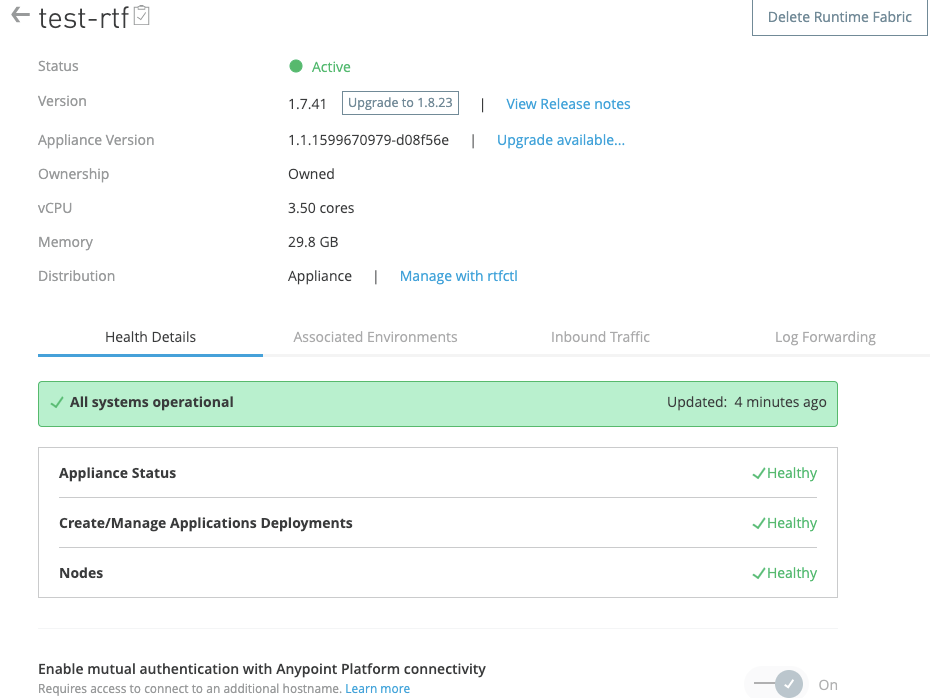
1. If the install is successful, the Runtime Fabric page in Runtime Manager will show like below
2. Login to EC-2 controller node to check:
ssh -i ‘my-keypair.pem' ec2-user@54.xxx.xx.234
$ tail -f /var/log/rtf-init.log
17 / 17: Wait for connectivity
================================================
time="2020-10-21T23:52:59Z" level=info msg="Waiting up to 10m0s for readinessn"
Runtime Fabric is ready.
Done.
Runtime Fabric installation complete.
3. Find the Ops Center login credential
On the controller node (use “sudo su –“ first to change to “root”)
cat /var/log/rtf-init.log | grep -B 1 -A 3 “Ops Center”
…
user admin@runtime-fabric created
Ops Center access:
URL: https://10.0.0.171:32009/web
User: admin@runtime-fabric
Password: u0HsX2kO…P3bQwGXMxv8nO4
You need to replace the private ip 10.x.x.x with the controller public IP, follow this document to navigate Ops Center,
Troubleshooting tips and other install options
The above install steps show the standard install path. One important part of this document covers the basic troubleshooting and what-if’s during the install.
- What if I want to have three controllers and three workers?
- You can control that in the rtfinstall.sh script.
- What if my install fails with the error that my account has exceeded the VPC limit?
- You need either free some AWS VPC resources, or you need to piggyback your Runtime Fabric on an existing VPC. To do that, you can use a text editor to modify “fabric.tf”, and change these values:
variable “existing_vpc_id” {
default = “vpc-8xxx38fd”}
variable “existing_subnet_ids” {
type = list(string)
default = [“subnet-a8caxxxd1”]}
You can find existing VPCs here. From there, you can search for “subnets,” find a subnet, or create a new subnet.

- What if my install did not complete successfully?
If your install didn’t complete, but the EC-2 nodes (controllers, workers) were created, delete the unfinished Runtime Fabric instance, start from scratch again. You should delete the AWS EC-2 nodes (using IPs as the IDs to find the EC2 nodes). Also search here (change your region as needed) for a security group “runtime-fabric” that’s tied to your VPC, and delete the security group. Otherwise, it will cause conflict when you run install again.
Before you run the re-install, make sure you remove the “tf-data” directory (see below); back it up if needed. Otherwise, the re-install may pick up some of the stale data from “tf-data”, causing unpredictable behavior.
- What if I get this error when I rerun install?
Error: Invalid count argument on fabric.tf line 399, in resource “aws_route_table_association” “rta”:
399: count = length(aws_subnet.public)
Try removing the folder “tf-data” (back up first if needed).
Enable the inbound traffic
After executing the install script successfully, follow this link to enable inbound traffic. Note the verbiage of this document may not match exactly the screen in Runtime Manager, as the page may get minor updates between versions, but the essence is the same.
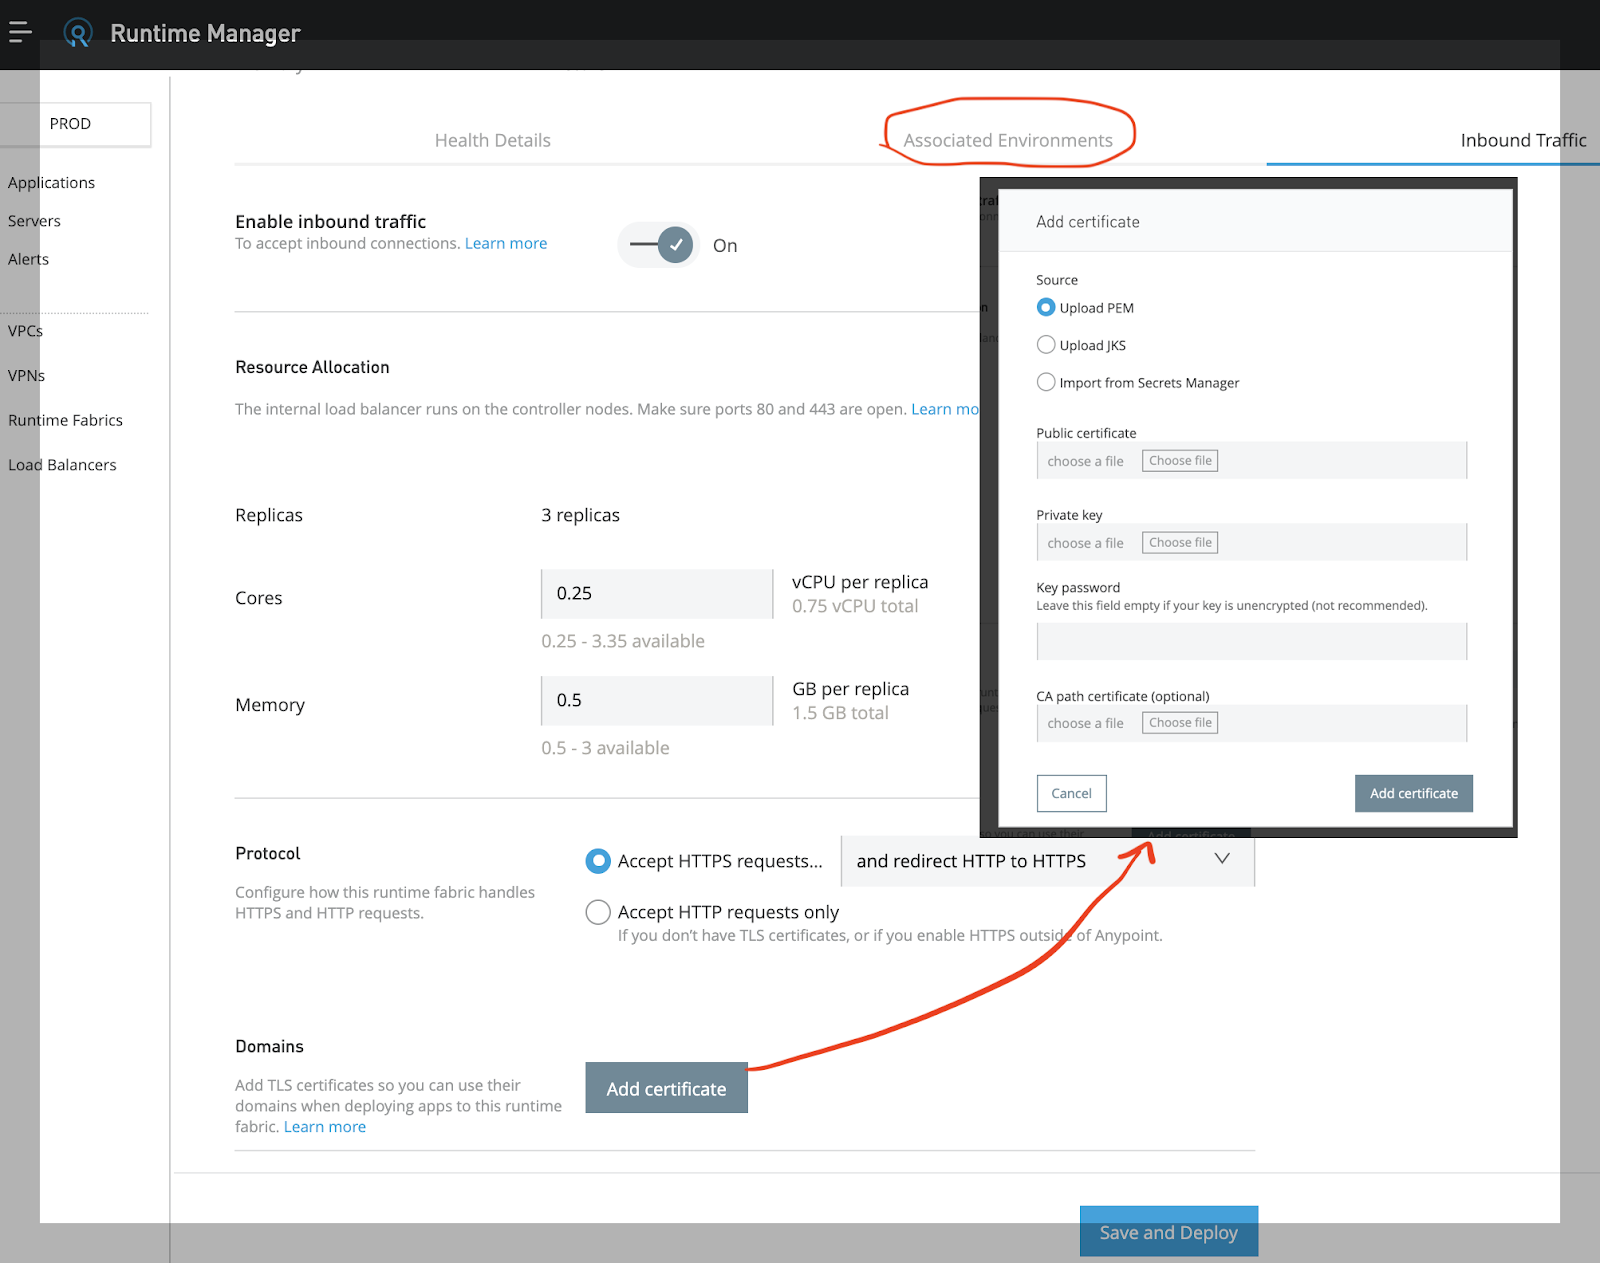
The first step to enable inbound traffic is to prepare the SSL certificate. You can upload the certificate directly. We recommend you follow the best practice below by using the Secret Manager to manage the SSL certificate:
Remember to enable “edit” mode to make changes, and click “finish” when done editing (see screenshot below):

- Create a secret group
- Generate a certificate if needed: openssl req -x509 -newkey rsa:4096 -keyout key.pem -out certificate.pem -days 365
- Pay attention to the certificate CN name. It will determine how your apps/APIs are accessed (see Smoke Test below)
- Create a key store under the group, upload the cert to the server
- create TLS context that links to the key store
- Add the certificate by following the online instructions — see screen below:
Deploy a test app and run smoke tests
You need to associate the environments (dev, qa, test, what not) to Runtime Fabric instance before you can deploy apps. Click the “Associated Environments” tab on the RTF page from Runtime Manager to select environments.
Deploying an app to Runtime Fabric from Runtime Manager is similar to deploying to Cloudhub.
1. How to test my app like “https://localhost:8082/test“ on EC-2 server
Depends on the certificate domain CN name:
If the domain is “*.my-company.com” and your deployed app name is “my-first-rtf”:
curl -k https://my-first-rtf.my-company.com/test –resolve my-first-rtf.my-compnay.com:443:34.xxx.xxx.56 (your controller public IP)
If the domain is specified as “rtf-dev.my-company.com”:
curl -k -H “Host:rtf-dev.my-company.com” https://32.xxx.xx.41/my-first-rtf/test
2. Test the traffic without using a certificate
You may test without installing a certificate, but you still need to set a domain name, and of course, you can only test HTTP.
Accessing the Mule log files
Perhaps the most itchy question of all Mule developers is: where is my Mule log file?
Log on to controller node (or using Ops Center “Server” menu):
Run “sudo su –“ if needed
kubectl get pods –all-namespaces
NAMESPACE NAME READY STATUS RESTARTS AGE
2009ab2e-bafb-4089-9701-000bbbc53bf0 my-rtf-test-5668d5895f-gv922 2/2 Running 0 17d
…
kube-system coredns-2b22n 1/1 Running 0 27d
Find your test app entry above, then run the following:
kubectl log -n 2009ab2e-bafb-4089-9701-000bbbc53bf0 my-rtf-test-5668d5895f-gv922 -c app -f
Conclusion
It is important for Mule developers to gain the basic skills with Runtime Fabric. In the future posts of this mini RTF series, we’ll cover on-prem Runtime Fabric install and the basics of Runtime Fabric CI-CD process.
Easily deploy and manage runtimes in your cloud or on-premises with Anypoint Runtime Fabric — get started today for free.


