
This is the part 2 of a series on Runtime Fabric.
The installation of Runtime Fabric involves many steps running across several platforms. Some steps rely on manually executing scripts on the command line and collecting the output from the script output. Depending on the platform you run the install on, the steps may differ. If you’re new to Runtime Fabric, the process can be overwhelming especially when you encounter problems.
The previous blog covered the AWS Runtime Fabric install process, this blog will cover the on-premises Runtime Fabric install.
Step 1: Create a Runtime Fabric Cluster in Cloudhub
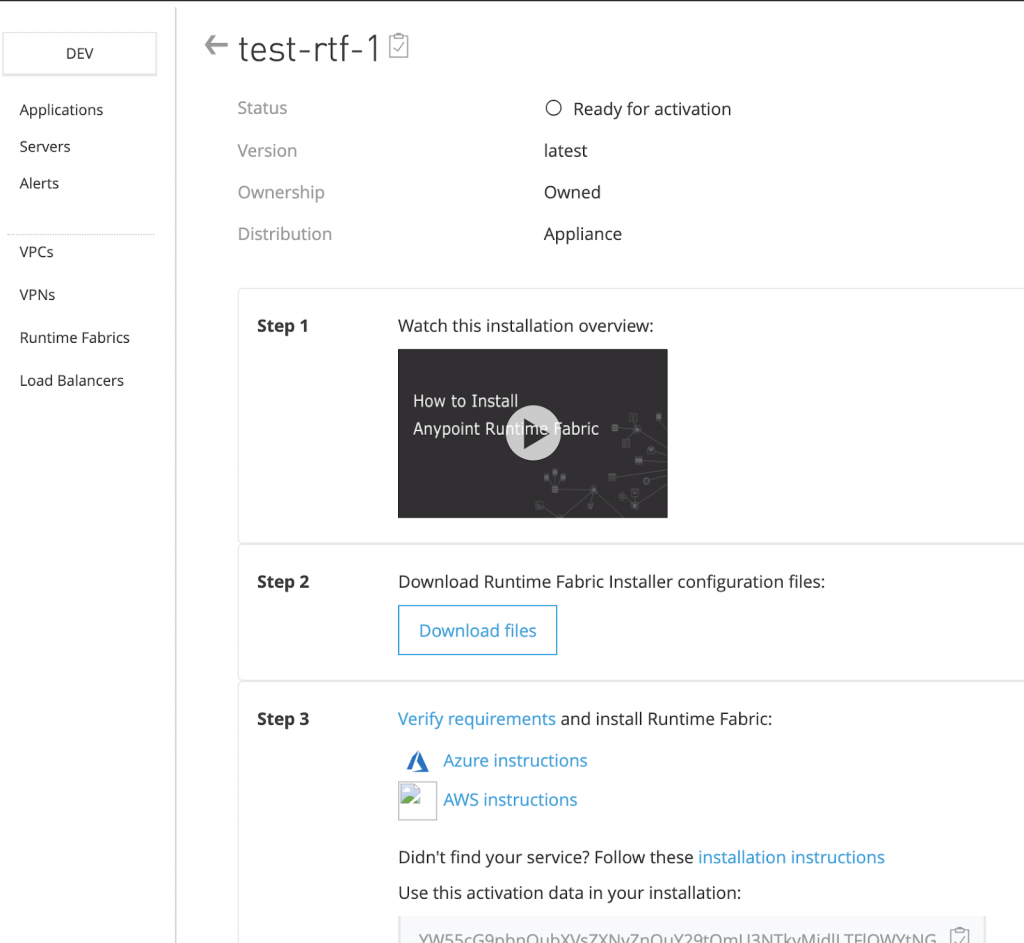
Follow the online document to create a Runtime Fabric cluster in Runtime Manager. You should see the following screen after Runtime Fabric cluster is set up:
Step 2: Server prep
This article assumes the initial server preparation is already done by the client IT. However, if you want to install it on your laptop, refer to this Runtime Fabric local install blog and see server prerequisites here.
Among the server requirements, pay close attention to these items:
1) Port 8472:
For network prerequisites, a common mistake is to miss the port 8472 requirement for UDP. Controllers use this port to communicate with the worker nodes. If necessary, you can use this tool to validate the UDP port.
If unsure with the network topology design, the best choice is to place both controllers and workers on the same subnet to minimize the network port blocking issues.
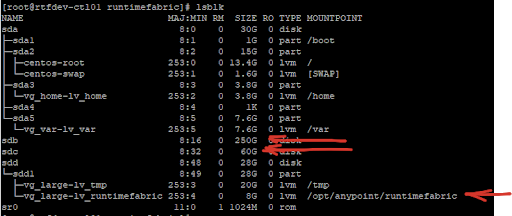
2) The docker and etcd disk devices:
- docker disk: 250+GB, online document shows a sample value “/dev/xvdc”
- etcd disk: 60+GB, online document shows a sample value “/dev/xvdb”
Your disks may have different names. Check with the client IT to find the exact device names. Use the “lsblk” command to double check. Here is an example with different disk names: “/dev/sdb” and “/dev/sdc.”
3) The Mule license:
Mule server license needs to be base64 encoded. The license file may have different formats. Avoid double encoding the license — use “cat my-file.lic |base64 -d” to verify if the file is already base64 encoded. Even with the wrong license file, the install may appear to be successful. But when you deploy apps, they will fail. You may need to check the Mule log files to see the license error.
Step 3: Running the install
Follow this document for the final installation and follow this process during the installation:
- If you have multiple controllers, designate one controller as the lead controller.
- Download the install script: the original file name looks similar to this “rtf-install-scripts-20200728-136beef.” You should rename it to “rtf-install-scripts.zip” to make it easier for you to follow the instructions. Remember you only need to download this file on the lead controller.
- You only need to run “generate-configs.sh” on the lead controller. It generates a text output. You need to run it like this (with the proper values filled):
RTF_CONTROLLER_IPS=”
RTF_WORKER_IPS=”
RTF_DOCKER_DEVICE=”
RTF_ETCD_DEVICE=”
RTF_ACTIVATION_DATA=”
RTF_MULE_LICENSE=”
./generate-configs.sh
After you execute the above script on the lead controller node, examine the output screen carefully. You need to copy and run the corresponding section of the output on each node (all controllers and workers). The result of running the snippet for each node is an “/opt/anypoint/runtimefabric/env” text file on that node. Examine the content of the env file to ensure it’s the right file for that node. The content is self-explanatory.
- Before executing init.sh, copy the following script on every controller and worker node: “/opt/anypoint/runtimefabric/rtf-install-scripts/scripts/init.sh” from the lead controller to “/opt/anypoint/runtimefabric/”
Run init.sh on the lead controller first, check for the screen output to look for the text as shown the install instructions:
…
Tue Aug 14 02:28:54 UTC Starting the installation
Tue Aug 14 02:28:56 UTC Operation has been created
Tue Aug 14 02:28:57 UTC Execute preflight checks
Tue Aug 14 02:29:48 UTC Configure packages for all nodes
Tue Aug 14 02:29:59 UTC Bootstrap all nodes
…
Once you see the above text on the lead controller, you can run init.sh on every other node concurrently (for all workers and remaining controllers).
Wait for every node to finish installing. It may take more than 20 minutes.
Step 4: Post install verification
Follow the monitoring steps from the install instruction page. For example, check this file on each node: /opt/anypoint/runtimefabric/.state/init-complete
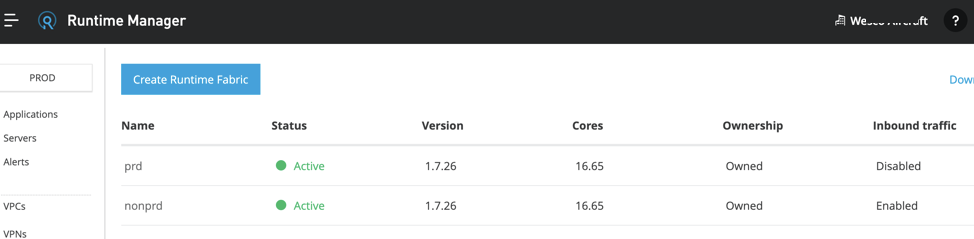
- Check from the Cloudhub Runtime Manager — the new cluster and underlying screens should be all green.
- Associate the environment(s) to the Runtime Fabric cluster as needed:

3. Find the Ops Center login credential:
On the controller node (use “sudo su –“ first to change to “root”)

cat /var/log/rtf-init.log | grep -B 1 -A 3 "Ops Center"
…
user admin@runtime-fabric created
Ops Center access:
URL:  https://10.0.0.171:32009/web
User: admin@runtime-fabric
Password: u0HsX2kO…P3bQwGXMxv8nO4
Remember to replace the private ip 10.x.x.x with the controller public IP, follow this document to navigate the Ops Center.
Step 5: Enable Runtime Fabric Inbound Traffic
Follow the MuleSoft online document to enable inbound traffic. For additional information, you can also see the previous blog post.
Step 6: Deploy a test app and run smoke tests
To deploy an application and run smoke tests, follow the online document and the previous blog as shown in the last section.
Troubleshooting tips
There can be many reasons Runtime Fabric install or deployment may fail. Here are a few common issues and suggested solutions:
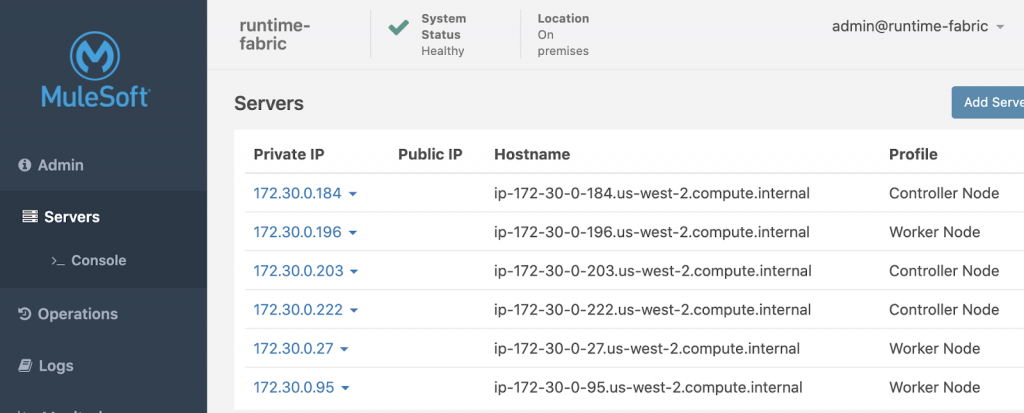
- Network issues can cause failures with install/upgrade/deployment. One indicator of a network issue is the controllers failing to connect to workers in the Ops Center. When you click on “Servers” in Ops center as shown below, you should see the list of controller and worker nodes. Click on any node, select “root” to login. If you can login to controllers successfully, but unable to login to worker nodes. There may be a network connectivity issue between controllers and workers through UDP port 8472. Use this help page to check if any ports are blocked.
Sometimes, placing controllers and workers on different subnets may cause this issue because the network layer may block some ports. One solution is to place the controllers and workers on the same subnet.
- Try this article if you see the below error during upgrade or install:
[ERROR]: Teleport is unavailable on the following cluster nodes:…
If the fix doesn’t work, then you may double check the network issue as listed above.
- As discussed in the earlier section, the Mule license file needs to be base64 encoded. If the Mule license is not applied correctly, or the license has expired, your application deployment will fail.
The best way to validate the license is to check the application log file. The previous blog shows one way to access the application log files.
To apply the correct license file, you can execute the following command under “/opt/anypoint/runtimefabric” directory:
./rtfctl apply mule-license BASE64_ENCODED_LICENSE
Conclusion
As more Mule customers start to adopt Runtime Fabric, it is important for developers to gain the basic knowledge of the application. In this series, we have covered Runtime Fabric installs on AWS and on-prem. In the next and final blog, we’ll discuss the basics of CI-CD with Runtime Fabric.
Easily deploy and manage runtimes in your cloud or on-premises with Anypoint Runtime Fabric — get started today for free.


