
Over the years, organizations have changed the way they generate, handle, store, and use data collected in customer interactions. What used to be millions of papers stored in a physical warehouse are now digitized files stored in modern data centers across the globe.
Digital data like clicks, shopping history, health insights, and more provide a baseline for multiple products. Every single interaction or piece of documentation must be stored, trackable, and ready to be consumed in a few milliseconds — which is why many organizations are leveraging cloud storage to increase their data capacity and capabilities.
However, cloud security is always a concern. Even though cloud providers offer extensive methods to secure the data, various organizations still suffer from a lack of security in their data buckets. Many security vulnerabilities relate to bucket misconfigurations exposed to public access or with the wrong permissions set to the objects.
This article will explain how to create a secure perimeter to your data, avoid undesirable exposure to the internet, and decrease the risk of a data breach.
Overview of an example use case

We’ll use fictional ACME Bank as an example use case to see this in action. ACME Bank has a great app to provide customers a unique experience to interact with their bank accounts. One of the app’s features is related to the account creation and the update of registration data in their profile like ID cards, proof of address, and revenue receipt.
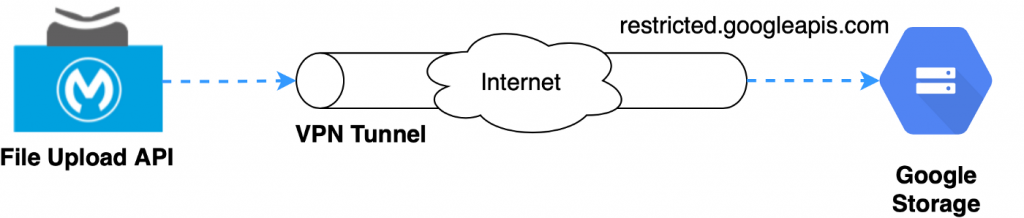
The app uploads a photo to a bucket in Google Storage. All the communication between the app and the underlying systems, including Google Storage, is managed by a modern API running in MuleSoft CloudHub infrastructure.
A secure credential is then issued for the API responsible for encapsulating the Storage API and all communications rely on the public address of Google.
In this case, a misconfiguration in the bucket allowing public access or wrong permission set in the objects may compromise everything and put your data at risk.
How to secure the channel
To avoid public exposure of the bucket, create a secure channel between our API’s environment and Google. This channel allows us to send our data privately to Google resources like storage, databases, compute engine, and other services.
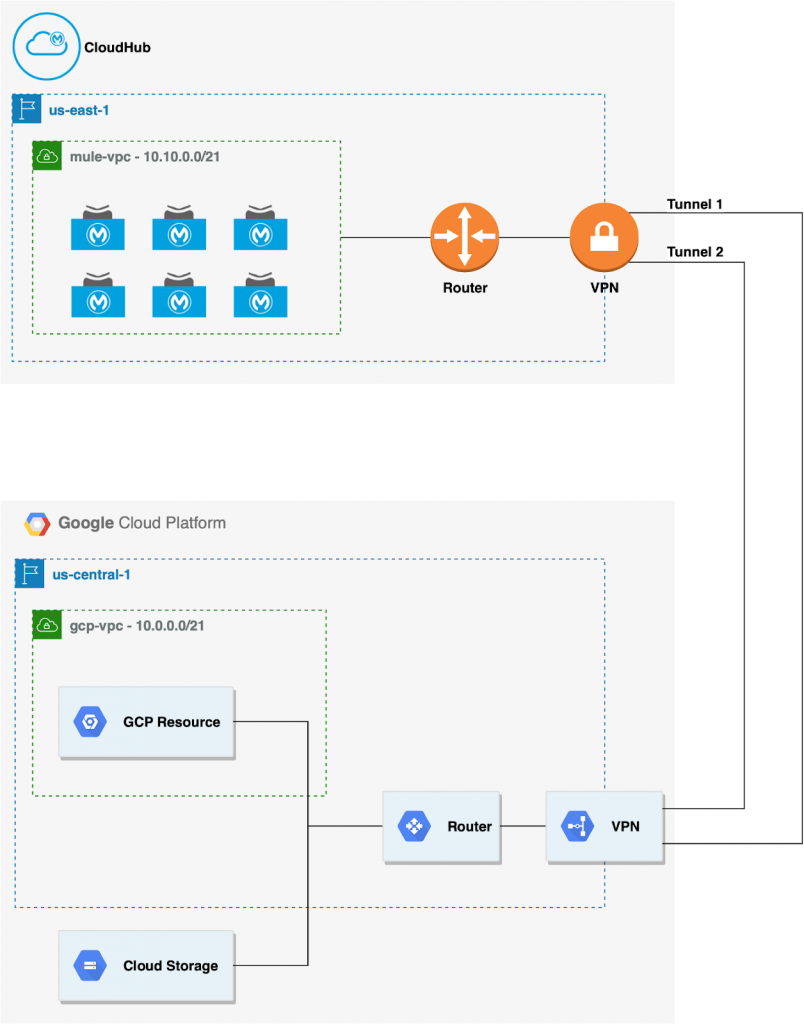
In this scenario, we will deploy a CloudHub VPC to create a secure and isolated network for our APIs in CloudHub and use a VPN to establish a secure channel to traffic our data. On the Google Cloud Platform we must set up a similar structure VPC (you can use the default provided by Google) and a VPN.
Before starting, you must plan your CIDR range as it must be defined before any VPC configuration. Additionally, it’s best to define your own Google VPC and associate it with the Cloud Router during the configuration.
With the VPN UP, configure Google Cloud to allow private traffic to its services.
Google has a service called VPC Service Controls. This service blocks access from the public internet and only allows traffic through a specific domain name and an IP range. The restricted.googleapis.com – 199.36.153.4/30 is not announced on the internet and is only routable within Google Cloud.
Setup
Below, I will provide step-by-step instructions on how to setup your VPN, Google Cloud, and CloudHub VPC.
- To make this work on our VPN tunnel, we must add a custom route to the IP range and announce it into our router. This will allow our VPN to be aware of this private address.
- Create a new route to the restricted IP range: 199.36.153.4/30:
gcloud compute routes create ROUTE_NAME
–network=MY_VPC_NAME
–destination-range=199.36.153.4/30
–next-hop-gateway=default-internet-gateway
- Access your router configuration and add a custom route advertisement. You can do this in your router configuration or for a specific BGP session. In our example, let’s apply it to the router configuration:
gcloud compute routers update MY_ROUTER_NAME
–advertisement-mode CUSTOM
–set-advertisement-groups ALL_SUBNETS
–set-advertisement-ranges 199.36.153.4/30
- The routes have been created and our VPN it’s now aware of this private IP range. To resolve the private range address, configure a private DNS zone on Google Cloud and configure the CloudHub VPC to resolve this DNS’ name.
- Go to Cloud DNS and create a managed zone for the domain: googleapis.com.
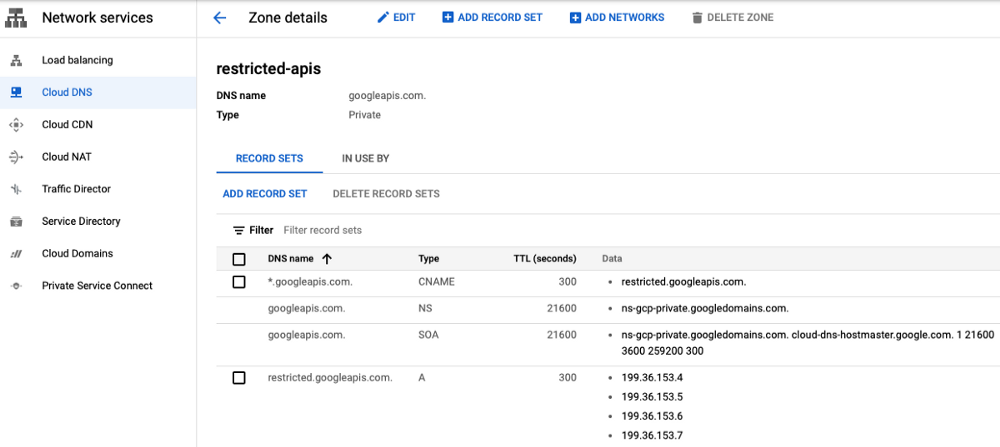
- Add a CNAME record for the DNS *.googleapis.com to the alias restricted.googleapis.com
- Add an A record for the DNS restricted.googleapis.com to the following IPs: 199.36.153.4, 199.36.153.5, 199.36.153.6, 199.36.153.7.
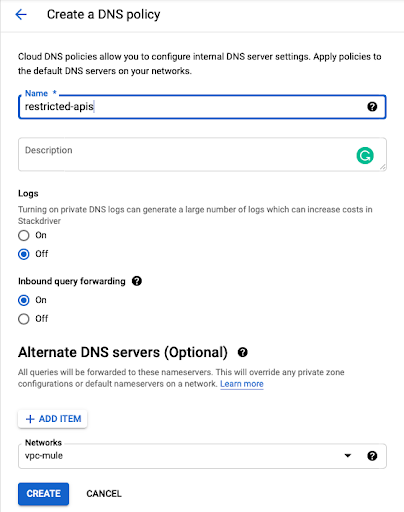
- After the Domain configuration, create a DNS policy (Cloud DNS → DNS Server Policies) to enable inbound DNS forwarding to the Google VPC. It will enable a DNS server to resolve and forward the DNS names through the VPC.
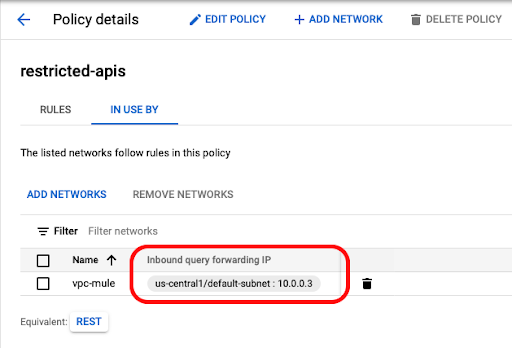
9. After creating the policy, go to the policy details to GET the Cloud DNS forwarder IP.
10. In our example, the forwarder IP is 10.0.0.3 and this will be used to configure the DNS server on CloudHub.
11. Configure the MuleSoft VPC applying a DNS configuration to resolve the private domain.
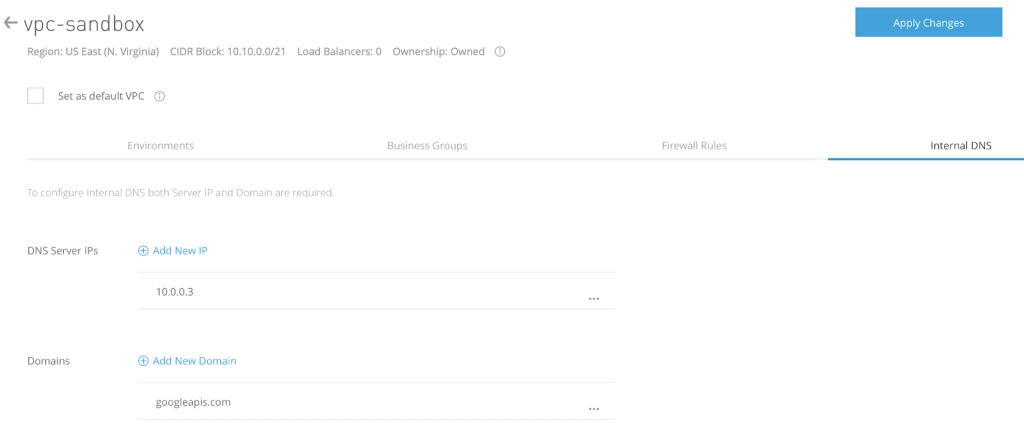
12. Go to the MuleSoft VPC configuration (Runtime Manager → VPCs) and select Internal DNS tab:
- At DNS Server IPs add the Cloud DNS forwarder IP: In our case 10.0.0.3
- Add a Domain: googleapis.com
- Apply the configurations to the VPC:
Internal DNS configuration may take one hour to propagate through the MuleSoft VPC. You may also restart your API to force the new DNS configurations.
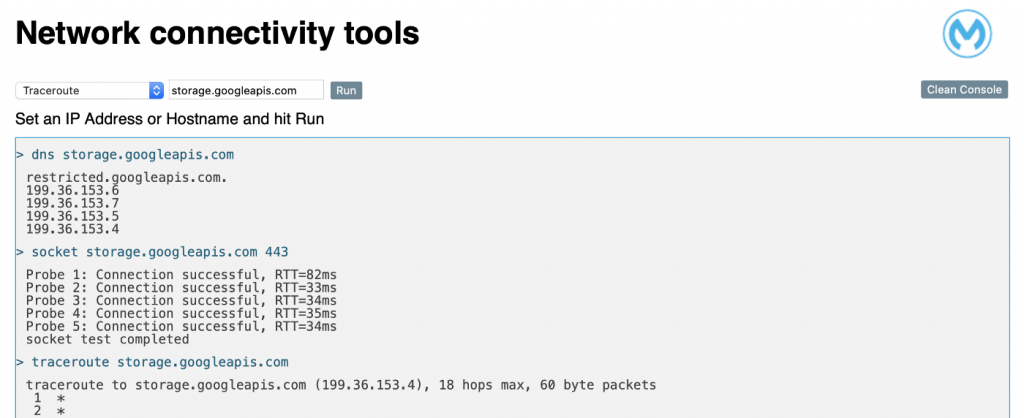
14. To check if the DNS configuration is working and if the VPN traffic is improving, you can use Net Tools. Net Tools is a support app that offers some basic network commands that will help us to test all the networking communication in our environment.
15. With this tool, we can easily check that the restricted domain is resolving and the communication through the VPN channel is working
Blocking external traffic
At this point we have MuleSoft and Google configured and all the traffic sent to storage.googleapis.com is passing through the VPN channel.
Now it’s time to block the external traffic to the storage.googleapis.com, allowing only internal traffic through the VPN.
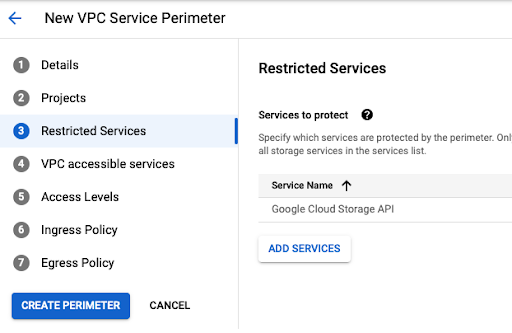
Go to VPC Service Controls and create a new perimeter into enforce mode option:
- Give a name to the perimeter.
- Select the Google project related to your VPN and Storage services.
- Select Google Cloud Storage API.
- Leave the other options with the default value.
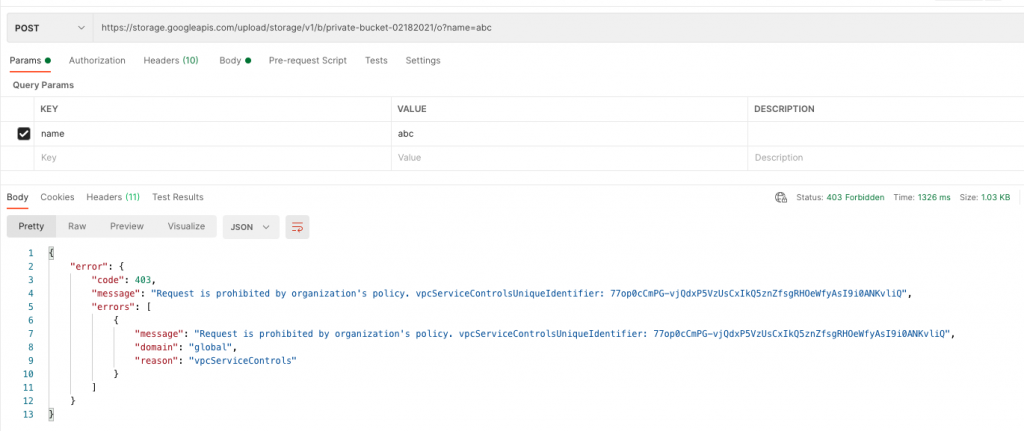
With the new perimeter in place, all traffic coming through the internet will be blocked. If you call Google Storage directly from a public IP your access will be denied.
For the Mule API, File Upload, we don’t need to change anything. The API is running into our MuleSoft VPC and all the traffic to storage.googleapis.com is being sent through the VPN channel using the restricted domain.
Summary
The use of MuleSoft VPC and VPN it’s a perfect way to create a secure channel with your Cloud provider and make your data run privately. There is no silver bullet for data security, but this is one option to increase your data governance and create security boundaries using APIs.
Try this solution out yourself via the GitHub code or learn more about authenticating Google API requests.
Guilherme Pereira is a MuleSoft Ambassador. You can find him on LinkedIn.


