
Multipart MIME (Multipurpose Internet Mail Extensions) allow us to bundle together an HTML version of an email message which can contain images, colors, fonts, links, etc. with a simplified plain text version of the same message through a single email message.
First, what is multipart MIME? Per Tom Burke, “a multipart MIME message is like a package with multiple boxes within it. In your standard HTML + text message, both types of content are sent in the email. Your email client, assuming it understands MIME format, will decide which of the boxes to open and display to you.”
Multipart alternative emails are a safe-haven for marketers, in simple words, such emails can contain both plain-text (text/plain), HTML (text/HTML), Apple Watch optimized HTML (text/watch-HTML) ensuring that your recipients can render the right message format you are sending, optimized for their email clients’ capabilities.
In this post, I’ll show you an alternative solution on how to send multipart/alternative emails through Mule 4 using a custom Java solution.
The challenge
Our today’s goal is to provide you with an interim solution to help you implement your solution until an out-of-the-box functionality is available, saving you some time writing Java code.
Currently, our Email Connector 1.4 – Mule 4 does not support sending entire multipart/* compatible messages, it only supports a single text/* part on its current form.
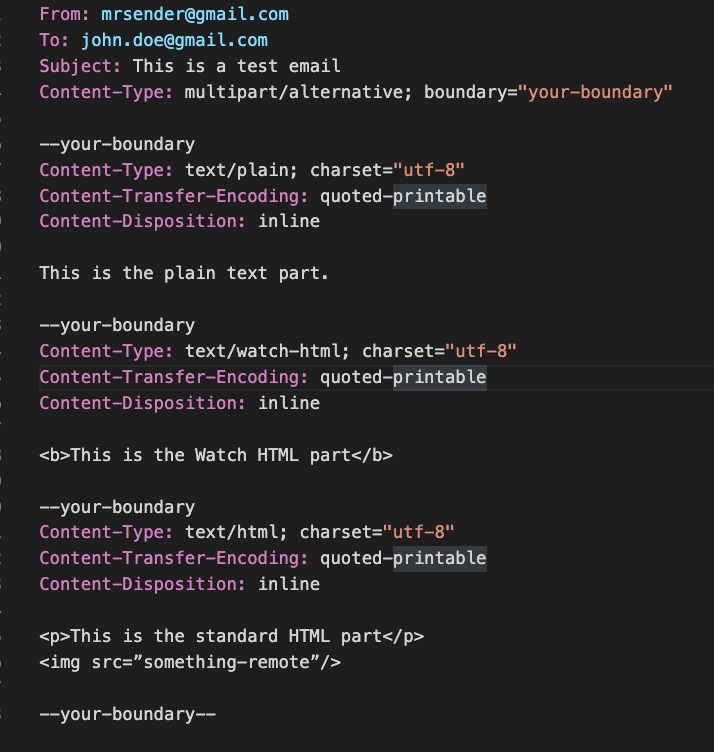
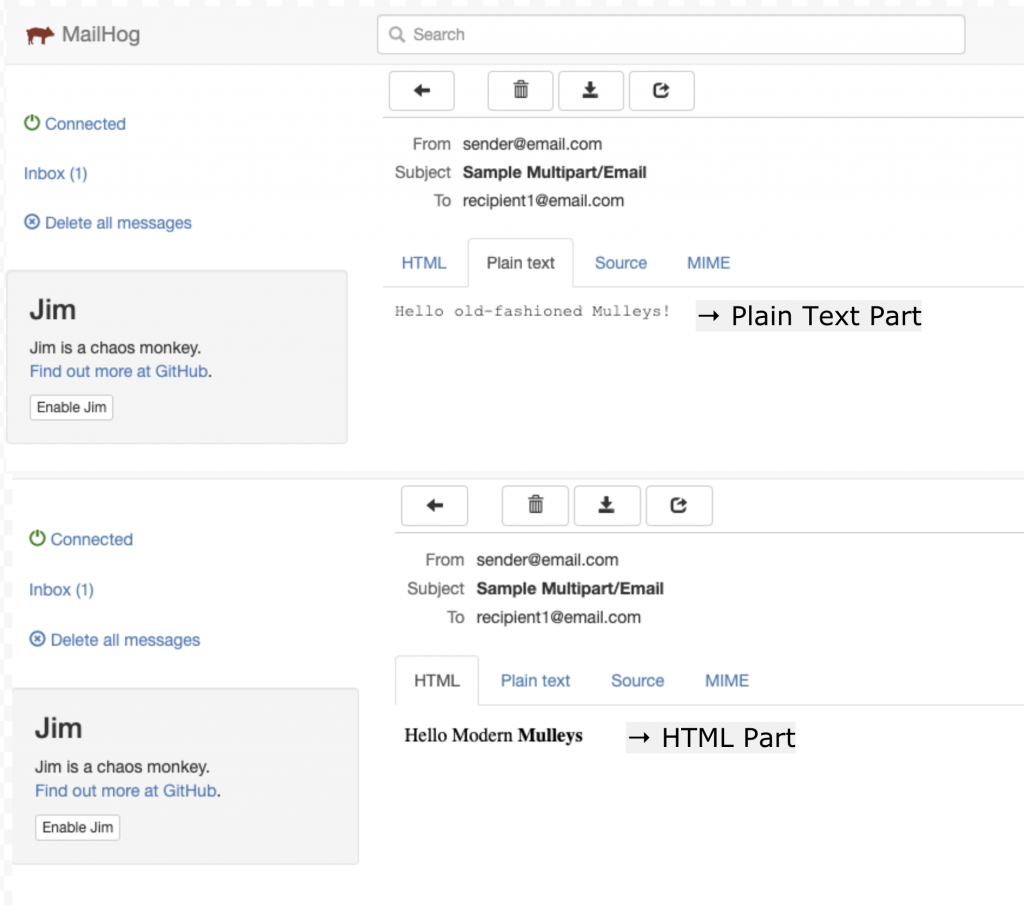
The image below shows how a multipart/alternative email message should look like as our end product.
Building our solution
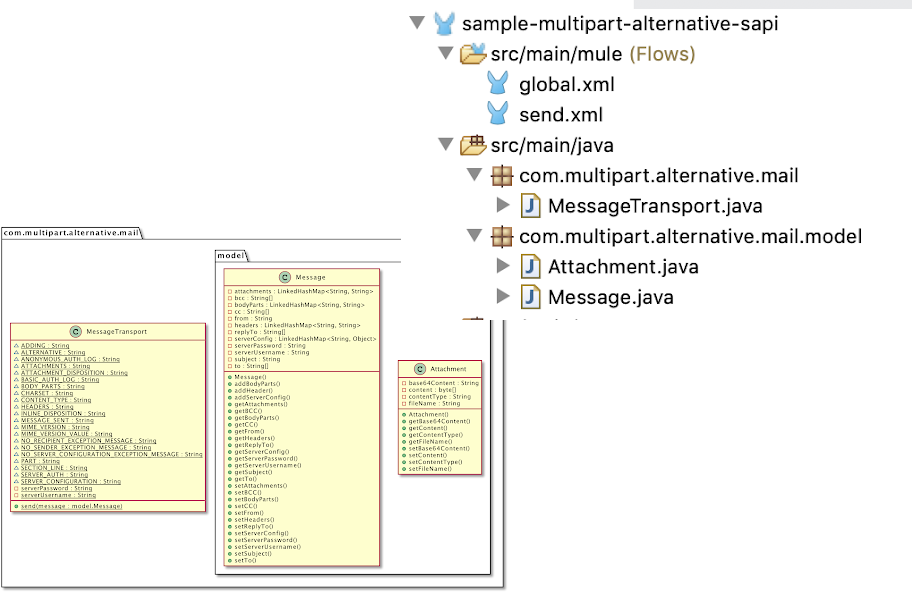
Our solution will be represented by three simple Java Classes, two model classes (Message and Attachment), and another functional class to send emails (MessageTransport).
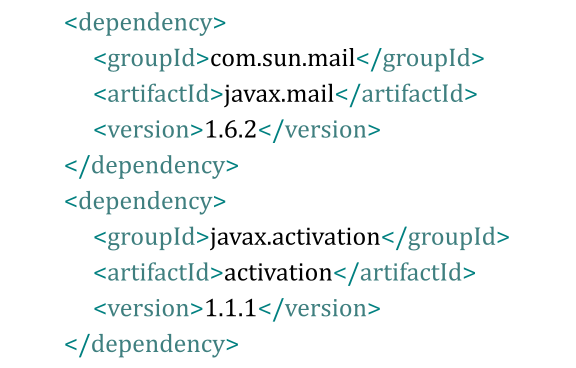
#1: Required Maven dependencies
In order to start, our first step will be adding all the following Maven dependencies into our POM.xml.
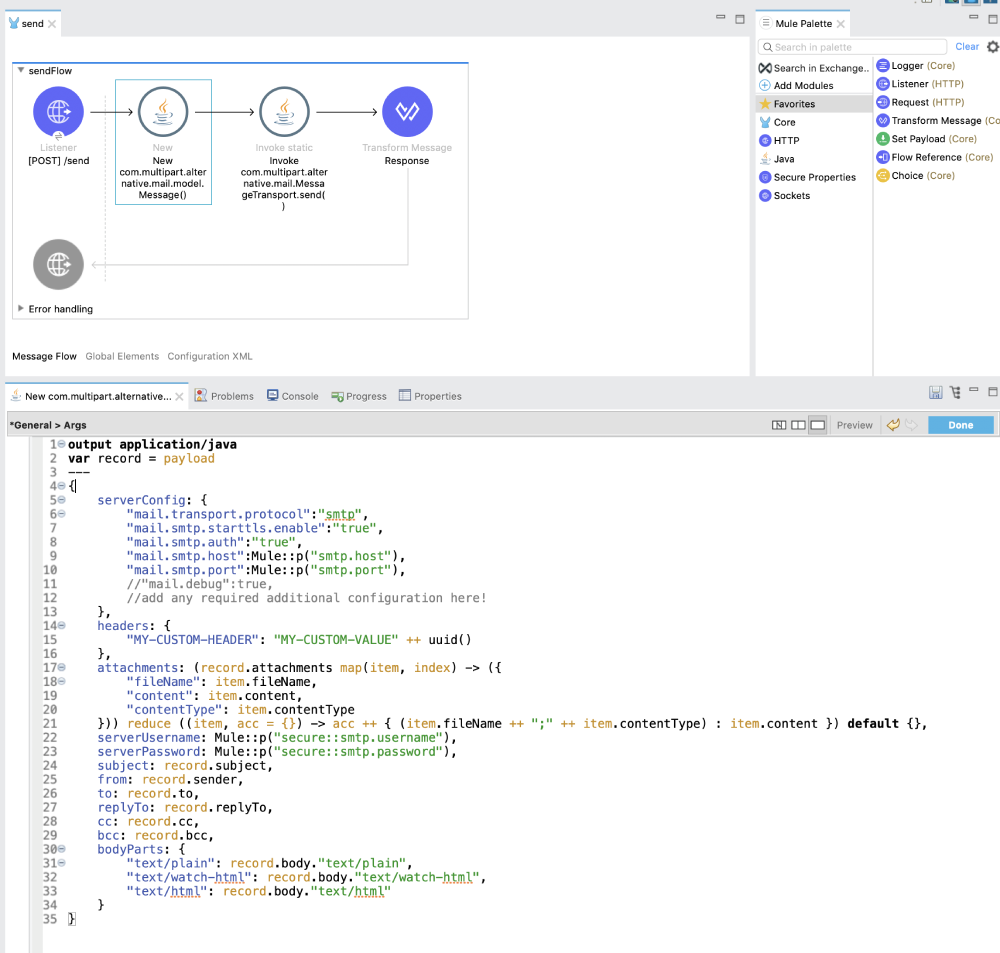
#2: Instantiating a new message using the Java Connector
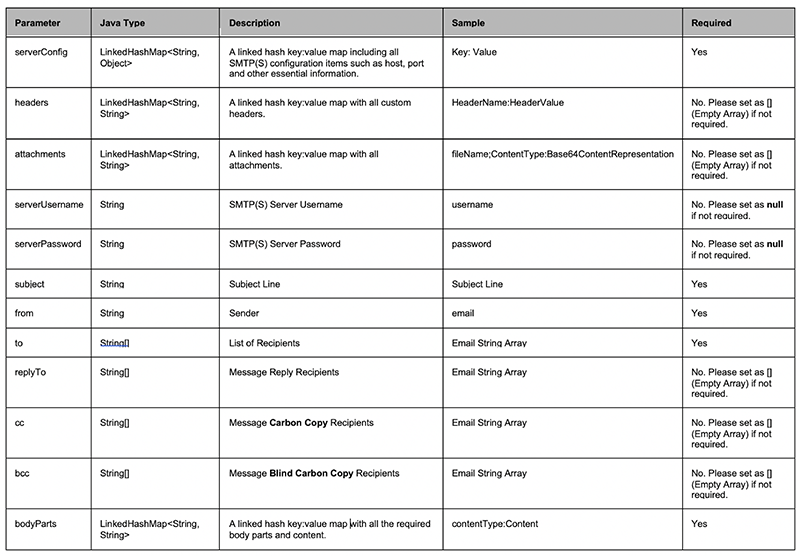
The second step to our solution will require us to instantiate an object of the model.Message class using the Java Connector new operation with the following arguments:
Here is a sample of how your flow should look like:
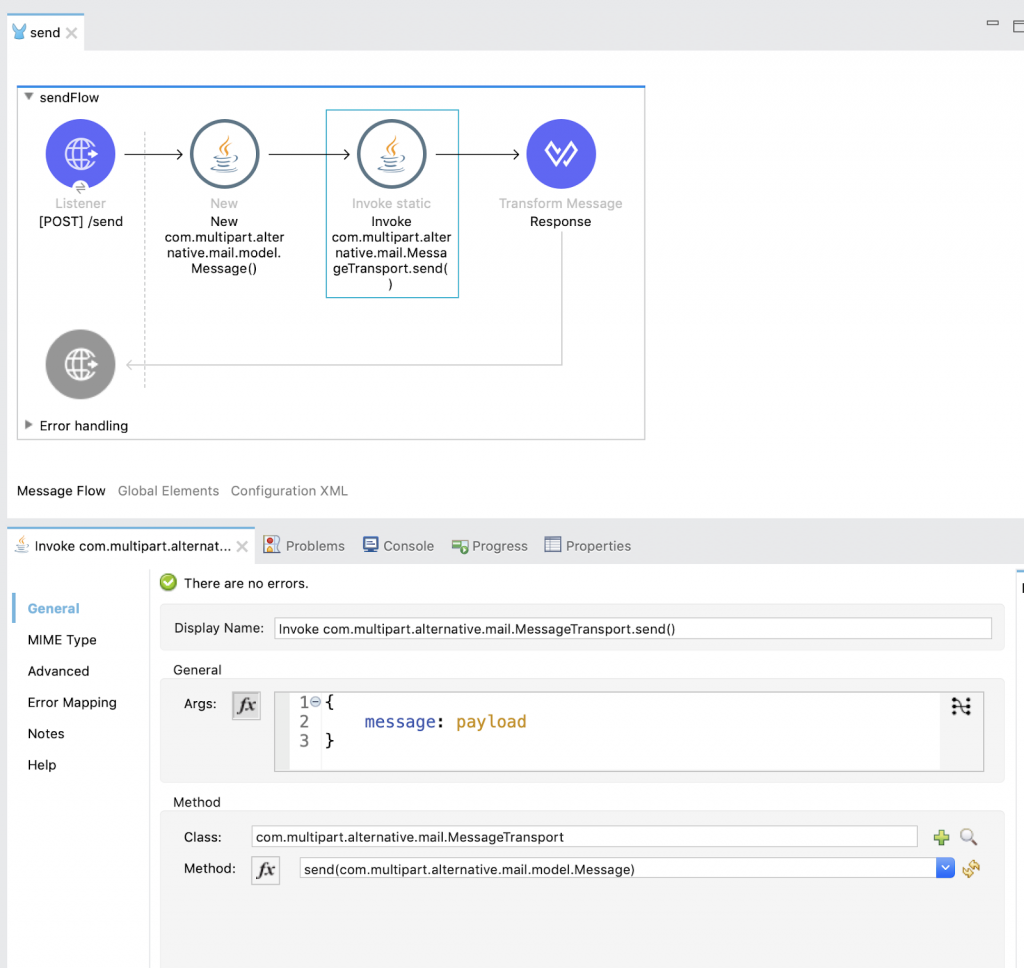
#3: Sending our email by simply invoking a static Java class
The third step to our solution will be statically invoking our MessageTransport.send(model.Message) method, based on the message object (model.Message) created during our second step. For that, we will be using the Java Connector invoke static operation to pass the previously instantiated class as part of the message parameter:
Testing the solution locally
In my opinion, one of the easiest ways to test SMTP integrations is by using MailHog as a Local Docker SMTP Server container and Webmail UI. This email testing tool is also equipped with a random error feature called Jim (the chaos monkey), which can be easily turned on/off, helping us build effective error-handling scenarios to our solution. Visit the solution GIT repo for more information.
Invoking our flow
You can use the test cURL script below, which is also available inside the solution (test/resources) folder to invoke our custom flow. Change the SMTP host/port based on your personal preferences before invoking it.
curl --location --request POST 'http://localhost:8081/send'
--header 'Content-Type: application/json'
--data-raw '{
    "attachments": [
        {
        "fileName":"awesome.png",
        "contentType":"image/png",
        "content":"iVBORw0KGgoAAAANSUhEUgAAANwAAADcCAYAAAAbWs+BAAAAGXRFWHRTb2Z0d2FyZQBBZG9iZSBJbWFnZVJlYWR5ccllPAAAAodJREFUeNrs3NFtg0AQRVGPRRNWyoCeUhM9LWWkjUw6iIQyCRvmnAKQF3S1/nqRmQ/gbzy9AhAcCA4QHAgOEBwIDgQHCA4EBwgOBAeCAwQHggMEB4IDBAeCg/tbvAJuJaJ2pCcz3HDgLyUgOBAcCA4QHAgOEBwIDhAcCA4EBwgOBAcIDgQHggMEB4IDTmm3aRKxlW5erOva6v2NsUft96jdIMndDQcIDgQHggMEB4IDBAeCA8EBggPBAYIDwQGCA8GB4ADBgeAAwcHFpt806bZBMvvv27b32g2SzOgUnBsOBAeCAwQHggMEB4IDwQGCA8EBggPBgeAAwYHgAMGB4ADBgeCggcjM2gcWb5BUm30zpNt5j+Mofd4Y+9QbKW44EBwIDhAcCA4QHAgOBAcIDgQHCA4EB4IDBAeCAwQHggMEB4KDBpZuB67e0Oi2GdJtE8YNB4IDBAeCA8EBggPBAYIDwQGCA8GB4ADBgeAAwYHgQHCA4EBwwGmRmbUPjLfaBz5erT6IzZCfGWMPNxwgOBAcCA4QHAgOEBwIDgQHCA4EBwgOBAeC8wpAcCA4QHAgOEBwcKl/sGlS7eWr31jmsGkCCA4EB4IDBAeCAwQHggPBAYIDwQGCA8EBggPBgeAAwYHgAMHBtco3Tcp/4PQbKdV6ba7MvkHihgPBAYIDwYHgAMGB4ADBgeAAwYHgQHCA4EBwgOBAcCA4QHAgOOC06TdNyg8cz+IDd9sg+QjZuOFAcIDgQHAgOEBwIDhAcCA4EBwgOBAcIDgQHCA4EBwIDhAcCA74xtLtwJmfNjlww4HgAMGB4ADBgeBAcIDgQHCA4EBwgOBAcCA4QHAgOEBwIDgQHPB7vgQYAPVcRHV5+lfgAAAAAElFTkSuQmCC"
        }
    ],
    "sender": "sender@email.com",
    "to": [
        "recipient1@email.com"
    ],
    "cc": [
        "cc1@email.com"
    ],
    "bcc": [
        "bcc1@email.com"
    ],
    "replyTo": [
        "replyto@email.com"
    ],
    "subject": "Sample Multipart/Email ",
    "body": {
        "text/plain": "Hello old-fashioned Mulleys!",
        "text/watch-html": "<p>Hello Smart Watch Owners <b>Mulleys</b></p>",
        "text/html": "<p>Hello Modern <b>Mulleys</b></p>"
    }
}'
Get started cloning this solution or to see more connectors, check out Anypoint Exchange.


