
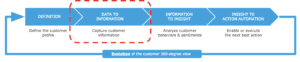
As companies embrace omnichannel strategies, achieving a 360-degree view of their customers has become increasingly challenging. Customer 360 is a continuous discipline around delivering a reliable view of their customers and relevant attributes so that any employee or system has access to the customer information it needs to manage the customer journey. The discipline is iterative in nature and involves 5 steps as illustrated below. In this article, we will provide a detailed guide regarding one strategy you can use to capture customer information (step 2, outlined in red below):
This stage is hard. Customer data is everywhere––whether it is streaming data sources, structured data files, unstructured documents, emails, weblogs, transaction logs, and social media. To create a customer 360 view, companies are leveraging data lakes that unify data from all customer touchpoints to gain better visibility, eliminate data silos, and capture 360-degree views of their customers.
In this article, I’ll show you how MuleSoft provides a single solution to quickly integrate (by developing APIs) your customer data into data lakes to help with customer 360 initiatives. As a side note, with MuleSoft, you can also rapidly build an API layer around that connectivity that enables you to properly govern and secure your precious customer data assets (that is for another article!).
In this blog, we’ll focus on connectivity with Azure Data Lake Store and walk you through the process of setting up a Data Lake Store and connect your data using an example Anypoint Studio project. Azure Data Lake Store is an enterprise-wide hyper-scale repository for big data analytic workloads. Azure Data Lake Store enables you to capture data of any size, type, and ingestion speed in one single place for operational and exploratory analytics.
1. Create an Azure Data Lake Store
1.1. Log in to the Azure portal and click on All services on the left-hand navigation bar.

1.2. In the search field, type in data lake and click on Data Lake Store.

1.3. In Data Lake Store, click on Create Data Lake Store in the center or click on Add in the top left.

1.4. In the New Data Lake Store window, enter the following information:
Name: mulesoft
Subscription: This can depend on your account. If you recently signed up, you should have a 30-day subscription. I selected Pay-As-You-Go.
Resource group: Either create a new resource group or use an existing one. (e.g. mulesoft).
Location: Leave the default East US 2.
Encryption settings: I set this to Do not enable encryption.

1.5. Click on Create.

1.6. Once you create the Data Lake Store, click on Data explorer in the left-hand navigation menu. We want to grant access to all users for this demo, so click on the Access button.

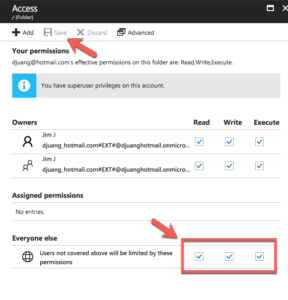
1.7. In the Access screen, check the Read, Write, and Execute checkboxes under Everyone else. And then click on Save.
2. Create an Azure Active Directory “Web” application
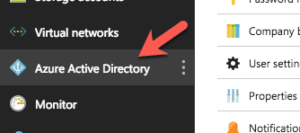
2.1. In the left-hand navigation menu, click on Azure Active Directory. If the menu item isn’t there, click on All services and search for it.
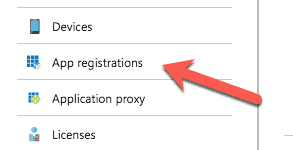
2.2. In the navigation menu for Azure Active Directory, click on App registrations.
2.3. Click on New application registration.
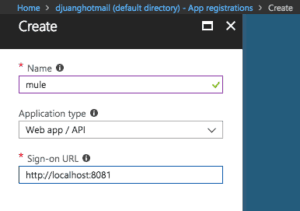
2.4. In the Create window, enter the following data:
Name: mule
Application type: Keep the default Web app / API
Sign-on URL: Just enter http://localhost:8081. This can be changed later and doesn’t affect anything in this demo.
Click on Create
2.5. Once the app has been created, copy down the Application ID: E.g. bdcabff5-af3c-4127-b69b-38bcf1792bfd. Next, click on Settings and then click on Required permissions.

2.6. In the Required permissions screen, click on Add and then click on Select an API. Select Azure Data Lake from the list of available APIs and then click on Select.

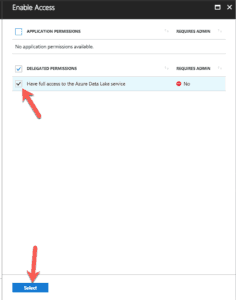
2.7. In the Enable Access screen, check the Have full access to the Azure Data Lake service checkbox and then click on Select.
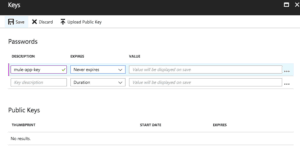
2.8. Next, we need to generate a key. Click on Keys on the left-hand navigation bar for the app settings.

2.9. In the Keys window, enter the following:
Description: mule-app-key
Expires: Set this to Never expires
And then click on Save. A value will appear for the key. Copy that value down. e.g. +zAbZQgXomvqsfHgCH32Yv+VCvkT3ZcxRyw5CWaw4dw=

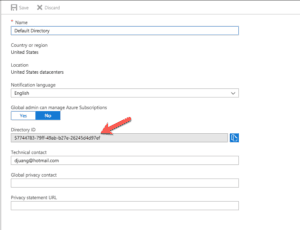
2.10. Next, let’s get your tenant ID. In Azure Active Directory click on Properties in the left-hand navigation bar.
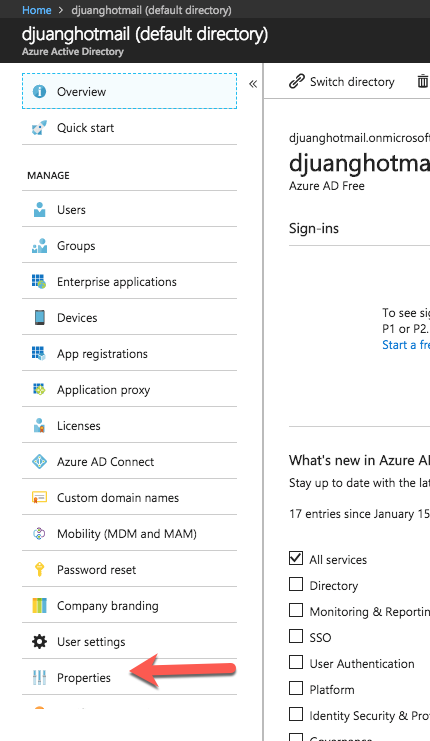
2.11. Copy down the Directory ID value. This is your tenant ID that you’ll need to make the OAuth call.
e.g. 57744783-79ff-49ab-b27e-26245d4d97ef.
3. Download and run the Mule project
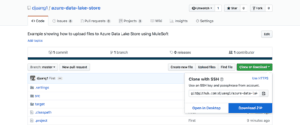
3.1. Download. the project from Github.
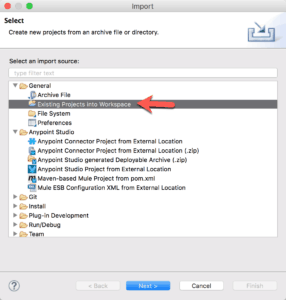
3.2. Import the project into Anypoint Studio
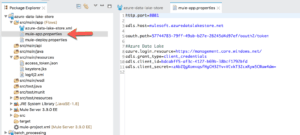
3.3. Open the mule-app.properties and modify the following properties:
adls.host: <name of your Data Lake Store>.azuredatalakestore.net
oauth.path: <tenant ID from Step 2.11>/oauth2/token
adls.client_id: This is the ID from Step 2.5
adls.client_secret: This is the key from Step 2.9
3.4. The first flow will list the files and folders from the root directory of the Data Lake Store. Once the flow receives the request it creates the parameters to be sent to the OAuth request. If the OAuth request is successful, it returns an access token that is used to make the HDFS request to list the folders.

3.5. The second flow shows how to upload data to the Data Lake Store. Similar to the first flow, it makes an OAuth request and passes the access token to make the HDFS request.

3.6. Run the project and open up Postman. Let’s test the first flow. Paste the following into the request URL:
And click Send. The screenshot to the right shows the results. If you add some folders and files, you’ll receive more data from the API call.


3.7. Open another tab and paste the following URL:
Change the method to PUT. Under the Body section, select the binary radio button and select the file name list.txt from the src/main/resources folder from the project. Click on Send.

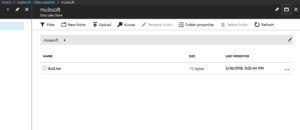
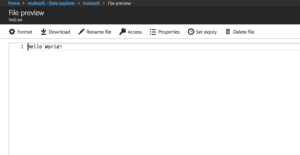
3.8. If successful, when you switch back the Data Lake Store, you should see the file in the root directory. Click to open the file.
3.9. You should see the following data in the file if everything was configured successfully.
Summary
As you can see, MuleSoft can easily connect your data to Azure Data Lake Store. We provide easy connectivity to the Microsoft Azure ecosystem through our library of connectors in Anypoint Exchange. This sample project exposes an HTTP endpoint, but you can easily setup multiple inbound endpoints to feed in data using our File, S/FTP, Database, or SAP connector.
You can even build your own connector using the Mule SDK. Anypoint Platform helps reduce the time it takes to connect multiple data sources, and enables you to spend more time delivering actionable insights around your customer 360 initiatives. In my next post, I’ll show you how you can define a File REST API layer around Azure Data Lake Store to properly govern and secure your precious customer data assets.
Resources
- Service-to-service authentication with Data Lake Store using a REST API
- Filesystem operations on Azure Data Lake Store using a REST API


