Picking up from the second part of this series, this blog post will wrap up building an end-to-end API solution. For the first post, you abstracted source systems with APIs to add flexibility, ease of consumption, and increase adoption and integration possibilities.
In the second post, you built process APIs, which were based on logical integration use cases from the source systems we have.
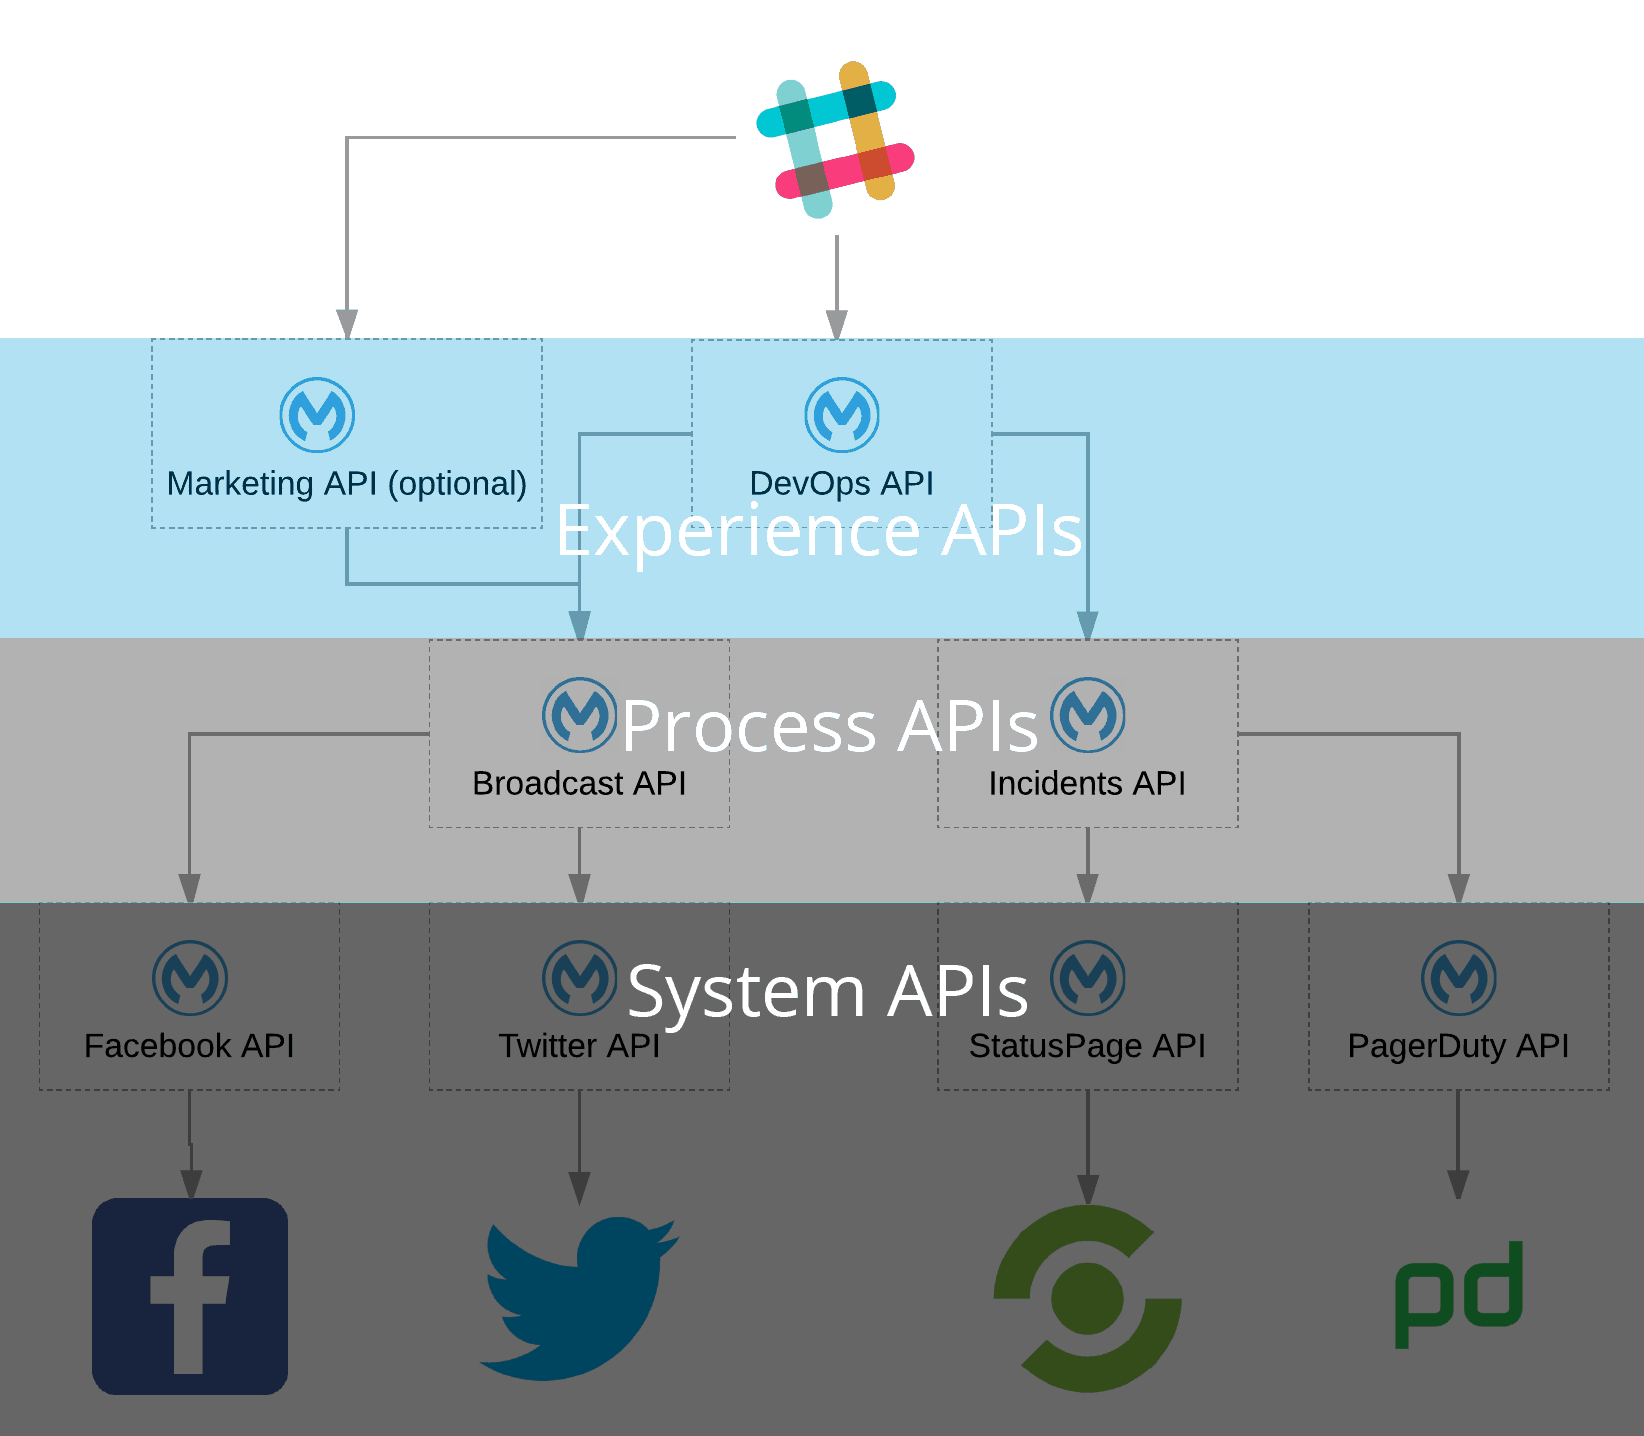
In this final part of the series, you’ll consume the two process APIs in a new experience API that can perform DevOps processes from Slack via a slash command. We’ll use all of the material learned from the 1st and 2nd issues of this series to build this solution.
Tools
- Anypoint Studio
- Desktop IDE for creating flows, connectors, and more
- Postman
- An amazing HTTP request tool for all devs
- Slack
- Real-time communication chat tool
- Ngrok
- Tunnel to a port on your local machine with a public address
Designing and Building an Experience API
This API – as all APIs – has two considerations to keep in mind when designing:
- What is the end service requesting and/or providing?
- What are the payload requirements for the process APIs we’re going to be calling—data ingressed and egressed?
To begin writing your DevOps API spec, you want to ingress a URL encoded payload from a Slack slash command and, on success, respond back to Slack with a JSON that includes the responses from your Broadcast and Incidents APIs.
With that in mind, you can start building a RAML definition.
Building Your Experience API Specs
The Slack documentation states that a slash command request will include a uri-encoded POST request that has the following example structure:
token=gIkuvaNzQIHg97ATvDxqgjtO
team_id=T0001
team_domain=example
enterprise_id=E0001
enterprise_name=Globular%20Construct%20Inc
channel_id=C2147483705
channel_name=test
user_id=U2147483697
user_name=Steve
command=/weather
text=94070
response_url=https://hooks.slack.com/commands/1234/5678
trigger_id=13345224609.738474920.8088930838d88f008e0
Since you know what your responses from the broadcast and incidents API will look like, you can create the following DevOps API specification. Go ahead and import this into Anypoint Studio and start working on building the “DevOps.getstarted” application.
Note: If the API specifications weren’t built, an individual/team member would have a long and arduous process of trying to understand the previous APIs before being able to build on top of them. Even with code comments, critical pieces of information go missing.
After the application project is created, the first step is always to update the HTTP listener. Use the values you want for your service.
Persisting Objects in a Flow with Flow Variables
When new modules are added to a flow, they can alter/replace the payload variable. In a scenario where we want to persist an object temporarily within a flow, we can use flow vars.
This is different from a session variable in that it’s only scoped to within the flow. To set one, we’re going to use the DataWeave Transformer and set the Output to Flow Var with the name “slash.”
The “text” parameter coming from the slash command includes all the parameters that follow the command. You’ll need to split this string into the individual parameters to provide value. You will also need to set the MIME type to a Java Object:
%dw 1.0
%output application/java
%var slashArray = payload.text splitBy " "
---
{
route: slashArray[0],
incidentId: slashArray[1],
name : slashArray[2],
slackUserId: payload.user_id
}
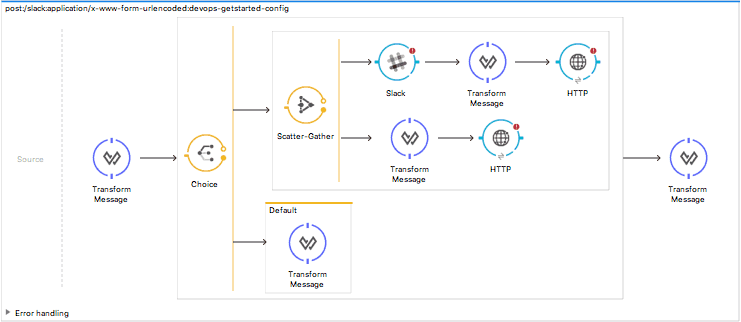
If the DevOps team only wants to resolve an incident instead of resolving and broadcasting, you will need to route accordingly. An “if statement” is what a choice router is for flows. It can perform a conditional evaluation and route according to whether or not these conditions are met.Conditional Routing with a Choice Router
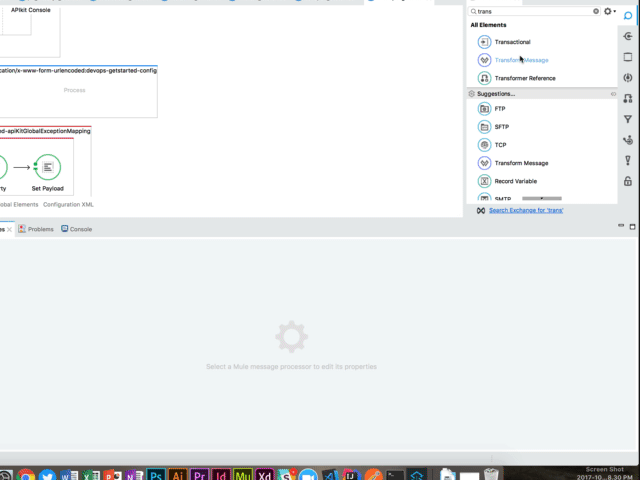
For this example, we’re going to consume two process APIs, so we need to include a scatter-gather as one of the paths for our choice router to take.
Place elements in your flow so you can configure your choice router:

Clicking your choice router will open up the configuration where you can enter the condition to choose the scatter-gather route:
#[flowVars.slash.route == "resolveAndBroadcast"]
Challenge: Create choices for just a resolve route for your experience API. Use the Flow Ref module where appropriate in your post:/slack flow and create Sub Flows to reuse configuration and code.
Reusing a Connector from Anypoint Exchange
Looking at your Incident API’s /resolve endpoint that we’ll be calling and the payload from Slack, we’re missing an email of the request. In order to fill that gap, import the Anypoint Connector for Slack from Exchange. This will enable you to make calls to Slack’s API without writing any code.
From the Mule Palette, search for “Slack” → click Search Exchange for ‘Slack’ and install. After restarting Anypoint Studio, place the connector into your flow:
Get a Public URL using Ngrok
Ngrok is a must-have tool for testing public requests to your application before deploying. To start up an HTTP tunnel to port 8081 (or any tunnel your DevOps app is using), run the following command in terminal/command prompt:
ngrok http 8081
Configuring a Slack Connector
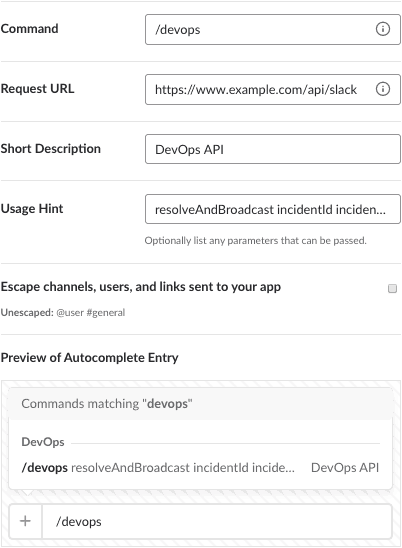
Next, provide the Slack connector with an access token. In order to do so, create a new Slack App. Go to the Slack website and enter the following details. Be sure to include the ngrok URL from the steps above as well as the path that matches your application:
Note: You’ll be updating the URL to the Slack App after deploying this Mule Application with the CloudHub URL.
Setting Slack token scopes
After saving, click “OAuth & Permissions” and add the following two scopes to gain API access to a user’s email for your Slack app. The default permissions for the token do not have the appropriate scope:
users:read
users:read.email
Let’s update the Slack connector in your Mule app to use this token to gain access. Clicking the “+” to add a new configuration for the connector and selecting Slack: Token Configuration. Paste the token into the textbox and save.
Fulfilling Slack connector requirements
Select the operation “user-info” and use the user’s ID to get the user’s e-mail.

Making Requests to Process APIs
With the Slack connector in place, you’re now ready to configure the HTTP connectors and set your DataWeave transformations to match the request needs.
Starting with the path that has the Slack connector, you’ll need to make the HTTP request to your Incidents API.
Going into the configuration, use the incidents API RAML specification from last time. The other flow path in your scatter-gather will be a request to the Broadcast API and require it’s RAML specification.
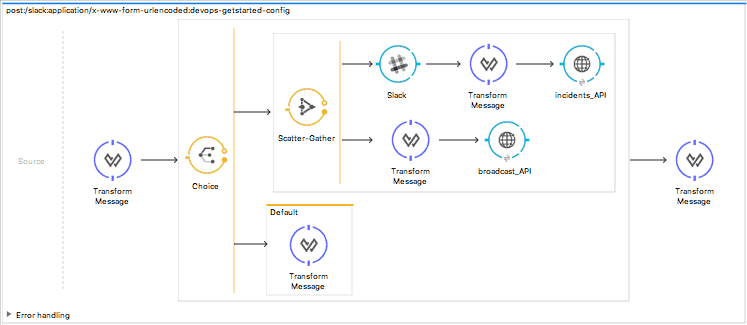
Matching Output to RAML Spec
To fulfill your API’s response contract according to the specification, and allow each of the outbound requests to be successful, you’ll need to set the DataWeave transformations.
Setting default choice route response
Starting with the default route for your choice router, set the transformer to output a default message back to slack. This is the default for when the slash command does not have the first parameter as “resolveAndBroadcast.”
%dw 1.0
%output application/json
---
[
{
"message": "Did not change incident. Please enter a valid slash command parameter."
},
{
"message": "Did not broadcast. Please enter a valid slash command parameter."
}
]
Transforming connector output
Updating the message before sending the request to the incidents API, set the DataWeave transform functions as below. Note how to use the initial Flow Variable and the payload from the Slack connector in your transformation:
%dw 1.0
%output application/json
---
{
pagerDuty: {
incident_id: flowVars.slash.incidentId
},
statusPage: {
incident_name: flowVars.slash.name + " resolved"
},
user: {
email: payload.profile.email
}
}
Concat strings in DataWeave
The broadcast API will take a string concatenation of a parameter from the original flow var and plain text:
%dw 1.0
%output application/json
---
{
message: "Incident $(flowVars.slash.incidentId) resolved"
}
Finalize the app
Lastly, set the output of your endpoint. Since the Scatter-gather router outputs an array (in order of flow), you can set the transformer to:
%dw 1.0
%output application/json
---
{
incidents: payload[0],
broadcast: payload[1]
}
Testing the App
You’re now ready to test your application by clicking the run command in Anypoint Studio. With the Slack slash command app installed in your workspace, run the command (replace mustache).
/devops {{incident_id}} {{service_name}}
After the above step, you should see the following:
Status page


PagerDuty

Looking Back
So in this final part of the series, you’ve created a very modular and reusable end-to-end solution that can be repurposed and modified for continued use––especially as business needs change. By separating the process layer logic from the experience layer, you’re able to reuse them for different front-end experiences to be created (e.g. Marketing ops).
The API specifications can be modified and given more detail as the application’s needs change. Versioning APIs and their respective specs ensures that existing applications do not break. Even adding additional system-level APIs can provide more capabilities and fulfill greater business needs without modifying existing APIs.
By building well-defined reusable abstractions, you are able to harness the true power of APIs and the inherent flexibility and reuse of existing assets. This allows you to complete integrations and projects faster and faster with each new API added to the list.
Looking Forward
Security is critical in order to deploy this end-to-end solution into a production environment. You’ll want to secure your individual APIs to prevent unauthorized access. To ensure that requests are coming from a trusted Slack instance, Slack includes validation schemes that can be incorporated into your experience API.
With built-in security and prebuilt modules, you can build a reliable & secure production ready solution with very little actual code and roll this solution to your organization.