We recently introduced our HowTo blog series, which is designed to present simple use-case tutorials to help you as you evaluate Anypoint Platform. The goal of this blog post is to give you a short introduction on how to implement a simple ETL (Extract, Transform, and Load) scenario using Mulesoft’s batch processing module.
Anypoint Platform brings together leading application integration technology with powerful data integration capabilities for implementing such a use case. In a typical scenario, you have to extract large amounts of data either reading a flat file or polling a database or by invoking an API using the platform. Once you have obtained the data, you have to transform this data to conform to the target systems requirements. This transformation might require merging the extracted data with data from other sources, change the data format, and then map it into the target system. The transformed data is then into target systems such as a SaaS applications, database, or Hadoop, etc.
In this blog, I will be demonstrating an example which satisfies the some of the key requirements for a typical ETL flow –
- Ability to extract only new/changed records from a database.
- Ability to process these records in parallel for accelerated loading.
- Ability to transform the record by merging them with data from different tables.
- Follow a predefined load/step/commit model to ensure reliability and recovery.
- Ability to create a report indicating which records were successful and which records failed.
Pre-requisites:
- Anypoint Platform – MuleSoft Anypoint Studio.
- A database where we can create and load a sample table required for this project. In this example, we will use an instance of the MySQL database.
- Download the latest MySQL database driver jar file.
- The Mule project downloadable from Anypoint Exchange.
- To follow the example in this guide, run the SQL script order.sql to set up the database and tables and load them with some sample data. You will find the order.sql file in the project under the folder src/main/resources
Steps:
- Start Mulesoft Anypoint Studio and point to a new workspace.
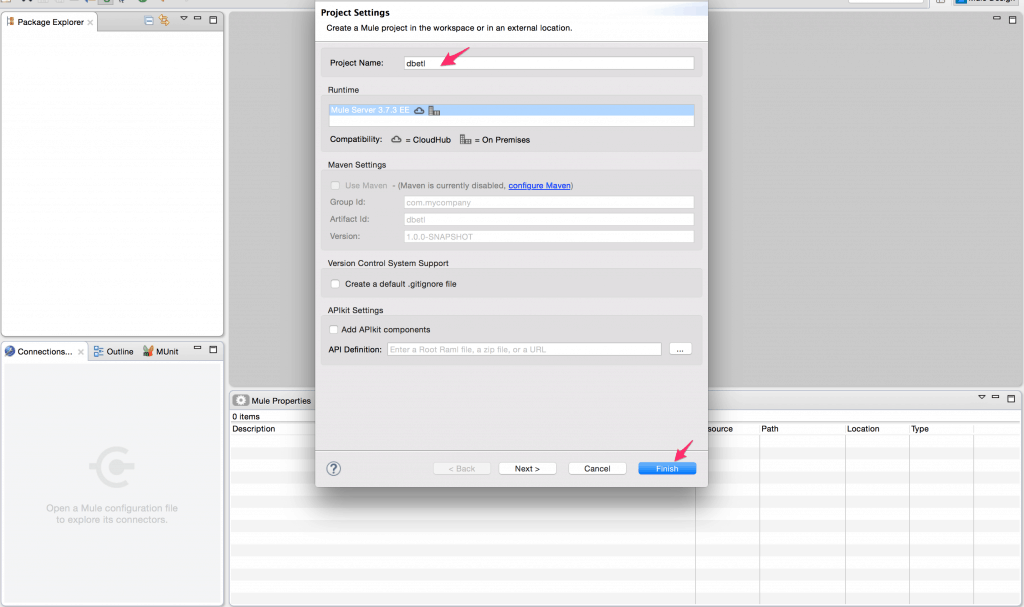
- Create a new project. File -> New -> Mule Project.
- Give a name to the project and click finish. You will see the mule configuration file where we can now add the Mule flows. Here is more information to understand Mule configuration.
- Setup the mule-app.properties file with your environment specific values for the MySQL database. You can download and fill out the sample mule-app.properties file from the project which has empty placeholders. You can then replace the file at src/main/app/mule-app.properties using this updated file.
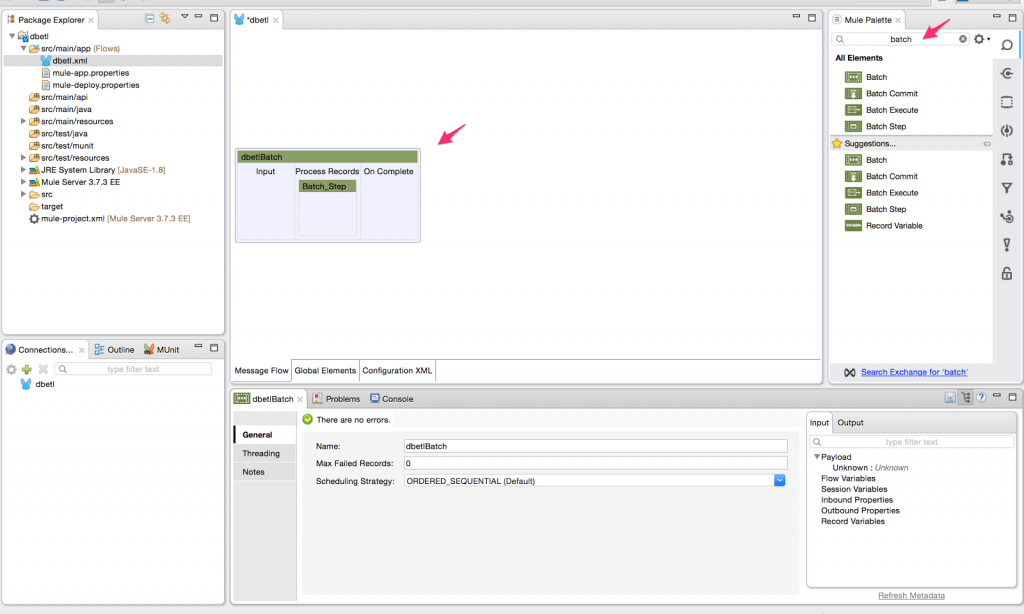
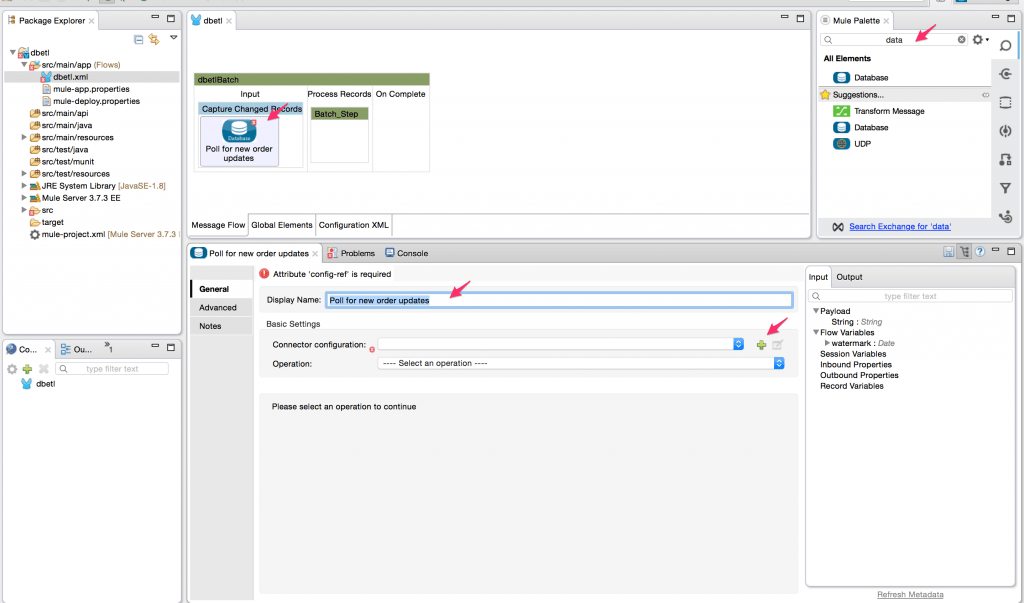
- Now search for the Batch Processing scope from the Mule Palette and drag it onto the canvas which will automatically create a batch job.
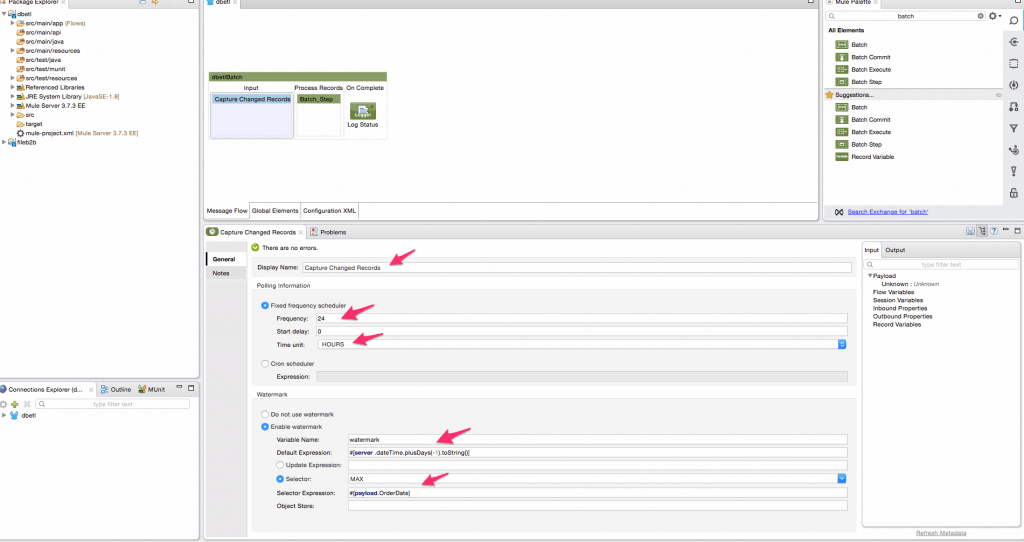
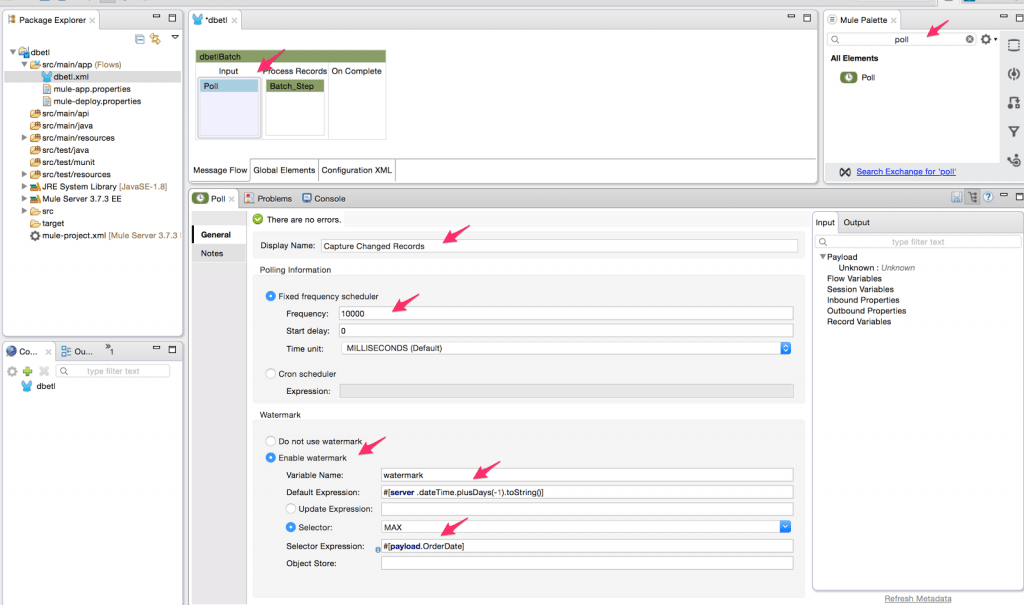
- Now search for the poll scope from the Mule Palette and drag it onto the input section of the batch processing scope and change the display name of the poll scope to ‘Capture Changed Records’. Adjust the frequency of the scheduler to poll every 10000 milliseconds. We will also enable watermarking capabilities of the poll scope. We will configure the polling scope to read all records changed since the previous day. After reading all the records, we want to set the watermark value at the maximum value of the order date. Next time the polling scope will only look for records with an order date greater than the watermark value. The frequency is set to poll for new records every 24 hours.
- Add the database connector inside the poll scope since we will be reading the changed records from a database table. Modify the display name of the database connector to ‘Poll for new order updates’.
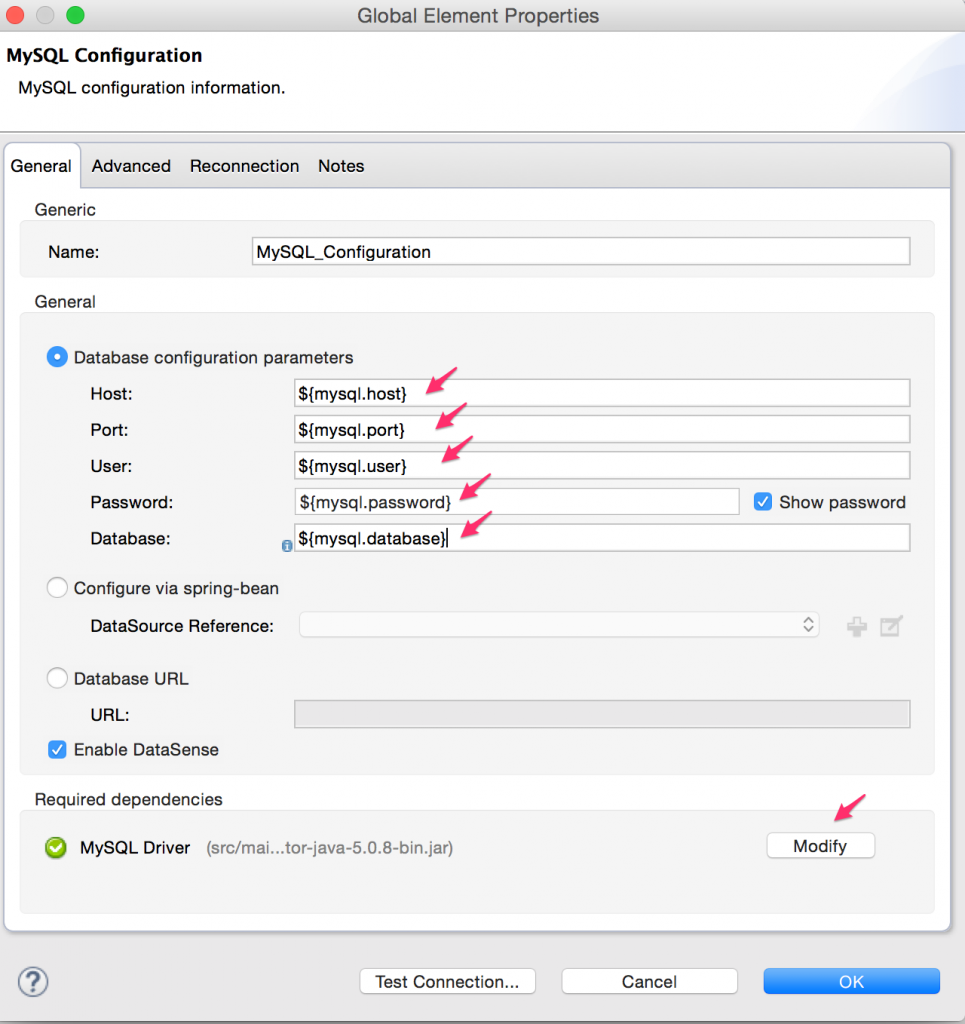
- Create a new MySQL configuration and configure it as shown below. After adding the database configuration parameters, add the file for the MySQL database driver.
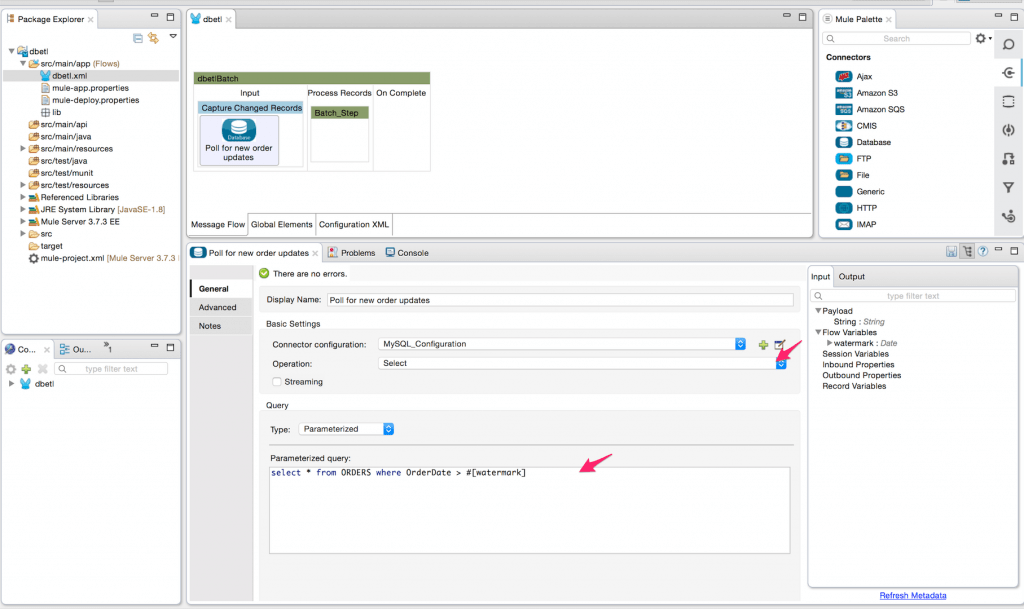
- Select the database operation ‘Select’ and put the following SQL query to get all changed records in the order table – ‘select * from ORDERS where OrderDate > #[watermark]’.
- Rename the Batch step to ‘Transform_QuerySKU’.
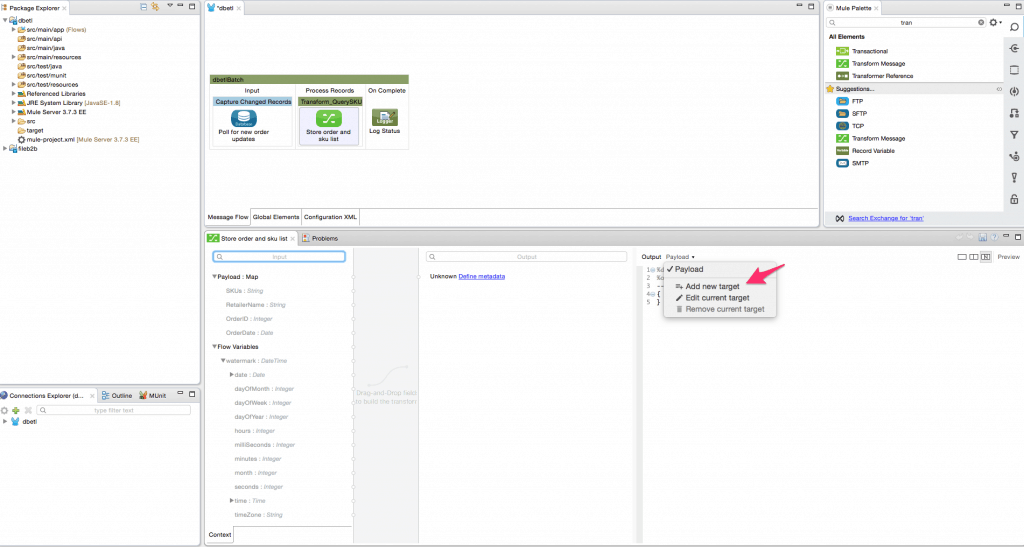
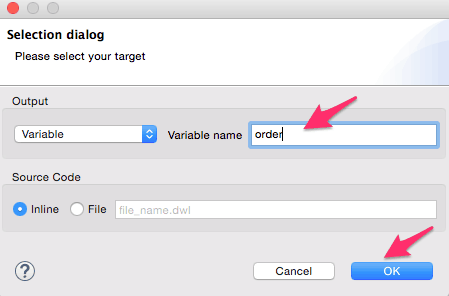
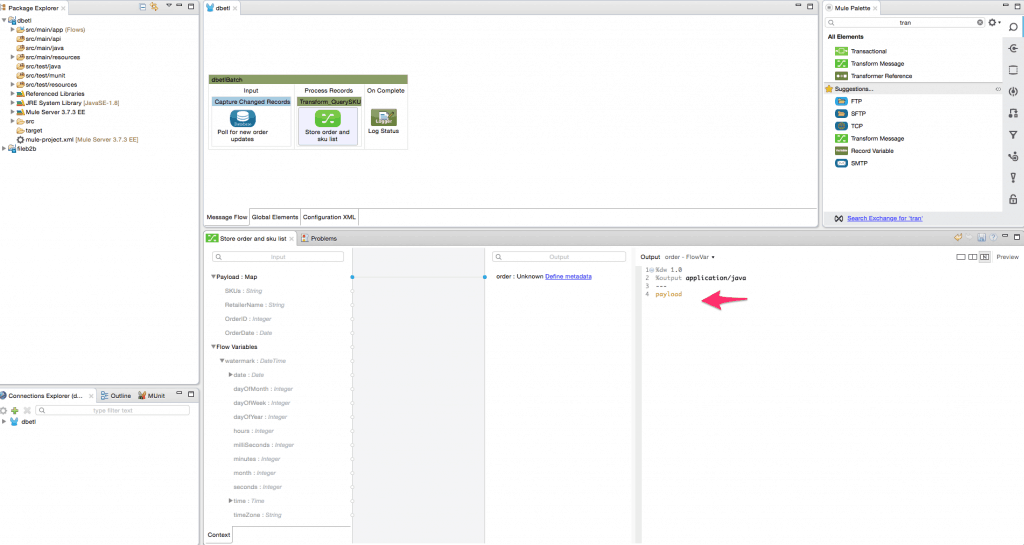
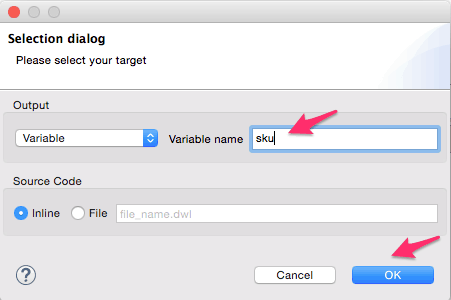
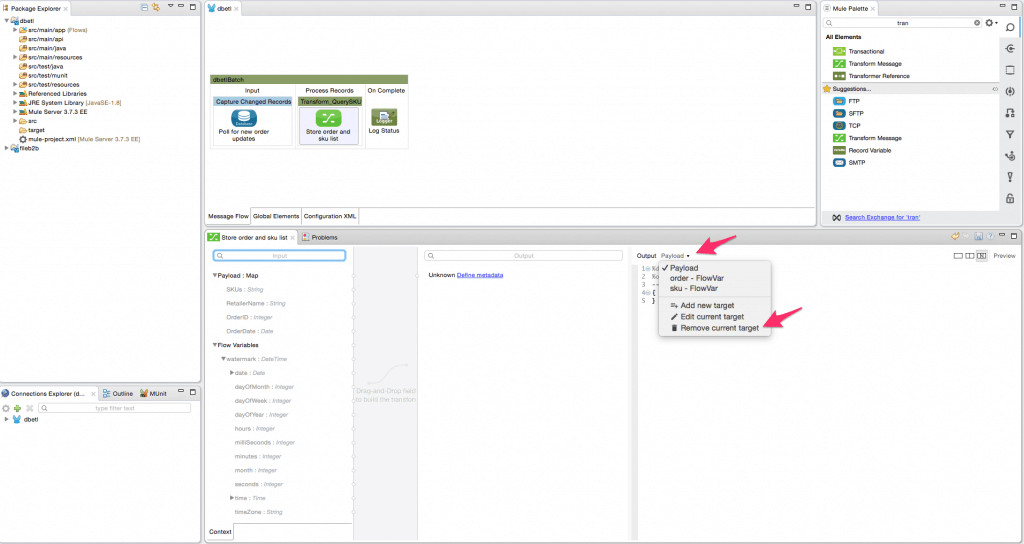
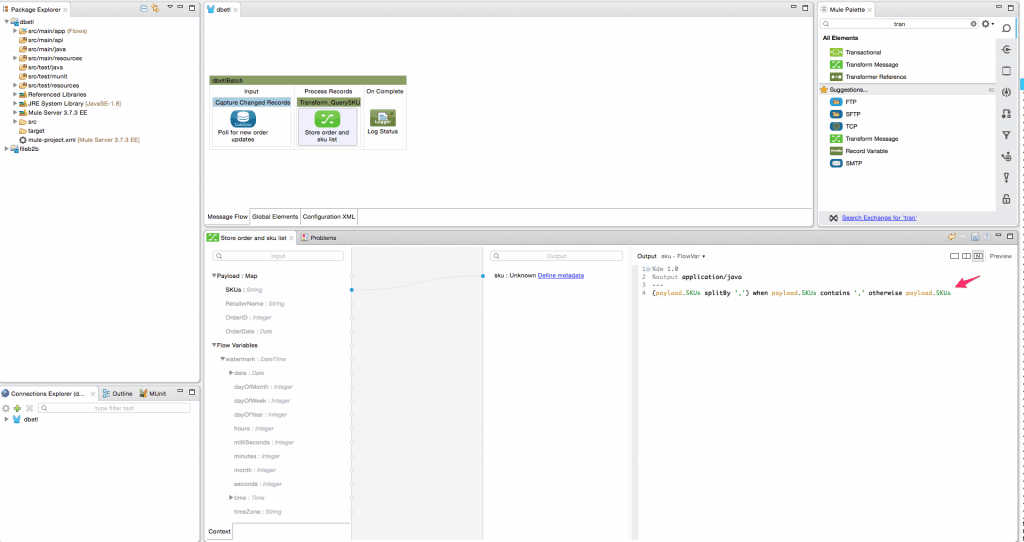
- Add the transform message transformer from the palette into the Transform_QuerySKU batch step. Rename it to ‘Store order and sku list’. We will create a flow variable ‘order’ to save the incoming payload used in a later step. We will also create a flow variable ‘sku’ to store the list of SKU’s, and this list will be utilized in the for each loop later. This step is critical since the SKU value may contain a comma-separated list. Follow the steps shown using the screenshots below to create the variables and delete the payload mapper.
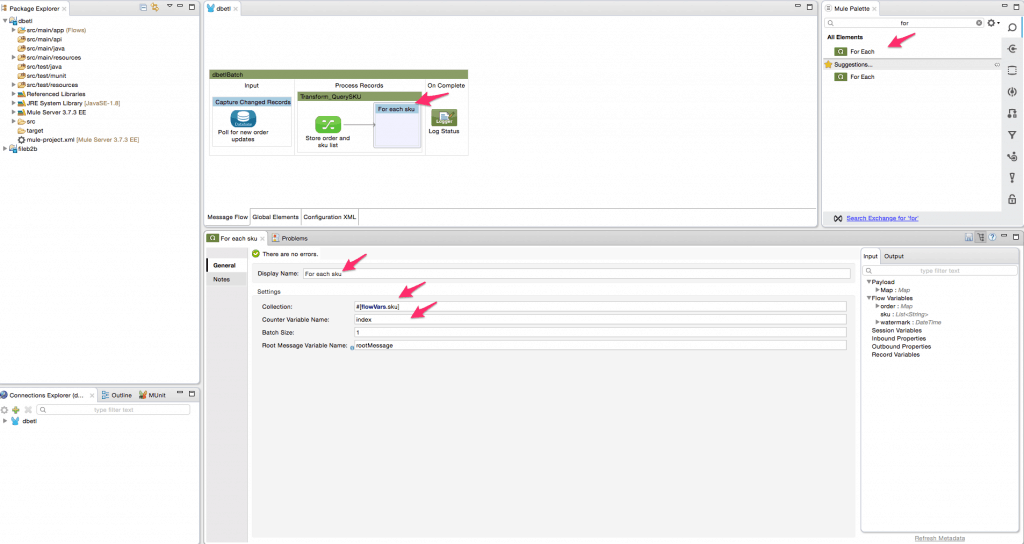
- Add the for each scope from the palette into the batch step to iterate over each SKU value in the array as shown below.
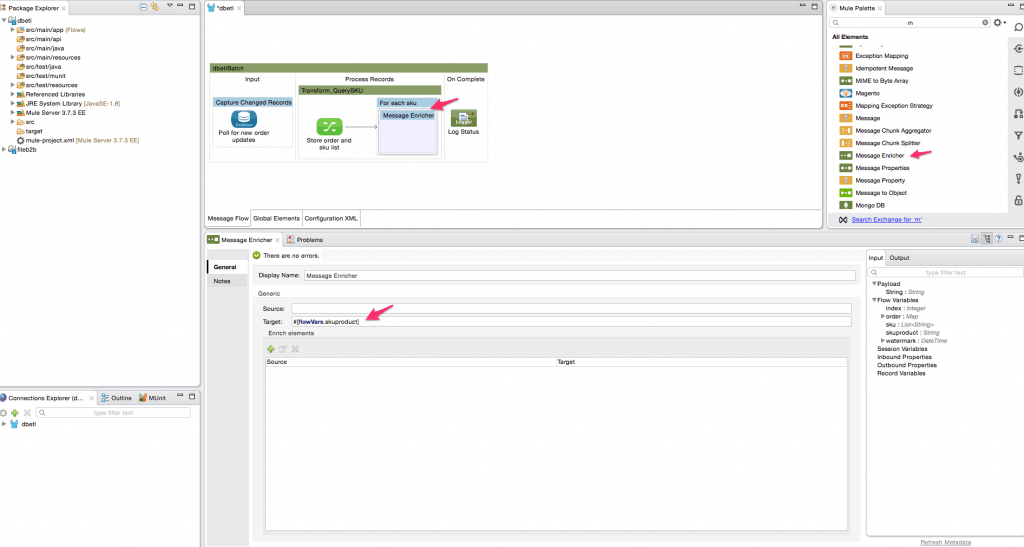
- Add a message enricher element from the palette inside the foreach scope. The message enricher will be used to store the result of the database query(looks up the product description for the sku) into a flow variable ‘skuproduct’.
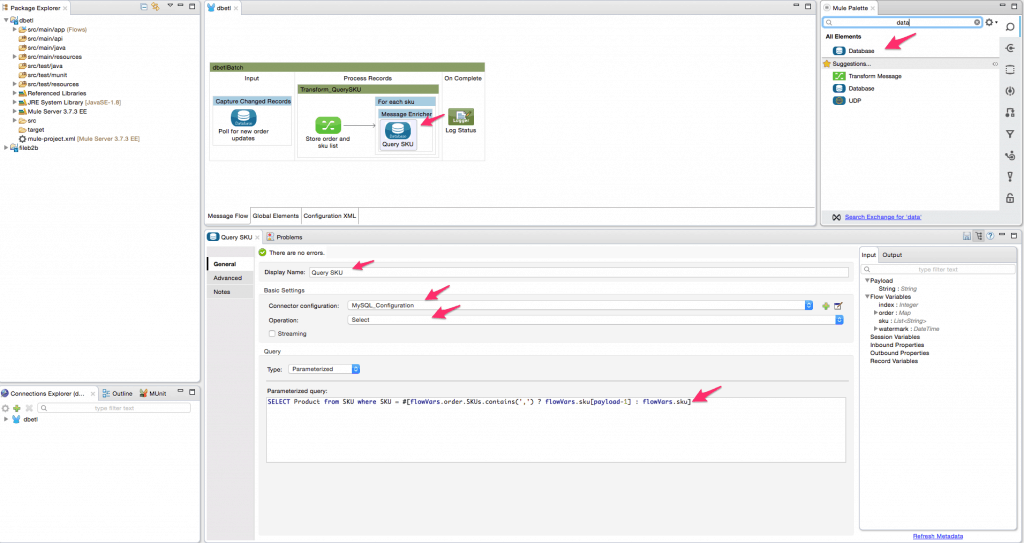
- Add the database connector inside the message enricher element to query the SKU table to get the product description for the SKU value. Configure the database connector as shown below. We use an MEL expression in the query – ‘SELECT Product from SKU where SKU = #[flowVars.order.SKUs.contains(‘,’) ? flowVars.sku[payload-1] : flowVars.sku]’. If the sku field contains a comma separated list, we select one sku at a time from the list to query the SKU table, else we select the one and only sku.
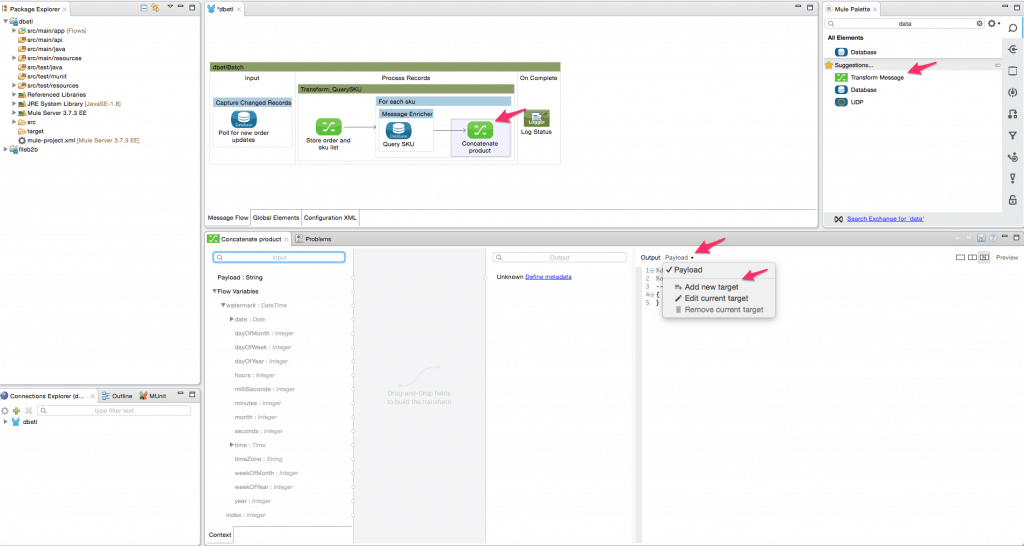
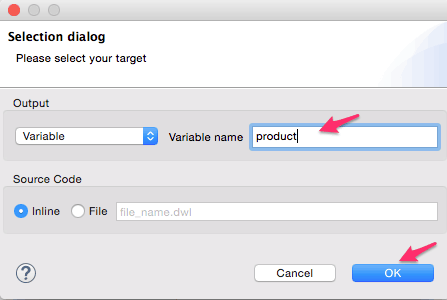
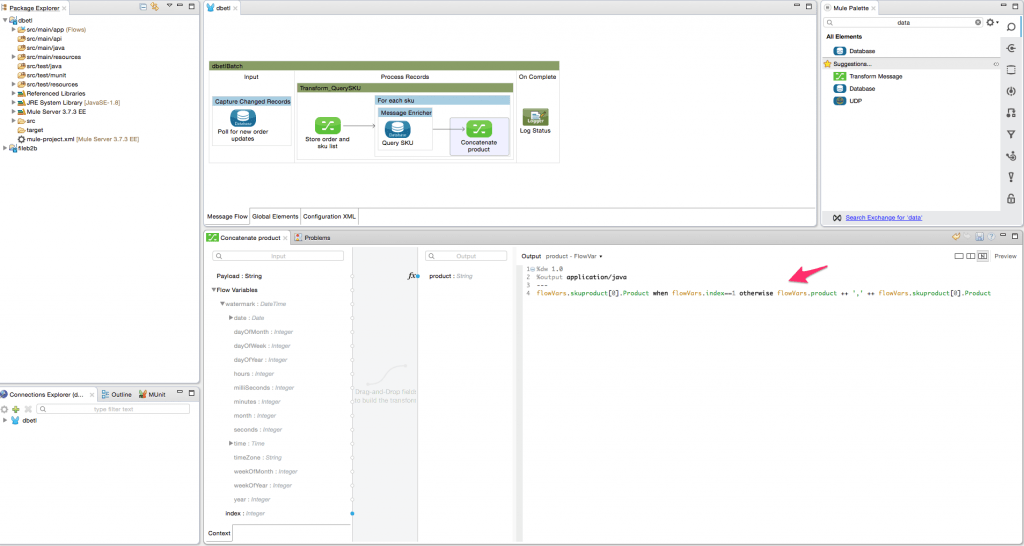
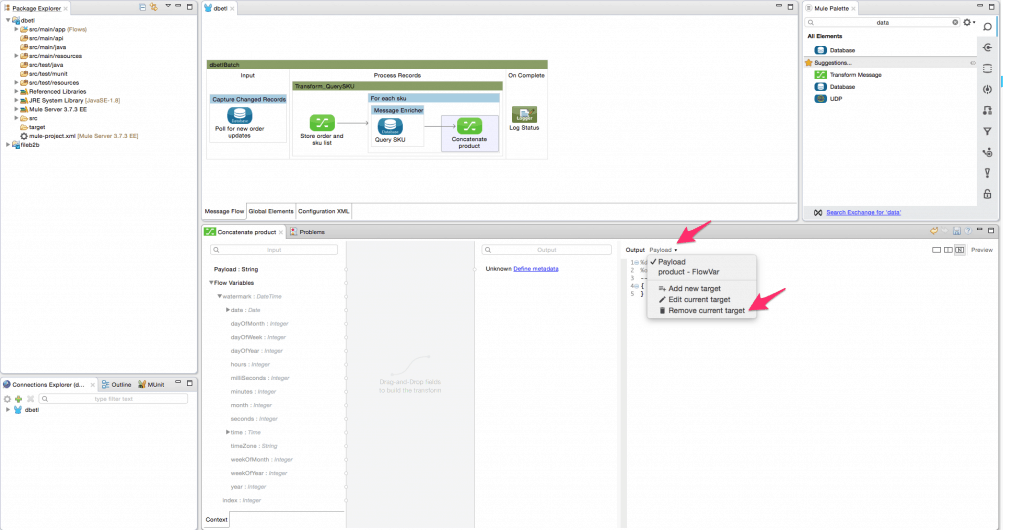
- Now add a data transform element(DataWeave) inside the foreach scope after the message enricher. The purpose of the transformer is to concatenate each corresponding product description of the SKU into a single comma separated list. Configure the DataWeave transformer by adding a new target Flow variable ‘product’. The transform expression is – ‘flowVars.skuproduct[0].Product when flowVars.index==1 otherwise flowVars.product ++ ‘,’ ++ flowVars.skuproduct[0].Product’. Delete the payload output target and rename to ‘Concatenate Product’.
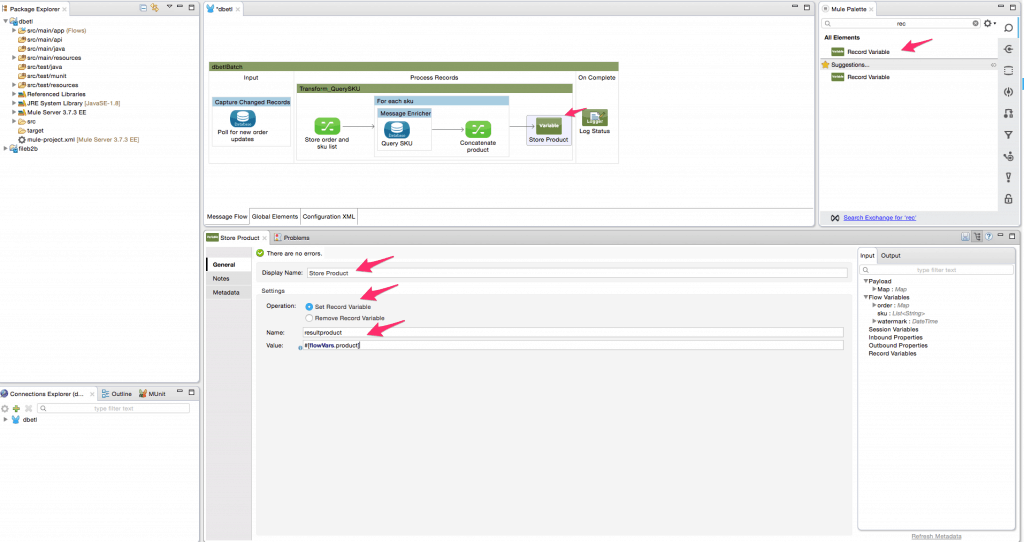
- Add a record variable transformer to store the flow variable ‘product’ value in a variable ‘result product’. We do this because the value stored in a record variable will persist across batch steps.
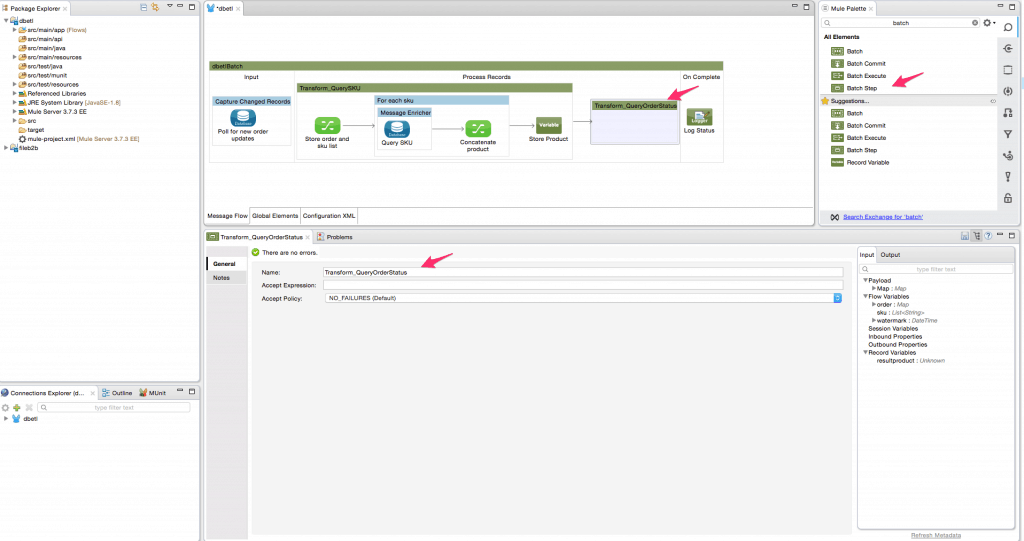
- Add another batch step in the flow. Rename this to ‘Transform_QueryOrderStatus’.
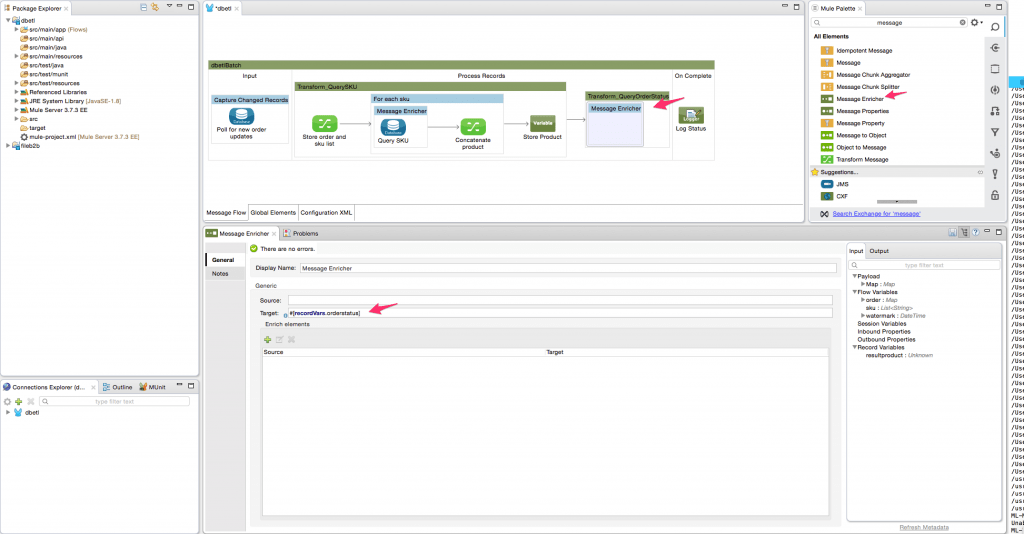
- Add a message enricher element from the palette inside this batch step. The message enricher will be used to store the result of the database query(looks up the order status based on Order ID) into a record variable ‘orderstatus’.
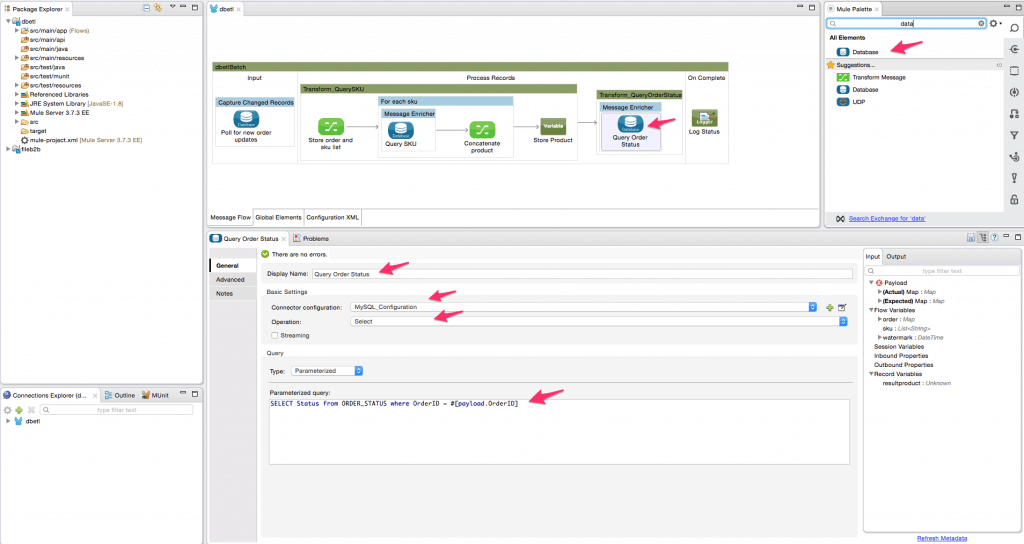
- Add the database connector inside the message enricher element to query the ORDER_STATUS table to get the status for the OrderID value. Configure the database connector as shown below.
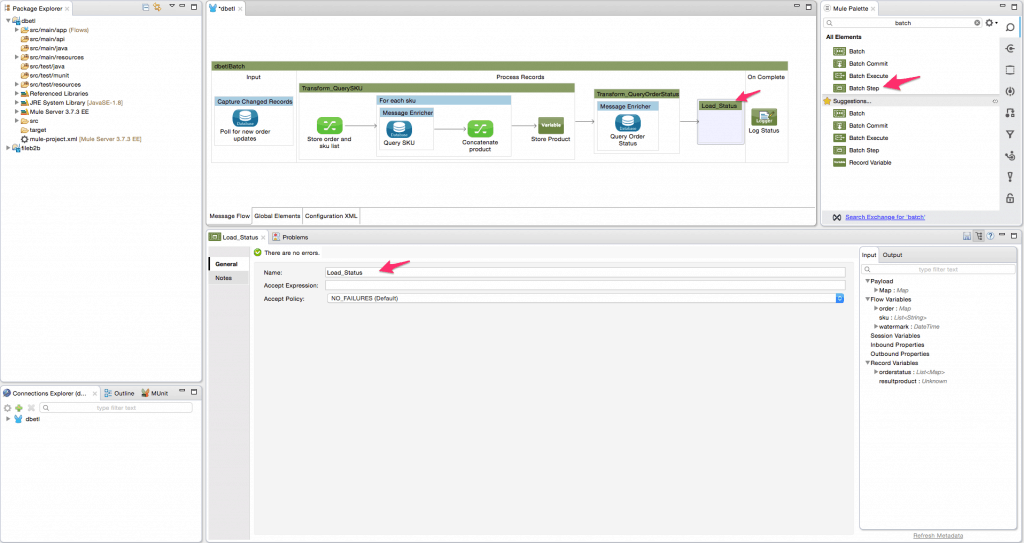
- Now that we have completed the extract and transform steps, we will now proceed to load the record into the target table(Status Report). Add another batch step in the end. Rename this to ‘Load_Status’.
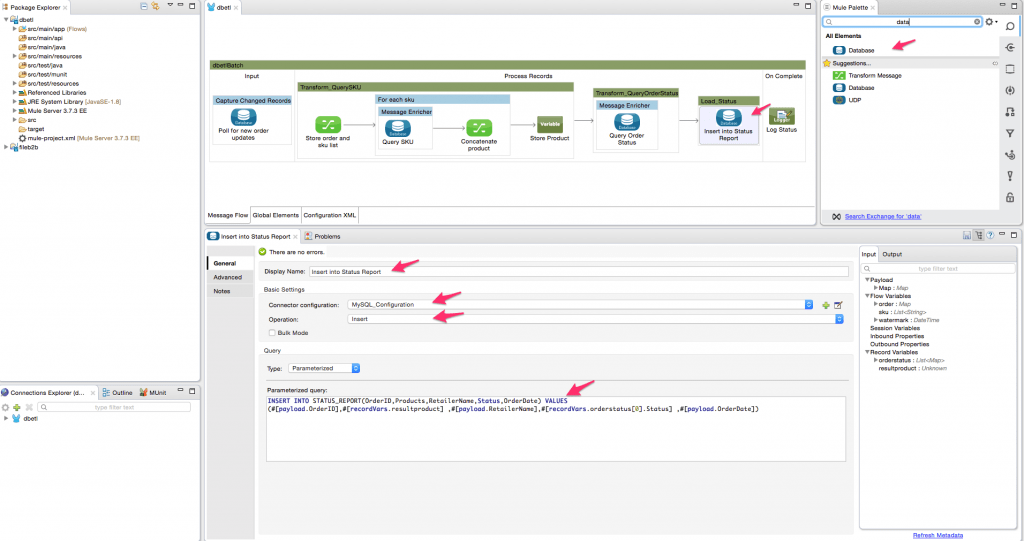
- Add the database connector inside the batch step. Rename it to ‘Insert into Status Report’. Select the ‘Insert’ operation. Put the following query – ‘INSERT INTO STATUS_REPORT(OrderID,Products,RetailerName,Status,OrderDate) VALUES (#[payload.OrderID],#[recordVars.resultproduct] ,#[payload.RetailerName],#[recordVars.orderstatus[0].Status] ,#[payload.OrderDate])’.
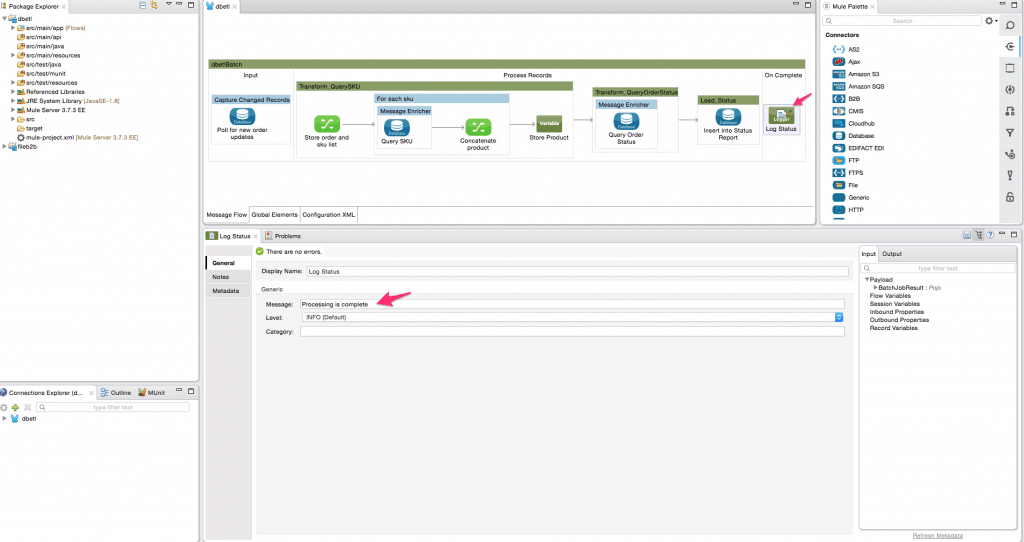
- Add a logger activity in the on the complete step. This logger will print out the message “Processing is complete” at the end of the ETL process. Configure it as shown below.
We have now successfully created an ETL (Extract, Transform & Load) flow which is be used to automate a typical data loading scenario in an enterprise.
To create this flow we have leveraged the following features of Anypoint Platform:
- Batch processing module along with the watermarking feature which can be used in any scenario to capture change data for a large number of records.
- Database Connector: Allows you to connect to almost any relational database.
- DataSense uses message metadata to facilitate application design.
- Mule Expression Language (MEL): Lightweight Mule-specific expression language that can be used to access/evaluate the data in the payload.
- Transformers/DataWeave: A simple, powerful way to query and transform data using the platform.
As we continue to see a rapid adoption in real time integration scenarios based on APIs, batch processing continues its maintain its stronghold in some scenarios. Some of the typical scenarios for batch processing are to migrate a large number of records from one system to another (especially SaaS applications), loading data into a data warehouse or Big Data systems and aggregating all transactions in a day to create daily reports, or archiving a bunch of old records for auditing requirements.
For more information on batch capabilities, please look at the awesome documentation that our team put together. If you liked this howto, sign up for our newsletter in the top right corner of the page!


